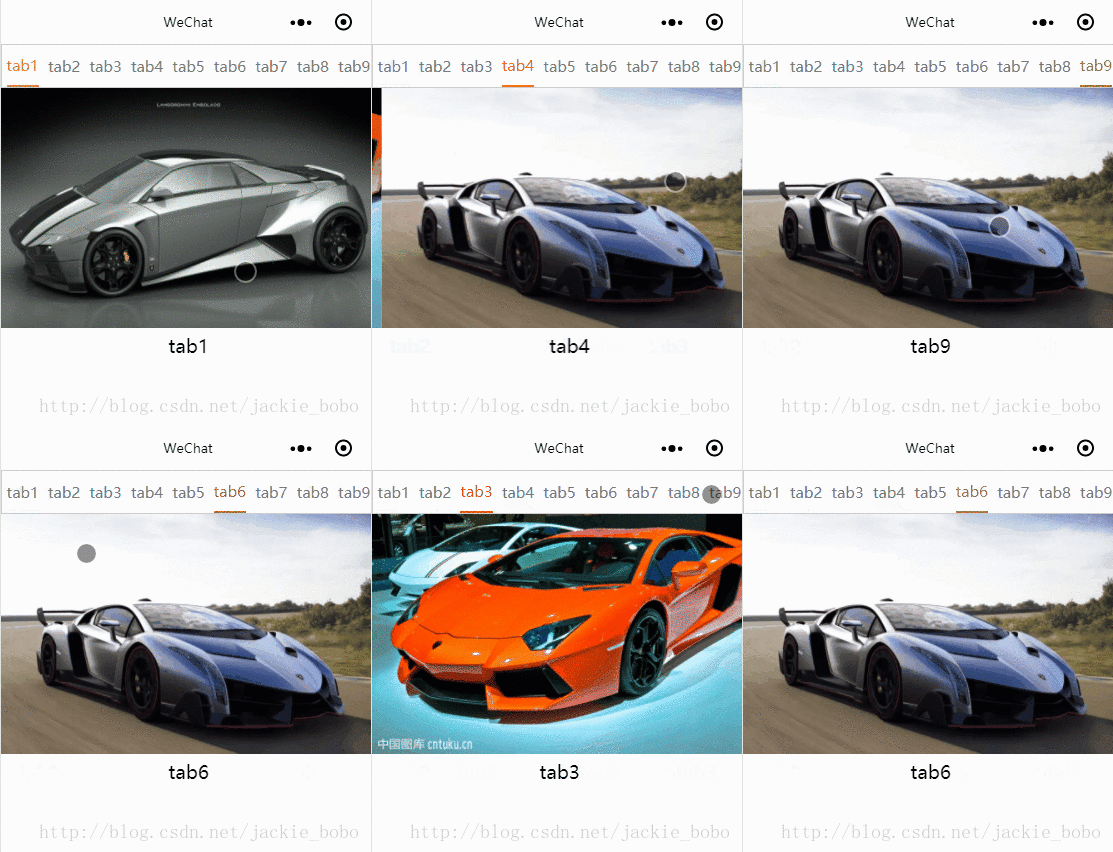
小程序实现页面顶部选项卡效果
更新时间:2018年11月06日 15:00:21 作者:jackie_bobo
这篇文章主要为大家详细介绍了小程序实现页面顶部选项卡效果,具有一定的参考价值,感兴趣的小伙伴们可以参考一下
本文实例为大家分享了小程序实现选项卡效果的具体代码,供大家参考,具体内容如下
效果图:

github源码下载
<!--index.wxml-->
<view class="swiper-tab" >
  <view bindtap="swithNav" wx:for="{{tabCont}}" wx:key="item.index" class="swiper-tab-list {{currentTab==item.index?'active':''}}" data-current='{{item.index}}' >{{item.title}}</view>
</view>
<swiper class="swiper-box" current="{{currentTab}}" duration="300" style="height:400px" bindchange="GetCurrentTab" data-current='6' >
  <swiper-item wx:for="{{tabCont}}" wx:key="item.index">
   <image src='{{item.pic}}'></image>
   <view>{{item.title}}</view>
  </swiper-item>
</swiper>
CSS:
/**index.wxss**/

/**index.wxss**/

.swiper-tab {
 line-height: 80rpx;
 border: 1px solid #ccc;
 display: flex;
 justify-content: space-around;
 align-items: center;
}

.swiper-tab-list {
 font-size: 30rpx;
 color: #777;
 text-align: center;
}

.active {
 color: #da7c0c;
 border-bottom: 5rpx solid #da7c0c;
}

.swiper-box {
 display: block;
 height: 100%;
 width: 100%;
 overflow: hidden;
}

.swiper-box view {
 text-align: center;
}

image {
 width: 100%;
}
js:
Page({

 /**
  * 页面的初始数据
  */
 data: {
  currentTab:0,
  tabCont: [{ "title": "tab1", "pic": "../../img/1.jpg", "index": "0" }, { "title": "tab2", "pic": "../../img/2.jpg", "index": "1" }, { "title": "tab3", "pic": "../../img/3.jpg", "index": "2" }, { "title": "tab4", "pic": "../../img/2.jpg", "index": "3" }, { "title": "tab5", "pic": "../../img/2.jpg", "index": "4" }, { "title": "tab6", "pic": "../../img/2.jpg", "index": "5" }, { "title": "tab7", "pic": "../../img/2.jpg", "index": "6" }, { "title": "tab8", "pic": "../../img/2.jpg", "index": "7" }, { "title": "tab9", "pic": "../../img/2.jpg", "index": "8" }],
 },

 /**
  * 生命周期函数--监听页面加载
  */
 onLoad: function (options) {

 },

 /**
  * 生命周期函数--监听页面初次渲染完成
  */
 onReady: function () {

 },

 /**
  * 生命周期函数--监听页面显示
  */
 onShow: function () {

 },

 /**
  * 生命周期函数--监听页面隐藏
  */
 onHide: function () {

 },

 /**
  * 生命周期函数--监听页面卸载
  */
 onUnload: function () {

 },

 /**
  * 页面相关事件处理函数--监听用户下拉动作
  */
 onPullDownRefresh: function () {

 },

 /**
  * 页面上拉触底事件的处理函数
  */
 onReachBottom: function () {

 },

 /**
  * 用户点击右上角分享
  */
 onShareAppMessage: function () {

 },
 // swiper滑动时触发bindchange事件,获取事件对象e获取当前所在滑块的 index,并将其更新至data的currentTab中,视图渲染通过判断currentTab的让对应的tab hover。
 GetCurrentTab:function(e){
  console.log(e.detail.current);
  var that = this;
  this.setData({
   currentTab:e.detail.current
  });
  // console.log("11111"+this.data.currentTab);
 },
 swithNav:function(e){
  var that = this;
  that.setData({
   currentTab:e.target.dataset.current
  });

 }
})
以上就是本文的全部内容,希望对大家的学习有所帮助,也希望大家多多支持脚本之家。
相关文章

element-table表格中插入颜色块显示数据状态的示例代码
这篇文章主要介绍了element-table表格中插入颜色块显示数据状态,代码部分分为dom部分和data部分及css部分,本文结合示例代码给大家介绍的非常详细,对大家的学习或工作具有一定的参考借鉴价值,需要的朋友参考下吧2023-12-12
纯JavaScript实现获取onclick、onchange等事件的值
这篇文章主要介绍了JavaScript获取onclick、onchange等事件的值的方法,需要的朋友可以参考下2014-12-12
浅谈javascript中for in 和 for each in的区别
两个的作用都用来遍历对象,但为什么有了for in语句了还要for each in语句呢,后来看了下for each in开发的文档,for each in是作为E4X标准的一部分在javascript 1.6中发布的,而且它不是ECMAScript标准的一部分2015-04-04
用js代码和插件实现wordpress雪花飘落效果的四种方法
这篇文章主要介绍了用js代码和插件实现wordpress雪花飘落效果的四种方法,需要的朋友可以参考下2014-12-12


最新评论