
iOS实现带遮罩的弹出选项卡
更新时间:2020年02月22日 08:24:35 作者:will_han
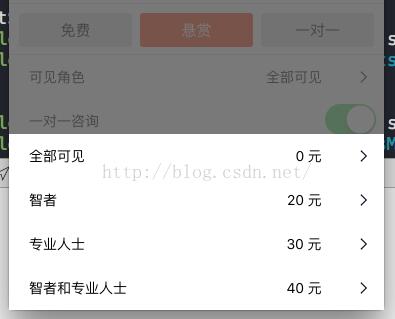
这篇文章主要为大家详细介绍了iOS实现弹出选项卡,并附带遮罩,文中示例代码介绍的非常详细,具有一定的参考价值,感兴趣的小伙伴们可以参考一下
在我们日常开发的过程中难免会碰到一些选项的需求,下面是我针对我们该次需求做的一个小的Demo,闲话不多说了,上图片,上代码。
这样在我们选择上面一个Cell进行点击的时候,我会通过一个代理把数据传递到下面的页面,下面是代码
//
// LCAlertListView.h
// MeiMeiDu
//
// Created by 韩伟佳 on 16/4/6.
// Copyright © 2016年 LangCuang. All rights reserved.
//

#import <UIKit/UIKit.h>
@class LCAlertListView;

@protocol LCAlertListViewDelegate <NSObject>

-(void)alertListView:(LCAlertListView*)view didSelectedRow:(NSInteger)row;

@end

@interface LCAlertListView : UIView<UITableViewDataSource, UITableViewDelegate>

-(instancetype)initWithFrame:(CGRect)frame datas:(NSArray*)datas;
-(instancetype)initWithFrame:(CGRect)frame datas:(NSArray*)datas count:(NSArray*)counts;
@property(nonatomic, strong) id<LCAlertListViewDelegate> delegate;
@end
下面是具体实现
//
// LCAlertListView.m
// MeiMeiDu
//
// Created by 韩伟佳 on 16/4/6.
// Copyright © 2016年 LangCuang. All rights reserved.
//

#import "LCAlertListView.h"
#import "NoFreeCell.h"

static CGFloat TableViewHeight ;

@implementation LCAlertListView{
 UITableView* mTableView;
 NSArray* tableData;
 NSArray* visiableData;
 NSArray* visiableCount;
 UIButton* backgroundBtn;
}

-(instancetype)initWithFrame:(CGRect)frame datas:(NSArray*)datas{
 if (self = [super initWithFrame:frame]) {
 self.backgroundColor = [UIColor clearColor];
 backgroundBtn = [[UIButton alloc] initWithFrame:frame];
 backgroundBtn.backgroundColor = RGBA(88, 88, 88, 0.8);
 [backgroundBtn addTarget:self action:@selector(dismiss) forControlEvents:UIControlEventTouchUpInside];
 [self addSubview:backgroundBtn];
 tableData = datas;
 TableViewHeight = (datas.count + 1) * 44 + 20;
 mTableView = [[UITableView alloc] initWithFrame:CGRectMake(0, kScreenHeight, kScreenWidth, TableViewHeight) style:UITableViewStylePlain];
 [mTableView registerClass:[UITableViewCell class] forCellReuseIdentifier:@"cell"];
 mTableView.delegate = self;
 mTableView.dataSource = self;
 [self addSubview:mTableView];
 [UIView animateWithDuration:.25 animations:^{
 [mTableView setFrame:CGRectMake(0, kScreenHeight - TableViewHeight, kScreenWidth, TableViewHeight)];
 } completion:^(BOOL finished) {

 }];
 }
 return self;
}
-(instancetype)initWithFrame:(CGRect)frame datas:(NSArray*)datas count:(NSArray*)counts{
 if (self = [super initWithFrame:frame]) {
 self.backgroundColor = [UIColor clearColor];
 backgroundBtn = [[UIButton alloc] initWithFrame:frame];
 backgroundBtn.backgroundColor = RGBA(88, 88, 88, 0.8);
 [backgroundBtn addTarget:self action:@selector(dismiss) forControlEvents:UIControlEventTouchUpInside];
 [self addSubview:backgroundBtn];
 visiableData = datas;
 visiableCount = counts;
 TableViewHeight = (datas.count + 1) * 44 + 20;
 mTableView = [[UITableView alloc] initWithFrame:CGRectMake(0, kScreenHeight, kScreenWidth, TableViewHeight) style:UITableViewStylePlain];
 [mTableView registerClass:[UITableViewCell class] forCellReuseIdentifier:@"cell"];
 mTableView.delegate = self;
 mTableView.dataSource = self;
 [self addSubview:mTableView];
 [UIView animateWithDuration:.25 animations:^{
 [mTableView setFrame:CGRectMake(0, kScreenHeight - TableViewHeight, kScreenWidth, TableViewHeight)];
 } completion:^(BOOL finished) {

 }];
 }
 return self;
}


- (NSInteger)tableView:(UITableView *)tableView numberOfRowsInSection:(NSInteger)section{
 if(tableData.count > 0){
 return [tableData count];
 }else if (visiableCount.count > 0){
 return [visiableCount count];
 }
 return nil;
}

- (UITableViewCell *)tableView:(UITableView *)tableView cellForRowAtIndexPath:(NSIndexPath *)indexPath{
 UITableViewCell* cell;
 NoFreeCell *doubleCell;
 if([tableData count] <= 3 && [tableData count] > 0){
 cell = [tableView dequeueReusableCellWithIdentifier:@"cell" forIndexPath:indexPath];
 cell.textLabel.text = tableData[indexPath.row];
 return cell;

 }else {
 static NSString *identifier = @"cell0";
 doubleCell =[tableView dequeueReusableCellWithIdentifier:identifier];
 if (doubleCell == nil){
 doubleCell= [[NoFreeCell alloc]initWithStyle:UITableViewCellStyleDefault reuseIdentifier:identifier];
 doubleCell.visibleRoleLabel.text = visiableData[indexPath.row];
 doubleCell.showVisibleRoleLabel.text = visiableCount[indexPath.row];
 }
 return doubleCell;
 }

}

-(void)tableView:(UITableView *)tableView didSelectRowAtIndexPath:(NSIndexPath *)indexPath{
 NSInteger row = indexPath.row;
 [self dismiss:row];
}

-(void)dismiss:(NSInteger) row{
 if (_delegate && [_delegate respondsToSelector:@selector(alertListView:didSelectedRow:)]) {
 [_delegate alertListView:self didSelectedRow:row];
 }

 [UIView animateWithDuration:.15 animations:^{
 [mTableView setFrame:CGRectMake(0, kScreenHeight, kScreenWidth, TableViewHeight)];
 } completion:^(BOOL finished) {
 [self removeFromSuperview];
 }];

}

-(void)dismiss{
 [UIView animateWithDuration:.15 animations:^{
 [mTableView setFrame:CGRectMake(0, kScreenHeight, kScreenWidth, TableViewHeight)];
 } completion:^(BOOL finished) {
 [self removeFromSuperview];
 }];
}
@end
上面的NoFree 文件只是一个自定义的Cell,我们可以根据自己的需求自己设计,就不上传了,最后我们说说用法:
LCAlertListView* alertListView = [[LCAlertListView alloc]initWithFrame:CGRectMake(0, 0, kScreenWidth, kScreenHeight) datas:visibleRoleArray count:visibleRoleCountArray];
 alertListView.delegate = self;
 [[[self.view superview] superview] addSubview:alertListView];
下面是代理传值的使用
#pragma mark - LCAlertListViewDelegate
-(void)alertListView:(LCAlertListView *)view didSelectedRow:(NSInteger)row{
 if(didSelectedIndex == 0){
 testVisibleRole = visibleRoleArray[row];
 }else{
 testData = datas[row];
 }

 NSIndexPath *indexPath = [NSIndexPath indexPathForRow:didSelectedIndex inSection:0];
 [_myTableView reloadRowsAtIndexPaths:@[indexPath] withRowAnimation:UITableViewRowAnimationFade];
}
这样,我们的AlertTableVIew 就做好了。
以上就是本文的全部内容,希望对大家的学习有所帮助,也希望大家多多支持脚本之家。
您可能感兴趣的文章:
相关文章
 这篇文章主要介绍了详解iOS WebDriverAgent 环境搭建,小编觉得挺不错的,现在分享给大家,也给大家做个参考。一起跟随小编过来看看吧2018-01-01
 这篇文章主要介绍了IOS 实现摇一摇的操作的相关资料,需要的朋友可以参考下2016-10-10
 这篇文章主要为大家详细介绍了iOS实现远程推送原理及具体过程,图文结合的方式针对iOS远程推送进行分析,感兴趣的小伙伴们可以参考一下2016-05-05
 ios浏览器上输入法会弹出遮挡输入框问题,下面小编给大家分享scrollTop()解决IOS中输入法遮挡输入框问题,一起看看吧2017-09-09
 这篇文章主要介绍了iOS使用UIScrollView实现无限循环轮播图效果,文中示例代码介绍的非常详细,具有一定的参考价值,感兴趣的小伙伴们可以参考一下2018-07-07
 这篇文章主要为大家详细介绍了iOS9提示框的正确使用方式,iOS8升级到iOS9的过程,弹出提示框的方式有了很大的改变,感兴趣的小伙伴们可以参考一下2016-05-05
 这篇文章主要给大家介绍了关于在iOS中Label实现显示不同颜色与字体的相关资料,文中分别介绍了利用range或者文字两种实现的方法,文中通过示例代码介绍的非常详细,需要的朋友可以参考借鉴,下面来一起看看吧。2017-11-11
 在程序中我们经常用到Block,但写weak self 时会比较繁琐,下面这篇文章主要给大家介绍了关于iOS开发技巧之WeakSelf宏的进化的相关资料,文中通过示例代码介绍的非常详细,对大家的学习或者工作具有一定的参考学习价值,需要的朋友们一起来看看吧2018-05-05
 小编今天为大家带来一场淅淅沥沥的夜空之雨和满天飞舞的樱花之恋,希望能在炎炎夏日为您带来一丝清爽的凉意!学习iOS动画的小伙伴们可以参考学习。2016-08-08
IOS中(Xcode) DEBUG模式(RELEASE模式)控制NSLog输出,NSLog输出方式
这篇文章主要介绍了IOS中(Xcode) DEBUG模式(RELEASE模式)控制NSLog输出,NSLog输出方式的相关资料,需要的朋友可以参考下2016-11-11


最新评论