
ASP.NET通过更改Url进行页面传值的实现代码
更新时间:2020年04月30日 11:14:10 作者:南 墙
这篇文章主要介绍了ASP.NET通过更改Url进行页面传值的实现代码,本文通过实例代码给大家介绍的非常详细,对大家的学习或工作具有一定的参考借鉴价值,需要的朋友可以参考下
这里,通过假数据,手动创建的一个类,然后创建的一个集合,放入下拉框,选好值以后,点确定
会在另一个页面产生对应的id
创建一个类:
using System;
using System.Collections.Generic;
using System.Linq;
using System.Web;

namespace WebApplication1
{
 public class Dept
 {
  public int Id { get; set; }
  public string DeptName { get; set; }
 }
}
一个选择的web窗体
<%@ Page Language="C#" AutoEventWireup="true" CodeBehind="Dept.aspx.cs" Inherits="WebApplication1.Dept1" %>

<!DOCTYPE html>

<html xmlns="http://www.w3.org/1999/xhtml">
<head runat="server">
<meta http-equiv="Content-Type" content="text/html; charset=utf-8"/>
 <title></title>
</head>
<body>
 <form id="form1" runat="server">
  <div>
   <asp:DropDownList ID="DropDownList1" runat="server" AutoPostBack="true">

   </asp:DropDownList>
  </div>
  <p>><a href="dept_<%=DropDownList1.SelectedValue %>.html" rel="external nofollow" >查询</a></p>
 </form>
</body>
</html>
选择的web窗体的后台代码
using System;
using System.Collections.Generic;
using System.Linq;
using System.Web;
using System.Web.UI;
using System.Web.UI.WebControls;

namespace WebApplication1
{
 public partial class Dept1 : System.Web.UI.Page
 {
  protected void Page_Load(object sender, EventArgs e)
  {
   if (!IsPostBack)
   {
    LoadDeptData();
   }
  }

  private void LoadDeptData()
  {
   //手动创建数据
   List<Dept> depts = new List<Dept>
   {
    new Dept{Id=1,DeptName="小明"},
    new Dept{Id=2,DeptName="小王"},
    new Dept{Id=3,DeptName="小李"}
   };
   this.DropDownList1.DataSource = depts;
   //默认显示的值
   this.DropDownList1.DataTextField = "DeptName";
   this.DropDownList1.DataValueField = "Id";
   //保存
   this.DropDownList1.DataBind();
  }
 }
}
建一个继承Modules类
using System;
using System.Collections.Generic;
using System.Linq;
using System.Text.RegularExpressions;
using System.Web;

namespace WebApplication1.Modules
{
 public class DeptModule : IHttpModule
 {
  public void Dispose()
  {

  }

  public void Init(HttpApplication context)
  {
   context.BeginRequest += Context_BeginRequest;
  }

  private void Context_BeginRequest(object sender, EventArgs e)
  {
   //处理请求
   //获取请求url
   HttpApplication application = sender as HttpApplication;
   //相对路径
   string url = application.Request.RawUrl;
   //一个正则,用来匹配是不是相对应的页面
   Regex regex = new Regex(@"dept_(\d+).html");
   //正则的匹配后的,微软给铺好的路,正则匹配后的一个数组;
   GroupCollection groupCollection = regex.Match(url).Groups;
   //这里取得是数组的第一个值,看看是不是成功匹配了,
   if (groupCollection[0].Success)
   {
    //取到第二个值
    var id = groupCollection[1].Value.Trim('_');
    //存储id,等用到的时候直接去第二个页面去取值
    HttpContext.Current.RewritePath("~/DeptDetail.aspx","","deptid="+id);

   }
  }
 }
}
建完了类,要进入配置文件进行配置
因为我这里是放在一个文件夹下面了,所以配置文件指定type的时候,要加一个文件夹的路径
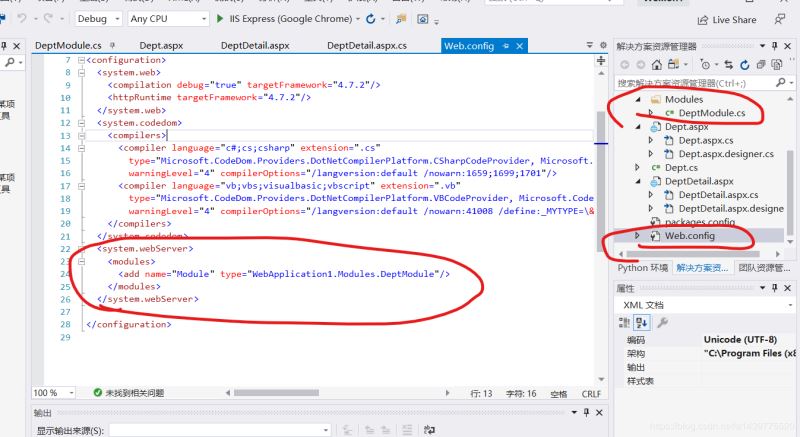
 <system.webServer>
 <modules>
  <add name="Module" type="WebApplication1.Modules.DeptModule"/>
 </modules>
 </system.webServer>
显示的web窗体
<%@ Page Language="C#" AutoEventWireup="true" CodeBehind="DeptDetail.aspx.cs" Inherits="WebApplication1.DeptDetail" %>

<!DOCTYPE html>

<html xmlns="http://www.w3.org/1999/xhtml">
<head runat="server">
<meta http-equiv="Content-Type" content="text/html; charset=utf-8"/>
 <title></title>
</head>
<body>
 <form id="form1" runat="server">
  <div>
   <asp:TextBox ID="TextBox1" runat="server"></asp:TextBox>
  </div>
 </form>
</body>
</html>
显示的web窗体的后台代码
using System;
using System.Collections.Generic;
using System.Linq;
using System.Web;
using System.Web.UI;
using System.Web.UI.WebControls;

namespace WebApplication1
{
 public partial class DeptDetail : System.Web.UI.Page
 {
  protected void Page_Load(object sender, EventArgs e)
  {
   if (!IsPostBack)
   {
    //直接通过request获取Module存入的id
    this.TextBox1.Text = $"{Request.QueryString["deptid"]}";
   }
  }
 }
}
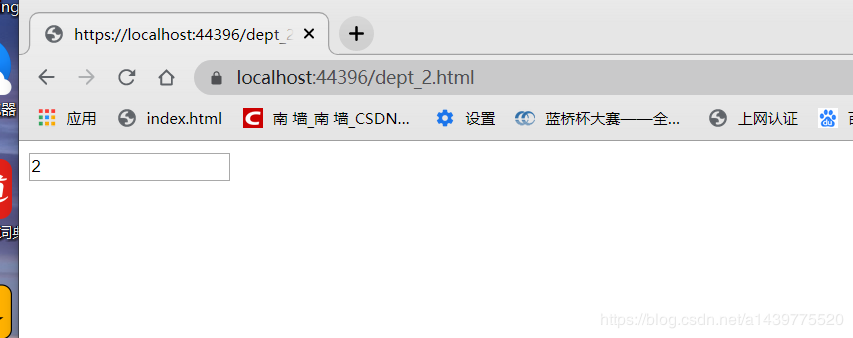
效果图
选择一个后点击查询

地址栏和内容都进行了更改
到此这篇关于ASP.NET通过更改Url进行页面传值的文章就介绍到这了,更多相关asp.net url 页面传值内容请搜索脚本之家以前的文章或继续浏览下面的相关文章希望大家以后多多支持脚本之家!
相关文章
 这篇文章主要给大家介绍了关于.net 4.5部署到docker容器的完整步骤,文中通过示例代码介绍的非常详细,对大家学习或者使用.net4.5具有一定的参考学习价值,需要的朋友们下面来一起学习学习吧2019-04-04
 这篇文章主要给大家介绍了关于ASP.NET Core实现单体程序的事件发布/订阅的相关资料,文中通过示例代码介绍的非常详细,对大家的学习或者工作具有一定的参考学习价值,需要的朋友们下面来一起学习学习吧2019-03-03
 这篇文章主要介绍了Asp.Net实现的通用分页函数,结合实例形势分析了asp.net分页函数的功能,定义及使用技巧,需要的朋友可以参考下2016-04-04
 这篇文章主要介绍了asp.net基于session实现购物车的方法,结合实例形式较为详细的分析了asp.net使用session存储临时数据实现购物车功能的相关技巧,需要的朋友可以参考下2015-11-11
 这篇文章主要介绍了ASP.NET新增时多字段取值解决方案,从解题思路出发分析原因,2015-09-09
 这篇文章介绍了Asp.net通过SignalR2进行实时聊天的方法,文中通过示例代码介绍的非常详细。对大家的学习或工作具有一定的参考借鉴价值,需要的朋友可以参考下2022-05-05
Asp.Net FckEditor在web.config中配置的具体实例
Asp.Net FckEditor在web.config中配置的具体实例,需要的朋友可以参考一下2013-06-06 这篇文章介绍了.Net项目在Docker容器中开发部署的方法,对大家的学习或者工作具有一定的参考学习价值,需要的朋友们下面随着小编来一起学习学习吧2022-04-04
.NET Core 2.0迁移小技巧之MemoryCache问题修复解决的方法
这篇文章主要给大家介绍了关于.NET Core 2.0迁移小技巧之MemoryCache问题修复解决的相关资料,文中通过示例代码介绍的非常详细,对大家的学习或者工作具有一定的参考学习价值,需要的朋友们下面随着小编来一起学习学习吧。2017-08-08 asp.net 扩展GridView 增加单选按钮列的代码2010-02-02


最新评论