
使用keras实现densenet和Xception的模型融合
更新时间:2020年05月23日 16:26:53 作者:csliudh
这篇文章主要介绍了使用keras实现densenet和Xception的模型融合,具有很好的参考价值,希望对大家有所帮助。一起跟随小编过来看看吧
我正在参加天池上的一个竞赛,刚开始用的是DenseNet121但是效果没有达到预期,因此开始尝试使用模型融合,将Desenet和Xception融合起来共同提取特征。
代码如下:
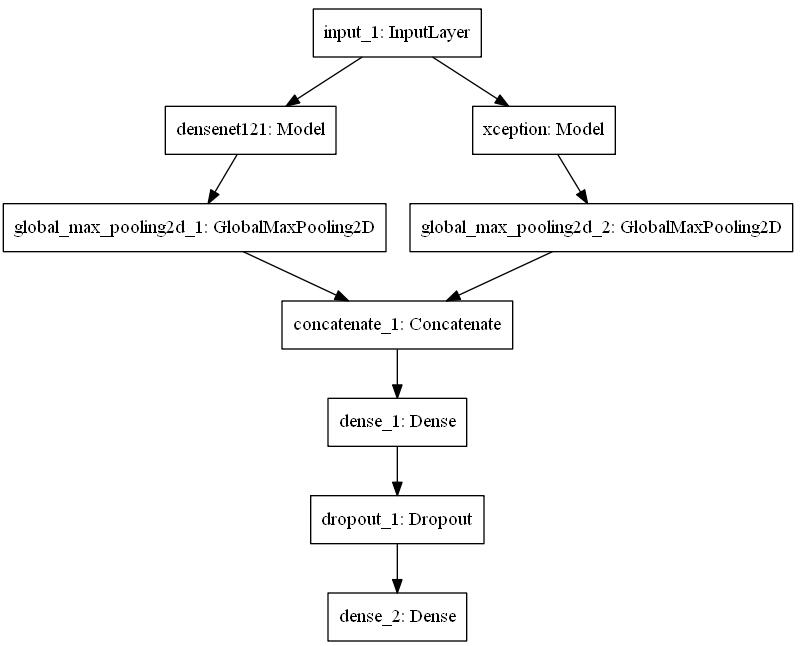
def Multimodel(cnn_weights_path=None,all_weights_path=None,class_num=5,cnn_no_vary=False):
	'''
	获取densent121,xinception并联的网络
	此处的cnn_weights_path是个列表是densenet和xception的卷积部分的权值
	'''
	input_layer=Input(shape=(224,224,3))
	dense=DenseNet121(include_top=False,weights=None,input_shape=(224,224,3))
	xception=Xception(include_top=False,weights=None,input_shape=(224,224,3))
	#res=ResNet50(include_top=False,weights=None,input_shape=(224,224,3))

	if cnn_no_vary:
		for i,layer in enumerate(dense.layers):
			dense.layers[i].trainable=False
		for i,layer in enumerate(xception.layers):
			xception.layers[i].trainable=False
		#for i,layer in enumerate(res.layers):
		#	res.layers[i].trainable=False

	if cnn_weights_path!=None:
		dense.load_weights(cnn_weights_path[0])
		xception.load_weights(cnn_weights_path[1])
		#res.load_weights(cnn_weights_path[2])
	dense=dense(input_layer)
	xception=xception(input_layer)

	#对dense_121和xception进行全局最大池化
	top1_model=GlobalMaxPooling2D(data_format='channels_last')(dense)
	top2_model=GlobalMaxPooling2D(data_format='channels_last')(xception)
	#top3_model=GlobalMaxPool2D(input_shape=res.output_shape)(res.outputs[0])

	print(top1_model.shape,top2_model.shape)
	#把top1_model和top2_model连接起来
	t=keras.layers.Concatenate(axis=1)([top1_model,top2_model])
	#第一个全连接层
	top_model=Dense(units=512,activation="relu")(t)
	top_model=Dropout(rate=0.5)(top_model)
	top_model=Dense(units=class_num,activation="softmax")(top_model)

	model=Model(inputs=input_layer,outputs=top_model)

	#加载全部的参数
	if all_weights_path:
		model.load_weights(all_weights_path)
	return model
如下进行调用:
if __name__=="__main__":
 weights_path=["./densenet121_weights_tf_dim_ordering_tf_kernels_notop.h5",
 "xception_weights_tf_dim_ordering_tf_kernels_notop.h5"]
 model=Multimodel(cnn_weights_path=weights_path,class_num=6)
 plot_model(model,to_file="G:/model.png")
最后生成的模型图如下:有点长,可以不看
需要注意的一点是,如果dense=dense(input_layer)这里报错的话,说明你用的是tensorflow1.4以下的版本,解决的方法就是
1、升级tensorflow到1.4以上
2、改代码:
def Multimodel(cnn_weights_path=None,all_weights_path=None,class_num=5,cnn_no_vary=False):
	'''
	获取densent121,xinception并联的网络
	此处的cnn_weights_path是个列表是densenet和xception的卷积部分的权值
	'''
	dir=os.getcwd()
	input_layer=Input(shape=(224,224,3))

	dense=DenseNet121(include_top=False,weights=None,input_tensor=input_layer,
		input_shape=(224,224,3))
	xception=Xception(include_top=False,weights=None,input_tensor=input_layer,
		input_shape=(224,224,3))
	#res=ResNet50(include_top=False,weights=None,input_shape=(224,224,3))

	if cnn_no_vary:
		for i,layer in enumerate(dense.layers):
			dense.layers[i].trainable=False
		for i,layer in enumerate(xception.layers):
			xception.layers[i].trainable=False
		#for i,layer in enumerate(res.layers):
		#	res.layers[i].trainable=False
	if cnn_weights_path!=None:
		dense.load_weights(cnn_weights_path[0])
		xception.load_weights(cnn_weights_path[1])

	#print(dense.shape,xception.shape)
	#对dense_121和xception进行全局最大池化
	top1_model=GlobalMaxPooling2D(input_shape=(7,7,1024),data_format='channels_last')(dense.output)
	top2_model=GlobalMaxPooling2D(input_shape=(7,7,1024),data_format='channels_last')(xception.output)
	#top3_model=GlobalMaxPool2D(input_shape=res.output_shape)(res.outputs[0])

	print(top1_model.shape,top2_model.shape)
	#把top1_model和top2_model连接起来
	t=keras.layers.Concatenate(axis=1)([top1_model,top2_model])
	#第一个全连接层
	top_model=Dense(units=512,activation="relu")(t)
	top_model=Dropout(rate=0.5)(top_model)
	top_model=Dense(units=class_num,activation="softmax")(top_model)

	model=Model(inputs=input_layer,outputs=top_model)

	#加载全部的参数
	if all_weights_path:
		model.load_weights(all_weights_path)
	return model
这个bug我也是在服务器上跑的时候才出现的,找了半天,而实验室的cuda和cudnn又改不了,tensorflow无法升级,因此只能改代码了。
如下所示,是最后画出的模型图:(很长,底下没内容了)

以上这篇使用keras实现densenet和Xception的模型融合就是小编分享给大家的全部内容了,希望能给大家一个参考,也希望大家多多支持脚本之家。
相关文章
 在本篇文章里小编给大家分享了一篇关于python3处理word文档实例分析内容,有兴趣的朋友们可以参考下。2020-12-12
 这篇文章主要介绍了使用tensorflow将图片灰度化以及遇到的坑解决,具有很好的参考价值,希望对大家有所帮助,如有错误或未考虑完全的地方,望不吝赐教2024-02-02
 这篇文章主要介绍了Python包资源下载路径报404解决方案,文中通过示例代码介绍的非常详细,对大家的学习或者工作具有一定的参考学习价值,需要的朋友可以参考下2020-11-11
浅析Python 3 字符串中的 STR 和 Bytes 有什么区别
Python2的str相当于Python3的Bytes,而Unicode相当于Python3的Bytes。这篇文章主要介绍了Python 3 字符串中的 STR 和 Bytes 究竟有什么区别?需要的朋友可以参考下2018-10-10 pyttsx3是一个开源的Python文本转语音库,可以将文本转换为自然的人类语音,这篇文章主要介绍了如何通过Python的pyttsx3库将文字转为音频,需要的朋友可以参考下2023-04-04
关于win10在tensorflow的安装及在pycharm中运行步骤详解
这篇文章主要介绍了关于win10在tensorflow的安装及在pycharm中运行的步骤详解,本文通过图文并茂的形式给大家介绍的非常详细,对大家的学习或工作具有一定的参考借鉴价值,需要的朋友可以参考下2020-03-03 这篇文章主要介绍了使用python+Pyqt5实现串口调试助手,串口通讯程序首先要对串口进行设置,如波特率、数据位、停止位、校验位等,需要的朋友可以参考下2022-04-04
 今天小编就为大家分享一篇python调用matlab的m自定义函数方法,具有很好的参考价值,希望对大家有所帮助。一起跟随小编过来看看吧2019-02-02
 下面小编就为大家带来一篇Python下的Softmax回归函数的实现方法(推荐)。小编觉得挺不错的,现在就分享给大家,也给大家做个参考。一起跟随小编过来看看吧2017-01-01
 在Python中序列是最基本的数据结构,它是一块用于存放多个值得连续内存空间,Python中内置了5个常用的序列结构,分别是列表、元组、集合、字典和字符串,本文将详细讲解python中的列表和元组,感兴趣的朋友跟随小编一起看看吧2022-11-11


最新评论