
selenium+超级鹰实现模拟登录12306
最近迷上了用selenium去登陆各大网站,别说selenium真挺好用,可以轻松搞定ajax动态加载的网页,不用很费劲的去抓包查找。咳咳…跑题了,回归正题。
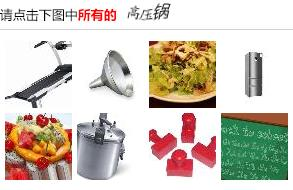
这次用selenium去登录12306网站,听说比较困难。我就去试了试,发现它的验证码实在是那啥…就是这样的。听头疼的。
我来说说主要的代码编写吧。
过程:
用我们的开发者工具定位到输入账号和密码的窗口,找到并send_keys
driver.find_element_by_id('username').send_keys('用户名')
time.sleep(0.5)
driver.find_element_by_id('password').send_keys('密码')
然后复杂的过程就来了。我们想要得到验证码的图片。但是头疼的是,图片是再变化的。我们请求一次,就变化一次,不像其他普通网站一样不会变化,直接保存图片就行了。但是这是12306诶,哪这么轻松。想了想,我决定把整张页面截屏保存下来,然后对验证码区域裁剪下来,就可以保证一致了。
# 将页面进行截图并保存
driver.save_screenshot('12306登录页面截图.png')

# 确定验证码左上角和右下角的坐标
code_img = driver.find_element_by_xpath('//*[@id="loginForm"]/div/ul[2]/li[4]/div/div/div[3]/img')
location = code_img.location # 确定验证码图片左上角的坐标
print('location:', location)
size = code_img.size # 确定验证码图片的长和宽
print('size:', size)
rangle = (int(location['x']), int(location['y']), int(location['x']) + int(size['width']),
     int(location['y']) + int(size['height']))
print('rangle:', rangle)
i = Image.open('12306页面截图.png')
# 对指定区域裁剪
code_pic = i.crop(rangle)
file_name = 'code_pic.png'
code_pic.save(file_name)
time.sleep(2)
print('验证码图片保存成功!!')
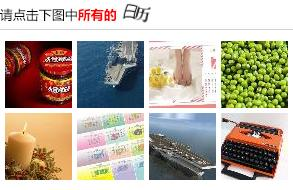
我们识别验证码用的是超级鹰,具体如何使用可以去查一查。验证码有可能需要我们点击多个,所以通过打码平台会得到多个坐标,就比如这种。有两个日历,需要点击两次,通过超级鹰就会得到两个坐标。如下图。我们发现有两个坐标会有一个“|”,有三个坐标就有两个“|”,所以我们就把他们split下,让每个坐标嵌套再一个列表里。此过程代码如下:
# 识别验证坐标
chaojiying = Chaojiying_Client('用户账号', '密码', '开发者账号') # 用户中心>>软件ID 生成一个替换 96001
im = open('code_pic.png', 'rb').read() # 本地图片文件路径 来替换 a.jpg 有时WIN系统须要//
result = chaojiying.PostPic(im, 9004)['pic_str'] # 1902 验证码类型 官方网站>>价格体系 3.4+版 print 后要加()

all_list = [] # 存储被点击的坐标
if '|' in result:
  list1 = result.split('|')
  xy_list = []
  count1 = len(list1)
  for i in list1:
    x = int(list1[i].split(',')[0])
    xy_list.append(x)
    y = int(list1[i].split(',')[1])
    xy_list.append(y)
    all_list.append(xy_list)
else:
  xy_list = []
  x = int(result.split(',')[0])
  xy_list.append(x)
  y = int(result.split(',')[1])
  xy_list.append(y)
  all_list.append(xy_list)
print(all_list)

最后嘛,我们得到了验证码的坐标,当然就去点击啦。但是,这个坐标是相对于验证码的图片的坐标,我们必须用ActionChains来移动一下动作链的位置。把他移动到验证码图片的location。,然后点击就ok了。此步骤的代码如下:
# 循环遍历点击图片
for i in all_list:
  x = i[0]
  y = i[1]
  action = ActionChains(driver).move_to_element_with_offset(code_img, x, y).click().perform()
  time.sleep(1)
driver.find_element_by_id('loginSub').click()
最后来看看全部代码吧!!
这个代码是超级鹰提供的接口。我封装成一个类了。
#!/usr/bin/env python
# coding:utf-8

import requests
from hashlib import md5


class Chaojiying_Client(object):

  def __init__(self, username, password, soft_id):
    self.username = username
    password = password.encode('utf8')
    self.password = md5(password).hexdigest()
    self.soft_id = soft_id
    self.base_params = {
      'user': self.username,
      'pass2': self.password,
      'softid': self.soft_id,
    }
    self.headers = {
      'Connection': 'Keep-Alive',
      'User-Agent': 'Mozilla/4.0 (compatible; MSIE 8.0; Windows NT 5.1; Trident/4.0)',
    }


  def PostPic(self, im, codetype):
    """
    im: 图片字节
    codetype: 题目类型 参考 http://www.chaojiying.com/price.html
    """
    params = {
      'codetype': codetype,
    }
    params.update(self.base_params)
    files = {'userfile': ('ccc.jpg', im)}
    r = requests.post('http://upload.chaojiying.net/Upload/Processing.php', data=params, files=files,
             headers=self.headers)
    return r.json()


  def ReportError(self, im_id):
    """
    im_id:报错题目的图片ID
    """
    params = {
      'id': im_id,
    }
    params.update(self.base_params)
    r = requests.post('http://upload.chaojiying.net/Upload/ReportError.php', data=params, headers=self.headers)
    return r.json()
下面是自己写的,也就六七十行。
from selenium import webdriver
from chaojiying_Python.chaojiying import Chaojiying_Client
import time
from PIL import Image
from selenium.webdriver import ActionChains
from selenium.webdriver.chrome.options import Options

# 实现无可视化界面的操作
# chrome_options = Options()
# chrome_options.add_argument('--headless')
# chrome_options.add_argument('--disable-gpu')
driver = webdriver.Chrome('D:\software\studySoftware\chromedriver_win32\chromedriver.exe')
driver.get('https://kyfw.12306.cn/otn/login/init')
# driver.maximize_window()
time.sleep(1)
driver.find_element_by_id('username').send_keys('用户名')
time.sleep(0.5)
driver.find_element_by_id('password').send_keys('密码')
# 将页面进行截图并保存
driver.save_screenshot('12306登录页面截图.png')

# 确定验证码左上角和右下角的坐标
code_img = driver.find_element_by_xpath('//*[@id="loginForm"]/div/ul[2]/li[4]/div/div/div[3]/img')
location = code_img.location # 确定验证码图片左上角的坐标
print('location:', location)
size = code_img.size # 确定验证码图片的长和宽
print('size:', size)
rangle = (int(location['x']), int(location['y']), int(location['x']) + int(size['width']),
     int(location['y']) + int(size['height']))
print('rangle:', rangle)
i = Image.open('12306页面截图.png')
# 对指定区域裁剪
code_pic = i.crop(rangle)
file_name = 'code_pic.png'
code_pic.save(file_name)
time.sleep(2)
print('验证码图片保存成功!!')
# 识别验证坐标
chaojiying = Chaojiying_Client('用户账号', '密码', '开发者账号') # 用户中心>>软件ID 生成一个替换 96001
im = open('code_pic.png', 'rb').read() # 本地图片文件路径 来替换 a.jpg 有时WIN系统须要//
result = chaojiying.PostPic(im, 9004)['pic_str'] # 1902 验证码类型 官方网站>>价格体系 3.4+版 print 后要加()

all_list = [] # 存储被点击的坐标
if '|' in result:
  list1 = result.split('|')
  xy_list = []
  count1 = len(list1)
  for i in list1:
    x = int(list1[i].split(',')[0])
    xy_list.append(x)
    y = int(list1[i].split(',')[1])
    xy_list.append(y)
    all_list.append(xy_list)
else:
  xy_list = []
  x = int(result.split(',')[0])
  xy_list.append(x)
  y = int(result.split(',')[1])
  xy_list.append(y)
  all_list.append(xy_list)
print(all_list)
# 循环遍历点击图片
for i in all_list:
  x = i[0]
  y = i[1]
  action = ActionChains(driver).move_to_element_with_offset(code_img, x, y).click().perform()
  time.sleep(1)
driver.find_element_by_id('loginSub').click()
到此这篇关于selenium+超级鹰实现模拟登录12306的文章就介绍到这了,更多相关selenium 模拟登录12306内容请搜索脚本之家以前的文章或继续浏览下面的相关文章希望大家以后多多支持脚本之家!
相关文章
 这篇文章主要为大家详细介绍了如何加载并处理TorchVision的FashionMNIST Dataset,文中的示例代码讲解详细,感兴趣的小伙伴可以了解一下2022-12-12
 这篇文章主要为大家详细介绍了python绘制雪景图,文中示例代码介绍的非常详细,具有一定的参考价值,感兴趣的小伙伴们可以参考一下2019-12-12
 这篇文章主要为大家详细介绍了Python3利用Qt5实现简易的五子棋游戏,文中示例代码介绍的非常详细,具有一定的参考价值,感兴趣的小伙伴们可以参考一下2022-05-05
 这篇文章主要为大家介绍了Python区块链创建Genesis Block教程详解,有需要的朋友可以借鉴参考下,希望能够有所帮助,祝大家多多进步,早日升职加薪2022-05-05
 今天小编就为大家分享一篇python实现异常信息堆栈输出到日志文件,具有很好的参考价值,希望对大家有所帮助。一起跟随小编过来看看吧2019-12-12
 这篇文章主要为大家详细介绍了python matplotlib画图库学习绘制常用的图,文中示例代码介绍的非常详细,具有一定的参考价值,感兴趣的小伙伴们可以参考一下2019-03-03
 本文主要介绍了Appium自动化测试实现H5页面元素定位,文中通过示例代码介绍的非常详细,具有一定的参考价值,感兴趣的小伙伴们可以参考一下2022-02-02
 这篇文章主要为大家详细介绍了python实现邮箱发送信息,文中示例代码介绍的非常详细,具有一定的参考价值,感兴趣的小伙伴们可以参考一下2021-08-08
 这篇文章主要介绍了Python基于递归算法实现的走迷宫问题,结合迷宫问题简单分析了Python递归算法的定义与使用技巧,需要的朋友可以参考下2017-08-08
 这篇文章主要介绍了python函数的对象、函数嵌套、名称空间和作用域 ,本文给大家介绍的非常详细,具有一定的参考借鉴价值,需要的朋友可以参考下2019-05-05


最新评论