
Python 详解通过Scrapy框架实现爬取百度新冠疫情数据流程
更新时间:2021年11月10日 14:07:52 作者:剑客阿良_ALiang
Scrapy是用纯Python实现一个为了爬取网站数据、提取结构性数据而编写的应用框架,用途非常广泛,框架的力量,用户只需要定制开发几个模块就可以轻松的实现一个爬虫,用来抓取网页内容以及各种图片,非常之方便
前言
闲来无聊,写了一个爬虫程序获取百度疫情数据。申明一下,研究而已。而且页面应该会进程做反爬处理,可能需要调整对应xpath。
Github仓库地址:代码仓库
本文主要使用的是scrapy框架。
环境部署
主要简单推荐一下
插件推荐
这里先推荐一个Google Chrome的扩展插件xpath helper,可以验证xpath语法是不是正确。
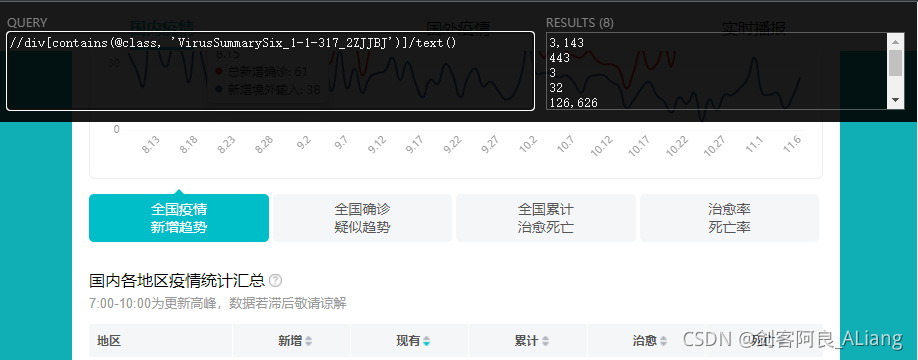
爬虫目标
需要爬取的页面:实时更新:新型冠状病毒肺炎疫情地图
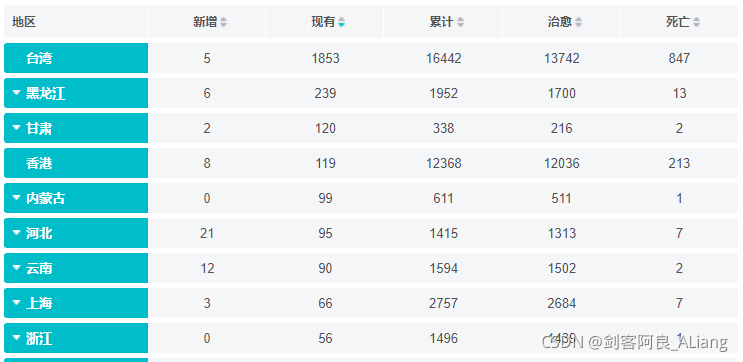
主要爬取的目标选取了全国的数据以及各个身份的数据。

项目创建
使用scrapy命令创建项目
scrapy startproject yqsj
webdriver部署
这里就不重新讲一遍了,可以参考我这篇文章的部署方法:Python 详解通过Scrapy框架实现爬取CSDN全站热榜标题热词流程
项目代码
开始撸代码,看一下百度疫情省份数据的问题。

页面需要点击展开全部span。所以在提取页面源码的时候需要模拟浏览器打开后,点击该按钮。所以按照这个方向,我们一步步来。
Item定义
定义两个类YqsjProvinceItem和YqsjChinaItem,分别定义国内省份数据和国内数据。
# Define here the models for your scraped items
#
# See documentation in:
# https://docs.scrapy.org/en/latest/topics/items.html

import scrapy


class YqsjProvinceItem(scrapy.Item):
    # define the fields for your item here like:
    # name = scrapy.Field()
    location = scrapy.Field()
    new = scrapy.Field()
    exist = scrapy.Field()
    total = scrapy.Field()
    cure = scrapy.Field()
    dead = scrapy.Field()


class YqsjChinaItem(scrapy.Item):
    # define the fields for your item here like:
    # name = scrapy.Field()
    # 现有确诊
    exist_diagnosis = scrapy.Field()
    # 无症状
    asymptomatic = scrapy.Field()
    # 现有疑似
    exist_suspecte = scrapy.Field()
    # 现有重症
    exist_severe = scrapy.Field()
    # 累计确诊
    cumulative_diagnosis = scrapy.Field()
    # 境外输入
    overseas_input = scrapy.Field()
    # 累计治愈
    cumulative_cure = scrapy.Field()
    # 累计死亡
    cumulative_dead = scrapy.Field()
中间件定义
需要打开页面后点击一下展开全部。

完整代码
# Define here the models for your spider middleware
#
# See documentation in:
# https://docs.scrapy.org/en/latest/topics/spider-middleware.html

from scrapy import signals

# useful for handling different item types with a single interface
from itemadapter import is_item, ItemAdapter
from scrapy.http import HtmlResponse
from selenium.common.exceptions import TimeoutException
from selenium.webdriver import ActionChains
import time


class YqsjSpiderMiddleware:
    # Not all methods need to be defined. If a method is not defined,
    # scrapy acts as if the spider middleware does not modify the
    # passed objects.

    @classmethod
    def from_crawler(cls, crawler):
        # This method is used by Scrapy to create your spiders.
        s = cls()
        crawler.signals.connect(s.spider_opened, signal=signals.spider_opened)
        return s

    def process_spider_input(self, response, spider):
        # Called for each response that goes through the spider
        # middleware and into the spider.

        # Should return None or raise an exception.
        return None

    def process_spider_output(self, response, result, spider):
        # Called with the results returned from the Spider, after
        # it has processed the response.

        # Must return an iterable of Request, or item objects.
        for i in result:
            yield i

    def process_spider_exception(self, response, exception, spider):
        # Called when a spider or process_spider_input() method
        # (from other spider middleware) raises an exception.

        # Should return either None or an iterable of Request or item objects.
        pass

    def process_start_requests(self, start_requests, spider):
        # Called with the start requests of the spider, and works
        # similarly to the process_spider_output() method, except
        # that it doesn't have a response associated.

        # Must return only requests (not items).
        for r in start_requests:
            yield r

    def spider_opened(self, spider):
        spider.logger.info('Spider opened: %s' % spider.name)


class YqsjDownloaderMiddleware:
    # Not all methods need to be defined. If a method is not defined,
    # scrapy acts as if the downloader middleware does not modify the
    # passed objects.

    @classmethod
    def from_crawler(cls, crawler):
        # This method is used by Scrapy to create your spiders.
        s = cls()
        crawler.signals.connect(s.spider_opened, signal=signals.spider_opened)
        return s

    def process_request(self, request, spider):
        # Called for each request that goes through the downloader
        # middleware.

        # Must either:
        # - return None: continue processing this request
        # - or return a Response object
        # - or return a Request object
        # - or raise IgnoreRequest: process_exception() methods of
        #   installed downloader middleware will be called
        # return None
        try:
            spider.browser.get(request.url)
            spider.browser.maximize_window()
            time.sleep(2)
            spider.browser.find_element_by_xpath("//*[@id='nationTable']/div/span").click()
            # ActionChains(spider.browser).click(searchButtonElement)
            time.sleep(5)
            return HtmlResponse(url=spider.browser.current_url, body=spider.browser.page_source,
                                encoding="utf-8", request=request)
        except TimeoutException as e:
            print('超时异常:{}'.format(e))
            spider.browser.execute_script('window.stop()')
        finally:
            spider.browser.close()

    def process_response(self, request, response, spider):
        # Called with the response returned from the downloader.

        # Must either;
        # - return a Response object
        # - return a Request object
        # - or raise IgnoreRequest
        return response

    def process_exception(self, request, exception, spider):
        # Called when a download handler or a process_request()
        # (from other downloader middleware) raises an exception.

        # Must either:
        # - return None: continue processing this exception
        # - return a Response object: stops process_exception() chain
        # - return a Request object: stops process_exception() chain
        pass

    def spider_opened(self, spider):
        spider.logger.info('Spider opened: %s' % spider.name)
定义爬虫
分别获取国内疫情数据以及省份疫情数据。完整代码:
#!/usr/bin/env python
# -*- coding: utf-8 -*-
# @Time    : 2021/11/7 22:05
# @Author  : 至尊宝
# @Site    :
# @File    : baidu_yq.py

import scrapy
from selenium import webdriver
from selenium.webdriver.chrome.options import Options

from yqsj.items import YqsjChinaItem, YqsjProvinceItem


class YqsjSpider(scrapy.Spider):
    name = 'yqsj'
    # allowed_domains = ['blog.csdn.net']
    start_urls = ['https://voice.baidu.com/act/newpneumonia/newpneumonia#tab0']
    china_xpath = "//div[contains(@class, 'VirusSummarySix_1-1-317_2ZJJBJ')]/text()"
    province_xpath = "//*[@id='nationTable']/table/tbody/tr[{}]/td/text()"
    province_xpath_1 = "//*[@id='nationTable']/table/tbody/tr[{}]/td/div/span/text()"

    def __init__(self):
        chrome_options = Options()
        chrome_options.add_argument('--headless')  # 使用无头谷歌浏览器模式
        chrome_options.add_argument('--disable-gpu')
        chrome_options.add_argument('--no-sandbox')
        self.browser = webdriver.Chrome(chrome_options=chrome_options,
                                        executable_path="E:\\chromedriver_win32\\chromedriver.exe")
        self.browser.set_page_load_timeout(30)

    def parse(self, response, **kwargs):
        country_info = response.xpath(self.china_xpath)
        yq_china = YqsjChinaItem()
        yq_china['exist_diagnosis'] = country_info[0].get()
        yq_china['asymptomatic'] = country_info[1].get()
        yq_china['exist_suspecte'] = country_info[2].get()
        yq_china['exist_severe'] = country_info[3].get()
        yq_china['cumulative_diagnosis'] = country_info[4].get()
        yq_china['overseas_input'] = country_info[5].get()
        yq_china['cumulative_cure'] = country_info[6].get()
        yq_china['cumulative_dead'] = country_info[7].get()
        yield yq_china

        # 遍历35个地区
        for x in range(1, 35):
            path = self.province_xpath.format(x)
            path1 = self.province_xpath_1.format(x)
            province_info = response.xpath(path)
            province_name = response.xpath(path1)
            yq_province = YqsjProvinceItem()
            yq_province['location'] = province_name.get()
            yq_province['new'] = province_info[0].get()
            yq_province['exist'] = province_info[1].get()
            yq_province['total'] = province_info[2].get()
            yq_province['cure'] = province_info[3].get()
            yq_province['dead'] = province_info[4].get()
            yield yq_province
pipeline输出结果文本
将结果按照一定的文本格式输出出来。完整代码:
# Define your item pipelines here
#
# Don't forget to add your pipeline to the ITEM_PIPELINES setting
# See: https://docs.scrapy.org/en/latest/topics/item-pipeline.html


# useful for handling different item types with a single interface
from itemadapter import ItemAdapter

from yqsj.items import YqsjChinaItem, YqsjProvinceItem


class YqsjPipeline:
    def __init__(self):
        self.file = open('result.txt', 'w', encoding='utf-8')

    def process_item(self, item, spider):
        if isinstance(item, YqsjChinaItem):
            self.file.write(
                "国内疫情\n现有确诊\t{}\n无症状\t{}\n现有疑似\t{}\n现有重症\t{}\n累计确诊\t{}\n境外输入\t{}\n累计治愈\t{}\n累计死亡\t{}\n".format(
                    item['exist_diagnosis'],
                    item['asymptomatic'],
                    item['exist_suspecte'],
                    item['exist_severe'],
                    item['cumulative_diagnosis'],
                    item['overseas_input'],
                    item['cumulative_cure'],
                    item['cumulative_dead']))
        if isinstance(item, YqsjProvinceItem):
            self.file.write(
                "省份:{}\t新增:{}\t现有:{}\t累计:{}\t治愈:{}\t死亡:{}\n".format(
                    item['location'],
                    item['new'],
                    item['exist'],
                    item['total'],
                    item['cure'],
                    item['dead']))
        return item

    def close_spider(self, spider):
        self.file.close()
配置文件改动
直接参考,自行调整:
# Scrapy settings for yqsj project
#
# For simplicity, this file contains only settings considered important or
# commonly used. You can find more settings consulting the documentation:
#
#     https://docs.scrapy.org/en/latest/topics/settings.html
#     https://docs.scrapy.org/en/latest/topics/downloader-middleware.html
#     https://docs.scrapy.org/en/latest/topics/spider-middleware.html

BOT_NAME = 'yqsj'

SPIDER_MODULES = ['yqsj.spiders']
NEWSPIDER_MODULE = 'yqsj.spiders'


# Crawl responsibly by identifying yourself (and your website) on the user-agent
#USER_AGENT = 'yqsj (+http://www.yourdomain.com)'
USER_AGENT = 'Mozilla/5.0'

# Obey robots.txt rules
ROBOTSTXT_OBEY = False

# Configure maximum concurrent requests performed by Scrapy (default: 16)
#CONCURRENT_REQUESTS = 32

# Configure a delay for requests for the same website (default: 0)
# See https://docs.scrapy.org/en/latest/topics/settings.html#download-delay
# See also autothrottle settings and docs
#DOWNLOAD_DELAY = 3
# The download delay setting will honor only one of:
#CONCURRENT_REQUESTS_PER_DOMAIN = 16
#CONCURRENT_REQUESTS_PER_IP = 16

# Disable cookies (enabled by default)
COOKIES_ENABLED = False

# Disable Telnet Console (enabled by default)
#TELNETCONSOLE_ENABLED = False

# Override the default request headers:
DEFAULT_REQUEST_HEADERS = {
    'Accept': 'text/html,application/xhtml+xml,application/xml;q=0.9,*/*;q=0.8',
    'Accept-Language': 'en',
    'User-Agent': 'Mozilla/5.0 (Windows NT 6.2; WOW64) AppleWebKit/537.36 (KHTML, like Gecko) Chrome/27.0.1453.94 Safari/537.36'
}

# Enable or disable spider middlewares
# See https://docs.scrapy.org/en/latest/topics/spider-middleware.html
SPIDER_MIDDLEWARES = {
   'yqsj.middlewares.YqsjSpiderMiddleware': 543,
}

# Enable or disable downloader middlewares
# See https://docs.scrapy.org/en/latest/topics/downloader-middleware.html
DOWNLOADER_MIDDLEWARES = {
   'yqsj.middlewares.YqsjDownloaderMiddleware': 543,
}

# Enable or disable extensions
# See https://docs.scrapy.org/en/latest/topics/extensions.html
#EXTENSIONS = {
#    'scrapy.extensions.telnet.TelnetConsole': None,
#}

# Configure item pipelines
# See https://docs.scrapy.org/en/latest/topics/item-pipeline.html
ITEM_PIPELINES = {
   'yqsj.pipelines.YqsjPipeline': 300,
}

# Enable and configure the AutoThrottle extension (disabled by default)
# See https://docs.scrapy.org/en/latest/topics/autothrottle.html
#AUTOTHROTTLE_ENABLED = True
# The initial download delay
#AUTOTHROTTLE_START_DELAY = 5
# The maximum download delay to be set in case of high latencies
#AUTOTHROTTLE_MAX_DELAY = 60
# The average number of requests Scrapy should be sending in parallel to
# each remote server
#AUTOTHROTTLE_TARGET_CONCURRENCY = 1.0
# Enable showing throttling stats for every response received:
#AUTOTHROTTLE_DEBUG = False

# Enable and configure HTTP caching (disabled by default)
# See https://docs.scrapy.org/en/latest/topics/downloader-middleware.html#httpcache-middleware-settings
#HTTPCACHE_ENABLED = True
#HTTPCACHE_EXPIRATION_SECS = 0
#HTTPCACHE_DIR = 'httpcache'
#HTTPCACHE_IGNORE_HTTP_CODES = []
#HTTPCACHE_STORAGE = 'scrapy.extensions.httpcache.FilesystemCacheStorage'
验证结果
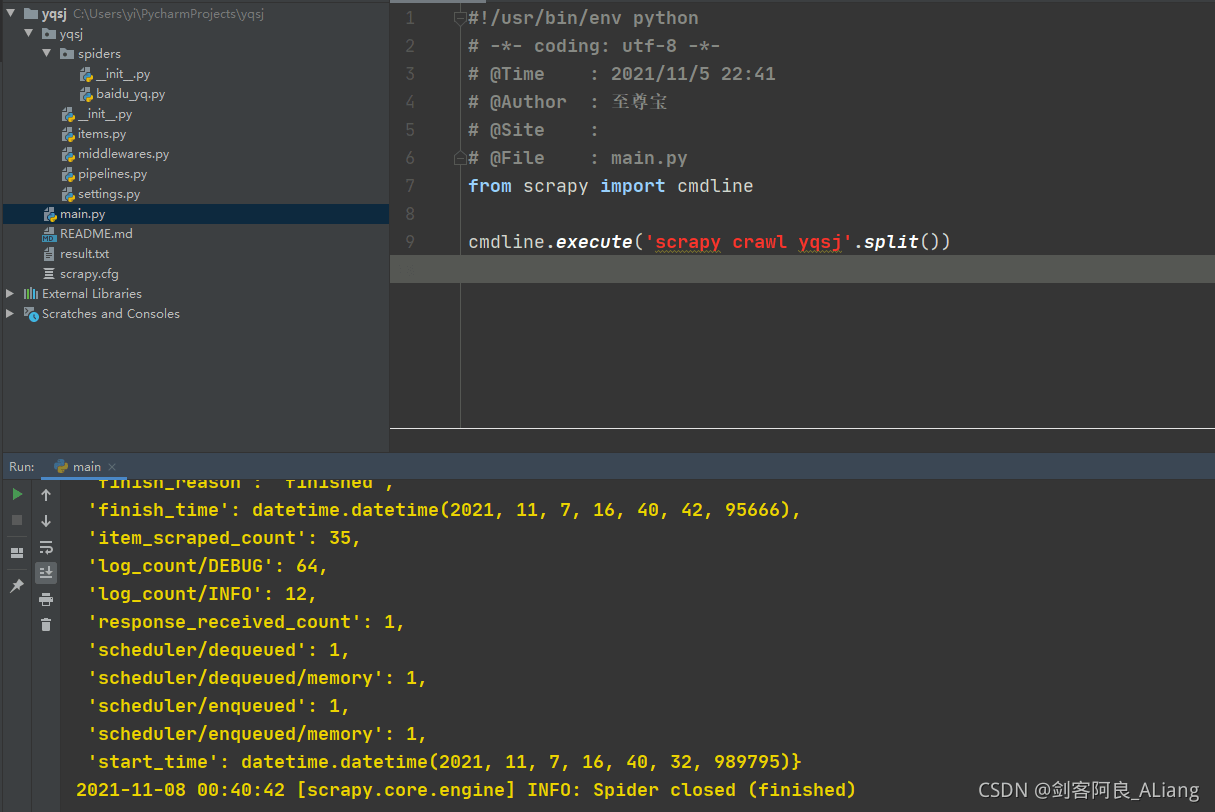
看看结果文件

总结
emmmm,闲着无聊,写着玩,没啥好总结的。
分享:
修心,亦是修行之一。顺境修力,逆境修心,缺一不可。 ——《剑来》
如果本文对你有作用的话,不要吝啬你的赞,谢谢。

以上就是Python 详解通过Scrapy框架实现爬取百度新冠疫情数据流程的详细内容,更多关于Python Scrapy框架的资料请关注脚本之家其它相关文章!
相关文章
 这篇文章主要分享的是关于Flask 视图介绍, Flask 中路由是请求的 url 与处理函数之间的映射,使用app.route装饰器将处理函数和 url 绑定,路由绑定的处理函数就被成为视图函数。下面来看文章的详细内容,需要的朋友也可以参考一下2021-11-11
 由于某些原因,需要将代码从A机房迁移到B机房,这两个之间不能互相访问,但是历史原因导致A机房的代码全是utf8编码的,B机房要求是GBK编码,看看这个怎么解决。虽然很简单,但是还是要推荐给大家,需要的小伙伴参考下吧。2015-03-03
 今天小编就为大家分享一篇对pandas replace函数的使用方法小结,具有很好的参考价值,希望对大家有所帮助。一起跟随小编过来看看吧2018-05-05
 这篇文章主要介绍了详解Django之auth模块(用户认证),小编觉得挺不错的,现在分享给大家,也给大家做个参考。一起跟随小编过来看看吧2018-04-04
 这篇文章主要介绍了pyqt4实现半透明的天气预报界面示例,需要的朋友可以参考下2014-03-03
 这篇文章主要介绍了Python 强制限定小数点位数的操作方式,具有很好的参考价值,希望对大家有所帮助。一起跟随小编过来看看吧2021-03-03
 这篇文章主要给大家介绍了关于Django中login_required装饰器的使用方法,并给大家进行了实例借鉴,利用@login_required实现Django用户登陆访问限制,文中通过示例代码介绍的非常详细,需要的朋友可以参考借鉴,下面来一起看看吧。2017-11-11
python格式化字符串的实战教程(使用占位符、format方法)
我们经常会用到%-formatting和str.format()来格式化,下面这篇文章主要给大家介绍了关于python格式化字符串的相关资料,文中通过实例代码介绍的非常详细,需要的朋友可以参考下2022-08-08 这篇文章主要介绍了pycharm 创建py文件总是为txt格式的问题及解决方案,具有很好的参考价值,希望对大家有所帮助。如有错误或未考虑完全的地方,望不吝赐教2022-07-07
 下面小编就为大家带来一篇Python 模拟购物车的实例讲解。小编觉得挺不错的,现在就分享给大家,也给大家做个参考。一起跟随小编过来看看吧2017-09-09


最新评论