
Android中的存储详解
1、存储在App内部
最简单的一种。在尝试过程中发现,手机中很多文件夹都没有权限读写。我们可以将我们需要写的文件存放到App中的files文件夹中,当然我们有权限在整个App中读写文件
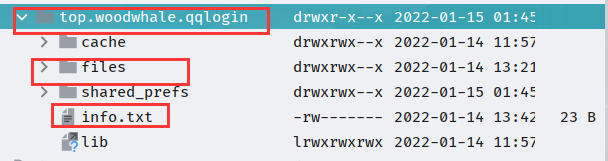
可以通过API获取一个file对象,这里的this就是MainActivity类
// 获取当前包下的files路径 /data/data/top.woodwhale.qqlogin/files
File filesDir = this.getFilesDir();
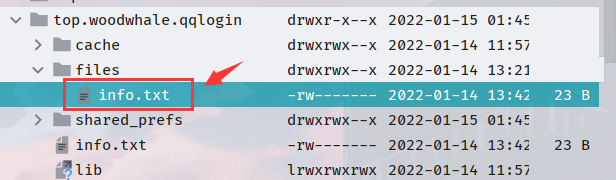
之后就可以通过文件输出流写入文件:
File filesFile = new File(filesDir,"info.txt");
boolean flag = (filesFile.exists() || filesFile.createNewFile());
FileOutputStream fos = new FileOutputStream(file);
fos.write((ac+"***"+pwd).getBytes(StandardCharsets.UTF_8));
fos.close();
写入成功:
当然,我们既然在这个App中都有权限,那么所有目录都可以写:
// 写入到自己有权限写的地方
File file = new File("/data/data/top.woodwhale.qqlogin/info.txt");
2、SD卡外部存储
虽然现在很多的手机都不支持SD卡了,但是仍然有平板使用。
直接放出一个Activity类,其中调用了nvironment.getExternalStorageDirectory();方法类获取一个sd卡file对象,使用Formatter.formatFileSize(this,externalStorageDirectory.getFreeSpace()));Formatter类中的转化,将long类型转化为大小类型,同时调用sd卡file对象的getFreeSpace()方法,获取卡中剩余的空间,之后就是写入externalStorageDirectory.getPath()卡中的路径
public class SdcardActivity extends Activity {
    private Button btn;
    public static String TAG = "SdcardActivity";
    @Override
    protected void onCreate(Bundle savedInstanceState) {
        super.onCreate(savedInstanceState);
        setContentView(R.layout.activity_sc_card_rw);
        btn = this.findViewById(R.id.bt_sdw);
        btn.setOnClickListener(view -> {
            File externalStorageDirectory = Environment.getExternalStorageDirectory();
            Log.d(TAG, "sd卡路径是:"+externalStorageDirectory.getPath());
            Log.d(TAG,"sd卡剩余空间是"+ Formatter.formatFileSize(this,externalStorageDirectory.getFreeSpace()));
            File file = new File(externalStorageDirectory,"love.txt");
            try {
                boolean flag = file.exists() || file.createNewFile();
                if (flag) {
                    FileOutputStream fos = new FileOutputStream(file);
                    fos.write("woodwhale love sheepbotany".getBytes(StandardCharsets.UTF_8));
                    fos.close();
                }
            } catch (Exception e) {
                e.printStackTrace();
            }
        });
    }
}
但是,在此之前,我们需要一个SD卡的读写权限,我们在AndrodiManifest.xml中配置下面的ses-permission
<uses-permission android:name="android.permission.WRITE_EXTERNAL_STORAGE"/>
<uses-permission android:name="android.permission.READ_EXTERNAL_STORAGE"/>
最终,在我们的sd卡中看到如下结果,证明写入成功:

3、SharedPreferences存储
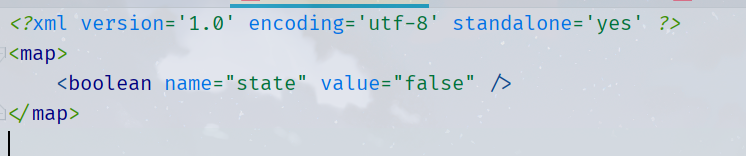
SharedPreferences是android下的一个类,功能就是记录偏好设置,形成一个xml文件
我们可以用SharedPreferences来存储一些信息。
例如常见的这种:
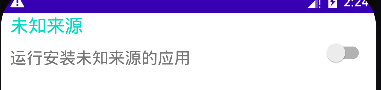
我们勾选之后,再次打开app仍然处于勾选状态。
那么这种情况如何实现呢?
通过xml生成上面的布局
<?xml version="1.0" encoding="utf-8"?>
<RelativeLayout xmlns:android="http://schemas.android.com/apk/res/android"
    android:layout_width="match_parent"
    android:layout_height="80dp">

    <LinearLayout
        android:layout_width="match_parent"
        android:layout_height="match_parent"
        android:orientation="vertical"
        android:layout_centerVertical="true">

        <TextView
            android:layout_width="wrap_content"
            android:layout_height="wrap_content"
            android:text="未知来源"
            android:textColor="@color/teal_200"
            android:layout_marginLeft="10dp"
            android:textSize="20sp" />

        <TextView
            android:layout_width="wrap_content"
            android:layout_height="wrap_content"
            android:text="运行安装未知来源的应用"
            android:layout_marginLeft="10dp"
            android:layout_marginTop="10dp"
            android:textSize="18sp"/>
    </LinearLayout>

    <Switch
        android:id="@+id/sw_source"
        android:layout_width="wrap_content"
        android:layout_height="wrap_content"
        android:layout_alignParentRight="true"
        android:layout_marginTop="30dp"
        android:layout_marginRight="10dp" />


</RelativeLayout>
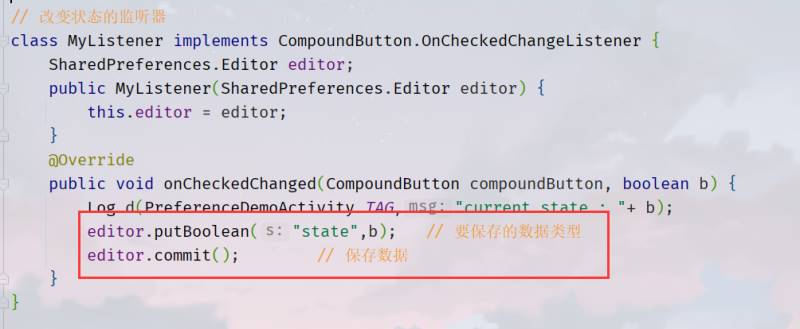
我们把Switch这个选择框在activity类中赋予一个变量,给他加上一个OnCheckedChangeListener,再使用SharedPreferences来进行设置偏好,整体代码如下
package top.woodwhale.qqlogin;

import android.app.Activity;
import android.content.SharedPreferences;
import android.os.Bundle;
import android.util.Log;
import android.widget.CompoundButton;
import android.widget.Switch;
import androidx.annotation.Nullable;

public class PreferenceDemoActivity  extends Activity {

    private Switch sw;
    public static String TAG = "PreferenceDemoActivity";
    @Override
    protected void onCreate(@Nullable Bundle savedInstanceState) {
        super.onCreate(savedInstanceState);
        setContentView(R.layout.activity_pre_demo);
        sw = (Switch) this.findViewById(R.id.sw_source);
        SharedPreferences settingInfo = this.getSharedPreferences("settingInfo", MODE_PRIVATE);
        SharedPreferences.Editor edit = settingInfo.edit();
        sw.setOnCheckedChangeListener(new MyListener(edit));
        boolean state = settingInfo.getBoolean("state", true);
        Log.d(TAG,"STATE=="+ state);
        sw.setChecked(state);
    }
}

// 改变状态的监听器
class MyListener implements CompoundButton.OnCheckedChangeListener {
    SharedPreferences.Editor editor;
    public MyListener(SharedPreferences.Editor editor) {
        this.editor = editor;
    }
    @Override
    public void onCheckedChanged(CompoundButton compoundButton, boolean b) {
        Log.d(PreferenceDemoActivity.TAG,"current state : "+ b);
        editor.putBoolean("state",b);   // 要保存的数据类型
        editor.commit();        // 保存数据
    }
}
其中,editor的功能是保存数据
其次,为了每次打开App都可以看到我们的配置,通过读取偏好配置文件,设置switch框的勾选

这样就可以同步偏好设置的勾选啦!
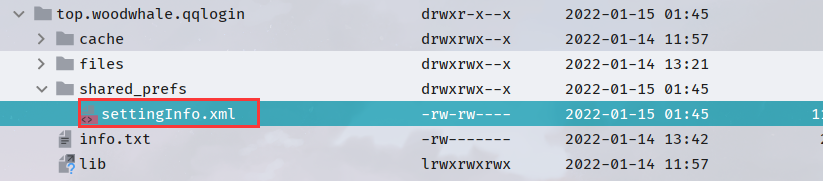
最后我们可以在手机内部看到我们写入的偏好设置xml文件了,这样也属于存储在App内部
4、使用SQLite数据库存储
Android设备自带SQLite数据库,如果掌握过mysql,那么SQLite非常容易上手,且不说提供了非常简便的API,就算是自己写也比JDBC简单!
首先我们不适用提供的API来实现一次增删改查!
4.1 自己完成一个BaseDao类
BaseDao类本来是用来连接数据库等基础的,具体的增删改查应该在service层实现,但为了这里测试,我们将crud的方法写入到BaseDao类中封装起来。具体架构如下:
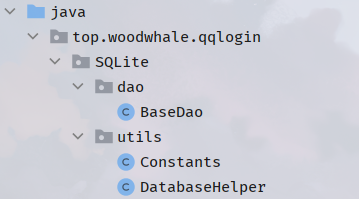
首先是Constants类,是常量类,其中有我们的数据库名、版本号、表名
public class Constants {
    public static final String DATABASE_NAME = "woodwhale.db";
    public static final int VERSION_CODE = 1;
    public static final String TABLE_NAME = "user";
}
其次是DatabaseHelper类,继承SQLiteOpenHelper类,用来开启数据库,其中的onCreate方法是数据库创建时的回调,onUpgrade方法时升级数据时的回调,我们在Constans类中写了一个版本号,爸爸那边每次升级可以加入新的功能,可以写在onUpgrade方法中,通过switch实现。不过需要注意,升级只能让版本号上升,不能降级,否则会报错!
package top.woodwhale.qqlogin.SQLite.utils;

import android.content.Context;
import android.database.sqlite.SQLiteDatabase;
import android.database.sqlite.SQLiteOpenHelper;
import android.util.Log;

public class DatabaseHelper extends SQLiteOpenHelper {
    public static String TAG = "DatabaseHelper";
    /**
     * @param context   上下文
     */
    public DatabaseHelper( Context context) {
        super(context, Constants.DATABASE_NAME, null, Constants.VERSION_CODE);
    }

    @Override
    public void onCreate(SQLiteDatabase sqLiteDatabase) {
        // 创建时的回调
        Log.d(TAG, "创建数据库");
        String sql = "create table " + Constants.TABLE_NAME + " (id integer,name varchar,age integer)";
        sqLiteDatabase.execSQL(sql);
    }

    @Override
    public void onUpgrade(SQLiteDatabase sqLiteDatabase, int i, int i1) {
        // 升级数据库的回调
        Log.d(TAG, "升级数据库!");
        String sql = null;
        switch (i) {
            case 1:
                sql = "alter table "+ Constants.TABLE_NAME + " add phone integer";
                sqLiteDatabase.execSQL(sql);
                break;
            case 2:
                sql = "alter table "+ Constants.TABLE_NAME + " add address varchar";
                sqLiteDatabase.execSQL(sql);
                break;
        }
    }
}
最后就是我们封装好的数据库BaseDao类,通过语句实现了增删改查
package top.woodwhale.qqlogin.SQLite.dao;

import android.annotation.SuppressLint;
import android.content.Context;
import android.database.Cursor;
import android.database.sqlite.SQLiteDatabase;
import android.util.Log;

import top.woodwhale.qqlogin.SQLite.utils.Constants;
import top.woodwhale.qqlogin.SQLite.utils.DatabaseHelper;

// BaseDao类
public class BaseDao {

    private final DatabaseHelper dbh;
    private SQLiteDatabase db;
    public static String TAG = "BaseDao";

    public BaseDao(Context context) {
        dbh = new DatabaseHelper(context);
    }

    // 增
    public void add(int id, String name, int age) {
        db = dbh.getWritableDatabase();
        String sql = "insert into " + Constants.TABLE_NAME + "(id,name,age) values(?,?,?)";
        Object[] params = new Object[]{id,name,age};
        db.execSQL(sql,params);
        db.close();
    }

    // 删
    public void free(int id) {
        db = dbh.getWritableDatabase();
        String sql = "delete from " + Constants.TABLE_NAME + " where id=?";
        Object[] params = new Object[]{id};
        db.execSQL(sql,params);
        db.close();
    }

    // 改
    public void edit(int id, int age) {
        db = dbh.getWritableDatabase();
        String sql = "update " + Constants.TABLE_NAME +" set age = ? where id = ?";
        Object[] params = new Object[]{age,id};
        db.execSQL(sql,params);
        db.close();
    }

    // 查
    @SuppressLint("Range")
    public void show(int id) {
        db = dbh.getReadableDatabase();
        String sql = "select * from  " + Constants.TABLE_NAME +" where id = ?";
        String[] params = new String[]{String.valueOf(id)};
        Cursor cursor =  db.rawQuery(sql, params);
        while (cursor.moveToNext()) {
            String name = cursor.getString(cursor.getColumnIndex("name"));
            Log.d(TAG,"name == "+name);
            int age = cursor.getInt(cursor.getColumnIndex("age"));
            Log.d(TAG,"age == "+age);
        }
        cursor.close();
        db.close();
    }
}
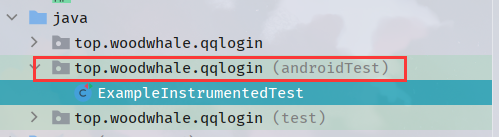
接着我们在AndroidTest包下进行测试
package top.woodwhale.qqlogin;

import android.content.Context;
import android.database.sqlite.SQLiteDatabase;
import android.util.Log;

import androidx.test.platform.app.InstrumentationRegistry;
import androidx.test.ext.junit.runners.AndroidJUnit4;

import org.junit.Test;
import org.junit.runner.RunWith;

import static org.junit.Assert.*;

import top.woodwhale.qqlogin.SQLite.dao.BaseDao;
import top.woodwhale.qqlogin.SQLite.utils.DatabaseHelper;

/**
 * Instrumented test, which will execute on an Android device.
 *
 * @see <a href="http://d.android.com/tools/testing" rel="external nofollow" >Testing documentation</a>
 */
@RunWith(AndroidJUnit4.class)
public class ExampleInstrumentedTest {

    public static final String TAG = "ExampleInstrumentedTest";
    public static final Context appContext = InstrumentationRegistry.getInstrumentation().getTargetContext();;
    public static final BaseDao dao = new BaseDao(appContext);;

    @Test
    public void useAppContext() {
        // Context of the app under test.
        assertEquals("top.woodwhale.qqlogin", appContext.getPackageName());
    }

    @Test
    public void testCreate() {
        DatabaseHelper dbh = new DatabaseHelper(appContext);
        SQLiteDatabase writableDatabase = dbh.getWritableDatabase();
        Log.d(TAG, writableDatabase.getPath());
    }

    @Test
    public void testAdd() {
        dao.add(1,"woodwhale",19);
        dao.add(2,"sheepbotany",21);
    }
    @Test
    public void testFree() {
        dao.free(1);
    }
    @Test
    public void testEdit() {
        dao.edit(1,3);
    }
    @Test
    public void testShow() {
        dao.show(1);
    }

}
增删改查都成功,成功就如图所示:
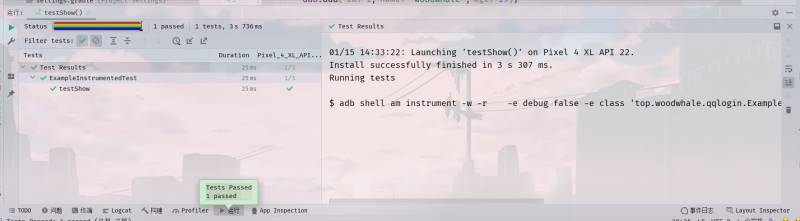
由于只有查询有log回显,在logcat中之后show方法出现了log

4.2 使用Google写的API处理
那么使用Google写好的增删改查api可以避免我们sql语句的格式问题和语法错误
经过测试,如下代码没有问题(在BaseDao类中)
// 使用API的添加
    public void addByAPI(int id, String name, int age) {
        ContentValues contentValues = new ContentValues();
        contentValues.put("id",id);
        contentValues.put("name",name);
        contentValues.put("age",age);
        db = dbh.getWritableDatabase();
        db.insert(Constants.TABLE_NAME,null,contentValues);
        db.close();
    }
    // 删除
    public void freeByAPI(int id) {
        db = dbh.getWritableDatabase();
        db.delete(Constants.TABLE_NAME,"id = ?",new String[]{String.valueOf(id)});
        db.close();
        Log.d(TAG,"API删除成功!");
    }
    // 修改
    public void editByAPI(int id, String name, Integer age) {
        ContentValues contentValues = new ContentValues();
        if (name != null) {
            contentValues.put("name",name);
        }
        if (age != null) {
            contentValues.put("age",age);
        }
        db = dbh.getWritableDatabase();
        db.update(Constants.TABLE_NAME,contentValues,"id = ?", new String[]{String.valueOf(id)});
        db.close();
    }
    // 查询
    public void showByAPI(int id) {
        db = dbh.getReadableDatabase();
        Cursor cursor = db.query(false, Constants.TABLE_NAME, new String[]{"id", "name", "age"}, "id = ?", new String[]{String.valueOf(id)}, "id", null, null, null);
        while (cursor.moveToNext()) {
            int ID = cursor.getInt(0);
            Log.d(TAG,"ID == "+ID);
            String name = cursor.getString(1);
            Log.d(TAG,"name == "+name);
            int age = cursor.getInt(2);
            Log.d(TAG,"age == "+age);
        }
        cursor.close();
        db.close();

    }
4.3 事务使用
使用db.beginTransaction(); db.setTransactionSuccessful(); db.endTransaction();三个方法来进行事务的处理。
简单的一个测试类
// 测试一个数据库事物
    @Test
    public void testTransaction() {
        DatabaseHelper dbh = new DatabaseHelper(appContext);
        SQLiteDatabase db = dbh.getWritableDatabase();
        db.beginTransaction();
        Log.d(TAG,"事物开启!");
        try {
            db.execSQL("update " + Constants.TABLE_NAME +" set age = 114 where id = 1");
            int i = 10 / 0;
            db.execSQL("update " + Constants.TABLE_NAME +" set age = 114 where id = 2");
            db.setTransactionSuccessful();
            Log.d(TAG,"事物成功!");
        } catch (Exception e) {
            e.printStackTrace();
        } finally {
            db.endTransaction();
            db.close();
            Log.d(TAG,"事物关闭!");
        }
        dao.showByAPI(1);
        dao.showByAPI(2);
    }
看看logcat,首先是进入了 事物开启,然后程序进入了try中,因为除以了一个0所以报错,捕获异常了之后就是进入到finally中关闭了事务,可以发现我们sql中的信息都回滚了,没有改变。

我们把int i = 10 / 0;删了试一试,可以看到成功执行事物。

值得注意的是,事物开启之后,仅有当前的db对象可以执行sql语句,使用Dao类中的方法是无法进行增删改查的,因为对这些得到的db对象上了锁!
总结
到此这篇关于Android中的存储详解的文章就介绍到这了,更多相关Android存储内容请搜索脚本之家以前的文章或继续浏览下面的相关文章希望大家以后多多支持脚本之家!
相关文章
 在各种 Android 热修复方案中,Andfix的即时生效令人印象深刻,它稍显另类, 并不需要重新启动,而是在加载补丁后直接对方法进行替换就可以完成修复,然而它的使用限制也遭遇到更多的质疑2021-06-06
 这篇文章主要给大家讲了Android APP性能优化相关的思考以及优化重点分析,需要的朋友参考下吧。2017-12-12
 牛顿摆大家应该都不陌生,也叫碰碰球、永动球(理论情况下),那么今天我们用Flutter实现这么一个理论中的永动球,可以作为加载Loading使用,需要的可以参考一下2022-04-04
 这篇文章主要介绍了Android桌面组件App Widget用法,较为深入浅出的分析了Android桌面组件App Widget的功能、定义及使用技巧,具有一定参考借鉴价值,需要的朋友可以参考下2015-09-09
 这篇文章主要为大家详细介绍了Android学习教程之日历控件操作代码,具有一定的参考价值,感兴趣的小伙伴们可以参考一下2016-11-11
 这篇文章主要为大家介绍了Android Intent传递大量数据出现问题解决,有需要的朋友可以借鉴参考下,希望能够有所帮助,祝大家多多进步,早日升职加薪2022-07-07
 ViewStub是Android布局优化中一个很不错的标签/控件,直接继承自View。虽然Android开发人员基本上都听说过,但是真正用的可能不多。今天我们就来详细探讨下ViewStub的使用2016-09-09
 所谓单点登录就是指的同一个账户(id)不能在一个以上的设备上登录对应的用户系统(排除web端和移动端可以同时登录的情况),例如:用户m在A设备登录并保持登录状态,然后又在B设备登录,此时A应该要强制下线,m无法在A设备上继续执行用户相关的操作,下面来一起看看吧。2016-11-11
 这篇文章主要介绍了Android中各级目录的作用,有需要的朋友可以参考一下2013-12-12
 这篇文章主要介绍了Android仿小米安全中心检测进度条效果,具有一定的参考价值,感兴趣的小伙伴们可以参考一下2016-10-10


最新评论