
SpringSecurity OAuth2单点登录和登出的实现
Spring Security OAuth 最新官方已经不再维护,以下内容只用于学习记录。
GitHub:shpunishment/spring-security-oauth2-demo
1. 单点登录
单点登录即有多个子系统,有一个认证中心。当访问其中任意一个子系统时,如果发现未登录,就跳到认证中心进行登录,登录完成后再跳回该子系统。此时访问其他子系统时,就已经是登录状态了。登出统一从认证中心登出,登出后各个子系统就无法访问了,需要再次登录。
Spring Security OAuth 建立在Spring Security 之上,所以大部分配置还是在Security中,Security完成对用户的认证和授权,OAuth完成单点登录。
Spring Security OAuth 的单点登录主要靠@EnableOAuth2Sso实现,简化了从资源服务器到认证授权服务器的SSO流程,并使用授权码方式获取。
1.1 使用内存保存客户端和用户信息
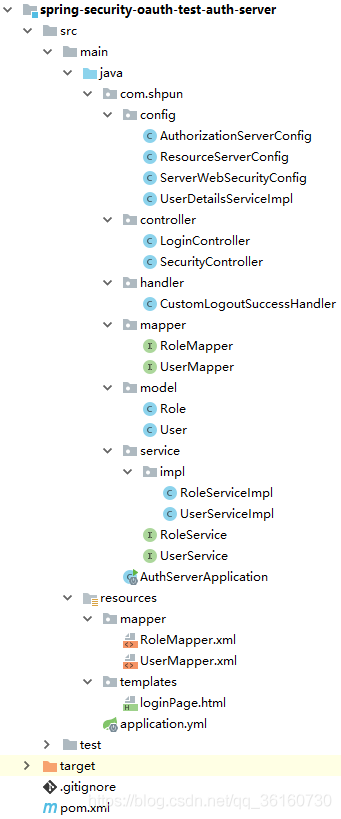
1.1.1 认证中心 auth-server
添加依赖
<dependency>
    <groupId>org.springframework.boot</groupId>
    <artifactId>spring-boot-starter-web</artifactId>
</dependency>
<dependency>
    <groupId>org.springframework.boot</groupId>
    <artifactId>spring-boot-starter-thymeleaf</artifactId>
</dependency>
<dependency>
    <groupId>org.springframework.boot</groupId>
    <artifactId>spring-boot-starter-security</artifactId>
</dependency>
<dependency>
    <groupId>org.springframework.security.oauth</groupId>
    <artifactId>spring-security-oauth2</artifactId>
    <version>2.3.8.RELEASE</version>
</dependency>
<dependency>
    <groupId>org.springframework.boot</groupId>
    <artifactId>spring-boot-starter-data-redis</artifactId>
</dependency>
<!--spring2.0集成redis所需common-pool2-->
<dependency>
    <groupId>org.apache.commons</groupId>
    <artifactId>commons-pool2</artifactId>
    <version>2.4.2</version>
</dependency>
<dependency>
    <groupId>com.alibaba</groupId>
    <artifactId>fastjson</artifactId>
    <version>1.2.60</version>
</dependency>
application.yml
server:
  port: 8000
  servlet:
    context-path: /auth-server
	session:
      cookie:
        name: oauth-auth-server

spring:
  redis:
    # Redis默认情况下有16个分片,这里配置具体使用的分片,默认是0
    database: 0
    host: localhost
    port: 6379
    # 连接密码(默认为空)
    password:
    # 连接超时时间(毫秒)
    timeout: 10000ms
    lettuce:
      pool:
        # 连接池最大连接数(使用负值表示没有限制) 默认 8
        max-active: 8
        # 连接池最大阻塞等待时间(使用负值表示没有限制) 默认 -1
        max-wait: -1
        # 连接池中的最大空闲连接 默认 8
        max-idle: 8
        # 连接池中的最小空闲连接 默认 0
        min-idle: 0
添加授权服务器配置,主要令牌路径的安全性,客户端详情和令牌存储。
这里配置了一个客户端,支持授权码模式和刷新Token,并且将Token存在Redis中。
@Configuration
@EnableAuthorizationServer
public class AuthorizationServerConfig extends AuthorizationServerConfigurerAdapter {

    private static final String RESOURCE_ID = "resource-1";

    @Autowired
    private PasswordEncoder passwordEncoder;

    @Autowired
    private RedisConnectionFactory redisConnectionFactory;

    /**
     * 配置授权服务器的安全性,令牌端点的安全约束
     *
     * @param security
     * @throws Exception
     */
    @Override
    public void configure(AuthorizationServerSecurityConfigurer security) throws Exception {
        security
                // 开启 /oauth/check_token
                .tokenKeyAccess("permitAll()")
                // 开启 /oauth/token_key
                .checkTokenAccess("isAuthenticated()")
                // 允许表单认证
                // 如果配置,且url中有client_id和client_secret的,则走 ClientCredentialsTokenEndpointFilter
                // 如果没有配置,但是url中没有client_id和client_secret的,走basic认证保护
                .allowFormAuthenticationForClients();
    }

    /**
     * 配置客户端,可存在内存和数据库中
     *
     * @param clients
     * @throws Exception
     */
    @Override
    public void configure(ClientDetailsServiceConfigurer clients) throws Exception {
        clients
                .inMemory()
                .withClient("client_1")
                .resourceIds(RESOURCE_ID)
                .authorizedGrantTypes("authorization_code", "refresh_token")
                .scopes("read")
                .authorities("client")
                .secret(passwordEncoder.encode("123456"))
                // 必须添加,会和请求时重定向地址匹配
                .redirectUris("http://localhost:8001/service1/login")
                // 自动批准,在登录成功后不会跳到批准页面,让资源所有者批准
                //.autoApprove(true);
    }

    /**
     *
     * 配置授权服务器端点的非安全功能,例如令牌存储,令牌自定义,用户批准和授予类型
     *
     * @param endpoints
     * @throws Exception
     */
    @Override
    public void configure(AuthorizationServerEndpointsConfigurer endpoints) throws Exception {
        endpoints
                // 令牌存在redis
                .tokenStore(tokenStore());
    }

	/**
     * 配置redis,使用redis存token
     * @return
     */
    @Bean
    public TokenStore tokenStore(){
        return new RedisTokenStore(redisConnectionFactory);
    }
}
添加资源服务器配置,主要配置资源id和需要Token验证的url
对于相同的url,如果二者都配置了验证,则优先进入ResourceServerConfigurerAdapter,会被 OAuth2AuthenticationProcessingFilter 处理,进行token验证;而不会进行WebSecurityConfigurerAdapter 的表单认证等。
@Configuration
@EnableResourceServer
public class ResourceServerConfig extends ResourceServerConfigurerAdapter {

    private static final String RESOURCE_ID = "resource-1";

    /**
     * 添加特定于资源服务器的属性
     *
     * @param resources
     */
    @Override
    public void configure(ResourceServerSecurityConfigurer resources) throws Exception {
        resources
                .resourceId(RESOURCE_ID);
    }

    /**
     * 使用此配置安全资源的访问规则,配置需要token验证的url。 默认情况下,所有不在"/oauth/**"中的资源都受到保护。
     *
     * @param http
     * @throws Exception
     */
    @Override
    public void configure(HttpSecurity http) throws Exception {
        // 只有 /security/getUserInfo 需要token验证
        http
                .requestMatchers().antMatchers("/security/getUserInfo")
                .and()
                .authorizeRequests()
                .anyRequest().authenticated();
    }
}
security配置,用户数据,自定义登录页,成功失败Handler,session,配置非受保护URL等。
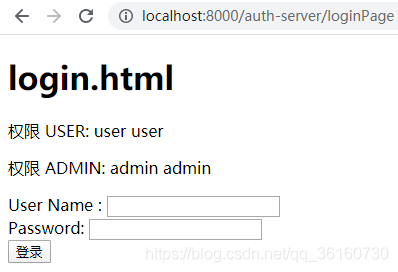
这里添加了两个用户以及登录页等配置。
@Configuration
public class ServerWebSecurityConfig extends WebSecurityConfigurerAdapter {

    /**
     * 认证管理器配置,用于信息获取来源(UserDetails)以及密码校验规则(PasswordEncoder)
     *
     * @param auth
     * @throws Exception
     */
    @Override
    protected void configure(AuthenticationManagerBuilder auth) throws Exception {
        auth
                // 使用内存认证,在内存中保存两个用户
                .inMemoryAuthentication()
                .passwordEncoder(passwordEncoder())
                // admin 拥有ADMIN和USER的权限
                .withUser("admin").password(passwordEncoder().encode("admin")).roles("ADMIN", "USER")
                .and()
                // user 拥有USER的权限
                .withUser("user").password(passwordEncoder().encode("user")).roles("USER");
    }

    /**
     * 核心过滤器配置,更多使用ignoring()用来忽略对静态资源的控制
     * @param web
     * @throws Exception
     */
    @Override
    public void configure(WebSecurity web) throws Exception {
        web
                .ignoring()
                .antMatchers("/static/js/**");
    }

    /**
     * 安全过滤器链配置,自定义安全访问策略
     * @param http
     * @throws Exception
     */
    @Override
    protected void configure(HttpSecurity http) throws Exception {
        http
                .authorizeRequests()
                // /login 和 /oauth/authorize 路径配置为不需要任何身份验证,其他所有路径必须经过验证
                .antMatchers("/login", "/oauth/authorize").permitAll()
                // 其他请求都需要已认证
                .anyRequest().authenticated()
                .and()
                // 使用表单登录
                .formLogin()
                // 自定义username 和password参数
                .usernameParameter("login_username")
                .passwordParameter("login_password")
                // 自定义登录页地址
                .loginPage("/loginPage")
                // 验证表单的地址,由过滤器 UsernamePasswordAuthenticationFilter 拦截处理
                .loginProcessingUrl("/login")
                .permitAll()
                .and()
                .csrf().disable();
    }

    @Bean
    public static BCryptPasswordEncoder passwordEncoder() {
        return new BCryptPasswordEncoder();
    }
}
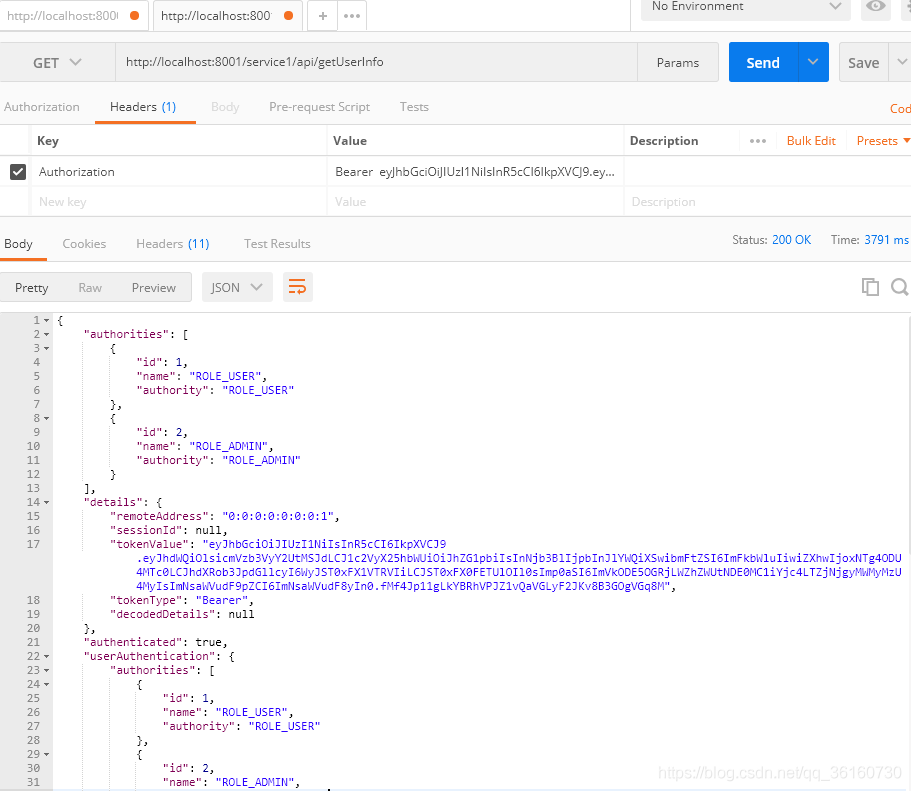
获取当前用户信息,供客户端获取
@RestController
@RequestMapping("/security")
public class SecurityController {
    @GetMapping("/getUserInfo")
    @ResponseBody
    public Principal getUserInfo(Principal principal) {
        return principal;
    }
}
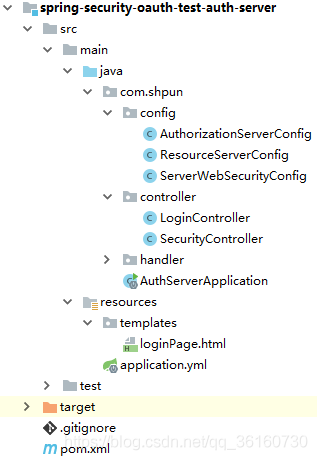
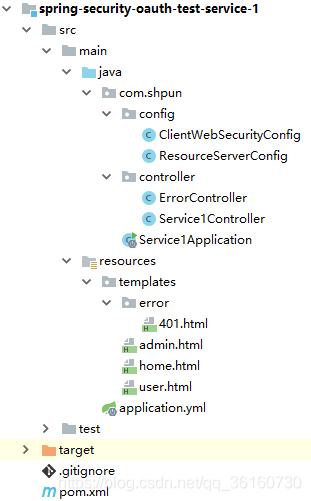
1.1.2 子系统 service-1
添加依赖
<dependency>
    <groupId>org.springframework.boot</groupId>
    <artifactId>spring-boot-starter-web</artifactId>
</dependency>

<dependency>
    <groupId>org.springframework.boot</groupId>
    <artifactId>spring-boot-starter-thymeleaf</artifactId>
</dependency>

<dependency>
    <groupId>org.springframework.security.oauth.boot</groupId>
    <artifactId>spring-security-oauth2-autoconfigure</artifactId>
    <version>2.1.13.RELEASE</version>
</dependency>
application.yml
server:
  port: 8001
  servlet:
    context-path: /service1
	session:
      cookie:
        name: oauth-service-1

security:
  oauth2:
    client:
      clientId: client_1
      clientSecret: 123456
      # 获取访问令牌的URI
      accessTokenUri: http://localhost:8000/auth-server/oauth/token
      # 将用户重定向到的授权URI
      userAuthorizationUri: http://localhost:8000/auth-server/oauth/authorize
    resource:
      # 获取当前用户详细信息
      userInfoUri: http://localhost:8000/auth-server/security/getUserInfo
security配置,如果需要对service-1的url进行控制,需要添加 WebSecurityConfigurerAdapter 配置,可配置子系统中哪些接口需要auth-server的认证,配置非受保护URL等。
@Configuration
// @EnableOAuth2Sso 注解 在继承 WebSecurityConfigurerAdapter 类的上面时
// 代表着在该子类配置的基础上增强 OAuth2Sso 相关配置。
@EnableOAuth2Sso
@EnableGlobalMethodSecurity(prePostEnabled = true)
public class ClientWebSecurityConfig extends WebSecurityConfigurerAdapter {
/**
* 安全过滤器链配置,自定义安全访问策略。可配置客户端不受保护的资源
*
* @param http
* @throws Exception
*/
@Override
public void configure(HttpSecurity http) throws Exception {
http
.antMatcher("/**")
.authorizeRequests()
// 访问 / /home 不用认证
.antMatchers("/", "/home").permitAll()
.anyRequest().authenticated()
.and()
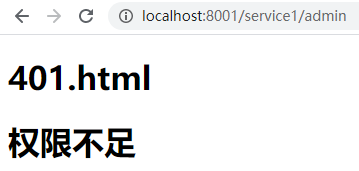
// 权限不足跳转 /401
.exceptionHandling().accessDeniedPage("/401");
}
/**
* 核心过滤器配置,更多使用ignoring()用来忽略对静态资源的控制和过滤微服务间feign的接口
*
* @param web
* @throws Exception
*/
@Override
public void configure(WebSecurity web) throws Exception {
web
.ignoring()
.antMatchers("/js/**");
}
}
客户端资源服务器配置,只有 /api/* 需要token验证
@Configuration
@EnableResourceServer
public class ResourceServerConfig extends ResourceServerConfigurerAdapter {

    private static final String RESOURCE_ID = "resource-1";

    /**
     * 添加特定于资源服务器的属性
     *
     * @param resources
     */
    @Override
    public void configure(ResourceServerSecurityConfigurer resources) throws Exception {
        resources
                .resourceId(RESOURCE_ID);
    }

    /**
     * 使用此配置安全资源的访问规则,配置需要token验证的url。 默认情况下,所有不在"/oauth/**"中的资源都受到保护。
     *
     * @param http
     * @throws Exception
     */
    @Override
    public void configure(HttpSecurity http) throws Exception {
        // /api/* 都需要token验证,会被 OAuth2AuthenticationProcessingFilter 处理
        http
                .requestMatchers()
                .antMatchers("/api/*")
                .and()
                .authorizeRequests()
                .anyRequest().authenticated();
    }
}
service1控制器
@Controllerpublic class Service1Controller {<!--{C}%3C!%2D%2D%20%2D%2D%3E--> @RequestMapping(path = {<!--{C}%3C!%2D%2D%20%2D%2D%3E-->"/", "/home"}) public ModelAndView home() {<!--{C}%3C!%2D%2D%20%2D%2D%3E--> return new ModelAndView("home"); } @PreAuthorize("hasRole('USER')") @RequestMapping("/user") public ModelAndView user() {<!--{C}%3C!%2D%2D%20%2D%2D%3E--> return new ModelAndView("user"); } @PreAuthorize("hasRole('ADMIN')") @RequestMapping("/admin") public ModelAndView admin() {<!--{C}%3C!%2D%2D%20%2D%2D%3E--> return new ModelAndView("admin"); } /** * 测试 /api/* 是否被资源服务器拦截,需要token * @return */ @GetMapping("/api/getUserInfo") @ResponseBody public Principal getUserInfo() {<!--{C}%3C!%2D%2D%20%2D%2D%3E--> return SecurityContextHolder.getContext().getAuthentication(); } @GetMapping("/api2/getUserInfo") @ResponseBody public Principal getUserInfo2() {<!--{C}%3C!%2D%2D%20%2D%2D%3E--> return SecurityContextHolder.getContext().getAuthentication(); }}@Controller
public class Service1Controller {

    @RequestMapping(path = {"/", "/home"})
    public ModelAndView home() {
        return new ModelAndView("home");
    }

    @PreAuthorize("hasRole('USER')")
    @RequestMapping("/user")
    public ModelAndView user() {
        return new ModelAndView("user");
    }

    @PreAuthorize("hasRole('ADMIN')")
    @RequestMapping("/admin")
    public ModelAndView admin() {
        return new ModelAndView("admin");
    }

    /**
     * 测试 /api/* 是否被资源服务器拦截,需要token
     * @return
     */
    @GetMapping("/api/getUserInfo")
    @ResponseBody
    public Principal getUserInfo() {
        return SecurityContextHolder.getContext().getAuthentication();
    }

    @GetMapping("/api2/getUserInfo")
    @ResponseBody
    public Principal getUserInfo2() {
        return SecurityContextHolder.getContext().getAuthentication();
    }
}
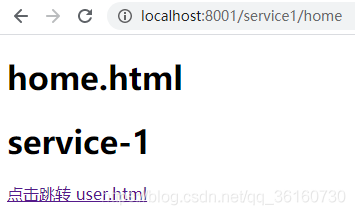
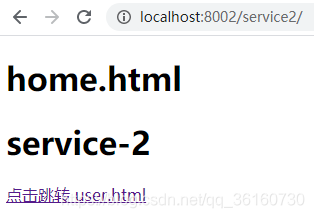
1.1.3 测试
service-2根据service-1复制一遍。
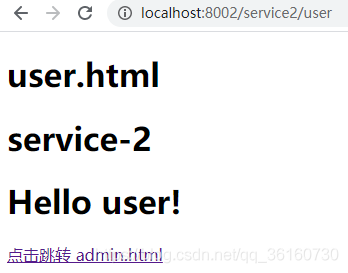
service-1和service-2不用登录即可访问 / /home
访问 /user 需要认证的资源,会先到auth-server进行认证
资源所有者批准

批准后才能访问到 /user
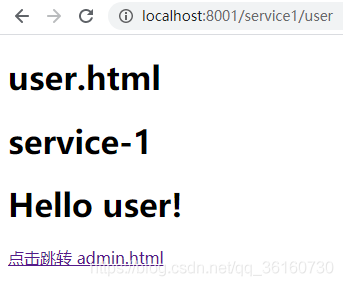
service-2的 /user 也可访问,即实现了单点登录
访问 /admin 用户权限不足
1.2 使用数据库保存客户端和用户信息
只需要修改auth-server中客户端和用户信息的获取方式。
用户信息部分,修改security配置,参考 Spring Security 使用 中的使用数据库保存用户信息。
由于将Token等信息存在了Redis中,所以在数据库中只需要保存客户端信息。修改 AuthorizationServerConfig
@Autowired
private DataSource dataSource;

@Override
public void configure(ClientDetailsServiceConfigurer clients) throws Exception {
    clients
            .withClientDetails(clientDetails(dataSource));
}

/**
 * 获取客户端详细信息服务,JDBC实现
 * @return
 */
@Bean
public ClientDetailsService clientDetails(DataSource dataSource) {
    return new JdbcClientDetailsService(dataSource);
}
添加表和数据,密码使用BCrypt加密,数据和使用内存时一致。
CREATE TABLE `oauth_client_details`  (
  `client_id` varchar(128) CHARACTER SET utf8 COLLATE utf8_general_ci NOT NULL,
  `resource_ids` varchar(256) CHARACTER SET utf8 COLLATE utf8_general_ci NULL DEFAULT NULL,
  `client_secret` varchar(256) CHARACTER SET utf8 COLLATE utf8_general_ci NULL DEFAULT NULL,
  `scope` varchar(256) CHARACTER SET utf8 COLLATE utf8_general_ci NULL DEFAULT NULL,
  `authorized_grant_types` varchar(256) CHARACTER SET utf8 COLLATE utf8_general_ci NULL DEFAULT NULL,
  `web_server_redirect_uri` varchar(256) CHARACTER SET utf8 COLLATE utf8_general_ci NULL DEFAULT NULL,
  `authorities` varchar(256) CHARACTER SET utf8 COLLATE utf8_general_ci NULL DEFAULT NULL,
  `access_token_validity` int(11) NULL DEFAULT NULL,
  `refresh_token_validity` int(11) NULL DEFAULT NULL,
  `additional_information` varchar(4096) CHARACTER SET utf8 COLLATE utf8_general_ci NULL DEFAULT NULL,
  `autoapprove` varchar(256) CHARACTER SET utf8 COLLATE utf8_general_ci NULL DEFAULT NULL,
  PRIMARY KEY (`client_id`) USING BTREE
) ENGINE = InnoDB CHARACTER SET = utf8 COLLATE = utf8_general_ci ROW_FORMAT = Compact;

INSERT INTO `oauth_client_details` VALUES ('client_1', 'resource-1', '$2a$10$TfM5Bisse4ewbmIDfqZcxuYl5dI39/lEzzvkzlxFELKglHQM78FIu', 'read', 'authorization_code,refresh_token', 'http://localhost:8001/service1/login,http://localhost:8002/service2/login', NULL, NULL, NULL, NULL, NULL);
效果与使用内存时一致。
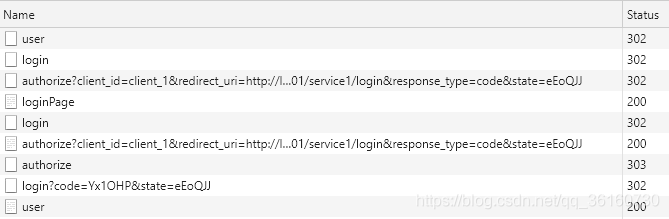
1.3 单点登录流程
打开F12会看到以下重定向过程,可看到大致步骤:
- 请求授权码,判断未登录,重定向登录页
- 登录成功,重定向继续请求授权码,未被资源所有者批准,返回批准页面
- 资源所有者批准,重定向返回授权码
- 客户端获取到授权码,请求Token
- 获取到Token,重定向 /user
1.2.1 请求授权码,判断未登录,重定向登录页
访问客户端受保护资源 localhost:8001/service1/user,未登录重定向到 localhost:8001/service1/login 进行登录认证,因为配置了单点登录@EnableOAuth2Sso,所以单点登录拦截器会读取授权服务器的配置,发起获取授权码请求
http://localhost:8000/auth-server/oauth/authorize?client_id=client_1&redirect_uri=http://localhost:8001/service1/login&response_type=code&state=eEoQJJ
被auth-server的 AuthorizationEndpoint.authorize() 处理,因为未登录认证,抛出异常
if (!(principal instanceof Authentication) || !((Authentication) principal).isAuthenticated()) {
	throw new InsufficientAuthenticationException(
			"User must be authenticated with Spring Security before authorization can be completed.");
}
异常在 ExceptionTranslationFilter.doFilter() 中处理
handleSpringSecurityException(request, response, chain, ase);
调用 LoginUrlAuthenticationEntryPoint.commence() 方法,获取登录页地址,并重定向
redirectUrl = buildRedirectUrlToLoginPage(request, response, authException);
1.2.2 登录成功,重定向继续请求授权码,未被资源所有者批准,返回批准页面
在auth-server中用户密码由 AbstractAuthenticationProcessingFilter.doFilter() 处理,UsernamePasswordAuthenticationFilter 继承自 AbstractAuthenticationProcessingFilter,在父类 doFilter() 方法中,会调用子类实现的 attemptAuthentication 方法,获取认证信息
authResult = attemptAuthentication(request, response);
在 attemptAuthentication() 方法中,将用户名和密码封装成token并认证,并添加额外信息后,进行认证
this.getAuthenticationManager().authenticate(authRequest);
getAuthenticationManager() 方法获取 AuthenticationManager 的实现类 ProviderManager,在 authenticate() 方法中,找到合适的 AuthenticationProvider 处理认证,这里是 DaoAuthenticationProvider,它父类 AbstractUserDetailsAuthenticationProvider 实现了该方法
result = provider.authenticate(authentication);
父类会调用 retrieveUser() 方法检索用户,实现在 DaoAuthenticationProvider
user = retrieveUser(username,(UsernamePasswordAuthenticationToken) authentication);
这里是从内存或数据库中获取用户,然后进行密码校验,成功后,将信息保存到Authentication,并返回。调用成功Handler,记住我等等。
默认登录成功,会重定向之前请求的地址
http://localhost:8000/auth-server/oauth/authorize?client_id=client_1&redirect_uri=http://localhost:8001/service1/login&response_type=code&state=eEoQJJ
再次被auth-server的 AuthorizationEndpoint.authorize() 处理,这时有用户认证信息,获取client信息,进行检查,检查资源所有者是否批准(客户端可设置是否自动批准)
如果未批准,返回批准页,请求转发 forward:/oauth/confirm_access
return getUserApprovalPageResponse(model, authorizationRequest, (Authentication) principal);
1.2.3 资源所有者批准,重定向返回授权码
用户批准后,被 AuthorizationEndpoint.approveOrDeny() 方法处理,返回授权码,并重定向用户设置的地址(/login),并带上code和state
return getAuthorizationCodeResponse(authorizationRequest, (Authentication) principal);
1.2.4 客户端获取到授权码,请求Token
在客户端 AbstractAuthenticationProcessingFilter 中处理
authResult = attemptAuthentication(request, response);
由子类 OAuth2ClientAuthenticationProcessingFilter.attemptAuthentication() 处理,判断token是否为空
accessToken = restTemplate.getAccessToken();
如果为空,在 AuthorizationCodeAccessTokenProvider.obtainAccessToken() 方法中,获取返回的授权码,向auth-server请求Token
return retrieveToken(request, resource, getParametersForTokenRequest(resource, request),getHeadersForTokenRequest(request));
在auth-server中 TokenEndpoint.getAccessToken() 方法获取token,进行客户端校验后生成token并返回
OAuth2AccessToken token = getTokenGranter().grant(tokenRequest.getGrantType(), tokenRequest);
1.2.5 获取到Token,重定向 /user
回到在客户端 OAuth2ClientAuthenticationProcessingFilter.attemptAuthentication() 中,获取到token后,带上token,向auth-server请求用户信息。
默认Token是使用uuid,生成用于认证的token和刷新的Token。认证Token默认12小时过期,刷新的Token默认30天过期。
OAuth2Authentication result = tokenServices.loadAuthentication(accessToken.getValue());
在auth-server 被 OAuth2AuthenticationProcessingFilter 处理,从头部获取并验证token后,完成该请求。
客户端获取到用户信息,在客户端重新完成登录的流程,最后在默认的登录成功Handler中获取到重定向地址(即 /user),并重定向。
1.3 JWT Token
1.3.1 资源服务器未添加tokenServices
只需要修改auth-server中授权服务器。
添加依赖
<dependency>
    <groupId>org.springframework.security</groupId>
    <artifactId>spring-security-jwt</artifactId>
    <version>1.0.11.RELEASE</version>
</dependency>
自定义生成token携带的信息
@Component
public class CustomTokenEnhancer implements TokenEnhancer {
    @Override
    public OAuth2AccessToken enhance(OAuth2AccessToken accessToken, OAuth2Authentication authentication) {
        final Map<String, Object> additionalInfo = new HashMap<>(2);
        UserDetails user = (UserDetails) authentication.getUserAuthentication().getPrincipal();
        additionalInfo.put("userName", user.getUsername());
        additionalInfo.put("authorities", user.getAuthorities());
        ((DefaultOAuth2AccessToken) accessToken).setAdditionalInformation(additionalInfo);
        return accessToken;
    }
}
修改 AuthorizationServerConfig
@Autowired
private CustomTokenEnhancer customTokenEnhancer;

@Autowired
private AuthenticationManager authenticationManager;

@Override
public void configure(AuthorizationServerEndpointsConfigurer endpoints) throws Exception {
    // token增强配置
    TokenEnhancerChain tokenEnhancerChain = new TokenEnhancerChain();
    tokenEnhancerChain.setTokenEnhancers(Arrays.asList(customTokenEnhancer, jwtAccessTokenConverter()));

    endpoints
            // 令牌存在redis
            .tokenStore(tokenStore())
            .tokenEnhancer(tokenEnhancerChain)
            // 密码授权方式时需要
            .authenticationManager(authenticationManager)
            // /oauth/token 运行get和post
            .allowedTokenEndpointRequestMethods(HttpMethod.GET, HttpMethod.POST);
}

/**
 * 用来生成token的转换器
 * @return
 */
@Bean
public JwtAccessTokenConverter jwtAccessTokenConverter() {
   JwtAccessTokenConverter jwtAccessTokenConverter = new JwtAccessTokenConverter();
   // 对称加密,设置签名,使用下面这个值作为密钥
   jwtAccessTokenConverter.setSigningKey("oauth");
   return jwtAccessTokenConverter;
}
添加客户端2,支持密码授权方式
INSERT INTO `oauth_client_details`(`client_id`, `resource_ids`, `client_secret`, `scope`, `authorized_grant_types`, `web_server_redirect_uri`, `authorities`, `access_token_validity`, `refresh_token_validity`, `additional_information`, `autoapprove`) VALUES ('client_2', 'resource-1', '$2a$10$TfM5Bisse4ewbmIDfqZcxuYl5dI39/lEzzvkzlxFELKglHQM78FIu', 'read', 'password,refresh_token', NULL, NULL, NULL, NULL, NULL, NULL);
测试
使用密码模式获取token

使用token获请求资源服务器保护的接口
流程
在auth-server的 TokenEndpoint 中验证信息并获取token。然后带着token请求,在service-1中被 OAuth2AuthenticationProcessingFilter 处理,doFilter() 方法会提取并验证token。
按上面的配置,并没有在资源服务器中配置tokenServices
Authentication authResult = authenticationManager.authenticate(authentication);
所以在加载 Authentication 的时候,tokenServices 为 UserInfoTokenServices,就会调用配置的 userInfoUri 去auth-server获取用户信息
OAuth2Authentication auth = tokenServices.loadAuthentication(token);
1.3.2 资源服务器添加tokenServices
auth-server
修改ResourceServerConfig
@Autowired
private TokenStore tokenStore;

@Override
public void configure(ResourceServerSecurityConfigurer resources) throws Exception {
    DefaultTokenServices defaultTokenServices = new DefaultTokenServices();
    defaultTokenServices.setTokenStore(tokenStore);

    resources
            .resourceId(RESOURCE_ID)
            .tokenServices(defaultTokenServices);
}
service-1
添加依赖
<dependency>
    <groupId>org.springframework.boot</groupId>
    <artifactId>spring-boot-starter-data-redis</artifactId>
</dependency>

<!--spring2.0集成redis所需common-pool2-->
<dependency>
    <groupId>org.apache.commons</groupId>
    <artifactId>commons-pool2</artifactId>
    <version>2.4.2</version>
</dependency>
修改application.yml
spring:
  redis:
    # Redis默认情况下有16个分片,这里配置具体使用的分片,默认是0
    database: 0
    host: localhost
    port: 6379
    # 连接密码(默认为空)
    password:
    # 连接超时时间(毫秒)
    timeout: 10000ms
    lettuce:
      pool:
        # 连接池最大连接数(使用负值表示没有限制) 默认 8
        max-active: 8
        # 连接池最大阻塞等待时间(使用负值表示没有限制) 默认 -1
        max-wait: -1
        # 连接池中的最大空闲连接 默认 8
        max-idle: 8
        # 连接池中的最小空闲连接 默认 0
        min-idle: 0
修改 ResourceServerConfig
@Autowired
private RedisConnectionFactory redisConnectionFactory;

@Override
public void configure(ResourceServerSecurityConfigurer resources) throws Exception {
    DefaultTokenServices defaultTokenServices = new DefaultTokenServices();
    defaultTokenServices.setTokenStore(tokenStore());

    resources
            .resourceId(RESOURCE_ID)
            .tokenServices(defaultTokenServices);
}

/**
 * 配置redis,使用redis存token
 * @return
 */
@Bean
public TokenStore tokenStore(){
    return new RedisTokenStore(redisConnectionFactory);
}
流程
在auth-server的 TokenEndpoint 中验证信息并获取token。然后带着token请求,在service-1中被 OAuth2AuthenticationProcessingFilter 处理,doFilter() 方法会提取并验证token。
按上面的配置,并没有在资源服务器中配置tokenServices
Authentication authResult = authenticationManager.authenticate(authentication);
所以在加载 Authentication 的时候,tokenServices 为 DefaultTokenServices,再加上有UserDetails的实现类,可以解析,就不用在调用auth-server
OAuth2Authentication auth = tokenServices.loadAuthentication(token);
2. 单点登出
这里除了部分的资源服务器中配置的api需要token验证,其他还是依赖于Spring Security的认证。而Spring Security是使用Cookie和Session的记录用户。所以可以将认证中心和各个子系统的Cookie设置在同一路径下,在认证中心登出时,将Cookie一并删除,实现认证中心和各个子系统的登出。各子系统需要知道认证中心的登出地址。在这里是http://localhost:8000/auth-server/logout。
修改认证中心和各个子系统的Cookie路径,测试发现,放在 / 下才可实现
server: servlet: session: cookie: path: /server:
  servlet:
    session:
      cookie:
        path: /
在auth-server添加登出成功的Handler
@Component
public class CustomLogoutSuccessHandler extends AbstractAuthenticationTargetUrlRequestHandler implements LogoutSuccessHandler {
    @Override
    public void onLogoutSuccess(HttpServletRequest request, HttpServletResponse response, Authentication authentication) throws IOException, ServletException {
        // 将子系统的cookie删掉
        Cookie[] cookies = request.getCookies();
        if(cookies != null && cookies.length>0){
            for (Cookie cookie : cookies){
                cookie.setMaxAge(0);
                cookie.setPath("/");
                response.addCookie(cookie);
            }
        }
        super.handle(request, response, authentication);
    }
}
修改auth-server的ServerWebSecurityConfig,添加logout配置
@Configuration
public class ServerWebSecurityConfig extends WebSecurityConfigurerAdapter {

    @Autowired
    private CustomLogoutSuccessHandler customLogoutSuccessHandler;

    @Override
    protected void configure(HttpSecurity http) throws Exception {
        http
        		...
                .and()
                // 默认为 /logout
                .logout()
                .logoutSuccessHandler(customLogoutSuccessHandler)
                // 无效会话
                .invalidateHttpSession(true)
                // 清除身份验证
                .clearAuthentication(true)
                .permitAll()
                ...;
    }
}
当然,使用了OAuth发放token,应该也需要使token失效。
@Autowired
private TokenStore tokenStore;

@GetMapping("/revokeToken")
public void revokeToken(HttpServletRequest request) {
    String authHeader = request.getHeader("Authorization");
    if (authHeader != null) {
        String tokenValue = authHeader.replace("Bearer", "").trim();
        OAuth2AccessToken accessToken = tokenStore.readAccessToken(tokenValue);
        tokenStore.removeAccessToken(accessToken);
    }
}
3. 总结
- AuthorizationEndpoint 处理 /oauth/authorize;TokenEndpoint 处理 /oauth/token。
- @EnableOAuth2Sso 会将资源服务器标记为OAuth 2.0的客户端, 它将负责将资源所有者(最终用户)重定向到用户必须输入其凭据的授权服务器。完成后,用户将被重定向回具有授权码的客户端。然后客户端通过调用授权服务器获取授权代码并将其交换为访问令牌。只有在此之后,客户端才能使用访问令牌调用资源服务器。
- @EnableResourceServer 意味着所属的服务需要访问令牌才能处理请求。在调用资源服务器之前,需要先从授权服务器获取访问令牌。
- 在资源服务器中配置的路径,都会被 OAuth2AuthenticationProcessingFilter 处理,获取token。
- 之前一直在纠结,客户端获取到了token,为什么在访问 /user 的请求头中并没有Authorization,亦可请求成功。其实都因为Security。没有在资源服务器中配置的路径,登录认证成功后并不需要携带token,而还是使用Security需要的Cookie和Session。
- 如果资源服务器没有配置tokenService,就会调用配置的userInfoUri去auth-server获取用户信息;如果资源服务器配置了tokenService,再加上有UserDetails的实现类,可以解析,就不用在调用auth-server的接口。
参考:
Spring Security Oauth2和Spring Boot实现单点登录
Spring Security Oauth2 单点登录案例实现和执行流程剖析
Spring Security OAuth2 入门
Spring security. How to log out user (revoke oauth2 token)
从零开始的Spring Security Oauth2(一)
从零开始的Spring Security Oauth2(二)
从零开始的Spring Security Oauth2(三)
Spring Security OAuth2 入门
Spring Security EnableOAuth2Sso注解实现原理
Spring Security OAuth2 使用Redis存储token键值详解
Spring Security OAuth2实现使用JWT
jwt 官网
jwt 解码器
到此这篇关于SpringSecurity OAuth2单点登录和登出的实现的文章就介绍到这了,更多相关SpringSecurity OAuth2单点登录登出内容请搜索脚本之家以前的文章或继续浏览下面的相关文章希望大家以后多多支持脚本之家!
相关文章
 这篇文章主要介绍了java过滤器中Filter,发送请求时,如果有不符合的信息将会被filter进行拦截,如果符合则会进行放行。如果感兴趣可以来学习一下2021-08-08
 这篇文章主要为大家详细介绍了JavaWeb实现用户登录与注册功能,文中示例代码介绍的非常详细,具有一定的参考价值,感兴趣的小伙伴们可以参考一下2021-08-08
 这篇文章主要介绍了基于Java汇总Spock框架Mock静态资源经验,前面讲了 Spock框架Mock对象、方法经验总结,今天分享一下Spock框架中Mock静态资源的实践经验汇总。分成静态资源和混合场景,需要的朋友可以参考一下2022-02-02
 大家好,本篇文章主要讲的是Spring Boot整合邮箱发送邮件实例,感兴趣的同学赶快来看一看吧,对你有帮助的话记得收藏一下2022-02-02
 这篇文章主要介绍了Spring Bean初始化及销毁多种实现方式,文中通过示例代码介绍的非常详细,对大家的学习或者工作具有一定的参考学习价值,需要的朋友可以参考下2019-11-11
SpringBoot定时任务动态扩展ScheduledTaskRegistrar详解
这篇文章主要为大家介绍了SpringBoot定时任务动态扩展ScheduledTaskRegistrar类示例详解,有需要的朋友可以借鉴参考下,希望能够有所帮助,祝大家多多进步,早日升职加薪2023-01-01 本篇文章主要介绍了SpringBoot 中使用JSP的方法示例,小编觉得挺不错的,现在分享给大家,也给大家做个参考。一起跟随小编过来看看吧2018-06-06
 散列表(Hash table,也叫哈希表),是根据关键码值(Key value)而直接进行访问的数据结构。本文将为大家具体介绍一下散列表的原理及其代码实现2022-01-01
 这篇文章主要为大家详细介绍了Retrofit+RxJava实现带进度条的文件下载,具有一定的参考价值,感兴趣的小伙伴们可以参考一下2019-06-06
使用SpringBoot-JPA进行自定义保存及批量保存功能
这篇文章主要介绍了使用SpringBoot-JPA进行自定义的保存及批量保存功能,本文通过实例代码给大家介绍的非常详细,具有一定的参考借鉴价值,需要的朋友可以参考下2019-06-06


最新评论