
WPF使用WrapPanel环绕面板布局
更新时间:2022年02月25日 10:40:19 作者:.NET开发菜鸟
这篇文章介绍了WPF使用WrapPanel环绕面板布局的方法,文中通过示例代码介绍的非常详细。对大家的学习或工作具有一定的参考借鉴价值,需要的朋友可以参考下
WrapPanel:环绕面板
WrapPanel布局面板将各个控件从左至右按照行或列的顺序罗列,当长度或高度不够时就会自动调整进行换行,后续排序按照从上至下或从右至左的顺序进行。
- Orientation——根据内容自动换行。当Orientation属性的值设置为 Horizontal:元素是从左向右排列的,然后自上至下自动换行。当Orientation属性的值设置为Vertical:元素是从上向下排列的,然后从左至右自动换行。
- ItemHeight——所有子元素都一致的高度。每个子元素填充高度的方式取决于它的VerticalAlignment属性、Height属性等。任何比ItemHeight高的元素都将被截断。
- ItemWidth——所有子元素都一致的宽度。每个子元素填充高度的方式取决于它的VerticalAlignment属性、Width属性等。任何比ItemWidth高的元素都将被截断。
1、Orientation属性的值设置为 Horizontal
示例效果图如下2图所示,图1是窗体宽度较小时候的效果,图2是窗体宽度拉大以后的效果

图1
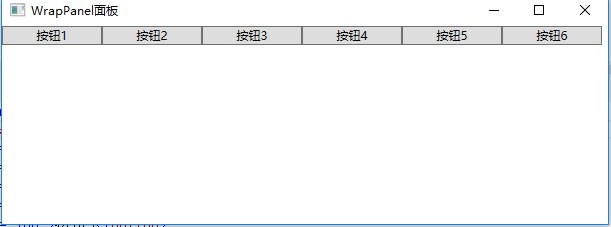
图2
使用XAML代码实现:
<Window x:Class="WpfDemo.MainWindow"
        xmlns="http://schemas.microsoft.com/winfx/2006/xaml/presentation"
        xmlns:x="http://schemas.microsoft.com/winfx/2006/xaml"
        Title="WrapPanel面板" Height="237" Width="525" WindowStartupLocation="CenterScreen">
    <WrapPanel Orientation="Horizontal">
        <Button Width="100">按钮1</Button>
        <Button Width="100">按钮2</Button>
        <Button Width="100">按钮3</Button>
        <Button Width="100">按钮4</Button>
        <Button Width="100">按钮5</Button>
        <Button Width="100">按钮6</Button>
    </WrapPanel>
</Window>
2、Orientation属性的值设置为Vertical
示例效果图如下2图所示,图1是窗体高度较大时候的效果,图2是窗体高度较小时的效果

图1

图2
使用XAML代码实现:
<Window x:Class="WpfDemo.MainWindow"
        xmlns="http://schemas.microsoft.com/winfx/2006/xaml/presentation"
        xmlns:x="http://schemas.microsoft.com/winfx/2006/xaml"
        Title="WrapPanel面板" Height="237" Width="525" WindowStartupLocation="CenterScreen">
    <WrapPanel Orientation="Vertical">
        <Button Width="100">按钮1</Button>
        <Button Width="100">按钮2</Button>
        <Button Width="100">按钮3</Button>
        <Button Width="100">按钮4</Button>
        <Button Width="100">按钮5</Button>
        <Button Width="100">按钮6</Button>
    </WrapPanel>
</Window>
到此这篇关于WPF使用WrapPanel环绕面板布局的文章就介绍到这了。希望对大家的学习有所帮助,也希望大家多多支持脚本之家。
相关文章

详解开源免费且稳定实用的.NET PDF打印组件itextSharp(.NET组件介绍之八)
本篇文章主要介绍了.NET PDF打印组件itextSharp。.NET中实现PDF打印的组件比较多,例如PDFsharp、Report.NET、sharpPDF、itextSharp等等,今天主要简单的介绍itextSharp组件。有兴趣的可以了解一下。2016-12-12
.net生成缩略图及水印图片时出现GDI+中发生一般性错误解决方法
这篇文章主要介绍了.net生成缩略图及水印图片时出现GDI+中发生一般性错误解决方法 ,需要的朋友可以参考下2014-11-11 Redis是一个用的比较广泛的Key/Value的内存数据库,这篇文章主要介绍了详解.NET中使用Redis数据库,有兴趣的可以了解一下。2016-12-12
 c# .net在WEB页中的COOKIES设置技巧,需要的朋友可以参考下。2011-07-07
Repeater绑定dictionary数据源代码及报错解决
为大家讲解下Repeater绑定dictionary数据源以及报错处理的方法,感兴趣的朋友可以参考下哈,希望对你有所帮助2013-04-04 这篇文章主要介绍了如何利用WPF实现文本描边以及外发光的效果,文中的示例代码讲解详细,对我们学习有一定帮助,需要的可以参考一下2022-03-03
 面传值是学习asp.net初期都会面临的一个问题,总的来说有页面传值、存储对象传值、ajax、类、model、表单等。但是一般来说,常用的较简单有QueryString,Session,Cookies,Application,Server.Transfer。2012-12-12
 这些内容是我在学习ASP.Net的时候对Page研究的一些心得,具体的细节没有很详细的探讨,更多的内容请大家参考MSDN,但是我举了一些初学者常犯的错误和出现错误的原因,希望可以给大家带来启发。2009-08-08
 这篇文章主要为大家详细介绍了asp.net的异步加载,文中示例代码介绍的非常详细,具有一定的参考价值,感兴趣的小伙伴们可以参考一下2016-08-08
 .net 操作xml的简单方法及说明,需要的朋友可以参考一下2013-06-06


最新评论