
深度剖析 Vue3 在浏览器的运行原理
前言
上一讲深度解析 Vue3 的响应式机制我们学习了 Vue 响应式的大致原理,响应式就是可以把普通的 JavaScript 对象包裹成响应式对象,这样,我们对对象做的修改,响应式都能够监听到,并且执行 effect 内部注册的函数来执行数据修改之后的效果
那今天我就跟你聊一下 Vue 在浏览器里是如何运行的,照例我们还是对着 Vue 3 的源码来学习,不过源码复杂,为了帮助你理解主要逻辑,我会直接把源码简化再演示
好了废话不多说,我们马上开始;前端框架需要处理的最核心的两个流程,就是首次渲染和数据更新后的渲染
首次渲染
我们知道,想要启动一个 Vue 项目,只需要从 Vue 中引入 createApp,传入 App 组件,并且调用 createApp 返回的 App 实例的 mount 方法,就实现了项目的启动;这个时候 Vue 也完成了首次渲染,代码逻辑如下:
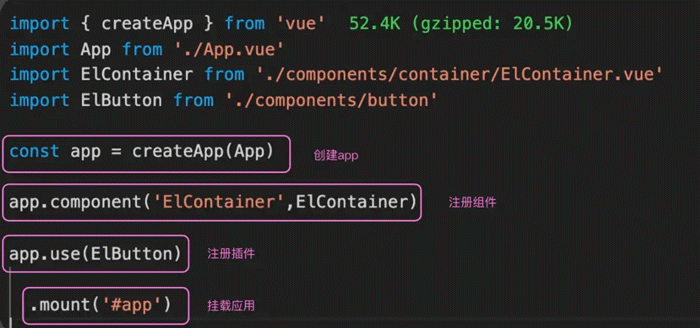
所以 createApp 就是项目的初始化渲染入口
这里就有一个看代码的小技巧,分享给你,我们首次查看源码的时候,可以先把一些无用的信息删除,方便自己梳理主体的逻辑。看 Vue 代码,和今天主题无关的无用信息有哪些,COMPAT 代码是用来兼容 Vue 2 的,DEV 代码是用来调试的,我们可以把这些代码删除之后,得到下面的简化版 createApp 源码
再看思路就比较清晰了
我们使用 ensureRenderer 返回的对象去创建 app,并且重写了app.mount 方法;在 mount 方法内部,我们查找 mount 传递的 DOM 元素,并且调用 ensureRenderer 返回的 mount 方法,进行初始化渲染
如下图所示:
之前我们讲过要会 TypeScript,这时你就能感受到 TypeScript 的好处了,现在即使我们不知道 app.mount 是什么逻辑,也能知道这个函数的参数只能是 Element、ShadowRoot 或者 string 三者之一,也就很好理解内部的 normalizeContainer 就是把你传递的参数统一变为浏览器的 DOM 元素,Typescript 类型带来的好处,我们在读源码的时候会一直感受得到
export const createApp = (...args) => {
    const app = ensureRenderer().createApp(...args);
    const { mount } = app;

    // 重写mount
    app.mount = (containerOrSelector: Element | ShadowRoot | string): any => {
      const container = normalizeContainer(containerOrSelector);
      if (!container) return;
      const component = app._component;

      if (!isFunction(component) && !component.render && !component.template) {
        component.template = container.innerHTML;
      }
      container.innerHTML = "";
      const proxy = mount(container, false, container instanceof SVGElement);

      if (container instanceof Element) {
        container.removeAttribute("v-cloak");

        container.setAttribute("data-v-app", "");
      }
      return proxy;
    };
    return app;
  };
我们继续深入了解 ensureRenderer 方法,以及 ensureRenderer 方法返回的 createApp方法
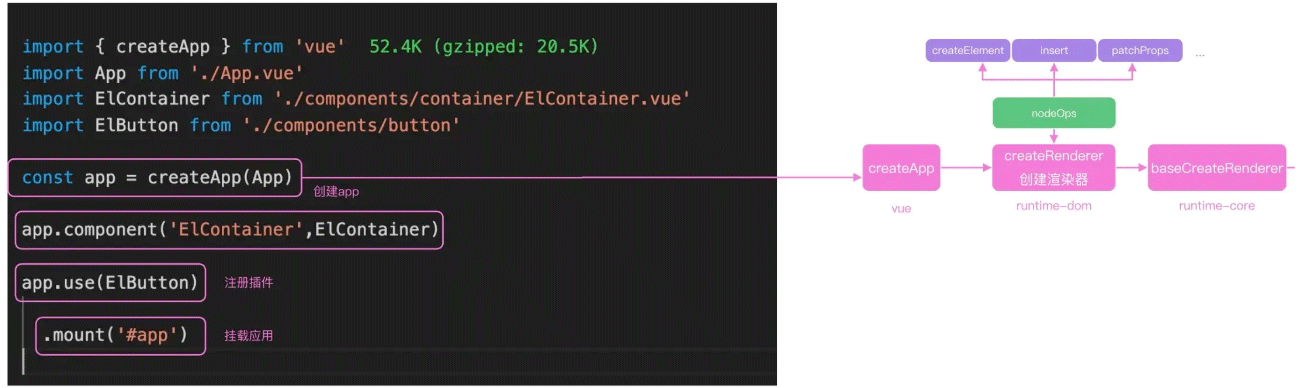
这里 ensureRenderer 函数,内部通过 createRenderer 函数,创建了一个浏览器的渲染器,并且缓存了渲染器 renderer,这种使用闭包做缓存的方式,你在日常开发中也可以借鉴这种思路
createRenderer 函数,我们在自定义渲染器那一讲里学到过,传递的 rendererOptions 就是浏览器里面标签的增删改查 API:
// 浏览器dom操作
import { nodeOps } from "./nodeOps"; // 浏览器dom属性更新
import { patchProp } from "./patchProp";
import { createRenderer } from "@vue/runtime-core";
const rendererOptions = extend({ patchProp }, nodeOps);
let renderer: Renderer<Element | ShadowRoot> | HydrationRenderer;
function ensureRenderer() {
  return (
    renderer ||
    ((renderer = createRenderer < Node),
    Element | (ShadowRoot > rendererOptions))
  );
}
可以看到,createRenderer 函数传递的参数是 nodeOps 和 patchProp 的合并对象
我们继续进入 nodeOps 和 pathProp 也可以看到下面的代码,写了很多方法;通过 ensureRenderer 存储这些操作方法后,createApp 内部就可以脱离具体的渲染平台了,这也是 Vue 3 实现跨端的核心逻辑:
export const nodeOps: Omit<RendererOptions<Node, Element>, 'patchProp'> = {
  insert: (child, parent, anchor) => { parent.insertBefore(child, anchor || null)
  },
  remove: child => {
    const parent = child.parentNode
    if (parent) {
      parent.removeChild(child)
      }
    },
    createElement: (tag, isSVG, is, props): Element => {
      const el = isSVG ? doc.createElementNS(svgNS, tag) : doc.createElement(tag, is ? { is } : undefined)
      if (tag === 'select' && props && props.multiple != null) {
        ;(el as HTMLSelectElement).setAttribute('multiple', props.multiple)

        }
        return el
        },
        createText: text => doc.createTextNode(text),
        createComment: text => doc.createComment(text),
        setText: (node, text) => { node.nodeValue = text },
        setElementText: (el, text) => { el.textContent = text },
        parentNode: node => node.parentNode as Element | null,
        nextSibling: node => node.nextSibling,
        querySelector: selector => doc.querySelector(selector),
        ...
}
然后我们就需要进入到 rumtime-core 模块去看下 createRenderer 是如何工作的
createRenderer 是调用 baseCreateRenderer 创建的,baseCreateRenderer 函数内部有十几个函数,代码行数合计 2000 行左右,这也是我们学习 Vue 源码最复杂的一个函数了
按前面简化源码的思路,先把工具函数的实现折叠起来,精简之后代码主要逻辑其实很简单
我们一起来看
首先获取了平台上所有的 insert、remove 函数,这些函数都是 nodeOps 传递进来的,然后定义了一些列 patch、mount、unmount 函数,通过名字我们不难猜出,这就是 Vue 中更新、渲染组件的工具函数,比如mountElement 就是渲染 DOM 元素、mountComponent 就是渲染组件 updateComponent 就是更新组件
export function createRenderer<
    HostNode = RendererNode,
    HostElement = RendererElement
>(options: RendererOptions<HostNode, HostElement>) {
    return baseCreateRenderer < HostNode, HostElement > (options)
}
function baseCreateRenderer() {
    const { insert: hostInsert,
        remove: hostRemove,
        patchProp: hostPatchProp,
        createElement: hostCreateElement,
        createText: hostCreateText,
        createComment: hostCreateComment,
        setText: hostSetText,
        setElementText: hostSetElementText,
        parentNode: hostParentNode,
        nextSibling: hostNextSibling,
        setScopeId: hostSetScopeId = NOOP,
        cloneNode: hostCloneNode,
        insertStaticContent: hostInsertStaticContent
    } = options
    const patch = () =>... //一个函数
    const processText = () =>...
    const processCommentNode = () =>...
    const processElement = () =>...
    const mountElement = () =>...
    const mountChildren = () =>...
    const patchElement = () =>...
    const patchBlockChildren = () =>...
    const patchProps = () =>...
    const processComponent = () =>...
    const mountComponent = () =>...
    const updateComponent = () =>...
    const setupRenderEffect = () =>...
    const patchChildren = () =>...
    const patchKeyedChildren = () =>...
    const unmount = () =>...
    const unmountComponent = () =>...
    const unmountComponent = () =>...
    const unmountComponent = () =>...
    const unmountComponent = () =>...
    const render: RootRenderFunction = (vnode, container, isSVG) => {
        if (vnode == null) {
            if (container._vnode) {
                unmount(container._vnode, null, null, true)
            }
        } else {
            patch(container._vnode || null, vnode, container, null, null, null, isSV }
        flushPostFlushCbs() container._vnode = vnode
    } return {
        render, hydrate, createApp: createAppAPI(render, hydrate)
    }
}
整个 createApp 函数的执行逻辑如下图所示:

最后返回的 createApp 方法,实际上是 createAPI 的返回值,并且给 createAPI 传递了render 方法;render 方法内部很简单,就是判断 container 容器上有没有 _vnode 属性,如果有的话就执行 unmout 方法,没有的话就执行 patch 方法,最后把 vnode 信息存储在 container._vnode 上
那 createAppAPI 又做了什么呢?我们继续进入 createAppAPI 源码,看下面的代码;内部创建了一个 app 对象,app 上注册了我们熟悉的 use、component 和 mount 等方法:
export function createAppAPI<HostElement>(render: RootRenderFunction, hydrate?: RootHydrateFunction): CreateAppFunction<HostElement> {
    return function createApp(rootComponent, rootProps = null) {
        const context = createAppContext()
        let isMounted = false const app: App = (context.app = {
            _context: context, _instance: null,
            use(plugin: Plugin, ...options: any[]) ,
            component(name: string, component?: Component): any {
                if (!component) {
                    return context.components[name]
                }
                context.components[name] = component return app
            },
            directive(name: string, directive?: Directive)
            mount(rootContainer: HostElement, isHydrate?: boolean, isSVG?: boolean): any {
                if (!isMounted) {
                    const vnode = createVNode(rootComponent as ConcreteComponent, rootProps)
                    vnode.appContext = context // 核心的逻辑
                    if (isHydrate && hydrate) {
                        hydrate(vnode as VNode<Node, Element>, rootContainer as any)
                    } else {
                        render(vnode, rootContainer, isSVG)
                    }
                    return getExposeProxy(vnode.component!) || vnode.component!.proxy
                }
            },
            provide(key, value) { context.provides[key as string] = value return app }
        }) return app
    }
}
可以看到 mount 内部执行的是传递进来的 render 方法,也就是上面的 render 方法
container 就是我们 app.mount 中传递的 DOM 元素,对 DOM 元素进行处理之后,执行 patch 函数实现整个应用的加载
所以我们的下一个任务就是需要搞清楚 patch 函数的执行逻辑
patch 函数
patch 传递的是 container._vnode,也就是上一次渲染缓存的 vnode、本次渲染组件的vnode,以及容器 container;下面就是 patch 函数的代码,核心代码我添加了注释;其中 n1 是上次渲染的虚拟 DOM,n2 是下次要渲染的虚拟 DOM
首先可以把 n1 和 n2 做一次判断,如果虚拟 DOM 的节点类型不同,就直接 unmount 之前的节点;因为比如之前是 Button 组件,现在要渲染 Container 组件,就没有计算 diff的必要,直接把 Button 组件销毁再渲染 Container 即可
如果 n1 和 n2 类型相同,比如都是 Button 组件或者都是 div 标签,我们需要判断具体的类型再去执行不同的函数,比如 processText、processFragment、processElement 以及 processComponent 等函数;
看第 55 行,这里的 ShapeFlags 用到了位运算的知识,我们后面会通过刷算法题的方式介绍,暂时我们只需要知道,ShapeFlags 可以帮助我们快速判断需要操作的类型就可以了
const patch: PatchFn = (
    n1,
    n2,
    container,
    anchor = null,
    parentComponent = null,
    parentSuspense = null,
    isSVG = false,
    slotScopeIds = null,
    optimized = __DEV__ && isHmrUpdating ? false : !!n2.dynamicChildren
) => { // 两次虚拟dom完全一样 啥也不用干
    if (n1 === n2) { return }// 虚拟dom节点类型不一样, unmount老的虚拟dom,并且n1赋值null if (n1 && !isSameVNodeType(n1, n2)) { anchor = getNextHostNode(n1) unmount(n1, parentComponent, parentSuspense, true)n1 = null }// n2是要渲染的虚拟dom,我们获取type,ref和shapeFlag const { type, ref, shapeFlag } = n2 switch (type) { case Text: // 文本
    processText(n1, n2, container, anchor) break case Comment: // 注释
    processCommentNode(n1, n2, container, anchor) break case Static: // 静态节点
    if (n1 == null) {
        mountStaticNode(n2, container, anchor, isSVG)
    } else if (__DEV__) {
        patchStaticNode(n1, n2, container, isSVG)
    }
    break
    case Fragment: processFragment(n1, n2, container, anchor, parentComponent, parentSuspense, isSVG, slotScopeIds, optimized)
break default: // 运运算判断操作类型
if (shapeFlag & ShapeFlags.ELEMENT) { // html标签
    processElement(n1, n2, container, anchor, parentComponent, parentSuspense, isSVG, slotScopeIds, optimized)
} else if (shapeFlag & ShapeFlags.COMPONENT) { // 组件
    processComponent(n1, n2, container, anchor, parentComponent, parentSuspense, isSVG, slotScopeIds, optimized)
} else if (shapeFlag & ShapeFlags.TELEPORT) {
    (type as typeof TeleportImpl).process(
        n1 as TeleportVNode, n2 as TeleportVNode,
        container,
        anchor,
        parentComponent,
        parentSuspense,
        isSVG,
        slotScopeIds, optimized, internals
    )
} else if (
    __FEATURE_SUSPENSE__ && shapeFlag & ShapeFlags.SUSPENSE
) {
    ;
    (type as typeof SuspenseImpl).process(
        n1,
        n2,
        container,
        anchor,
        parentComponent,
        parentSuspense,
        isSVG,
        slotScopeIds,
        optimized,
        internals
    )
}
else if (__DEV__) { warn('Invalid VNode type:', type, `(${typeof type})`) }
}// set ref if (ref != null && parentComponent) { setRef(ref, n1 && n1.ref, parentSuspense, n2 || n1, !n2) }
代码的整体执行逻辑如下图所示:

我们首次渲染的 App 是一个组件,所以要执行的就是 processComponent 方法
processComponent 方法
那我们继续进入到 processComponent 代码内部,看下面的代码。首次渲染的时候,n1就是 null,所以会执行 mountComponent;如果是更新组件的时候,n1 就是上次渲染的 vdom,需要执行 updateComponent
const processComponent = (
    n1: VNode | null,
    n2: VNode,
    container: RendererElement,
    anchor: RendererNode | null,
    parentComponent: ComponentInternalInstance | null,
    parentSuspense: SuspenseBoundary | null,
    isSVG: boolean,
    slotScopeIds: string[] | null,
    optimized: boolean) => {
    n2.slotScopeIds = slotScopeIds
    if (n1 == null) {
        if (n2.shapeFlag & ShapeFlags.COMPONENT_KEPT_ALIVE) {
            ; (parentComponent!.ctx as KeepAliveContext).activate(n2, container, anchor, isSVG, optimized)
        }
        else {
            mountComponent(n2, container, anchor, parentComponent, parentSuspense, isSVG, optimized)
        }
    } else {
        updateComponent(n1, n2, optimized)
    }
}
updateComponent 是虚拟 DOM 的逻辑,我们会在下一讲详细剖析,这一讲主要讲首次渲染的过程
所以我们进入 mountComponent 函数中,可以看到 mountComponent 函数内部会对组件的类型进行一系列的判断,还有一些对 Vue 2 的兼容代码,核心的渲染逻辑就是 setupComponent 函数和 setupRenderEffect 函数
import { setupComponent } from './component'
const mountComponent: MountComponentFn = () => {
    // 2.x compat may pre-creaate the component instance before actually
    // mounting
    const compatMountInstance = __COMPAT__ && initialVNode.isCompatRoot && initialVNode.component
    const instance: ComponentInternalInstance = compatMountInstance || (
        initialVNode.component = createComponentInstance(initialVNode, parentComponent, parentSuspense)
    ) // resolve props and slots for setup context
    if (!(__COMPAT__ && compatMountInstance)) {
        setupComponent(instance)
    } (instance,
        initialVNode,
        container,
        anchor,
        parentSuspense,
        isSVG, o
    ptimized
    )
if (__DEV__) { popWarningContext() endMeasure(instance, `mount`) }
}
setupComponent 和 setupRenderEffect,它俩又做了点什么呢?可以参考下面的示意图这两个实现组件首次渲染的函数:

setupComponent
首先看 setupComponent,要完成的就是执行我们写的 setup 函数
可以看到,内部先初始化了 props 和 slots,并且执行 setupStatefulComponent 创建组件,而这个函数内部从 component 中获取 setup 属性,也就是 script setup 内部实现的函数,就进入到我们组件内部的reactive、ref 等函数实现的逻辑了
export function setupComponent(
    instance: ComponentInternalInstance,
    isSSR = false) { isInSSRComponentSetup = isSSR const { props, children } = instance.vnode const isStateful = isStatefulComponent(instance) initProps(instance, props, isStateful, isSSR) initSlots(instance, children) const setupResult = isStateful ? setupStatefulComponent(instance, isSSR) : undefined isInSSRComponentSetup = false return setupResult } function setupStatefulComponent(instance: ComponentInternalInstance, isSSR: boolean) {
        const Component = instance.type as ComponentOptions // 执行setup
        const { setup } = Component if (setup) {
            const setupContext = (instance.setupContext = setup.length > 1 ? createSetupContext(instance) : null)
            setCurrentInstance(instance) pauseTracking()
            const setupResult = callWithErrorHandling(
                setup,
                instance,
                ErrorCodes.SETUP_FUNCTION,
                [instance.props, setupContext])
            if (isPromise(setupResult)) {
                setupResult.then(
                    unsetCurrentInstance, unsetCurrentInstance
                )
            } else {
                handleSetupResult(instance, setupResult, isSSR)
            }
        } else {
            finishComponentSetup(instance, isSSR)
        }
    }
export function callWithErrorHandling(
    fn: Function,
    instance: ComponentInternalInstance | null,
    type: ErrorTypes, args?: unknown[]
) {
    let res
    try { res = args ? fn(...args) : fn() } catch (err) { handleError(err, instance, type) } return res
}
setupRenderEffect
另一个 setupRenderEffect 函数,就是为了后续数据修改注册的函数,我们先梳理一下核心的实现逻辑
组件首次加载会调用 patch 函数去初始化子组件,注意 setupRenderEffect 本身就是在 patch 函数内部执行的,所以这里就会递归整个虚拟 DOM 树,然后触发生命周期 mounted,完成这个组件的初始化
页面首次更新结束后,setupRenderEffect 不仅实现了组件的递归渲染,还注册了组件的更新机制
在下面的核心代码中,我们通过 ReactiveEffect 创建了 effect 函数,这个概念上一讲我们手写过,然后执行 instance.update 赋值为 effect.run 方法,这样结合 setup 内部的 ref 和 reactive 绑定的数据,数据修改之后,就会触发 update 方法的执行,内部就会 componentUpdateFn,内部进行递归的 patch 调用执行每个组件内部的 update 方法实现组件的更新
if (!instance.isMounted) {
    patch(null, subTree, container, anchor, instance, parentSuspense, isSVG)
} else {
    // updateComponent
}
// create reactive effect for rendering
const effect = new ReactiveEffect(componentUpdateFn, () => queueJob(instance.update),
    instance.scope // track it in component's effect scope
)
const update = (instance.update = effect.run.bind(effect) as SchedulerJob)
update.id = instance.uid
update()
这样我们就实现了整个 Vue 的渲染和更新流程
到此这篇关于深度剖析 Vue3 在浏览器的运行原理的文章就介绍到这了,更多相关Vue3 运行原理内容请搜索脚本之家以前的文章或继续浏览下面的相关文章希望大家以后多多支持脚本之家!
相关文章
 这篇文章主要为大家介绍了Pinia介绍及工作原理解析,有需要的朋友可以借鉴参考下,希望能够有所帮助,祝大家多多进步,早日升职加薪2023-03-03
 今天小编就为大家分享一篇基于axios 解决跨域cookie丢失的问题,具有很好的参考价值,希望对大家有所帮助。一起跟随小编过来看看吧2018-09-09
 在本篇文章里小编给大家整理的是一篇关于Vue3.0的优化总结内容,有需要的朋友们可以学习下。2020-10-10
 这篇文章主要介绍了vue下的elementui轮播图自适应高度问题,具有很好的参考价值,希望对大家有所帮助。如有错误或未考虑完全的地方,望不吝赐教2022-09-09
 这篇文章主要介绍了Vue项目如何获取本地文件夹绝对路径问题,具有很好的参考价值,希望对大家有所帮助。如有错误或未考虑完全的地方,望不吝赐教2023-01-01
 这篇文章主要介绍了用Cordova打包Vue项目的方法步骤,小编觉得挺不错的,现在分享给大家,也给大家做个参考。一起跟随小编过来看看吧2019-02-02
 本篇文章主要介绍了vue的一个分页组件的示例代码,小编觉得挺不错的,现在分享给大家,也给大家做个参考。一起跟随小编过来看看吧2017-12-12
 vue3中引入新的组件传值方式,就是provide/inject依赖注入模式,本文主要介绍了vue3+ts 依赖注入provide inject的用法,感兴趣的可以了解一下2023-11-11
 这篇文章主要为大家详细介绍了vue移动端的左右滑动事件,文中示例代码介绍的非常详细,具有一定的参考价值,感兴趣的小伙伴们可以参考一下2020-06-06
 这篇文章主要为大家介绍了springboot+vue测试平台前端项目实现查询新增功能,有需要的朋友可以借鉴参考下,希望能够有所帮助,祝大家多多进步,早日升职加薪2022-05-05


最新评论