
详解Python使用OpenCV如何确定一个对象的方向
更新时间:2022年10月27日 08:36:33 作者:求则得之,舍则失之
在本教程中,我们将构建一个程序,该程序可以使用流行的计算机视觉库 OpenCV 确定对象的方向(即以度为单位的旋转角度),感兴趣的小伙伴可以了解一下
在本教程中,我们将构建一个程序,该程序可以使用流行的计算机视觉库 OpenCV 确定对象的方向(即以度为单位的旋转角度)。
最常见的现实世界用例之一是当您想要开发机械臂的取放系统时。确定一个物体在传送带上的方向是确定合适的抓取、捡起物体并将其放置在另一个位置的关键。

1.代码实现
接受一个名为input_img.jpg的图像,并输出一个名为output_img.jpg的带标记的图像。部分代码来自官方的OpenCV实现。
import cv2 as cv
from math import atan2, cos, sin, sqrt, pi
import numpy as np

def drawAxis(img, p_, q_, color, scale):
  p = list(p_)
  q = list(q_)

  ## [visualization1]
  angle = atan2(p[1] - q[1], p[0] - q[0]) # angle in radians
  hypotenuse = sqrt((p[1] - q[1]) * (p[1] - q[1]) + (p[0] - q[0]) * (p[0] - q[0]))

  # Here we lengthen the arrow by a factor of scale
  q[0] = p[0] - scale * hypotenuse * cos(angle)
  q[1] = p[1] - scale * hypotenuse * sin(angle)
  cv.line(img, (int(p[0]), int(p[1])), (int(q[0]), int(q[1])), color, 3, cv.LINE_AA)

  # create the arrow hooks
  p[0] = q[0] + 9 * cos(angle + pi / 4)
  p[1] = q[1] + 9 * sin(angle + pi / 4)
  cv.line(img, (int(p[0]), int(p[1])), (int(q[0]), int(q[1])), color, 3, cv.LINE_AA)

  p[0] = q[0] + 9 * cos(angle - pi / 4)
  p[1] = q[1] + 9 * sin(angle - pi / 4)
  cv.line(img, (int(p[0]), int(p[1])), (int(q[0]), int(q[1])), color, 3, cv.LINE_AA)
  ## [visualization1]

def getOrientation(pts, img):
  ## [pca]
  # Construct a buffer used by the pca analysis
  sz = len(pts)
  data_pts = np.empty((sz, 2), dtype=np.float64)
  for i in range(data_pts.shape[0]):
    data_pts[i,0] = pts[i,0,0]
    data_pts[i,1] = pts[i,0,1]

  # Perform PCA analysis
  mean = np.empty((0))
  mean, eigenvectors, eigenvalues = cv.PCACompute2(data_pts, mean)

  # Store the center of the object
  cntr = (int(mean[0,0]), int(mean[0,1]))
  ## [pca]

  ## [visualization]
  # Draw the principal components
  cv.circle(img, cntr, 3, (255, 0, 255), 2)
  p1 = (cntr[0] + 0.02 * eigenvectors[0,0] * eigenvalues[0,0], cntr[1] + 0.02 * eigenvectors[0,1] * eigenvalues[0,0])
  p2 = (cntr[0] - 0.02 * eigenvectors[1,0] * eigenvalues[1,0], cntr[1] - 0.02 * eigenvectors[1,1] * eigenvalues[1,0])
  drawAxis(img, cntr, p1, (255, 255, 0), 1)
  drawAxis(img, cntr, p2, (0, 0, 255), 5)

  angle = atan2(eigenvectors[0,1], eigenvectors[0,0]) # orientation in radians
  ## [visualization]

  # Label with the rotation angle
  label = "  Rotation Angle: " + str(-int(np.rad2deg(angle)) - 90) + " degrees"
  textbox = cv.rectangle(img, (cntr[0], cntr[1]-25), (cntr[0] + 250, cntr[1] + 10), (255,255,255), -1)
  cv.putText(img, label, (cntr[0], cntr[1]), cv.FONT_HERSHEY_SIMPLEX, 0.5, (0,0,0), 1, cv.LINE_AA)

  return angle

# Load the image
img = cv.imread("input_img.jpg")

# Was the image there?
if img is None:
  print("Error: File not found")
  exit(0)

cv.imshow('Input Image', img)

# Convert image to grayscale
gray = cv.cvtColor(img, cv.COLOR_BGR2GRAY)

# Convert image to binary
_, bw = cv.threshold(gray, 50, 255, cv.THRESH_BINARY | cv.THRESH_OTSU)

# Find all the contours in the thresholded image
contours, _ = cv.findContours(bw, cv.RETR_LIST, cv.CHAIN_APPROX_NONE)

for i, c in enumerate(contours):

  # Calculate the area of each contour
  area = cv.contourArea(c)

  # Ignore contours that are too small or too large
  if area < 3700 or 100000 < area:
    continue

  # Draw each contour only for visualisation purposes
  cv.drawContours(img, contours, i, (0, 0, 255), 2)

  # Find the orientation of each shape
  getOrientation(c, img)

cv.imshow('Output Image', img)
cv.waitKey(0)
cv.destroyAllWindows()

# Save the output image to the current directory
cv.imwrite("output_img.jpg", img)
2.输出图像
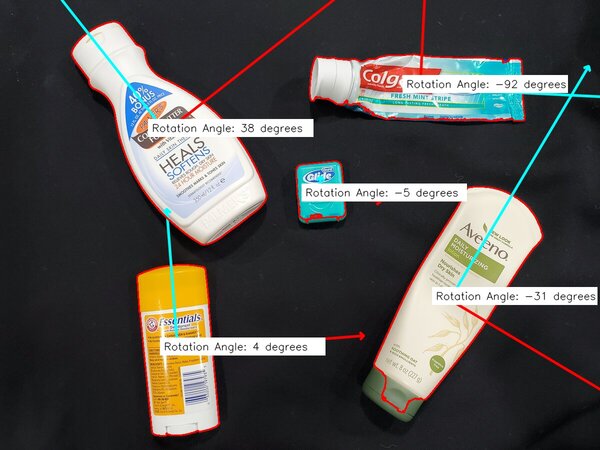
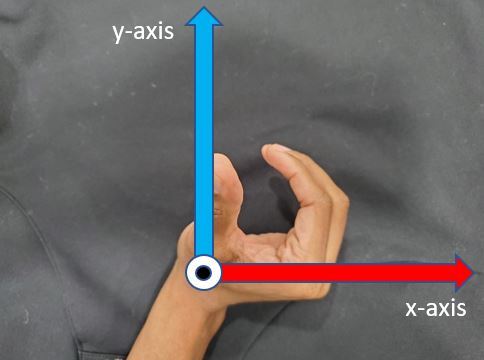
3.了解坐标轴
红线表示每个物体的正x轴。蓝线表示每个物体的正y轴。
全局正x轴从左到右横贯图像。整体正z轴指向这一页外。全局正y轴从图像的底部垂直指向图像的顶部。
使用右手法则来测量旋转,你将你的四个手指(食指到小指)笔直地指向全局正x轴的方向。

然后逆时针旋转四个手指90度。指尖指向y轴正方向,大拇指指向纸外z轴正方向。
4.计算0到180度之间的方向
如果我们想计算一个对象的方向,并确保结果总是在0到180度之间,我们可以使用以下代码:
# This programs calculates the orientation of an object.
# The input is an image, and the output is an annotated image
# with the angle of otientation for each object (0 to 180 degrees)

import cv2 as cv
from math import atan2, cos, sin, sqrt, pi
import numpy as np

# Load the image
img = cv.imread("input_img.jpg")

# Was the image there?
if img is None:
  print("Error: File not found")
  exit(0)

cv.imshow('Input Image', img)

# Convert image to grayscale
gray = cv.cvtColor(img, cv.COLOR_BGR2GRAY)

# Convert image to binary
_, bw = cv.threshold(gray, 50, 255, cv.THRESH_BINARY | cv.THRESH_OTSU)

# Find all the contours in the thresholded image
contours, _ = cv.findContours(bw, cv.RETR_LIST, cv.CHAIN_APPROX_NONE)

for i, c in enumerate(contours):

  # Calculate the area of each contour
  area = cv.contourArea(c)

  # Ignore contours that are too small or too large
  if area < 3700 or 100000 < area:
    continue

  # cv.minAreaRect returns:
  # (center(x, y), (width, height), angle of rotation) = cv2.minAreaRect(c)
  rect = cv.minAreaRect(c)
  box = cv.boxPoints(rect)
  box = np.int0(box)

  # Retrieve the key parameters of the rotated bounding box
  center = (int(rect[0][0]),int(rect[0][1]))
  width = int(rect[1][0])
  height = int(rect[1][1])
  angle = int(rect[2])


  if width < height:
    angle = 90 - angle
  else:
    angle = -angle

  label = "  Rotation Angle: " + str(angle) + " degrees"
  textbox = cv.rectangle(img, (center[0]-35, center[1]-25),
    (center[0] + 295, center[1] + 10), (255,255,255), -1)
  cv.putText(img, label, (center[0]-50, center[1]),
    cv.FONT_HERSHEY_SIMPLEX, 0.7, (0,0,0), 1, cv.LINE_AA)
  cv.drawContours(img,[box],0,(0,0,255),2)

cv.imshow('Output Image', img)
cv.waitKey(0)
cv.destroyAllWindows()

# Save the output image to the current directory
cv.imwrite("min_area_rec_output.jpg", img)

到此这篇关于详解Python使用OpenCV如何确定一个对象的方向的文章就介绍到这了,更多相关Python OpenCV确定对象方向内容请搜索脚本之家以前的文章或继续浏览下面的相关文章希望大家以后多多支持脚本之家!
相关文章
 这篇文章主要为大家详细介绍了python3如何将docx转换成pdf文件的方法,具有一定的参考价值,感兴趣的小伙伴们可以参考一下2018-03-03
 这篇文章主要介绍了python常用命令行选项与环境变量,本文给大家介绍的非常详细,具有一定的参考借鉴价值,需要的朋友可以参考下2020-02-02
 今天带大家来练习python实战,文中对利用python实现企业微信发送消息作了详细的图文解说及代码示例,对正在学习python的小伙伴很有帮助,需要的朋友可以参考下2021-05-05
 这篇文章主要介绍了使用Python下载抖音各大V视频的思路详解,本文给大家介绍的非常详细,对大家的学习或工作具有一定的参考借鉴价值,需要的朋友可以参考下2021-02-02
 这篇文章主要为大家详细介绍了Python中格式化字符串f-string的使用教程,文中通过示例为大家进行了详细的介绍,需要的可以参考一下2022-07-07
Python编程scoketServer实现多线程同步实例代码
这篇文章主要介绍了Python编程scoketServer实现多线程同步实例代码,小编觉得还是挺不错的,具有一定借鉴价值,需要的朋友可以参考下2018-01-01 这篇文章主要介绍了python线程中的同步问题及解决方法,文中通过示例代码介绍的非常详细,对大家的学习或者工作具有一定的参考学习价值,需要的朋友可以参考下2019-08-08
 Web服务器的各种系统管理工作包括了多Nginx/Apache 日志的统计,python使这个任务变得极其简单,下面我们来详细讲解下具体的做法,有需要的小伙伴可以参考下。2015-05-05
 今天给大家带来的是关于Python的相关知识,文章围绕着利用Python实现预测NBA比赛结果展开,文中有非常详细的介绍,需要的朋友可以参考下2021-06-06
 本人已经在运维行业工作了将近十年,我最早接触Linux是在大二的样子,那时候只追求易懂,所以就选择了Ubuntu作为学习、使用的对象,它简单、易用、好操作、界面绚丽,对于想接触Linux的新手来说是非常不错的2016-12-12


最新评论