
Typecho CSS3个性留言板之读者墙页面的实现方法
发布时间:2015-08-24 14:48:56 作者:佚名  我要评论
我要评论
这篇文章主要介绍了Typecho CSS3个性留言板读者墙页面的添加方法,需要的朋友可以参考下
效果图如下:
看到文章的首图相信大家都不陌生,可能其他博客的读者墙或者留言薄页面都见过,挺简约的真实记录博客的访客,留下的足迹,便于回访,这也算是博客里面互动的一个重要依据或者途径,下面就来说说在Typecho下该如何实现这麽个性的访问记录:
首先、把下面代码粘贴到当前主题的functions.php页面
<?php
/**
* 自定义页面模板
*
* @package custom
*/
?>
<?php $this->content(''); ?>
<div id="list-post">
<ul class='readers-list'>
<?php getFriendWall(); ?>
</ul></div>
.readers-list {line-height:16px;text-align:left;_zoom:1;overflow:hidden;text-overflow:ellipsis;white-space:nowrap;-o-text-}
.readers-list li{width:180px;float:left;*margin-right:-1px;list-style:none;}
.readers-list a,.readers-list a:hover strong{background-color:#f2f2f2;background-image:-webkit-linear-gradient(#f8f8f8,#f2f2f2);background-image:-moz-linear-gradient(#f8f8f8,#f2f2f2);background-image:linear-gradient(#f8f8f8,#f2f2f2);}
.readers-list a{position:relative;display:block;height:30px;margin:4px;padding:2px 4px 2px 44px;color:#999;overflow:hidden;border:#ccc 1px solid;border-radius:2px;box-shadow:#eee 0 0 2px;font-size:10px;line-height:14px;}
.readers-list .pic,.readers-list em,.readers-list strong{-webkit-transition:all .2s ease-out;-moz-transition:all .2s ease-out;transition:all .2s ease-out;}
.readers-list .pic{width:30px;height:30px;float:left;margin:0 8px 0 -40px;border-radius:2px;}
.readers-list em{color:#666;font-style:normal;margin-right:10px;font:bold 12px/16px microsoft yahei;}
.readers-list strong{color:#ddd;width:34px;text-align:right;position:absolute;right:6px;top:4px;font:bold 14px/16px microsoft yahei;}
.readers-list a:hover{border-color:#bbb;box-shadow:#ccc 0 0 2px;background-color:#fff;background-image:none;}
.readers-list a:hover .pic{opacity:.6;margin-left:0;}
.readers-list a:hover em{color:#EE8B17;font:bold 12px/36px microsoft yahei;}
.readers-list a:hover strong{color:#EE8B17;right:134px;top:0;text-align:center;border-right:#ccc 1px solid;height:34px;line-height:34px;}

看到文章的首图相信大家都不陌生,可能其他博客的读者墙或者留言薄页面都见过,挺简约的真实记录博客的访客,留下的足迹,便于回访,这也算是博客里面互动的一个重要依据或者途径,下面就来说说在Typecho下该如何实现这麽个性的访问记录:
首先、把下面代码粘贴到当前主题的functions.php页面
PHP Code复制内容到剪贴板
- //获得读者墙
- function getFriendWall()
- {
- $db = Typecho_Db::get();
- $sql = $db->select('COUNT(author) AS cnt', 'author', 'url', 'mail')
- ->from('table.comments')
- ->where('status = ?', 'approved')
- ->where('type = ?', 'comment')
- ->where('authorId = ?', '0')
- ->where('mail != ?', 'admin@ben-lab.com') //排除自己上墙
- ->group('author')
- ->order('cnt', Typecho_Db::SORT_DESC)
- ->limit('15'); //读取几位用户的信息
- $result = $db->fetchAll($sql);
- if (count($result) > 0) {
- $maxNum = $result[0]['cnt'];
- foreach ($result as $value) {
- $mostactive .= '<li><a target="_blank" rel="nofollow" href="' . $value['url'] . '"><span class="pic" style="background: url(http://1.gravatar.com/avatar/'.md5(strtolower($value['mail'])).'?s=36&d=&r=G) no-repeat; "></span><em>' . $value['author'] . '</em><strong>+' . $value['cnt'] . '</strong><br />' . $value['url'] . '</a></li>';
- }
- echo $mostactive;
- }
- }
其次、在主題目錄裏新建一個guestbook.php,粘貼以下代碼,當然,新建頁面的名稱可以自己填寫,本篇是以guestbook為例,你懂的
复制代码
代码如下:<?php
/**
* 自定义页面模板
*
* @package custom
*/
?>
第三、打开当前主题的page.php,复制全部代码.然后粘贴到guestbook.php,接著其次那步下面的代码
第四、替换代码,搜索下面代码替换成再下面内容
复制代码
代码如下:<?php $this->content(''); ?>
替换成
复制代码
代码如下:<div id="list-post">
<ul class='readers-list'>
<?php getFriendWall(); ?>
</ul></div>
第五、打开主题的style.css,粘贴以下代码
复制代码
代码如下:.readers-list {line-height:16px;text-align:left;_zoom:1;overflow:hidden;text-overflow:ellipsis;white-space:nowrap;-o-text-}
.readers-list li{width:180px;float:left;*margin-right:-1px;list-style:none;}
.readers-list a,.readers-list a:hover strong{background-color:#f2f2f2;background-image:-webkit-linear-gradient(#f8f8f8,#f2f2f2);background-image:-moz-linear-gradient(#f8f8f8,#f2f2f2);background-image:linear-gradient(#f8f8f8,#f2f2f2);}
.readers-list a{position:relative;display:block;height:30px;margin:4px;padding:2px 4px 2px 44px;color:#999;overflow:hidden;border:#ccc 1px solid;border-radius:2px;box-shadow:#eee 0 0 2px;font-size:10px;line-height:14px;}
.readers-list .pic,.readers-list em,.readers-list strong{-webkit-transition:all .2s ease-out;-moz-transition:all .2s ease-out;transition:all .2s ease-out;}
.readers-list .pic{width:30px;height:30px;float:left;margin:0 8px 0 -40px;border-radius:2px;}
.readers-list em{color:#666;font-style:normal;margin-right:10px;font:bold 12px/16px microsoft yahei;}
.readers-list strong{color:#ddd;width:34px;text-align:right;position:absolute;right:6px;top:4px;font:bold 14px/16px microsoft yahei;}
.readers-list a:hover{border-color:#bbb;box-shadow:#ccc 0 0 2px;background-color:#fff;background-image:none;}
.readers-list a:hover .pic{opacity:.6;margin-left:0;}
.readers-list a:hover em{color:#EE8B17;font:bold 12px/36px microsoft yahei;}
.readers-list a:hover strong{color:#EE8B17;right:134px;top:0;text-align:center;border-right:#ccc 1px solid;height:34px;line-height:34px;}
第六、新建页面或者编辑你的读者墙页面,点击底部高级选项,在自定义模版选择"自定义页面模版"发布即可!
相关文章
- 这篇文章主要介绍了Fastadmin的安装与使用方法,需要的朋友可以参考下2020-08-06
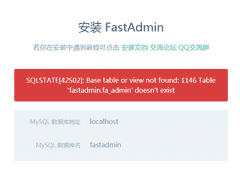
安装FastAdmin时报1146 Table 'fastadmin.fa_admin' doesn't exist错误
有部分小伙伴在安装FastAdmin时报以下错误,SQLSTATE[42S02]: Base table or view not found: 1146 Table 'fastadmin.fa_admin' doesn't exist2020-08-05 BOM信息是文件开头的一串隐藏的字符,用于让某些编辑器识别这是个UTF-8编码的文件,也编辑器自动加上的这个会导致页面头部会出现一个空白行;如果是织梦的程序也会引起验证2020-02-17
- 在本篇文章里小编给大家整理的是关于苹果cms采集插件安装的步骤和方法,有需要的朋友们可以学习下。2019-12-05
- 在本篇文章里小编给大家整理的是关于苹果cms添加播放器的方法步骤,对此有需要的朋友们可以学习下。2019-12-05
- 在本篇文章里小编给大家分享的是关于苹果cms更换logo的方法和步骤,有需要的朋友们可以学习参考下。2019-12-05
- 在本篇文章里小编给大家整理的是关于海洋cms电影源码安装步骤方法以及相关知识点,有兴趣的朋友们学习下。2019-12-05
- 在本篇文章里小编给大家整理的是关于苹果CMS自适应手模板设置方法,有需要的朋友们参考学习下。2019-12-05
- 在本篇文章里小编给大家整理的是关于苹果海洋CMS自定义采集助手设置方法,有需要的朋友们学习下。2019-12-05
- 这篇文章主要为大家介绍了苹果cms添加幻灯片的操作方法,步骤很简单,有需要的朋友们跟着操作下。2019-12-02


最新评论