
JavaScript实现滑块补图验证码效果

<div class="container">
    <div class="pic">
        <div class="gap"></div>
        <div class="verify-pic"></div>
    </div>
    <div class="slide">
        <div class="btn"></div>
    </div>
</div>
没错,全部手工绘制,不用任何图片、svg、字体图标之流
pic为背景图片,里面放着gap空白块,verify-pic被拖动的验证图
slide是滑块,btn是小按钮
样式
首先初始化样式和变量
:root {
    --btn-w: 40px;
    --btn-h: 24px;
    /* 按钮伪元素 */
    --btn-dot-w: 4px;
    /* 滑块 */
    --bar-h: 10px;
    /* 背景图 */
    --pic-w: 640px;
    --pic-h: 390px;
    --pic-src: url(https://i0.hdslb.com/bfs/vc/c13315f4c4195b342fd0d2795fd6c8b090a717bf.jpg);
    --radius: 8px;
}
* {
    margin: 0;
    padding: 0;
}
这几个样式很大众 没什么可讲的
.container {
display: flex;
position: relative;
height: var(--pic-h);
width: var(--pic-w);
flex-flow: column wrap;
justify-content: space-between;
padding: 10px;
}
.pic {
position: relative;
background: var(--pic-src) no-repeat;
width: 640px;
height: 340px;
}
.slide {
position: relative;
width: 100%;
height: var(--bar-h);
background-color: #999;
border-radius: 4px;
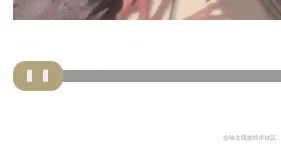
}.btn {
position: absolute;
left: 0;
/* (按钮高度 - 拖动条高度) * -1 / 2 */
top: calc((var(--btn-h) - var(--bar-h)) * -1 / 2);
width: var(--btn-w);
height: var(--btn-h);
background-color: #b5a37e;
border-radius: 10px;
cursor: pointer;
}这个滑块按钮,要想在垂直方向居中,就需要拿按钮高度 - 滑动条高度 / 2
但是为什么要 乘以 -1呢??
因为DOM坐标系是第三象限,负值为向上

接下来是里面的俩小薯条了
.btn::after,
.btn::before {
    content: "";
    position: absolute;
    top: 50%;
    transform: translateY(-50%);
    left: calc(var(--btn-w) / 3 - var(--btn-dot-w) / 2);
    height: var(--bar-h);
    width: var(--btn-dot-w);
    background-color: #eee;
}
这里我把整个滑块分成三份,所以位置就是滑块的三分之一,后面的小薯条除以2是为了居中
.btn::before {
    /* 伪元素在按钮的 2/ 3处 并减去自己的一半用来居中 */
    left: calc(var(--btn-w) / 3 * 2 - var(--btn-dot-w) / 2);
}
第二个小薯条就是三分之二的位置即可
至此 样式完成
操作逻辑 & 效果实现
const container = document.querySelector('.container'),
    pic = container.querySelector('.pic'), // 大图
    vPic = pic.querySelector('.verify-pic'), // 拖动图片
    gap = pic.querySelector('.gap'), // 背景图空白块
    btn = document.querySelector('.btn'); // 滑动条按钮
const pic_w = getStyle(pic, 'width'),
    pic_h = getStyle(pic, 'height'),
    cont_w = getStyle(container, 'width'),
    cont_h = getStyle(container, 'height'),
    vPic_w = getStyle(vPic, 'width'),
    vPic_h = getStyle(vPic, 'height'),
    btn_w = getStyle(btn, 'width');
const offset = 14;  // 可偏移距离
function getRadom(min, max) {
    return Math.floor(min + Math.random() * (max - min));
}
function getStyle(el, key) {
    return parseInt(getComputedStyle(el)[key]);
}先获取DOM以及设置配置
这里一定不能用offset系列获取矩形属性,因为隐藏的元素无法获取
初始化位置
function setPos() {
    const w = pic_w / 2,
        h = pic_h / 2 - vPic_h;
    // 移动空缺元素到右上部分
    const left = getRadom(w, pic_w - vPic_w),
        top = getRadom(0, h);
    gap.style.transform = `translate(${left}px, ${top}px)`;
    vPic.style.backgroundPosition = `${-left}px ${-top}px`;
    return [left, top];
}
把滑块和图片 移动到右上方随机位置
返回值作为最终对比值
由于left是指元素左边的距离,所以要减去元素宽度
 let x = 0, // 滑倒最后的值
    moving = false;
btn.addEventListener('mousedown', function (e) {
    moving = true;
    setShow(top, 'block');
});
 btn.addEventListener('mouseup', function () {
    setShow(top, 'none');
});
function setShow(top, flag) {
    vPic.style.display = flag;
    vPic.style.transform = `translateY(${top}px)`;
    btn.style.transform = 'none';
    vPic.style.transform = 'none';
    x = 0;
}这里的setShow可复用多次
现在有什么问题吗??
问题大着呢,你把mouseup绑在了小按钮上,当你抬起位置不是按钮,就不能触发了
正确做法是绑定在window上
接下来是重点,滑动事件
 window.addEventListener('mousemove', function (e) {
    if (!moving) {
        return;
    }
    // 图片位置 = 鼠标位置 - 滑动条位置 - 按钮 / 2 ----减去按钮是居中
    x = e.clientX - container.getBoundingClientRect().left - btn_w / 2;
    btn.style.transform = `translateX(${x}px)`;
    vPic.style.transform = `translate(${x}px, ${top}px)`;
});
window.addEventListener('mousemove', function (e) {
if (!moving) {
return;
}
// 图片位置 = 鼠标位置 - 滑动条位置 - 按钮 / 2 ----减去按钮是居中
x = e.clientX - container.getBoundingClientRect().left - btn_w / 2;
btn.style.transform = `translateX(${x}px)`;
vPic.style.transform = `translate(${x}px, ${top}px)`;
});这样基本就实现了,但是没有判断边界呢,现在可以随意滑动
function judge(x) {
    const { left } = container.getBoundingClientRect();
    return (
        x - left < 0 ||
        x + left > cont_w + left
    );
}
 window.addEventListener('mousemove', function (e) {
    if (!moving || judge(e.clientX)) {
        return;
    }
    // 图片位置 = 鼠标位置 - 滑动条位置 - 按钮 / 2 ----减去按钮是居中
    x = e.clientX - container.getBoundingClientRect().left - btn_w / 2;
    btn.style.transform = `translateX(${x}px)`;
    vPic.style.transform = `translate(${x}px, ${top}px)`;
});当x轴小于0或者鼠标大于图片宽度时退出
这时候给x赋值,鼠标抬起时判断
 window.addEventListener('mouseup', function () {
    const flag = x > left - offset && x < left + offset;
    moving = false;
    if (flag) {
        cb && cb();
    }
    else {
        setShow(top, 'none');
    }
});
如果成功 执行外面的回调函数 反之重置位置
现在基本完全实现
就在我喜出望外之际,我发现滑动一些刁钻的角度,会让鼠标属性改变,变成这样
cursor: not-allowed;
因为这个原因,会扰乱事件
但是我整篇代码也没设置过
所以我冥思苦想
那一定是事件默认行为搞的鬼
所以我给每个元素阻止了默认行为,最终排查发现,是mousedown导致的
 btn.addEventListener('mousedown', function (e) {
    // 不阻止默认行为 会导致鼠标属性变成 `now-allowed`
    e.preventDefault();
    moving = true;
    setShow(top, 'block');
});
以上就是JavaScript实现滑块补图验证码效果的详细内容,更多关于JavaScript滑块补图验证码的资料请关注脚本之家其它相关文章!
相关文章
 我们通常在使用cookie的时候一般都只是局限在本站内使用,也就是只在一个域名下使用2011-11-11
JavaScript自定义方法实现trim()、Ltrim()、Rtrim()的功能
去除字符串两端的空格,是字符串处理非常常用的方法如何trim() 、Ltrim() 、Rtrim(),可惜的是javascript中无此方法,下面有个不错的自定义教程感兴趣的朋友可以参考下2013-11-11 这篇文章主要为大家详细介绍了JavaScript如何调用后台接口实现Excel导出功能以及导出乱码问题的解决办法,需要的小伙伴可以参考一下2023-07-07
 extend()函数是jQuery的基础函数之一,作用是扩展现有的对象2013-06-06
 在我们做业务开发的漫长岁月里,会多次跟时间打交道,相信大多数小伙伴对日期格式化也并不陌生,本文简单记录了JavaScript实现日期格式化的过程,以及一些拓展,希望对大家有所帮助2023-05-05
 表单元素事件 (Form Element Events)仅在表单元素中有效。2009-07-07
 在进行自己的后台改版时,大体布局都使用了bootstrap,剩下的表单部分没理由不去使用它,对于表单的美化和布局,bootstrap做的也是很不错的。下文给大家介绍Bootstrap表单Form全面解析,感兴趣的朋友一起看下吧2016-06-06
 这篇文章主要为大家详细介绍了JavaScript仿百度图片浏览效果,具有一定的参考价值,感兴趣的小伙伴们可以参考一下2016-11-11
 这篇文章主要为大家详细介绍了js实现简单的抽奖系统,文中示例代码介绍的非常详细,具有一定的参考价值,感兴趣的小伙伴们可以参考一下2022-03-03
 这篇文章主要为大家详细介绍了JavaScript简易购物车功能的编写代码,文中示例代码介绍的非常详细,具有一定的参考价值,感兴趣的小伙伴们可以参考一下2016-09-09


最新评论