
vue+springboot实现图形验证码Kaptcha的示例
1、前端
form使用了element-ui的组件,主要还是看img标签,src绑定了form.imgCodeUrl数据,点击图片时触发refreshCode更新图片验证码。
	  <el-form-item prop="verificationCode" label="验证码" style="text-align: left;">
		  <el-input v-model="form.verificationCode" placeholder="请输入验证码" style="width: 120px;vertical-align: top;"></el-input>
		  <img id="img" alt="验证码" @click="refreshCode" :src="form.imgCodeUrl" style="padding-left: 12px;"/>
	  </el-form-item>
    data() {
      return {
        form: {
          username: '',
          password: '',
		  verificationCode:'',
		  imgCodeUrl:this.$verificationCodeUrl,
        },
    ...
	...
  refreshCode(){
	  this.form.imgCodeUrl=this.$verificationCodeUrl+"?d="+new Date().getTime();
  }
上面refreshCode更新图片验证码的原理,其实就是在原网址后添加随机的参数来改变form.imgCodeUrl网址,实现img标签自动刷新请求。
- this.$verificationCodeUrl是请求的网址,这里设置成全局常量写在了main.js中
//验证码地址
Vue.prototype.$verificationCodeUrl="http://127.0.0.1/api/createImageCode";
2、后端实现生成createImageCode验证码图片
使用kaptcha生成图片验证码,添加如下依赖
<dependency>
     <groupId>com.github.penggle</groupId>
     <artifactId>kaptcha</artifactId>
     <version>2.3.2</version>
</dependency>
配置kaptcha图片生成规则
...
import java.util.Properties;

@Configuration
public class KaptchaConfig {
    @Bean
    public DefaultKaptcha getDefaultKaptcha() {
        DefaultKaptcha defaultKaptcha = new DefaultKaptcha();
        Properties properties = new Properties();
        // 图片宽
        properties.setProperty("kaptcha.image.width", "130");
        // 图片高
        properties.setProperty("kaptcha.image.height", "50");
        // 图片边框
        properties.setProperty("kaptcha.border", "yes");
        // 边框颜色
        properties.setProperty("kaptcha.border.color", "105,179,90");
        // 字体颜色
        properties.setProperty("kaptcha.textproducer.font.color", "blue");
        // 字体大小
        properties.setProperty("kaptcha.textproducer.font.size", "40");
        // session key
        properties.setProperty("kaptcha.session.key", "imageCode");
        // 验证码长度
        properties.setProperty("kaptcha.textproducer.char.length", "4");
        // 字体
        properties.setProperty("kaptcha.textproducer.font.names", "宋体,楷体,微软雅黑");
        Config config = new Config(properties);
        defaultKaptcha.setConfig(config);
        return defaultKaptcha;
    }
}
生成验证码的图片通过response.getOutputStream流发送到前端,而验证码保存到session域中,等待用户登录表单提交时进行校验匹对
	...
	@Autowired
	private DefaultKaptcha defaultKaptcha;
	...
	//生成图片验证码
	@GetMapping("/createImageCode")
	public void createImageCode(HttpServletRequest request,HttpServletResponse response) {
		response.setHeader("Cache-Control", "no-store, no-cache");
		response.setContentType("image/jpeg");
		// 生成文字验证码
		String text = defaultKaptcha.createText();
		// 生成图片验证码
		BufferedImage image = defaultKaptcha.createImage(text);
		//保存到session域
		HttpSession session = request.getSession();
		session.setAttribute("imageCode",text);
		ServletOutputStream out = null;
		try {
			//响应输出图片流
			out = response.getOutputStream();
			ImageIO.write(image, "jpg", out);
		} catch (IOException e) {
			e.printStackTrace();
		} finally {
			try {
				out.flush();
				out.close();
			} catch (IOException e) {
				e.printStackTrace();
			}
		}
	}
3、前端提交表单
代码有点长,其实是嵌套了三层,第一层if (valid)判断表单校验(填入的数据是否符合规则),第二层this. h t t p . g e t ( " / v e r i f y I m a g e C o d e " 提交验证码判断验证码是否正确,第三层 t h i s . http.get("/verifyImageCode"提交验证码判断验证码是否正确,第三层this. http.get("/verifyImageCode"提交验证码判断验证码是否正确,第三层this.http.post("/user/login"最后判断用户名和密码是否正确,三层逻辑都通过才保存用户登录信息。
      submitForm() {
        this.$refs.form.validate(valid => {
		  //表单校验通过
          if (valid) {
			//先判断图形验证码
			this.$http.get("/verifyImageCode",{params:{verificationCode:this.form.verificationCode}})
			.then((response)=>{
				//图形验证码成功
				if(response.data.code === 0){
					//判断用户名和密码
					this.$http.post("/user/login",{
						username:this.form.username,
						password:this.form.password
					})
					.then((response)=>{
						if(response.data.code === 0){//登录成功
							this.$message({
							  message: '登录成功',
							  type: 'success',
							});
							localStorage.setItem("user",JSON.stringify(response.data.data));//保存用户信息
							this.$router.push("/");
						}
						else{
							this.$message.error("用户名或密码错误,请重试!!!");
						}
					})
					.catch((error)=>{
						//未接受到response的网络传输等错误
						console.log(error);
					});
				}else{//图形验证码错误
					this.$message.error(response.data.data.message);
					return;
				}
			})
			.catch((error)=>{
				//未接受到response的网络传输等错误
				console.log(error);
				return;
			});
          } else {
            this.$message.error('表单填写错误,请检查');
            return false;
          }
        });
      },
4、后端/verifyImageCode验证码匹对
CommonResult是自定义的返回数据结果类,可以搜我以前文章。前端传来的验证码与session域中的匹对。
	//匹对图片验证码
	@GetMapping("/verifyImageCode")
	public CommonResult<Object> verifyImageCode(String verificationCode,HttpServletRequest request) {
		HttpSession session = request.getSession();
		if(session.getAttribute("imageCode").equals(verificationCode)) {
			return CommonResult.success();
		}else {
			return CommonResult.failed(ErrorCode.IMG_CODE_VERIFY_ERROR.getCode(), Message.createMessage(ErrorCode.IMG_CODE_VERIFY_ERROR.getMessage()));
		}
	}
5、bug
测试时,验证码图片能够生成显示,并能刷新。但提交表单时,对/verifyImageCode的请求返回错误码500。
首先打印发现session域的值为null。了解到原来session会话是有唯一的session id。打印session id,发现每次请求session id的不一样。session id其实是存在在cookie里的。
所以前端发送请求时要携带cookie证书,vue配置
//携带证书 session id
axios.defaults.withCredentials = true
后端的跨域配置也要允许证书通行
//配置跨域过滤器CorsFilter
@Configuration
public class CorsConfig {
    @Bean
    public CorsFilter corsFilter() {
        UrlBasedCorsConfigurationSource source = new UrlBasedCorsConfigurationSource();
        //允许证书
        CorsConfiguration corsConfiguration = new CorsConfiguration();
        corsConfiguration.setAllowCredentials(true);
        List<String> list = Arrays.asList("*");
        corsConfiguration.setAllowedHeaders(list);
        corsConfiguration.setAllowedMethods(list);
        corsConfiguration.setAllowedOriginPatterns(list);
        source.registerCorsConfiguration("/**", corsConfiguration);
        CorsFilter corsFilter = new CorsFilter(source);
        return corsFilter;
    }
}
还没完,请求还是返回500。浏览器调试器显示如下
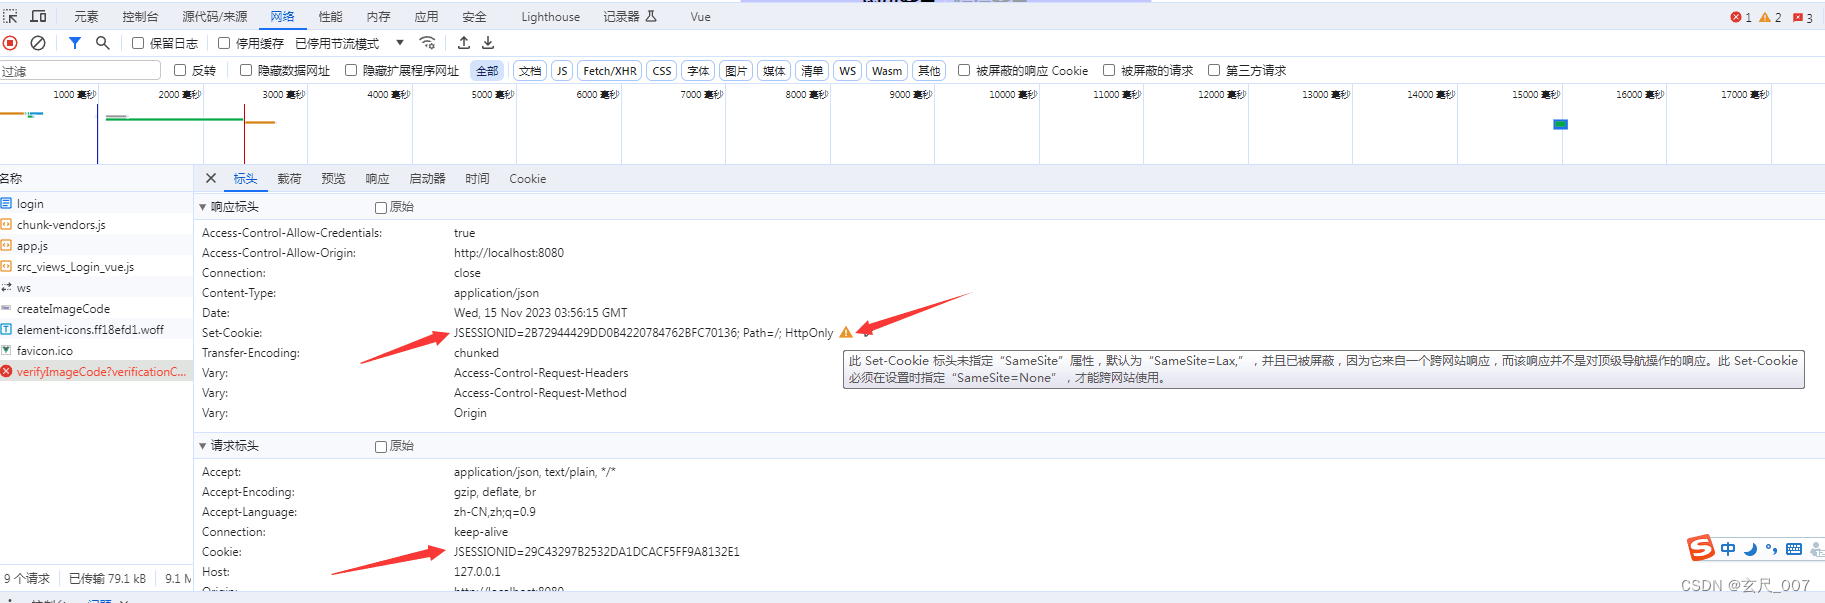
请求头中已经带cookie,然而响应头又set-cookie了,也就是cookie里的session id又被重置,为什么这样子?可能是感叹号报错的原因:set-cookie默认属性是"SameSite=Lax,"。参考网上文章,我们修改后端配置application.properties:
#获取同一个session id的cookie设置
server.servlet.session.cookie.secure=true
server.servlet.session.cookie.same-site=none
再运行起来,set-cookie和感动号消失,调试通过。
到此这篇关于vue+springboot实现图形验证码Kaptcha的示例的文章就介绍到这了,更多相关vue+springboot 图形验证码内容请搜索脚本之家以前的文章或继续浏览下面的相关文章希望大家以后多多支持脚本之家!
相关文章
 这篇文章主要介绍了vant IndexBar实现的城市列表的示例代码,文中通过示例代码介绍的非常详细,对大家的学习或者工作具有一定的参考学习价值,需要的朋友们下面随着小编来一起学习学习吧2019-11-11
 这篇文章主要介绍了vueJs实现DOM加载完成之后自动下拉到底部的实例代码,非常不错,具有一定的参考借鉴价值,需要的朋友可以参考下2018-08-08
 这篇文章主要介绍了vue2.0中goods选购栏滚动算法的实现代码,需要的朋友可以参考下2017-05-05
SpringBoot+Vue前后端分离,使用SpringSecurity完美处理权限问题的解决方法
这篇文章主要介绍了SpringBoot+Vue前后端分离,使用SpringSecurity完美处理权限问题,需要的朋友可以参考下2018-01-01 这篇文章主要介绍了Vue项目配置@别名全过程,具有很好的参考价值,希望对大家有所帮助,如有错误或未考虑完全的地方,望不吝赐教2023-10-10
Vue报错Component name"Home"should always be mult
这篇文章主要介绍了Vue报错Component name"Home"should always be multi问题及解决方案,具有很好的参考价值,希望对大家有所帮助。如有错误或未考虑完全的地方,望不吝赐教2022-09-09 这篇文章主要介绍了vue之保留小数点两位小数 使用filters(过滤器),具有很好的参考价值,希望对大家有所帮助,如有错误或未考虑完全的地方,望不吝赐教2023-11-11
 这篇文章主要为大家介绍了html中引入Vue.js的cdn实现简单的文档单页示例详解,有需要的朋友可以借鉴参考下,希望能够有所帮助,祝大家多多进步,早日升职加薪2023-08-08
 这篇文章主要介绍了vue中多附件上传的实现示例,帮助大家更好的理解和学习使用vue框架,感兴趣的朋友可以了解下2021-04-04
 这篇文章主要介绍了vue使用sass根据环境进行样式判断区分方式,具有很好的参考价值,希望对大家有所帮助。如有错误或未考虑完全的地方,望不吝赐教2023-03-03


最新评论