
Vue+Element实现页面生成快照截图
更新时间:2024年03月06日 16:56:26 作者:杀猪刀-墨林
这篇文章主要为大家详细介绍了Vue如何结合Element实现页面生成快照截图功能,文中的示例代码讲解详细,感兴趣的小伙伴可以跟随小编一起学习一下
页面部分:
<template>
  <div ref="homePage" class="home-container rel">
    <div class="snap-box abs">
      <div title="页面快照" class="z-pointer" @click="newSnapShot()">
        <img :src="snapCamera" alt="快照生成">
      </div>
    </div>
    <el-image-viewer
      v-if="imgUrl"
      :on-close="()=>{imgUrl=''}"
      :url-list="[imgUrl]" />
  </div>
</template>
js代码部分:
/**
 * 图片blob转图片base64
 * @param blob
 */
export const blobToBase64 = (blob) => {
	return new Promise((resolve, reject) => {
		const fileReader = new FileReader();
		fileReader.onload = (e) => {
			resolve(e.target.result);
		};
		// readAsDataURL
		fileReader.readAsDataURL(blob);
		fileReader.onerror = () => {
			reject(new Error('blobToBase64 error'));
		};
	});
}


import html2canvas from 'html2canvas';
import { blobToBase64 } from '@/utils/helper.js';


export default {
  name: 'Home',
  components: {
    'el-image-viewer': () => import('element-ui/packages/image/src/image-viewer'),
  },
  data() {
    return {
      tooltipRemark,
      loading: false,
      imgUrl: '',
    };
  },
  methods: {
    // 生成快照
    newSnapShot() {
      this.loading = true;
      const { ClipboardItem } = window;
      html2canvas(this.$refs.homePage).then((canvas) => {
        // 将canvas转为blob对象
        canvas.toBlob(async (blob) => {
          if (typeof (navigator.clipboard) === 'undefined' && !ClipboardItem) {
            await blobToBase64(blob).then((res) => {
              this.imgUrl = res;
              this.$message({
                message: '快照生成成功',
                type: 'success',
                duration: 2000,
              });
            }).catch(() => {
              this.$message({
                message: '快照生成失败',
                type: 'warning',
                duration: 2000,
              });
            }).finally(() => {
              this.loading = false;
            });
            return;
          }
          // 将blob对象放入剪切板item中
          // eslint-disable-next-line no-undef
          const data = [new ClipboardItem({ [blob.type]: blob })];
          // 写入剪切板,成功会执行resolve,失败则走reject
          await navigator.clipboard.write(data).then(() => {
            this.$message({
              message: '已保存到粘贴板',
              type: 'success',
              duration: 2000,
            });
            this.loading = false;
          }, () => {
            this.$message({
              message: '保存截图失败',
              type: 'warning',
              duration: 2000,
            });
            this.loading = false;
          });
        }, 'image/png');
      }).catch(() => {
        this.loading = false;
      });
    },
  },
};
知识补充
除了上文的内容,小编还为大家整理了vue结合element实现截图上传功能的示例代码,希望对大家有所帮助
下载相关依赖(element依赖省略)
代码如下(示例):
yarn add vue-cropper -S
main.js 里面引入并使用
代码如下(示例):
import vueCropper from 'vue-cropper' // 截图插件
Vue.use(vueCropper)
多处使用考虑抽离插件(子组件)
代码如下(示例):
<template>
  <div>
    <el-upload
      ref="upload"
      list-type="picture-card"
      :action="upurl"
      :data="updataData"
      :headers="uploadHeader"
      :on-change="changeUpload"
      :auto-upload="false"
      :show-file-list="false"
    >
      <img v-if="inputForm.pic" :src="inputForm.pic" class="avatar upimg" />
      <i v-else class="el-icon-plus avatar-uploader-icon"></i>
    </el-upload>
    <!-- vueCropper 剪裁图片实现-->
    <el-dialog :title="title" :visible.sync="dialogVisible" append-to-body>
      <div class="cropper-content">
        <div class="cropper" style="text-align: center">
          <vueCropper
            ref="cropper"
            :img="option.img"
            :outputSize="option.size"
            :outputType="option.outputType"
            :info="true"
            :full="option.full"
            :canMove="option.canMove"
            :canMoveBox="option.canMoveBox"
            :original="option.original"
            :autoCrop="option.autoCrop"
            :fixed="option.fixed"
            :fixedNumber="option.fixedNumber"
            :centerBox="option.centerBox"
            :infoTrue="option.infoTrue"
            :autoCropWidth="option.autoCropWidth"
            :autoCropHeight="option.autoCropHeight"
            :fixedBox="option.fixedBox"
          ></vueCropper>
        </div>
      </div>
      <div slot="footer" class="dialog-footer">
        <el-button @click="dialogVisible = false">取 消</el-button>
        <el-button type="primary" @click="finish">确认</el-button>
      </div>
    </el-dialog>
  </div>
</template>
<script>
import { uploadPictureBase64 } from "../api/upimg";
// import local from "@/utils/local";

export default {
  props:{
    title:{
      type:String,
    }
  },
  data() {
    return {
      upurl: "boxes-manage/file/uploadPictureBase64",
      inputForm: {
        pic: "",
      },
      dialogVisible: false,
      uploadHeader: { Authorization: "" },
      updataData: {
        file: "",
        fileType: "",
      }, //上传参数
      option: {
        img: "", // 裁剪图片的地址
        info: true, // 裁剪框的大小信息
        outputSize: 1, // 裁剪生成图片的质量
        outputType: "", // 裁剪生成图片的格式
        canScale: false, // 图片是否允许滚轮缩放
        autoCrop: true, // 是否默认生成截图框
        autoCropWidth: 400, // 默认生成截图框宽度
        autoCropHeight: 400, // 默认生成截图框高度
        fixedBox: false, // 固定截图框大小 不允许改变
        fixed: true, // 是否开启截图框宽高固定比例
        fixedNumber: [1, 1], // 截图框的宽高比例
        full: true, // 是否输出原图比例的截图
        canMoveBox: true, // 截图框能否拖动
        original: false, // 上传图片按照原始比例渲染
        centerBox: true, // 截图框是否被限制在图片里面
        infoTrue: true, // true 为展示真实输出图片宽高 false 展示看到的截图框宽高
      },
    };
  },
  methods: {
    // 上传按钮   限制图片大小 -----------------------------------------------------------
    changeUpload(file) {
      let testmsg = file.name.substring(file.name.lastIndexOf(".") + 1);
      const isJPG = testmsg === "jpg";
      const isPNG = testmsg === "png";
      const isLt2M = file.size / 1024 / 1024 < 2;
      if (!isJPG && !isPNG) {
        this.$message.error("上传头像图片只能是 JPG 或 PNG 格式!");
        return;
      }
      this.$nextTick(() => {
        this.option.img = file.url;
        this.dialogVisible = true;
      });
    },

    // 点击裁剪
    async finish() {
      await this.$refs.cropper.getCropData((data) => {
        let newdataff=data.split(";")[1].split(",")[1]
        this.updataData.file = this.base64toFile(data).name;
        this.updataData.fileType = this.base64toFile(data).name.split(".")[1];
        uploadPictureBase64({
          pictureBase64: newdataff,
          fileName: this.updataData.file,
          fileType: this.updataData.fileType,
        }).then((res) => {
          console.log(res);
          if (res.code == "0000") {
            this.$message({
              message: "上传图片成功",
              type: "success",
            });
            this.dialogVisible = false;  // 隐藏蒙城
            this.$emit("childFn", res.data);  // 与父组件进行交互
            this.inputForm.pic = res.data;  // 将返回的图片替换在页面上
          } else {
            this.$message.error(res.message);
          }
        });
      });
    },

    base64toFile(dataurl, filename = new Date().getTime()) {
      let arr = dataurl.split(",");
      let mime = arr[0].match(/:(.*?);/)[1];
      let suffix = mime.split("/")[1];
      let bstr = atob(arr[1]);
      let n = bstr.length;
      let u8arr = new Uint8Array(n);
      while (n--) {
        u8arr[n] = bstr.charCodeAt(n);
      }
      return new File([u8arr], `${filename}.${suffix}`, {
        type: mime,
      });
    },
  },
};
</script>
<style scoped>
/* 截图 */
.cropper {
  width: auto;
  height: 300px;
}
.upimg {
  height: 146px;
  width: 146px;
}
</style>
父组件里面使用
代码如下(示例):
1.引入截图子组件
import Cropperimg from "../components/vueCropperimg.vue";
2.注册截图子组件
  components: {
    Cropperimg,
  },
3.使用截图子组件
<Cropperimg title="商品图片裁剪" @childFn="parentFn" />
4.获取子组件上传的文件
parentFn(res) {
  console.log(res);
},
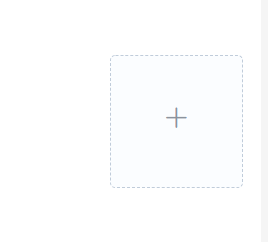
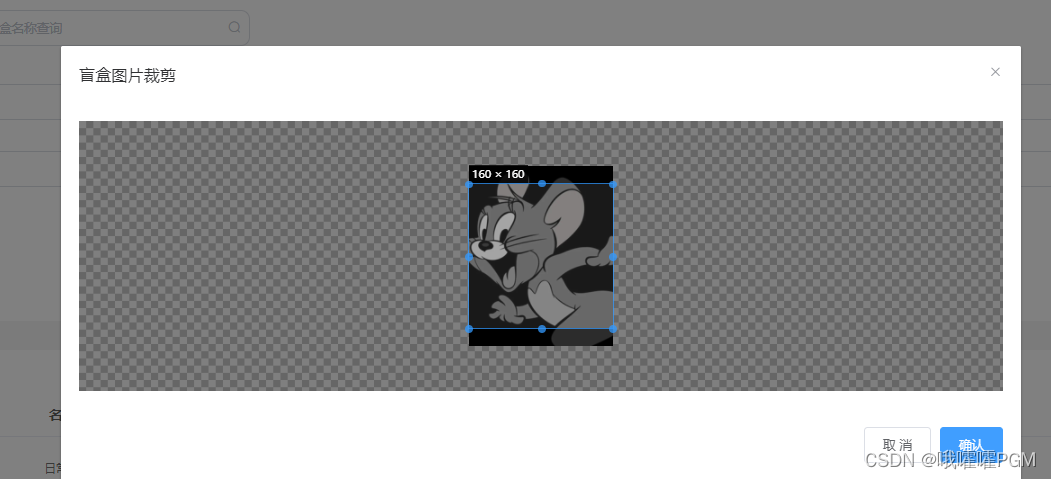
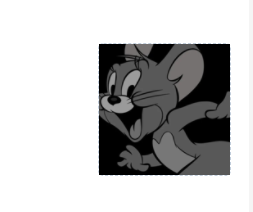
实际项目效果
上传前
上传开始截图
截图后
到此这篇关于Vue+Element实现页面生成快照截图的文章就介绍到这了,更多相关Vue Element截图内容请搜索脚本之家以前的文章或继续浏览下面的相关文章希望大家以后多多支持脚本之家!
相关文章
 这篇文章主要介绍了Vue3实现全局loading指令,本文通过示例代码给大家介绍的非常详细,对大家的学习或工作具有一定的参考借鉴价值,需要的朋友可以参考下2022-06-06
 本文主要介绍了M1 pro芯片启动Vue项目的方法步骤,文中通过示例代码介绍的非常详细,具有一定的参考价值,感兴趣的小伙伴们可以参考一下2021-11-11
解决element-ui的el-dialog组件中调用ref无效的问题
这篇文章主要介绍了解决element-ui的el-dialog组件中调用ref无效的问题,具有很好的参考价值,希望对大家有所帮助,如有错误或未考虑完全的地方,望不吝赐教2024-02-02
Vue中computed、methods与watch的区别总结
这篇文章主要给大家介绍了关于Vue中computed、methods与watch区别的相关资料,文中通过示例代码介绍的非常详细,对大家学习或者使用Vue具有一定的参考学习价值,需要的朋友们下面来一起学习学习吧2019-04-04
解决mpvue + vuex 开发微信小程序vuex辅助函数mapState、mapGetters不可用问题
这篇文章主要介绍了解决mpvue + vuex 开发微信小程序 vuex辅助函数mapState、mapGetters不可用问题,需要的朋友可以参考下2018-08-08 这篇文章主要为大家详细介绍了vue实现简单图片上传功能,文中示例代码介绍的非常详细,具有一定的参考价值,感兴趣的小伙伴们可以参考一下2022-03-03
 在项目中很多时候需要用到vue打包成html不需要放在服务器上就能浏览,根据官网打包出来的html直接打开是显示空白,下面这篇文章主要给大家介绍了关于vue打包后出现空白页的原因及解决方式的相关资料,需要的朋友可以参考下2022-07-07
 今天小编就为大家分享一篇vue transition 在子组件中失效的解决,具有很好的参考价值,希望对大家有所帮助。一起跟随小编过来看看吧2019-11-11
 本篇文章主要介绍了vue2 中如何实现动态表单增删改查实例,小编觉得挺不错的,现在分享给大家,也给大家做个参考。一起跟随小编过来看看吧2017-06-06
 这篇文章主要为大家介绍了Vue搭建Vuex环境,具有一定的参考价值,感兴趣的小伙伴们可以参考一下,希望能够给你带来帮助2021-11-11


最新评论