
Springboot集成Springbrick实现动态插件的步骤详解
spring-boot集成spring-brick实现动态插件
项目结构 & 需求实现
提示:本文的集成说明,是针对完成此设计、此需求进行的
项目结构
demo
│
├─application # 主应用
│
└─plugin-api
│
├─plugin-qwer # plugin-qwer-api的实现示例1(注:也可以是单独的一个项目,继承不继承plugin-api均可)
│
├─plugin-qwer2 # plugin-qwer-api的实现示例2(注:也可以是单独的一个项目,继承不继承plugin-api均可)
│
├─plugin-qwer-api # 插件qwer-api
│
├─plugin-xyz # plugin-xyz-api的实现示例(注:也可以是单独的一个项目,继承不继承plugin-api均可)
│
└─plugin-xyz-api # 插件xyz-api
需求实现
主应用(application)、各个插件的实现(plugin-qwer、plugin-qwer2、plugin-xyz)均可单独启动
主应用(application)启动后,可动态插拔各插件(plugin-qwer、plugin-qwer2、plugin-xyz)
在plugin-api中,定义各种接口、及相关的pojo,这些接口由具体的插件实现去完成,主应用(application)面向plugin-api编程即可
spring-boot集成spring-brick
环境说明
- spring-boot:2.6.13
- spring-brick:3.1.1
1. 主程序集成spring-brick
第一步:引入相关依赖
<dependency>
    <groupId>com.gitee.starblues</groupId>
    <artifactId>spring-brick</artifactId>
    <version>3.1.1</version>
</dependency>
第二步:修改程序入口方法
import com.gitee.starblues.loader.launcher.SpringBootstrap;
import com.gitee.starblues.loader.launcher.SpringMainBootstrap;
import com.ideaaedi.commonspring.annotation.EnableParameterRecorder;
import org.springframework.boot.SpringApplication;
import org.springframework.boot.autoconfigure.SpringBootApplication;
/**
 * main-application start class
 */
@SpringBootApplication
public class MainApplication implements SpringBootstrap {
    public static void main(String[] args) {
        // 这里使用 SpringMainBootstrap 引导启动
        SpringMainBootstrap.launch(MainApplication.class, args);
    }
    @Override
    public void run(String[] args) throws Exception {
        // 这里的写法和SpringBoot 启动保持一致
        SpringApplication.run(MainApplication.class, args);
    }
}
第三步:编写配置
plugin:
  # 运行模式, 开发环境: dev; 生产环境: prod
  runMode: prod
  # 主程序包名, 包名建议设置到范围最大级别,能包含主程序所有类的包名范围
  mainPackage: com.example.springbrick.application
  # 插件的路径, 可配置多个, 开发环境下配置为插件模块上级目录; 生产环境下配置到插件jar包存放目录。
  # 可使用~符号表示相对目录,比如:~/plugins,开发环境相对于开发根目录,生产环境下相对于主程序jar所在目录
  pluginPath:
    - C:/Users/Administrator/Desktop/plugin
第四步:设置maven插件
<!-- 本人引入此插件后,去除了spring-boot自身的打包插件 -->
<plugin>
    <groupId>com.gitee.starblues</groupId>
    <artifactId>spring-brick-maven-packager</artifactId>
    <version>3.1.1</version>
    <configuration>
        <mode>main</mode>
        <mainConfig>
            <!-- 指定main -->
            <mainClass>com.example.springbrick.application.MainApplication</mainClass>
            <packageType>jar</packageType>
        </mainConfig>
    </configuration>
    <executions>
        <execution>
            <goals>
                <goal>repackage</goal>
            </goals>
        </execution>
    </executions>
</plugin>
2. 准备plugin-api
第一步:引入相关依赖
<dependency>
    <groupId>com.gitee.starblues</groupId>
    <artifactId>spring-brick</artifactId>
    <version>3.1.1</version>
    <!-- 这里指定为provided即可,主程序中已经存在此artifact了  -->
    <scope>provided</scope>
</dependency>
第二步:引入相关依赖
注意:各plugin-api的包名,应该处于主程序包名(本人这里为plugin.mainPackage=com.example.springbrick.application)的子集。如果不这样设置的话,主程序和插件实现程序加载plugin-api中的类时,将被类加载器隔离
根据自己业务需要,定义业务接口及相关pojo即可,如:

3. 实现plugin-api
提示:各plugin-api的实现程序,继承不继承父类plugin-api都可以
第一步:引入相关依赖
- 架构级依赖
<!-- 引入要实现的plugin-api -->
<dependency>
    <groupId>com.example</groupId>
    <artifactId>plugin-xyz-api</artifactId>
    <version>1.0.0</version>
</dependency>
<!-- 引入spring-brick-bootstrap以完成插件的引导 -->
<dependency>
    <groupId>com.gitee.starblues</groupId>
    <artifactId>spring-brick-bootstrap</artifactId>
    <version>3.1.1</version>
</dependency>
<!-- 和主程序引入同样的spring-brick,不过这里需要设置为provided -->
<dependency>
    <groupId>com.gitee.starblues</groupId>
    <artifactId>spring-brick</artifactId>
    <version>3.1.1</version>
    <scope>provided</scope>
</dependency>- 业务级依赖
<!-- spring-boot-starter依赖 -->
<!--建议将spring-boot-starter依赖放到第一个位置, 以防止出现依赖冲突导致无法启动插件-->
<dependency>
    <groupId>org.springframework.boot</groupId>
    <artifactId>spring-boot-starter</artifactId>
    <version>2.6.13</version>
</dependency>
<!-- spring-boot-starter-web依赖. 当插件需要独立启动时,需要引入此插件。但是当要打包成插件前,需要去除此依赖(因为主程序中已经存在此依赖了) -->
<dependency>
    <groupId>org.springframework.boot</groupId>
    <artifactId>spring-boot-starter-web</artifactId>
    <version>2.6.13</version>
    <scope>test</scope>
</dependency>
第二步:修改程序入口方法
import com.gitee.starblues.bootstrap.SpringPluginBootstrap;
import org.springframework.boot.autoconfigure.SpringBootApplication;
/**
 * plugin start class
 */
@SpringBootApplication
public class PluginXyzApplication extends SpringPluginBootstrap {
    public static void main(String[] args) {
        new PluginXyzApplication().run(args);
    }
}
第三步:设置maven插件
<!-- 本人引入此插件后,去除了spring-boot自身的打包插件 -->
<plugin>
    <groupId>com.gitee.starblues</groupId>
    <artifactId>spring-brick-maven-packager</artifactId>
    <version>3.1.1</version>
    <configuration>
        <!--当前打包模式为: 开发模式-->
        <mode>prod</mode>
        <!--插件信息定义-->
        <pluginInfo>
            <!--插件id-->
            <id>plugin-xyz</id>
            <!--插件入口类, 定义说明见: 定义插件入口类-->
            <bootstrapClass>com.example.springbrick.plugin.xyz.PluginXyzApplication</bootstrapClass>
            <!--插件版本号-->
            <version>1.0.0</version>
        </pluginInfo>
    </configuration>
    <executions>
        <execution>
            <goals>
                <goal>repackage</goal>
            </goals>
        </execution>
    </executions>
</plugin>
4. 测试验证
提示:本人这里进行简单验证说明,更多验证可以去文末下载源码,自己跑起来后完成验证
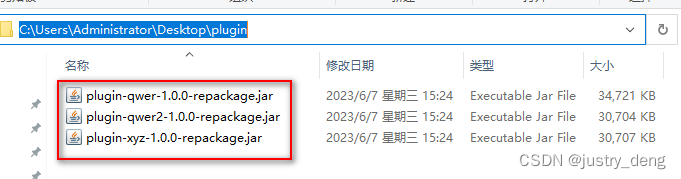
- 第一步:打包所有插件实现,然后放到主程序配置文件中(
plugin.pluginPath)指定的插件位置
- 第二步:启动主程序
  .   ____          _            __ _ _
 /\\ / ___'_ __ _ _(_)_ __  __ _ \ \ \ \
( ( )\___ | '_ | '_| | '_ \/ _` | \ \ \ \
 \\/  ___)| |_)| | | | | || (_| |  ) ) ) )
  '  |____| .__|_| |_|_| |_\__, | / / / /
 =========|_|==============|___/=/_/_/_/
 :: Spring Boot ::               (v2.6.13)
2023-06-07 15:27:55.223  INFO 20520 --- [       Thread-0] c.g.s.l.launcher.SpringMainBootstrap     : Starting SpringMainBootstrap using Java 17.0.3.1 on WIN-E500OMQS07D with PID 20520 (D:\maven\repository\com\gitee\starblues\spring-brick-loader\3.1.1\spring-brick-loader-3.1.1.jar started by Administrator in D:\working\demo)
2023-06-07 15:27:55.224  INFO 20520 --- [       Thread-0] c.g.s.l.launcher.SpringMainBootstrap     : No active profile set, falling back to 1 default profile: "default"
2023-06-07 15:27:55.430  INFO 20520 --- [       Thread-0] c.i.c.aop.ParameterRecorderRegistrar     : registry spring-bean parameterRecorder with ConstructorArg includePrefixes -> [], excludePrefixes -> [], parameterHandleMode -> USE_JSON, pretty -> true, ignoreParamTypes -> []
2023-06-07 15:27:55.902  INFO 20520 --- [       Thread-0] o.s.b.w.embedded.tomcat.TomcatWebServer  : Tomcat initialized with port(s): 8080 (http)
2023-06-07 15:27:55.909  INFO 20520 --- [       Thread-0] o.apache.catalina.core.StandardService   : Starting service [Tomcat]
2023-06-07 15:27:55.909  INFO 20520 --- [       Thread-0] org.apache.catalina.core.StandardEngine  : Starting Servlet engine: [Apache Tomcat/9.0.68]
2023-06-07 15:27:55.990  INFO 20520 --- [       Thread-0] o.a.c.c.C.[Tomcat].[localhost].[/]       : Initializing Spring embedded WebApplicationContext
2023-06-07 15:27:55.990  INFO 20520 --- [       Thread-0] w.s.c.ServletWebServerApplicationContext : Root WebApplicationContext: initialization completed in 737 ms
2023-06-07 15:27:56.246  INFO 20520 --- [       Thread-0] c.i.commonspring.aop.ParameterRecorder   : Set LocalVariableTableParameterNameDiscoverer as parameterNameDiscoverer.
2023-06-07 15:27:56.358  INFO 20520 --- [       Thread-0] o.s.b.w.embedded.tomcat.TomcatWebServer  : Tomcat started on port(s): 8080 (http) with context path ''
2023-06-07 15:27:56.364  INFO 20520 --- [       Thread-0] c.g.s.l.launcher.SpringMainBootstrap     : Started SpringMainBootstrap in 1.377 seconds (JVM running for 1.736)
2023-06-07 15:27:56.367  INFO 20520 --- [       Thread-0] c.g.s.i.operator.DefaultPluginOperator   : 插件加载环境: prod
2023-06-07 15:27:56.367  INFO 20520 --- [       Thread-0] c.g.s.i.operator.DefaultPluginOperator   : 插件加载模式: isolation
2023-06-07 15:27:56.367  INFO 20520 --- [       Thread-0] c.g.s.i.operator.DefaultPluginOperator   : 开始加载插件, 插件根路径为:
C:/Users/Administrator/Desktop/plugin
2023-06-07 15:27:56.367  INFO 20520 --- [       Thread-0] c.g.s.s.web.PluginStaticResourceConfig   : 插件静态资源访问前缀配置为: /static-plugin/{pluginId}
2023-06-07 15:27:56.382  INFO 20520 --- [       Thread-0] c.g.starblues.core.DefaultPluginManager  : 插件[plugin-qwer@1.0.0]加载成功
2023-06-07 15:27:56.383  INFO 20520 --- [       Thread-0] c.g.starblues.core.DefaultPluginManager  : 插件[plugin-qwer2@1.0.0]加载成功
2023-06-07 15:27:56.384  INFO 20520 --- [       Thread-0] c.g.starblues.core.DefaultPluginManager  : 插件[plugin-xyz@1.0.0]加载成功
2023-06-07 15:27:57.446  INFO 20520 --- [       Thread-0] c.g.s.b.ConfigurePluginEnvironment       : Plugin[plugin-qwer@1.0.0]  No active profile set, falling back to default profiles : default
2023-06-07 15:27:57.785  INFO 20520 --- [       Thread-0] c.g.starblues.core.DefaultPluginManager  : 插件[plugin-qwer@1.0.0]启动成功
2023-06-07 15:27:58.690  INFO 20520 --- [       Thread-0] c.g.s.b.ConfigurePluginEnvironment       : Plugin[plugin-qwer2@1.0.0]  No active profile set, falling back to default profiles : default
2023-06-07 15:27:59.033  INFO 20520 --- [       Thread-0] c.g.starblues.core.DefaultPluginManager  : 插件[plugin-qwer2@1.0.0]启动成功
2023-06-07 15:27:59.938  INFO 20520 --- [       Thread-0] c.g.s.b.ConfigurePluginEnvironment       : Plugin[plugin-xyz@1.0.0]  No active profile set, falling back to default profiles : default
2023-06-07 15:28:00.233  INFO 20520 --- [       Thread-0] c.g.starblues.core.DefaultPluginManager  : 插件[plugin-xyz@1.0.0]启动成功
2023-06-07 15:28:00.234  INFO 20520 --- [       Thread-0] c.g.s.i.operator.DefaultPluginOperator   : 插件初始化完成
访问测试类,观察控制台输出
测试类长这样,访问
localhost:8080/demo/hello-world接口即可
import com.example.springbrick.application.helper.DynamicClass;
import com.example.springbrick.application.plugin.api.qwer.QwerService;
import com.example.springbrick.application.plugin.api.xyz.XyzService;
import com.example.springbrick.application.plugin.api.xyz.entity.IdInfo;
import com.example.springbrick.application.plugin.api.xyz.entity.User;
import com.gitee.starblues.integration.user.PluginUser;
import org.springframework.web.bind.annotation.GetMapping;
import org.springframework.web.bind.annotation.RequestMapping;
import org.springframework.web.bind.annotation.RestController;
import javax.annotation.Resource;
import java.time.LocalDateTime;
import java.util.Map;
/**
* 动态插件支持
*/
@RestController
@RequestMapping("/demo")
public class DemoController {
@Resource
private PluginUser pluginUser;
@GetMapping("hello-world")
public void helloWorld() {
User user = new User();
user.setName("张三");
user.setBirthday(LocalDateTime.now());
IdInfo idInfo = new IdInfo();
idInfo.setIdNumber("12345");
idInfo.setExt("non");
user.setIdInfo(idInfo);
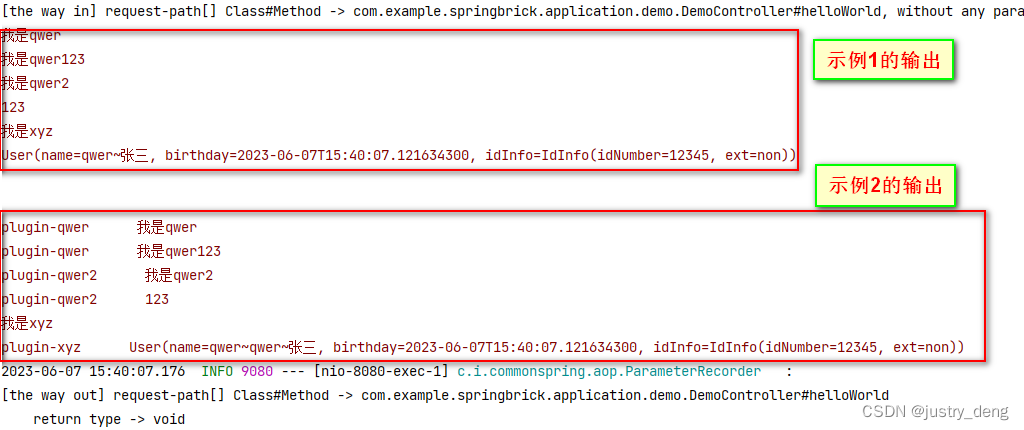
/* ------------------------------ 示例1 ------------------------------ */
QwerService qwerService = pluginUser.getBeanByInterface("plugin-qwer", QwerService.class).get(0);
System.err.println(qwerService.helloWorld());
System.err.println(qwerService.helloWorld123("sdfsd"));
XyzService xyzService = pluginUser.getBeanByInterface("plugin-xyz", XyzService.class).get(0);
xyzService.helloWorld();
System.err.println(xyzService.userInfo(user));
System.err.println();
System.err.println();
/* ------------------------------ 示例2 ------------------------------ */
Map<String, Object> pluginBean = pluginUser.getBean(QwerService.BEAN_NAME, false).getPluginBean();
pluginBean.forEach((pluginId, springBean) -> {
System.err.println(pluginId + " " + DynamicClass.exec(springBean, QwerService::helloWorld));
System.err.println(pluginId + " " + DynamicClass.exec(springBean, QwerService.EMPTY_INSTANCE::helloWorld123, "123"));
});
pluginBean = pluginUser.getBean(XyzService.BEAN_NAME, false).getPluginBean();
pluginBean.forEach((pluginId, springBean) -> {
DynamicClass.exec(springBean, XyzService::helloWorld);
System.err.println(pluginId + " " + DynamicClass.exec(springBean, XyzService.EMPTY_INSTANCE::userInfo, user));
});
}
}- 控制台输出
以上就是Springboot集成Springbrick实现动态插件的步骤详解的详细内容,更多关于Springboot集成Springbrick 动态插件的资料请关注脚本之家其它相关文章!
相关文章
 这篇文章主要介绍了Java容器类源码详解 Deque与ArrayDeque,Deque 接口继承自 Queue接口,但 Deque 支持同时从两端添加或移除元素,因此又被成为双端队列。,需要的朋友可以参考下2019-06-06
 这篇文章主要介绍了MAC算法之消息摘要算法HmacMD5的实现的相关资料,这里提供实例,帮助大家学习理解这部分知识,需要的朋友可以参考下2017-08-08
 这篇文章主要介绍了SpringBoot如何使用Scala进行开发的实现,文中通过示例代码介绍的非常详细,对大家的学习或者工作具有一定的参考学习价值,需要的朋友们下面随着小编来一起学习学习吧2019-12-12
 这篇文章主要为大家详细介绍了java struts2学习笔记之线程安全,感兴趣的朋友可以参考一下2016-04-04
 这篇文章主要介绍了SpringBoot整合ES解析搜索返回字段问题,本文给大家介绍的非常详细,对大家的学习或工作具有一定的参考借鉴价值,需要的朋友可以参考下2023-03-03
 下面小编就为大家分享一篇java发起http请求获取返回的Json对象方法,具有很好的参考价值,希望对大家有所帮助。一起跟随小编过来看看吧2018-03-03
 这篇文章主要为大家详细介绍了java布局管理之CardLayout的简单实例,具有一定的参考价值,感兴趣的小伙伴们可以参考一下2018-03-03
 在日常的开发中,参数校验是非常重要的一个环节,严格参数校验会减少很多出bug的概率,增加接口的安全性,下面这篇文章主要给大家介绍了关于Spring Boot参数校验及分组校验使用的相关资料,需要的朋友可以参考下2021-08-08
 我们知道,当写完一个普通的 Java 类后,想让 Spring IoC 容器在创建类的实例对象时使用构造方法完成实例对象的依赖注入,那么就需要在配置元数据中写好类的 Bean 定义,包括各种标签的属性。所以本文我们来说说这其中的配置细节,需要的朋友可以参考下2023-07-07
spring boot+vue 的前后端分离与合并方案实例详解
这篇文章主要介绍了spring boot+vue 的前后端分离与合并方案实例详解,需要的朋友可以参考下2017-11-11


最新评论