
SpringSecurityOAuth2实现微信授权登录
继上一篇走了下登录的流程后,已经熟悉了不少,这一篇就来尝试下微信的授权登录实现,之所以学下微信,是因为微信在当前的地位还是无人可及的,而且也是因为微信的OAuth2比较不同,挺多需要自定义的,因此来搞下微信授权登录,会了这个,相信别的第三方都可以轻松应对。
一. 准备工作
工程建立与之前一样
配置OAuth应用
对比之前的Github和Gitee,咱们都在他们那创建了自己的OAuth应用,那么对于微信来说,也是需要的,只是微信有些特殊,微信平台限制只有微信公众号服务号才能使用授权登录。那我们这种普通使用者是不是没法搞了?
实际上,微信还是提供了一个测试平台来供我们模拟服务号进行功能测试,我们可以到微信公众平台接口申请测试账号
通过扫码登录后,会显示如下页面: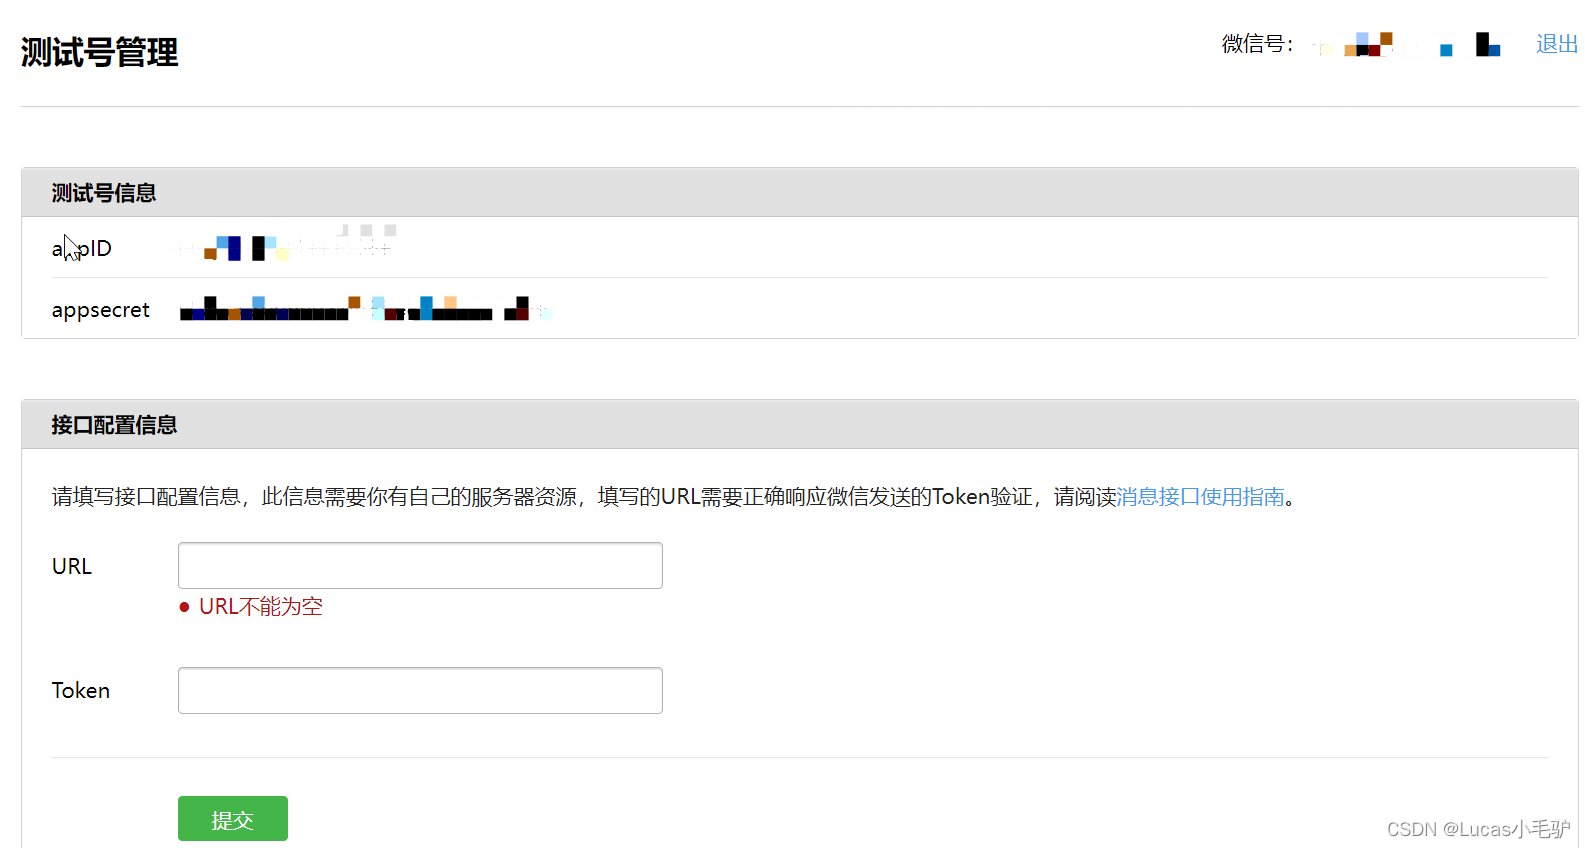

微信的不是叫ClientID,而是appid
你以为这样就OK啦?当然不是!看到了那个接口配置信息了没,微信需要我们配置一个接口,然后在提交时他会去请求我们的接口,做一次校验,我们需要在自己的服务器提供这样的接口,并且按微信的要求正确返回,他才认为我们的服务器是正常的。
具体的要求可以看他的文档:消息接口使用指南其中最关键的就是这个:
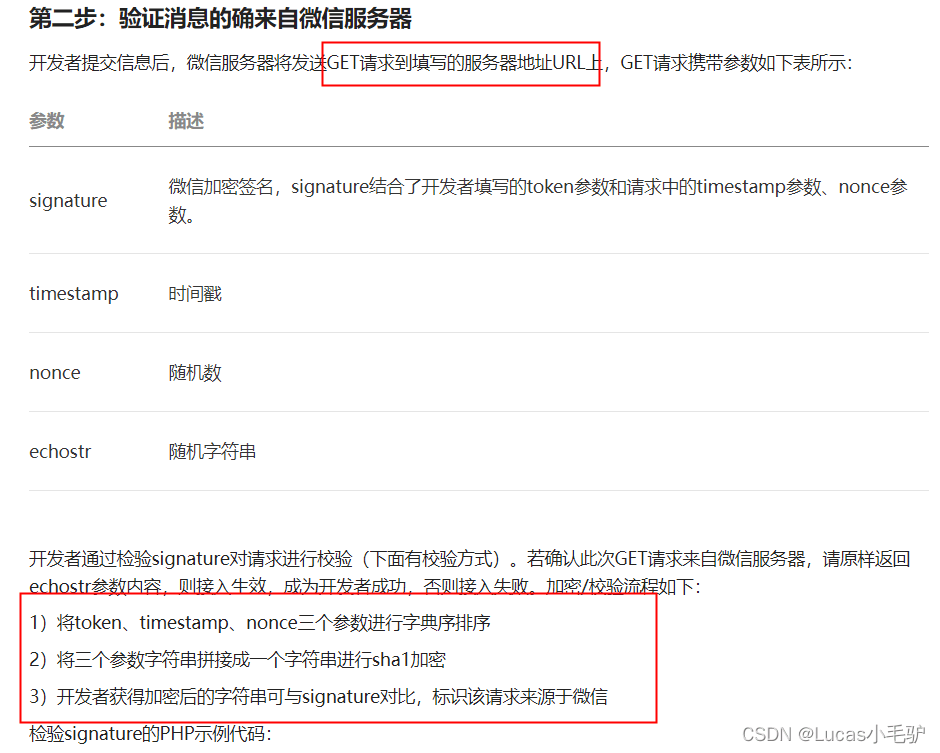
其实这个也好办,咱们写个程序就可以了,但是这里又会有另一问题需要解决,我们自己在电脑写的应用,电脑的网络大概率是内网(除非你在有公网的服务器开发),那微信的服务器要怎么请求到我们内网的电脑?
这就需要我们去搞一个内网穿透了。
- 内网穿透配置
推荐一款免费的工具:cpolar
要注意的是好像24h还是多长时间,这个域名会自动刷新的,所以也仅仅是适合我们测试用用
这里我配置了几个隧道,分别映射本地的80端口和8844端口
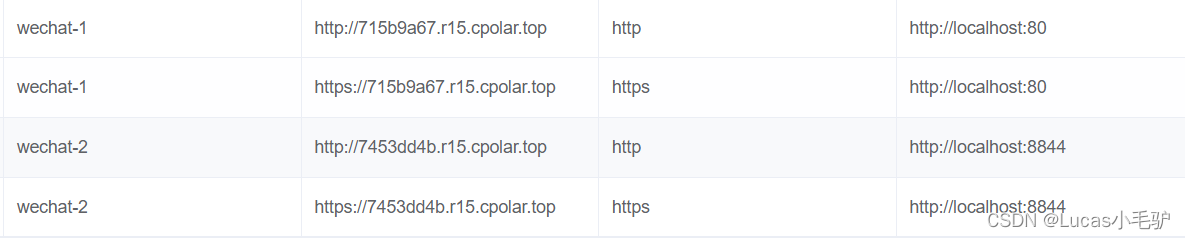
80端口是为了给微信服务器能用http请求我们接口
8844是应用程序开启的端口
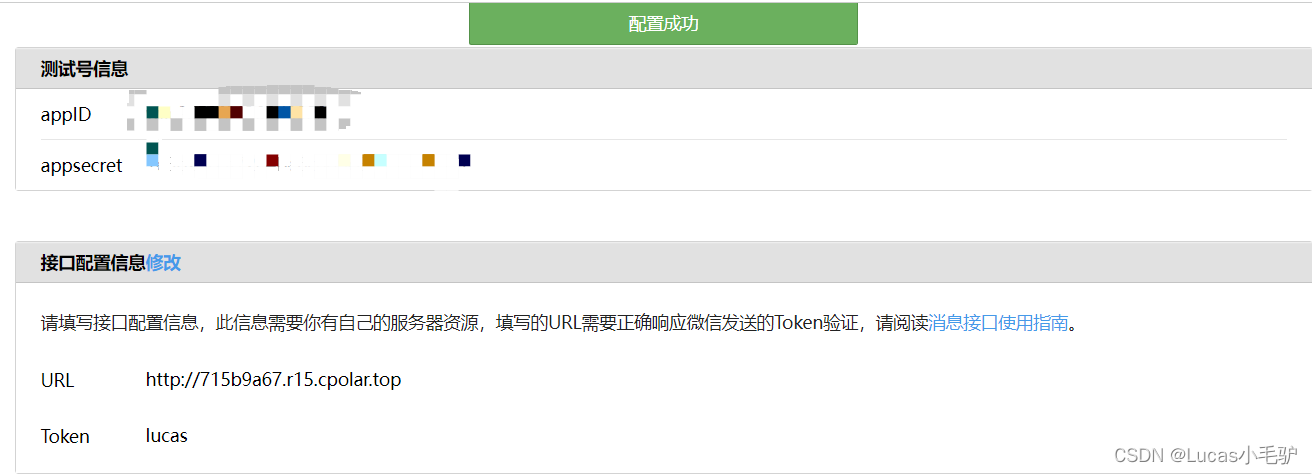
- 回到第二步配置接口url和Token
搞定内网穿透后,将80端口对应的http的接口填入微信配置中: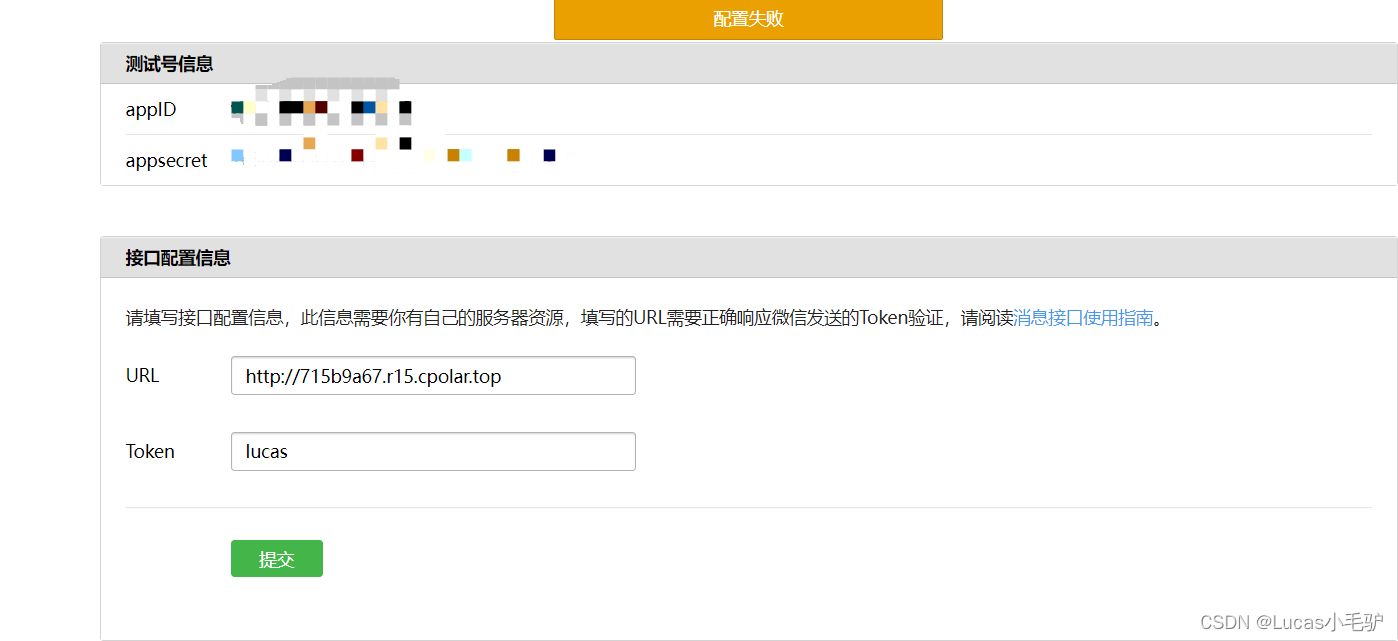

token可以随便填,但需要和接口代码中的token保持一样。
这里点击提交显示配置失败,是因为我们的接口还没写,微信服务器请求不到正确响应导致。这里我用golang来快速的提供下这个接口:
package main
import (
	"crypto/sha1"
	"encoding/hex"
	"net/http"
	"sort"
	"github.com/gin-gonic/gin"
)
type ByAlphabet []string
func (a ByAlphabet) Len() int {
	return len(a)
}
func (a ByAlphabet) Swap(i, j int) {
	a[i], a[j] = a[j], a[i]
}
func (a ByAlphabet) Less(i, j int) bool {
	return a[i] < a[j]
}
func SHA1(s string) string {
	hash := sha1.New()
	hash.Write([]byte(s))
	return hex.EncodeToString(hash.Sum(nil))
}
func main() {
	engine := gin.Default()
	engine.GET("/", func(ctx *gin.Context) {
		signature := ctx.Query("signature")
		timestamp := ctx.Query("timestamp")
		nonce := ctx.Query("nonce")
		echostr := ctx.Query("echostr")
		token := "lucas"
		tmpSlice := []string{nonce, timestamp, token}
		// 1.按字典序排序
		sort.Sort(ByAlphabet(tmpSlice))
		// 2.三个字段拼接为str
		str := tmpSlice[0] + tmpSlice[1] + tmpSlice[2]
		// 3. 计算str的sha1加密的字符串
		sha1Str := SHA1(str)
		// 4.比较sha1Str和signature,相同则返回echostr
		if sha1Str == signature {
			ctx.String(http.StatusOK, echostr)
			return
		} else {
			ctx.String(http.StatusOK, "")
			return
		}
	})
	engine.Run(":80")
}
启动应用,然后再在网页上提交,就可以成功了。
- 到了这一步,离成功也不远了
在上面这些操作,实际就是类似之前在gitee中新建一个OAuth app,但是不知道是否还记得,当时我们需要填写一个授权成功后的回调url的,接着我们就来微信这配置。
还是微信公众平台测试号管理这个页面,往下拉,会看到一个体验接口权限表,没错,我们需要获取用户信息,就在这个里面: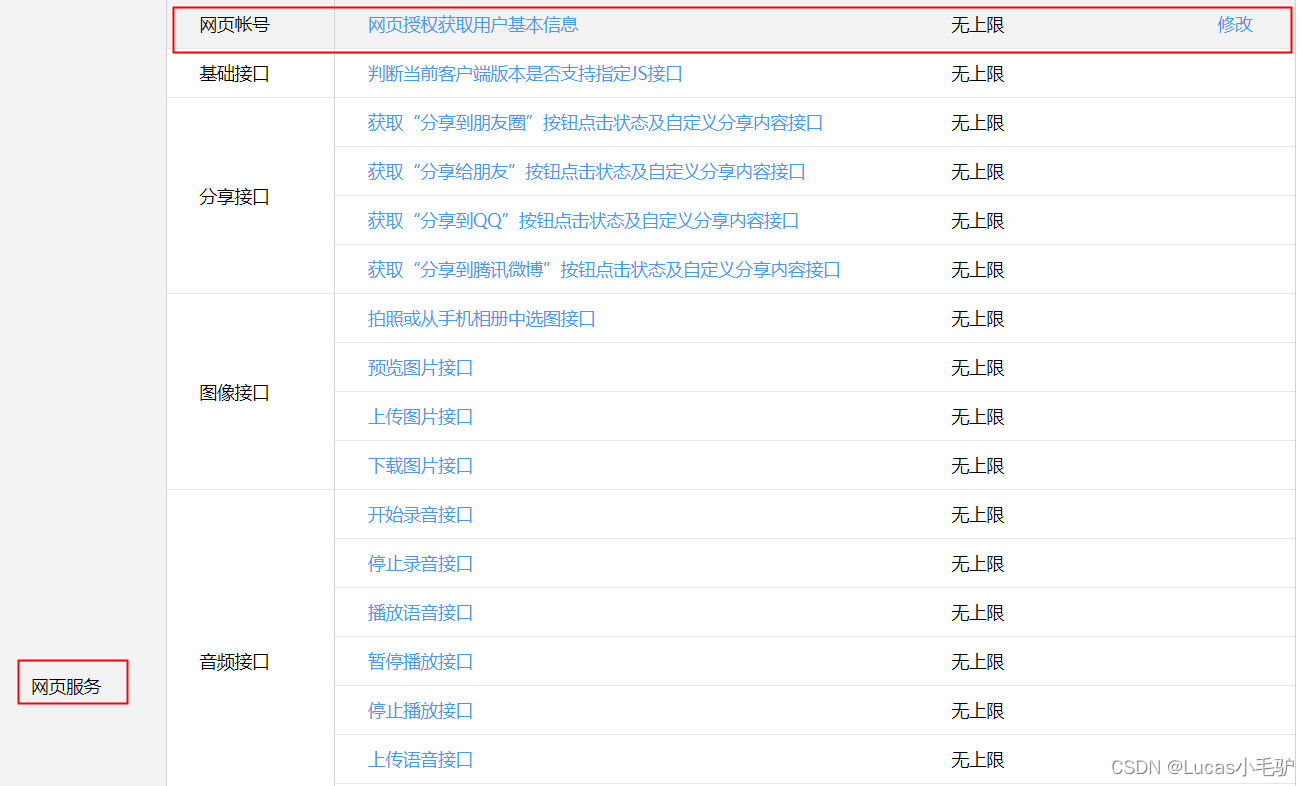

点击修改,会展示如下:
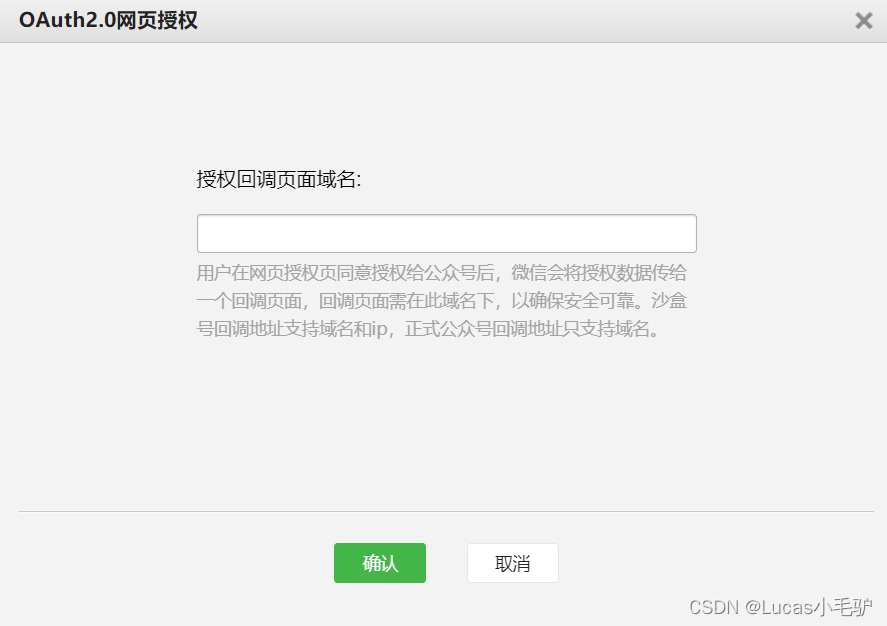
在这里填入我们的域名,注意不需要协议头,只要域名即可,也就是内网穿透给我们的那个:7453dd4b.r15.cpolar.top
注意这里不需要配置端口,只需要域名即可
好了,到了这一步,环境准备就完成了。
二. 开始编码
阅读官方文档
首先,先看看微信的官方接口文档说明在这文档里,我们可以了解到各个接口的请求路径以及参数,这在接下来配置中需要用到。
另外,我们也可以看到,微信使用appid而不是clientid,这也是我们需要自定义的地方。配置文件
根据文档,将相关的配置项写入
spring:
  security:
    oauth2:
      client:
        registration:
          github:
            clientId: xxxx # 填入自己应用的clientId
            clientSecret: xxxxx # 填入自己应用的clientSecret
            redirectUri: http://localhost:8844/login/oauth2/code/github
          gitee:
            clientId: xxxx # 填入自己应用的clientId
            clientSecret: xxxx # 填入自己应用的clientSecret
            redirectUri: http://localhost:8844/login/oauth2/code/gitee
            authorizationGrantType: authorization_code
          wechat:
            clientId: xxxx # 填入自己应用的appID
            clientSecret: xxxx # 填入自己应用的appsecret
            redirectUri: http://347b2d93.r8.cpolar.top/login/oauth2/code/wechat
            authorizationGrantType: authorization_code
            scope:
            - snsapi_userinfo
            clientName: tencent-wechat
        provider:
          gitee:
            authorizationUri: https://gitee.com/oauth/authorize
            tokenUri: https://gitee.com/oauth/token
            userInfoUri: https://gitee.com/api/v5/user
            userNameAttribute: name
          wechat:
            authorizationUri: https://open.weixin.qq.com/connect/oauth2/authorize
            tokenUri: https://api.weixin.qq.com/sns/oauth2/access_token
            userInfoUri: https://api.weixin.qq.com/sns/userinfo
userNameAttribute: nickname- 自定义配置
关于自定义配置这块,我们按照oauth2授权码的流程,结合官方文档接口,一步步看哪些是需要自定义配置的,然后给他定制上。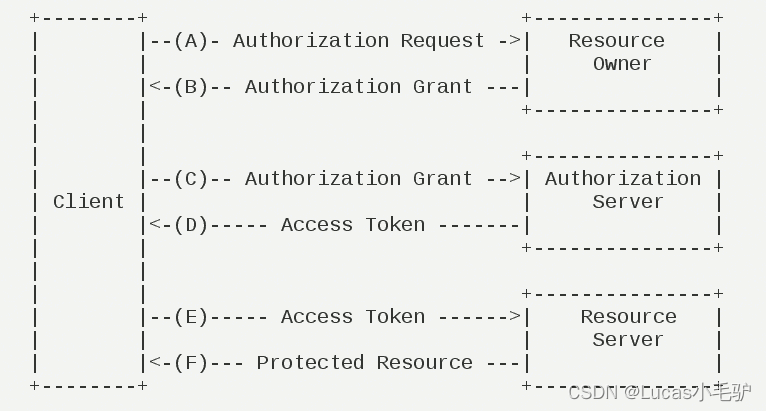

- 第一步是去申请授权码
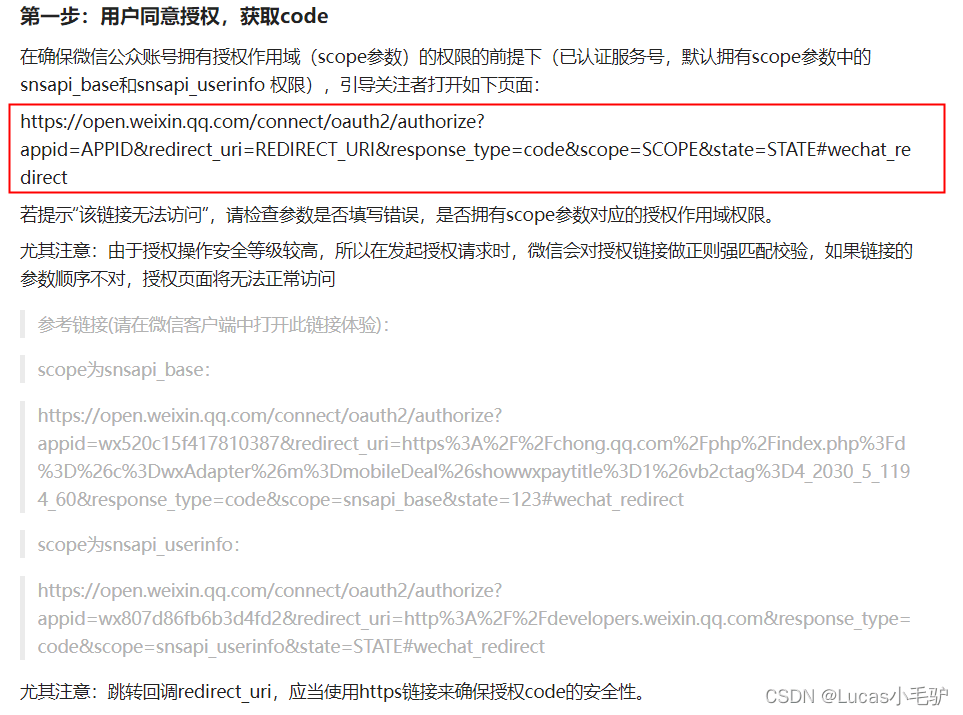

可以看到这里就需要自定义了,因为参数变为了appid以及需要加一个锚点#wechat_redirect
- 回顾下之前走过的登录流程分析,我们已经配置好了微信的Provider,在访问受限制的接口时会跳转到登录页面,点击wechat,就会被OAuth2AuthorizationRequestRedirectFilter过滤器过滤处理,因此我们要自定义参数,需要到这个过滤器中去查找可自定义的地方。
- 之前也分析过,在默认的实现类
DefaultOAuth2AuthorizationRequestResolver解析请求时预留了一个this.authorizationRequestCustomizer.accept(builder),而这个builder就是构建请求的 - 因此我们可以实现这个
authorizationRequestCustomizer,再将它set进去:
private final static String WECHAT_APPID = "appid";
private final static String WECHAT_SECRET = "secret";
private final static String WECHAT_FRAGMENT = "wechat_redirect";
/**
 * 1. 自定义微信获取授权码的uri
 * https://open.weixin.qq.com/connect/oauth2/authorize?
 * appid=wx807d86fb6b3d4fd2
 * &redirect_uri=http%3A%2F%2Fdevelopers.weixin.qq.com
 * &response_type=code
 * &scope=snsapi_userinfo
 * &state=STATE  非必须
 * #wechat_redirect
 * 微信比较特殊,比如不是clientid,而是appid,还强制需要一个锚点#wechat+redirect
 * @return
 */
public OAuth2AuthorizationRequestResolver customOAuth2AuthorizationRequestResolver(ClientRegistrationRepository clientRegistrationRepository) {
    // 定义一个默认的oauth2请求解析器
    DefaultOAuth2AuthorizationRequestResolver oAuth2AuthorizationRequestResolver = new DefaultOAuth2AuthorizationRequestResolver(clientRegistrationRepository, OAuth2AuthorizationRequestRedirectFilter.DEFAULT_AUTHORIZATION_REQUEST_BASE_URI);
    // 进行自定义
    Consumer<OAuth2AuthorizationRequest.Builder> authorizationRequestCustomizer = (builder) -> {
        builder.attributes(attributeConsumer -> {
            // 判断registrationId是否为wechat
            String registrationId = (String) attributeConsumer.get(OAuth2ParameterNames.REGISTRATION_ID);
            if ("wechat".equals(registrationId)) {
                // 替换参数名称
                builder.parameters(this::replaceWechatUriParamter);
                // 增加锚点,需要在uri构建中添加
                builder.authorizationRequestUri((uriBuilder) -> {
                    uriBuilder.fragment(WECHAT_FRAGMENT);
                    return uriBuilder.build();
                });
            }
        });
    };
    // 设置authorizationRequestCustomizer
    oAuth2AuthorizationRequestResolver.setAuthorizationRequestCustomizer(authorizationRequestCustomizer);
    return oAuth2AuthorizationRequestResolver;
}
/**
 * 替换Uri参数,parameterMap是保存的请求的各个参数
 * @param parameterMap
 */
private void replaceWechatUriParamter(Map<String, Object> parameterMap) {
    Map<String, Object> linkedHashMap = new LinkedHashMap<>();
    // 遍历所有参数,有序的,替换掉clientId为appid
    parameterMap.forEach((k, v) -> {
        if (OAuth2ParameterNames.CLIENT_ID.equals(k)) {
            linkedHashMap.put(WECHAT_APPID, v);
        } else {
            linkedHashMap.put(k, v);
        }
    });
    // 清空原始的paramterMap
    parameterMap.clear();
    // 将新的linkedHashMap存入paramterMap
    parameterMap.putAll(linkedHashMap);
}- 至于这内部替换参数的做法,可以先看看builder的实现,它在构建时已经创建了所有默认的参数,并且在
attributes中放入了registration_id,因此可以先拿到registration_id,再将参数全部拿出来,再进行遍历
在DefaultOAuth2AuthorizationRequestResolver中:

而参数部分,在构建uri时已经getParameters()将参数全部拿出来,并且设置到了this.parametersConsumer:
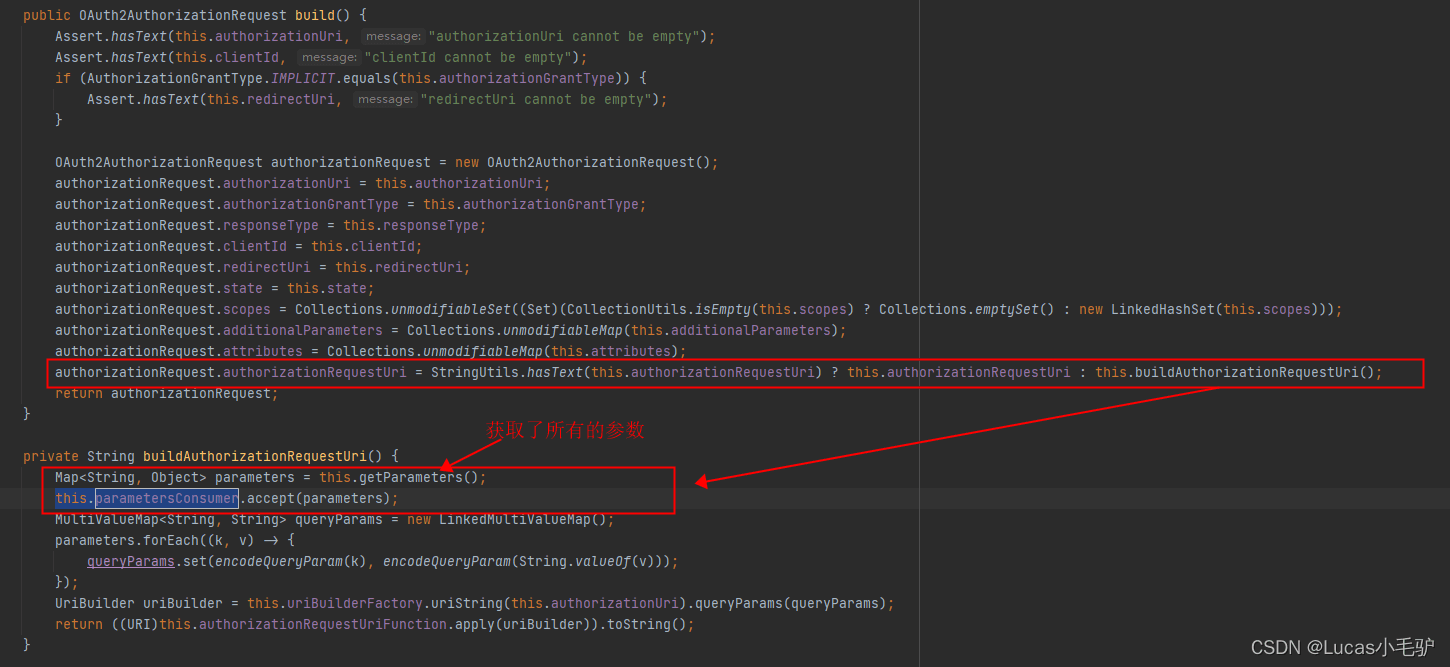
调用builder.parameters的用途就是重新处理参数:

这一块可能比较乱,我只是想告诉你们怎么写出那个自定义的代码的,结合这些应该是可以理解的。
- 第二步是通过code获取access_token
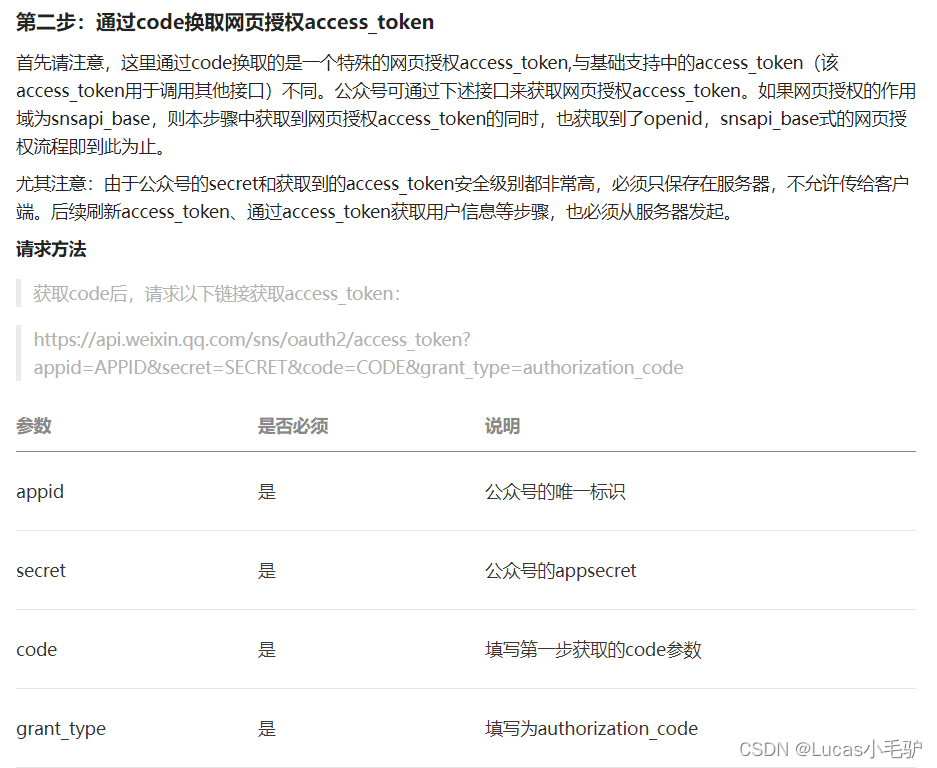

可以看到这里的请求参数也是需要做下变更的。
按照流程,这一步会被
OAuth2LoginAuthenticationFilter过滤处理,然后会交给AuthenticationManager,最终会委托给ProviderManager处理,再找到合适的Provider处理,这里是OAuth2LoginAuthenticationProvider,它又让OAuth2AuthorizationCodeAuthenticationProvider帮忙处理了。直接来到
OAuth2AuthorizationCodeAuthenticationProvider的authenticate()方法,它是交给了accessTokenResponseClient去请求获取access_token的: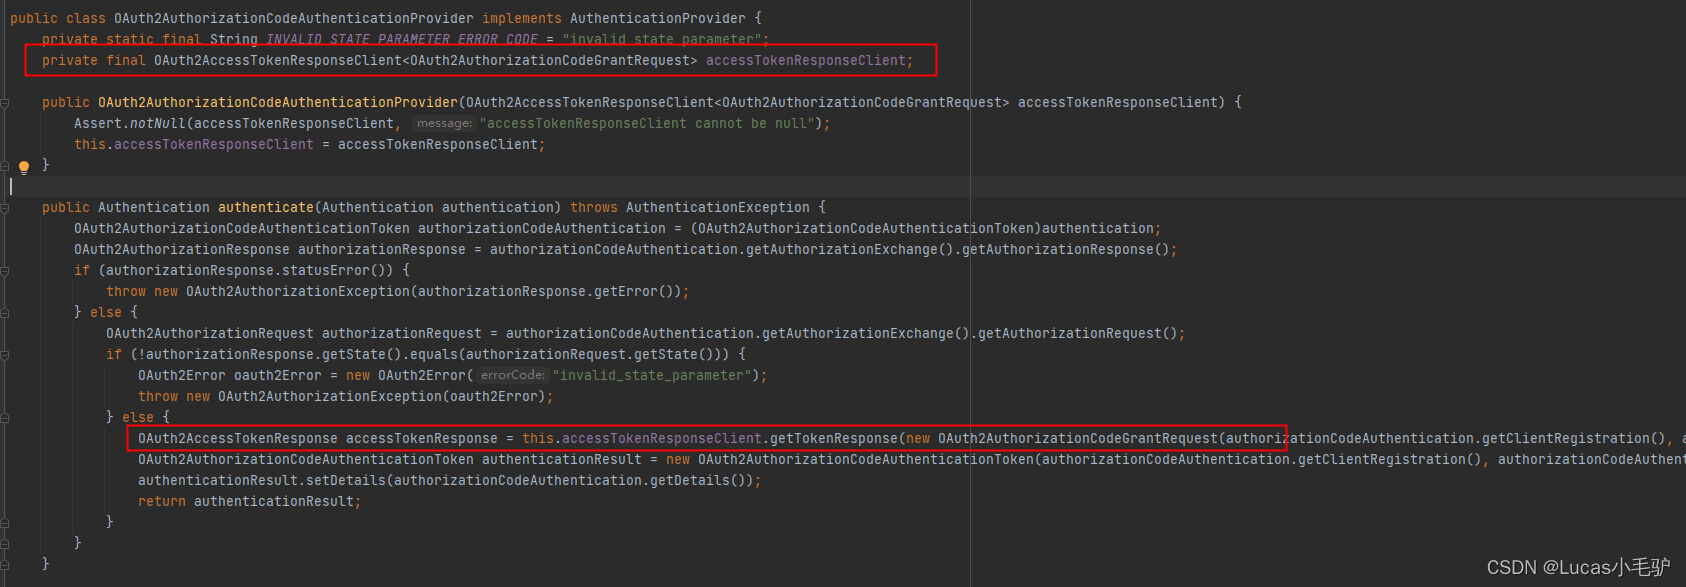
找到
OAuth2AccessTokenResponseClient的实现类:DefaultAuthorizationCodeTokenResponseClient,看到他的getTokenResponse方法,存在一个requestEntityConverter,请求实体转换器,并且提供了set方法,这就是说明我们可以自定义替换默认实现
接着进去它的实现类看看做了什么:
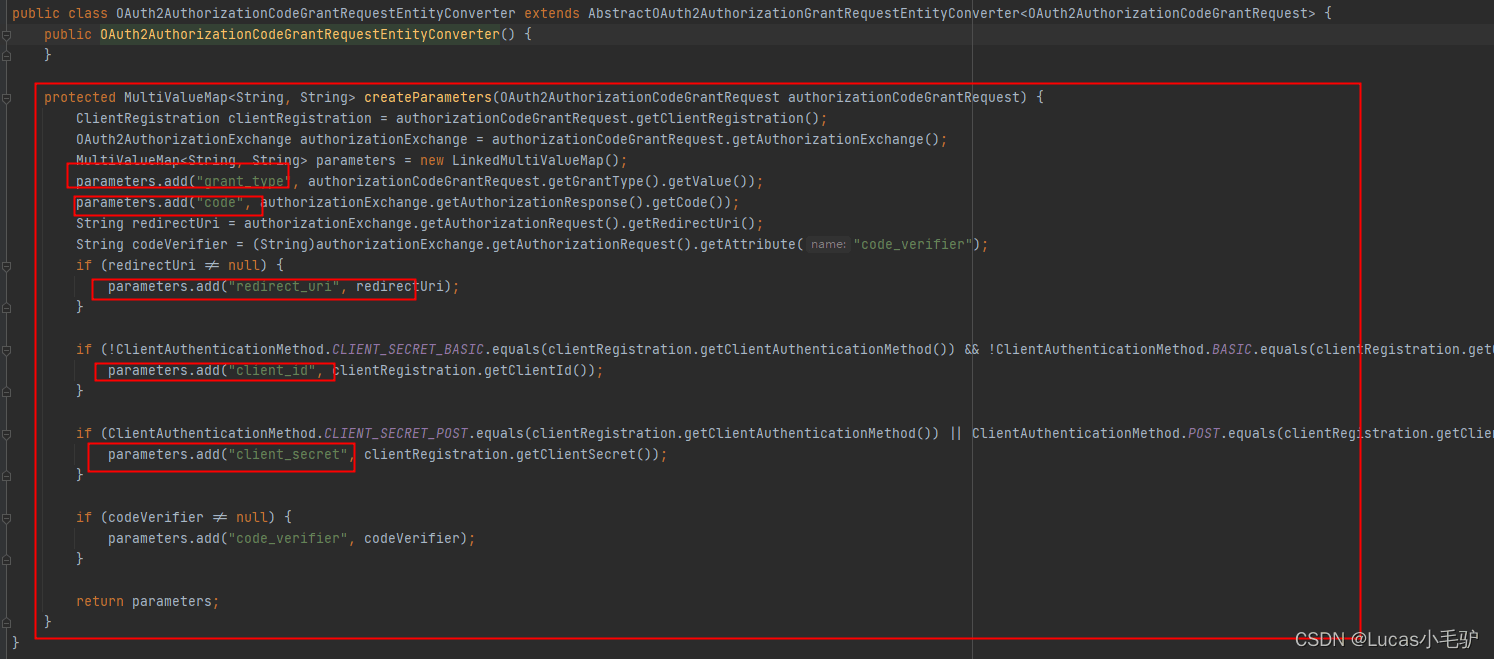


一眼看穿,实际就是在构造请求参数,那么我们只需要来实现自己的requestEntityConverter就可以在请求参数上为所欲为了。
5. 参考代码如下:
private final static String WECHAT_APPID = "appid";
private final static String WECHAT_SECRET = "secret";
private final static String WECHAT_FRAGMENT = "wechat_redirect";
/**
    * 2. 自定义请求access_token时的请求体转换器
    * 获取access_token
    * https://api.weixin.qq.com/sns/oauth2/access_token?
    * appid=APPID
    * &secret=SECRET
    * &code=CODE 从上一个请求响应中获取
    * &grant_type=authorization_code  框架帮忙填写了
    */
public OAuth2AccessTokenResponseClient<OAuth2AuthorizationCodeGrantRequest> customOAuth2AccessTokenResponseClient() {
    // 定义默认的Token响应客户端
    DefaultAuthorizationCodeTokenResponseClient oAuth2AccessTokenResponseClient = new DefaultAuthorizationCodeTokenResponseClient();
    // 定义默认的转换器
    OAuth2AuthorizationCodeGrantRequestEntityConverter oAuth2AuthorizationCodeGrantRequestEntityConverter = new OAuth2AuthorizationCodeGrantRequestEntityConverter();
    // 自定义参数转换器
    Converter<OAuth2AuthorizationCodeGrantRequest, MultiValueMap<String, String>> customParameterConverter = (authorizationCodeGrantRequest) -> {
        ClientRegistration clientRegistration = authorizationCodeGrantRequest.getClientRegistration();
        OAuth2AuthorizationExchange authorizationExchange = authorizationCodeGrantRequest.getAuthorizationExchange();
        MultiValueMap<String, String> parameters = new LinkedMultiValueMap();
        parameters.add("grant_type", authorizationCodeGrantRequest.getGrantType().getValue());
        parameters.add("code", authorizationExchange.getAuthorizationResponse().getCode());
        String redirectUri = authorizationExchange.getAuthorizationRequest().getRedirectUri();
        String codeVerifier = (String)authorizationExchange.getAuthorizationRequest().getAttribute("code_verifier");
        if (redirectUri != null) {
            parameters.add("redirect_uri", redirectUri);
        }
        parameters.add(WECHAT_APPID, clientRegistration.getClientId());
        parameters.add(WECHAT_SECRET, clientRegistration.getClientSecret());
        if (codeVerifier != null) {
            parameters.add("code_verifier", codeVerifier);
        }
        return parameters;
    };
    // 设置自定义参数转换器
    oAuth2AuthorizationCodeGrantRequestEntityConverter.setParametersConverter(customParameterConverter);
    // 自定义RestTemplate处理响应content-type为“text/plain”
    OAuth2AccessTokenResponseHttpMessageConverter oAuth2AccessTokenResponseHttpMessageConverter = new OAuth2AccessTokenResponseHttpMessageConverter();
    oAuth2AccessTokenResponseHttpMessageConverter.setSupportedMediaTypes(Arrays.asList(MediaType.TEXT_PLAIN, MediaType.APPLICATION_JSON));
    // 处理TOKEN_TYPE为null的问题,自定义accessTokenResponseParametersConverter,给TOKEN_TYPE赋值
    // 因为已经有默认的处理了,只是需要给token_type赋值
    Converter<Map<String, Object>, OAuth2AccessTokenResponse> setAccessTokenResponseConverter = (paramMap) -> {
        DefaultMapOAuth2AccessTokenResponseConverter defaultMapOAuth2AccessTokenResponseConverter = new DefaultMapOAuth2AccessTokenResponseConverter();
        paramMap.put(OAuth2ParameterNames.TOKEN_TYPE, OAuth2AccessToken.TokenType.BEARER.getValue());
        return defaultMapOAuth2AccessTokenResponseConverter.convert(paramMap);
    };
    // 设置这个转换器
    oAuth2AccessTokenResponseHttpMessageConverter.setAccessTokenResponseConverter(setAccessTokenResponseConverter);
    RestTemplate restTemplate = new RestTemplate(Arrays.asList(new FormHttpMessageConverter(), oAuth2AccessTokenResponseHttpMessageConverter));
    restTemplate.setErrorHandler(new OAuth2ErrorResponseErrorHandler());
    // 设置自定义转换器
    oAuth2AccessTokenResponseClient.setRequestEntityConverter(oAuth2AuthorizationCodeGrantRequestEntityConverter);
    // 设置自定义RestTemplate
    oAuth2AccessTokenResponseClient.setRestOperations(restTemplate);
    return oAuth2AccessTokenResponseClient;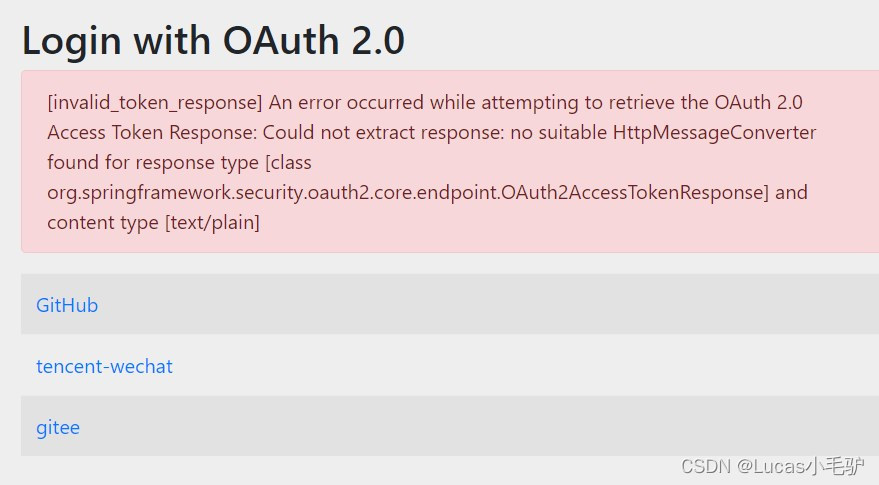
}注意看上面代码,除了参数转换这一部分的自定义外,还多做了一些处理响应的操作,主要原因是微信接口返回的是json字符串,但他的content-type却不是application/json,而是text/plain!!!,因此在这里会踩坑,没有做处理的话,可能你会遇到这样的报错:
既然返回的是
text/plain,那我们也只能做处理去兼容,注意下DefaultAuthorizationCodeTokenResponseClient类不止是提供了我们自定义请求实体转换,他发起请求的RestOperations也提供了set方法,也就是我们也可以自定义RestOperations来将text/plain给支持进去。

- 我们可以先看看官方中是怎么设置这个
RestOperations,他在构造方法中初始化:

在初始化RestTemplate(RestOperations的实现类)时传入了转换器OAuth2AccessTokenResponseHttpMessageConverter,进去看看:
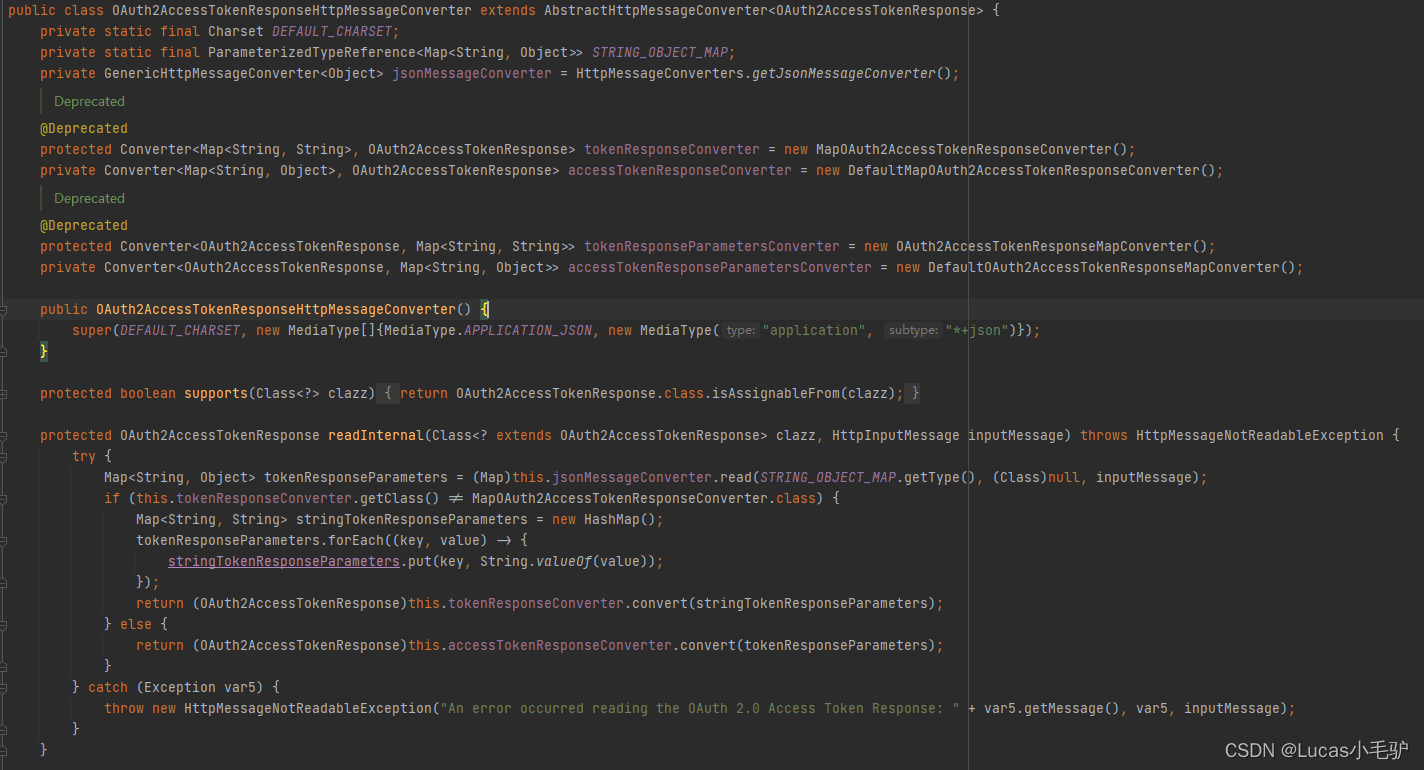
这就是官方自己定义的一个转换器,用来处理请求access_token响应的消息转换器,其实我们自定义就可以照猫画瓢,照抄这个转换器,再改改适配我们需要的。
但是看到这个转换器也提供了一些自定义的接口:accessTokenResponseConverter和accessTokenResponseParametersConverter,那我们也可以直接就自定义这部分。
- 接着看看这个
OAuth2AccessTokenResponseHttpMessageConverter继承了AbstractHttpMessageConverter<T> implements HttpMessageConverter<T>,该父类内有一个方法可以设置MediaType:

因此我们要想支持text/plain,那我们可以直接调用这个方法,进行设置,因此有了以下代码:
OAuth2AccessTokenResponseHttpMessageConverter oAuth2AccessTokenResponseHttpMessageConverter = new OAuth2AccessTokenResponseHttpMessageConverter();
oAuth2AccessTokenResponseHttpMessageConverter.setSupportedMediaTypes(Arrays.asList(MediaType.TEXT_PLAIN, MediaType.APPLICATION_JSON));
- 到这里,好像都没问题了,但是一运行起来,又会报错,这次的坑是:springsecurity默认token响应对象
OAuth2AccessTokenResponse中的OAuth2AccessToken对象在构造时必须有TokenType这个属性,否则会报错: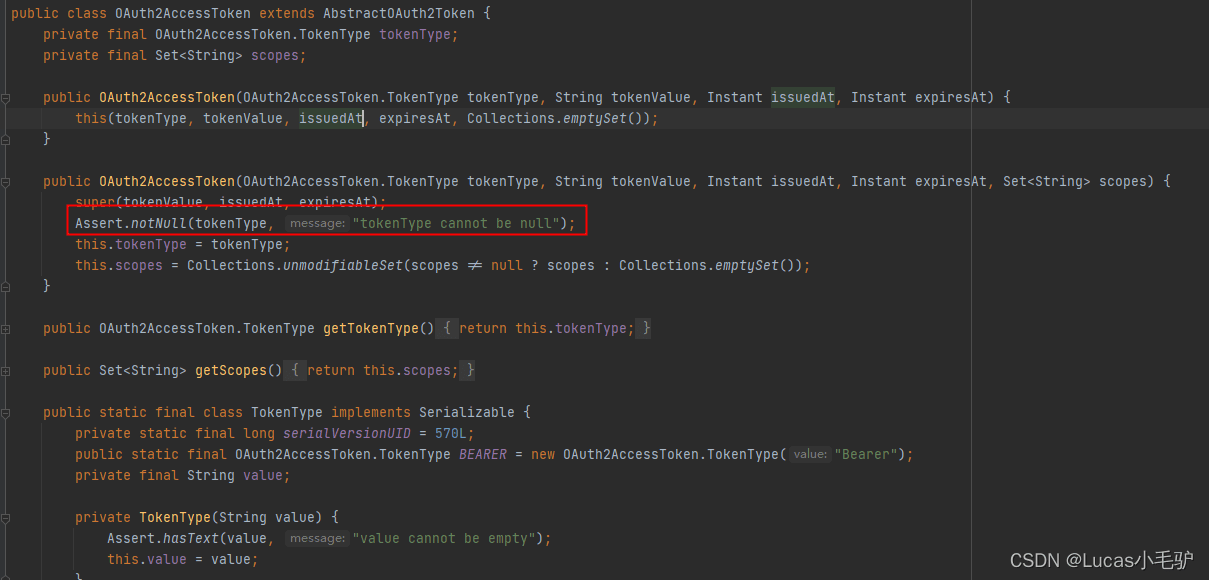

但是我们请求接口时响应数据里没有TokenType,因此我们这里需要再处理下,给他填个值,这里就要用到OAuth2AccessTokenResponseHttpMessageConverter提供的自定义接口accessTokenResponseConverter了,在将参数转为OAuth2AccessTokenResponse对象时给他的OAuth2AccessToken设置一个TokenType:
// 处理TOKEN_TYPE为null的问题,自定义accessTokenResponseParametersConverter,给TOKEN_TYPE赋值
// 因为已经有默认的处理了,只是需要给token_type赋值
Converter<Map<String, Object>, OAuth2AccessTokenResponse> setAccessTokenResponseConverter = (paramMap) -> {
    DefaultMapOAuth2AccessTokenResponseConverter defaultMapOAuth2AccessTokenResponseConverter = new DefaultMapOAuth2AccessTokenResponseConverter();
    paramMap.put(OAuth2ParameterNames.TOKEN_TYPE, OAuth2AccessToken.TokenType.BEARER.getValue());
    return defaultMapOAuth2AccessTokenResponseConverter.convert(paramMap);
};- 到这里,第二步的自定义才结束,这里挺繁琐的,有两个坑需要埋,因此唠叨比较长。
- 第三步通过access_token获取用户信息


在这里依然是需要自定义一些操作,首先就是请求了,然后响应也是需要处理,因为微信响应的用户信息的实体是不同的,自然也是需要自定义了。
- 根据之前的流程分析,我们回到
OAuth2LoginAuthenticationProvider的authenticate方法中,在获取到access_token后,紧接着就是获取用户信息了:

这里调用了一个userService的loadUser方法,并且返回了一个OAuth2User,这个OAuth2User是一个接口,因此我们自定义的用户实体只要实现它即可作为返回值返回了,在这里先定义出来:
@Data
public class WeChatEntity implements OAuth2User {
    // 用户的唯一标识
    private String openid;
    // 用户昵称
    private String nickname;
    // 用户的性别,值为1表示男,值为2表示女,值为0表示未知
    private Integer sex;
    // 用户个人资料填写的省份
    private String province;
    // 普通用户个人资料填写的城市
    private String city;
    // 国家,如中国为CN
    private String country;
    // 用户头像,最后一个数值代表正方形头像大小(有0、46、64、96、132数值可选,0代表640*640正方形头像),
    // 用户没有头像时该项为空。若用户更换头像,原有头像URL将失效。
    private String headimgurl;
    // 用户特权信息
    private List<String> privilege;
    // 只有在用户将公众号绑定到微信开放平台帐号后,才会出现该字段。
    private String unionid;
    @Override
    public Map<String, Object> getAttributes() {
        return null;
    }
    @Override
    public Collection<? extends GrantedAuthority> getAuthorities() {
        return null;
    }
    /**
        不可以返回null,在构建实体时会有断言
    **/
    @Override
    public String getName() {
        return nickname;
    }
}
这里需要注意的就是
getName()方法不返回null,因为在OAuth2AuthorizedClient构造中断言它不为空
- 接着便是要看看这个
loadUser做了什么了,找到默认的实现类DefaultOAuth2UserService: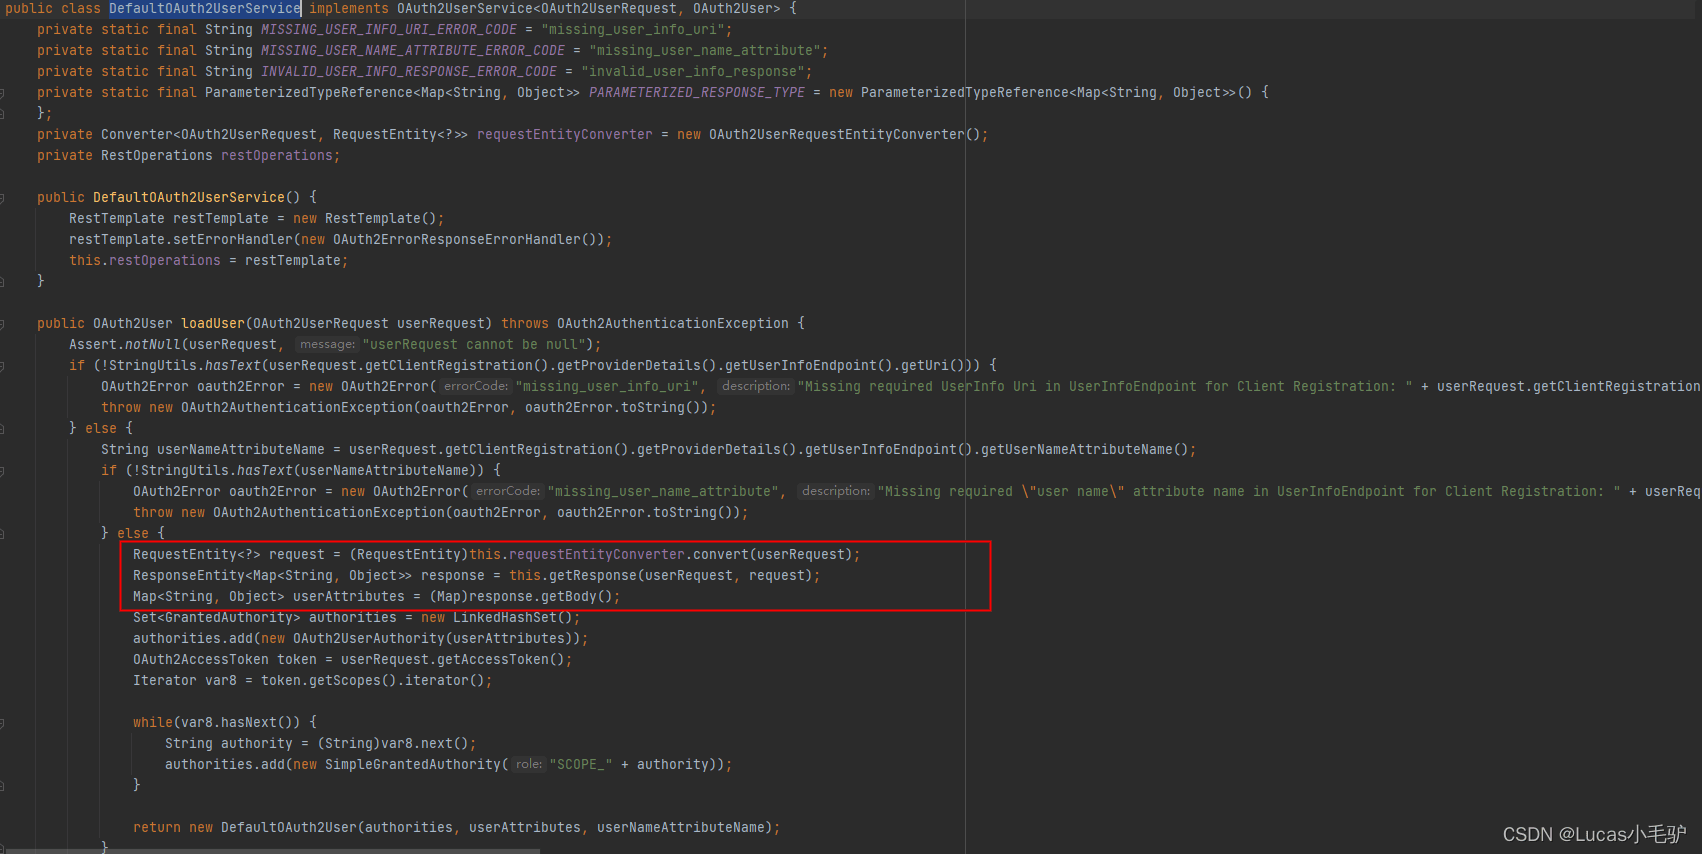

虽然这里也是提供了自定义接口,但是微信获取用户信息的接口参数是query参数,需要拼接在请求url上,获取的类型也是我们自定义的实体,因此这里不采用直接实现提供的自定义接口的方式,而是直接实现一个我们自己的UserService。
3. 实现代码
- 首先我们要实现自己的UserService,最好的方法就是直接参考默认实现的,先整个复制,再改成适合我们自己的
- 第一个要改的地方就是
getResponse方法,我们需要自己构造请求url:
private ResponseEntity<WeChatEntity> getResponse(OAuth2UserRequest userRequest) {
    OAuth2Error oauth2Error;
    try {
        // 发起Get请求,请求参数是query参数,需要自己拼接
        MultiValueMap<String, String> queryParams = new LinkedMultiValueMap<>();
        queryParams.add("access_token", userRequest.getAccessToken().getTokenValue());
        // 获取access token时,其他参数被存储在了userRequest中,从里面把openid拿出来
        queryParams.add("openid", (String) userRequest.getAdditionalParameters().get("openid"));
        queryParams.add("lang", "zh_CN");
        URI uri = UriComponentsBuilder.fromUriString(userRequest.getClientRegistration().getProviderDetails().getUserInfoEndpoint().getUri()).queryParams(queryParams).build().toUri();
        ResponseEntity<WeChatEntity> retData = this.restOperations.exchange(uri, HttpMethod.GET, null, PARAMETERIZED_RESPONSE_TYPE);
        return retData;
    } catch (OAuth2AuthorizationException var6) {
        oauth2Error = var6.getError();
        StringBuilder errorDetails = new StringBuilder();
        errorDetails.append("Error details: [");
        errorDetails.append("UserInfo Uri: ").append(userRequest.getClientRegistration().getProviderDetails().getUserInfoEndpoint().getUri());
        errorDetails.append(", Error Code: ").append(oauth2Error.getErrorCode());
        if (oauth2Error.getDescription() != null) {
            errorDetails.append(", Error Description: ").append(oauth2Error.getDescription());
        }
        errorDetails.append("]");
        oauth2Error = new OAuth2Error("invalid_user_info_response", "An error occurred while attempting to retrieve the UserInfo Resource: " + errorDetails.toString(), (String)null);
        throw new OAuth2AuthenticationException(oauth2Error, oauth2Error.toString(), var6);
    } catch (UnknownContentTypeException var7) {
        String errorMessage = "An error occurred while attempting to retrieve the UserInfo Resource from '" + userRequest.getClientRegistration().getProviderDetails().getUserInfoEndpoint().getUri() + "': response contains invalid content type '" + var7.getContentType().toString() + "'. The UserInfo Response should return a JSON object (content type 'application/json') that contains a collection of name and value pairs of the claims about the authenticated End-User. Please ensure the UserInfo Uri in UserInfoEndpoint for Client Registration '" + userRequest.getClientRegistration().getRegistrationId() + "' conforms to the UserInfo Endpoint, as defined in OpenID Connect 1.0: 'https://openid.net/specs/openid-connect-core-1_0.html#UserInfo'";
        oauth2Error = new OAuth2Error("invalid_user_info_response", errorMessage, (String)null);
        throw new OAuth2AuthenticationException(oauth2Error, oauth2Error.toString(), var7);
    } catch (RestClientException var8) {
        oauth2Error = new OAuth2Error("invalid_user_info_response", "An error occurred while attempting to retrieve the UserInfo Resource: " + var8.getMessage(), (String)null);
        throw new OAuth2AuthenticationException(oauth2Error, oauth2Error.toString(), var8);
    }
}- 因为我们的参数是自己拼接的,因此这个
requestEntityConverter转换器就不需要了,可以直接删除 - 然后就是
loadUser处调用getResponse:
@Override
public OAuth2User loadUser(OAuth2UserRequest userRequest) throws OAuth2AuthenticationException {
    Assert.notNull(userRequest, "userRequest cannot be null");
    if (!StringUtils.hasText(userRequest.getClientRegistration().getProviderDetails().getUserInfoEndpoint().getUri())) {
        OAuth2Error oauth2Error = new OAuth2Error("missing_user_info_uri", "Missing required UserInfo Uri in UserInfoEndpoint for Client Registration: " + userRequest.getClientRegistration().getRegistrationId(), (String)null);
        throw new OAuth2AuthenticationException(oauth2Error, oauth2Error.toString());
    } else {
        String userNameAttributeName = userRequest.getClientRegistration().getProviderDetails().getUserInfoEndpoint().getUserNameAttributeName();
        if (!StringUtils.hasText(userNameAttributeName)) {
            OAuth2Error oauth2Error = new OAuth2Error("missing_user_name_attribute", "Missing required \"user name\" attribute name in UserInfoEndpoint for Client Registration: " + userRequest.getClientRegistration().getRegistrationId(), (String)null);
            throw new OAuth2AuthenticationException(oauth2Error, oauth2Error.toString());
        } else {
            ResponseEntity<WeChatEntity> response = this.getResponse(userRequest);
            // 直接返回最终的实体
            WeChatEntity userAttributes = (WeChatEntity)response.getBody();
            return userAttributes;
        }
    }
}- 最后还要处理响应体的转换,将我们获取到的数据转换为
WeChatEntity,这就需要Spring的HttpMessageConverter了,而且在微信获取用户信息中返回的还是JSON字符串,text/plain的,因此我们还需要再处理这些问题,有了上面的处理经验,我们知道是从RestTemplate入手,我们可以参考SpringSecurity官方实现的这个OAuth2AccessTokenResponseHttpMessageConverter,还是照抄,再改写:
public class WeChatUserHttpMessageConverter extends AbstractHttpMessageConverter<WeChatEntity> {
    private static final ParameterizedTypeReference<WeChatEntity> STRING_OBJECT_MAP;
    private static final Charset DEFAULT_CHARSET;
    private GenericHttpMessageConverter<Object> jsonMessageConverter = HttpMessageConverters.getJsonMessageConverter();
    static {
        DEFAULT_CHARSET = StandardCharsets.UTF_8;
        STRING_OBJECT_MAP = new ParameterizedTypeReference<WeChatEntity>() {
        };
    }
    public WeChatUserHttpMessageConverter() {
        super(DEFAULT_CHARSET, MediaType.TEXT_PLAIN, MediaType.APPLICATION_JSON, new MediaType("application", "*+json"));
    }
    @Override
    protected boolean supports(Class<?> clazz) {
        return  WeChatEntity.class.isAssignableFrom(clazz);
    }
    @Override
    protected WeChatEntity readInternal(Class<? extends WeChatEntity> clazz, HttpInputMessage inputMessage) throws IOException, HttpMessageNotReadableException {
        try {
            WeChatEntity weChatEntity = (WeChatEntity)this.jsonMessageConverter.read(STRING_OBJECT_MAP.getType(), (Class)null, inputMessage);
            return weChatEntity;
        } catch (Exception var5) {
            throw new HttpMessageNotReadableException("An error occurred reading the OAuth 2.0 Access Token Response: " + var5.getMessage(), var5, inputMessage);
        }
    }
    @Override
    protected void writeInternal(WeChatEntity weChatEntity, HttpOutputMessage outputMessage) throws IOException, HttpMessageNotWritableException {
    }
}- 最后的最后,配置SpringSecurity,以上的自定义,没有配置到SpringSecurity的filterChain中,是不可能生效的。
@Bean
public SecurityFilterChain filterChain(HttpSecurity http,  ClientRegistrationRepository clientRegistrationRepository) throws Exception {
    http
            .authorizeHttpRequests()
            .anyRequest()
            .authenticated().and()
            .oauth2Login(oauth2LoginCustomizer -> {
                // 授权端点配置
                oauth2LoginCustomizer.authorizationEndpoint().authorizationRequestResolver(customOAuth2AuthorizationRequestResolver(clientRegistrationRepository));
                // 获取token端点配置
                oauth2LoginCustomizer.tokenEndpoint().accessTokenResponseClient(customOAuth2AccessTokenResponseClient());
                // 获取用户信息端点配置
                oauth2LoginCustomizer.userInfoEndpoint().userService(new WeChatUserService());
            });
    return http.build();
}
到了这里就真的大功告成…
接着准备测试…
三. 测试验证
有了以上的自定义改造后,剩下的就是测试验证了,对于微信,因为我们只是测试,没有接入网站应用,因此我们也没法使用那种二维码扫码登录的方式来测试了。。
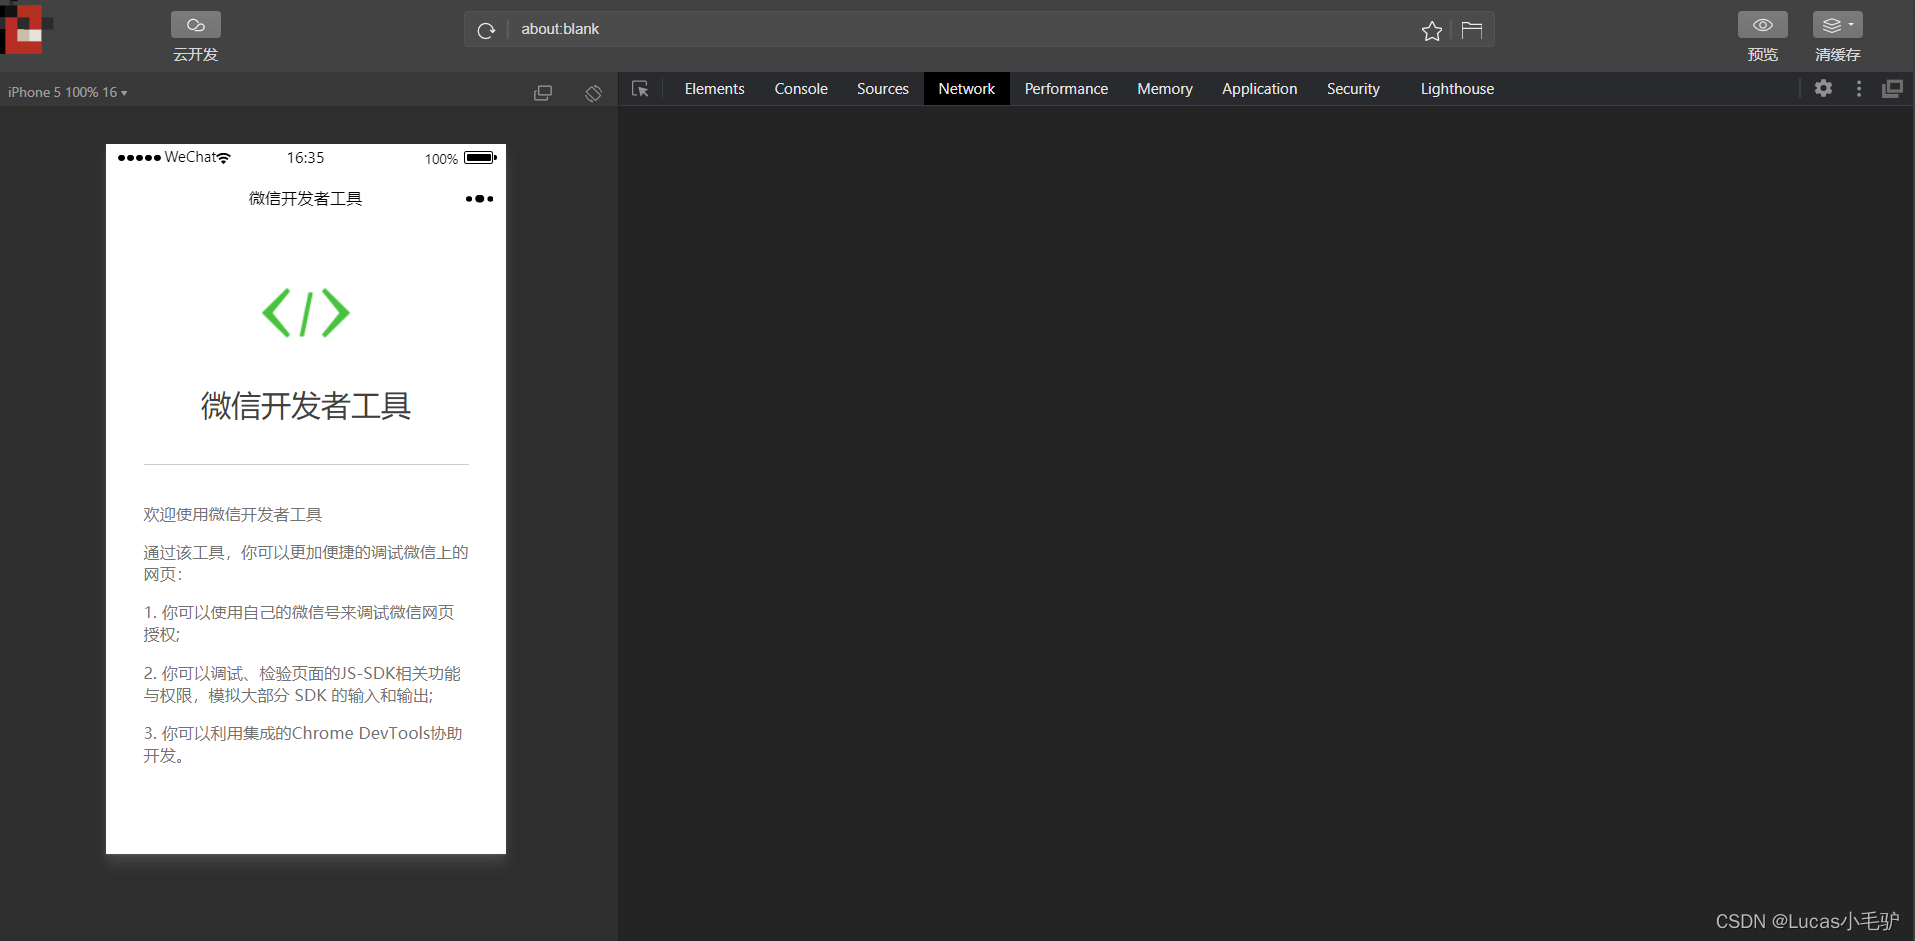
但我们可以使用微信开发者工具来发起请求,微信开发者工具需要先使用微信账号登录,这样你发起请求就相当于是用这个账号来申请微信的权限。
打开后登录后如下界面:
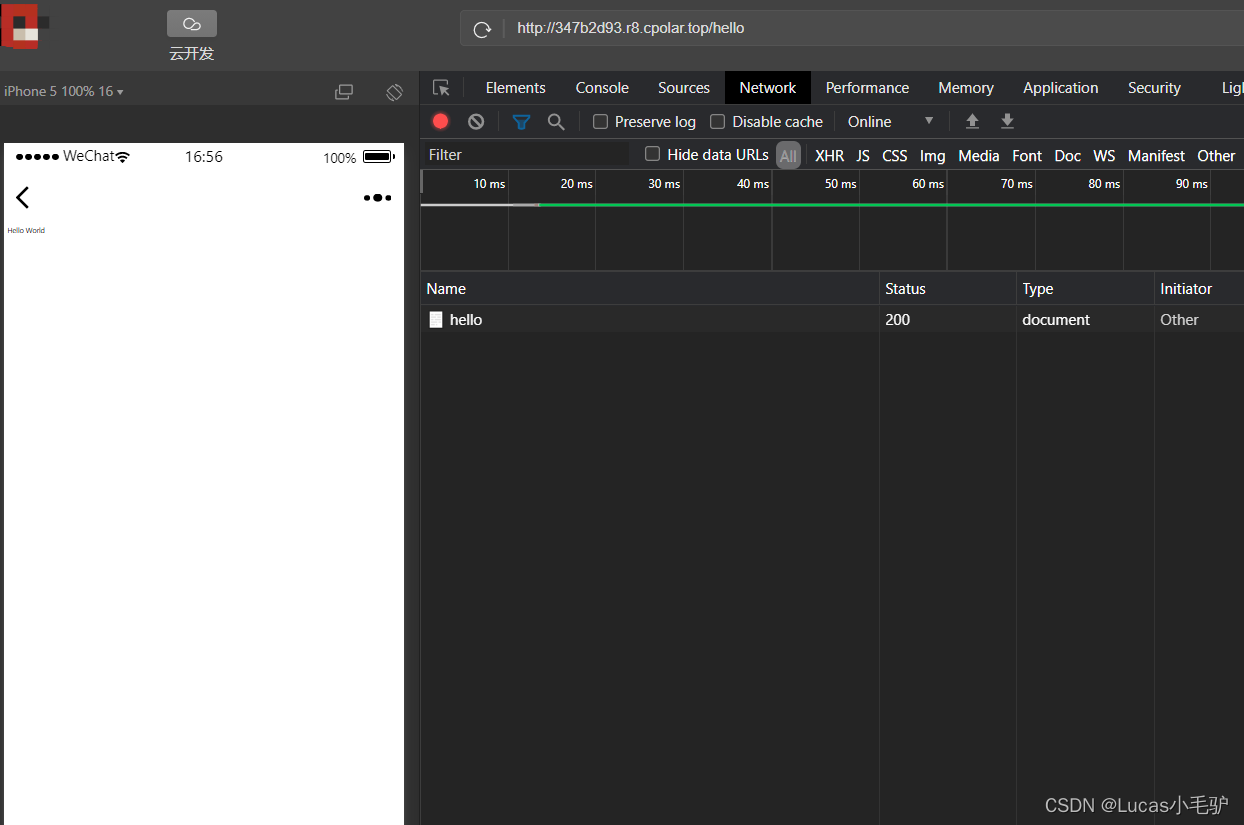
启动我们的应用,然后在微信开发者工具中访问
http://347b2d93.r8.cpolar.top/hello或http://347b2d93.r8.cpolar.top/user: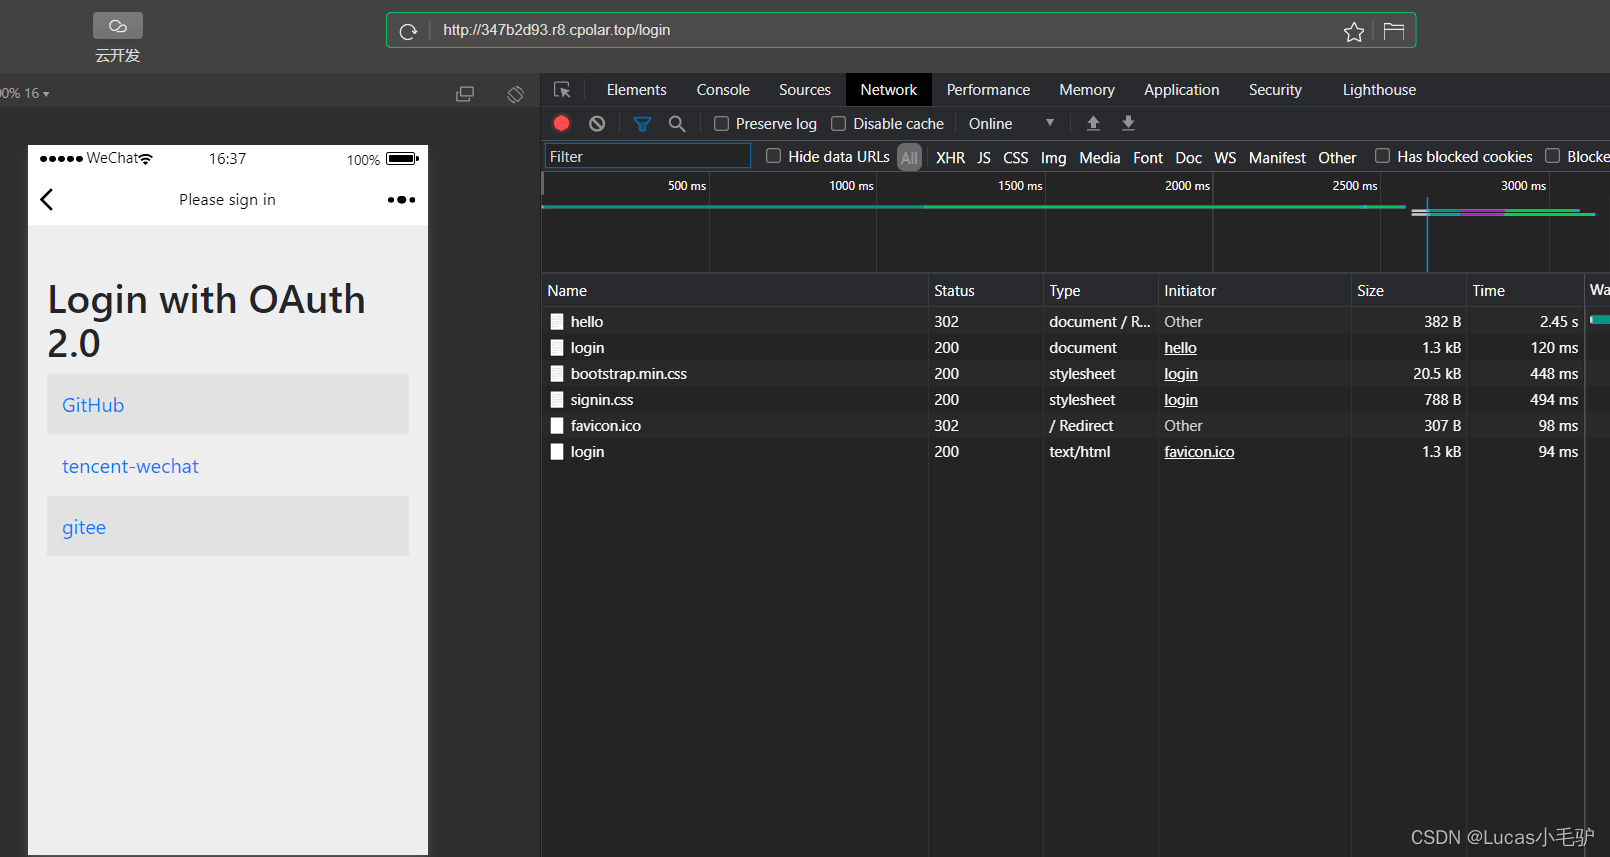
点击
tencent-wechat,同意授权: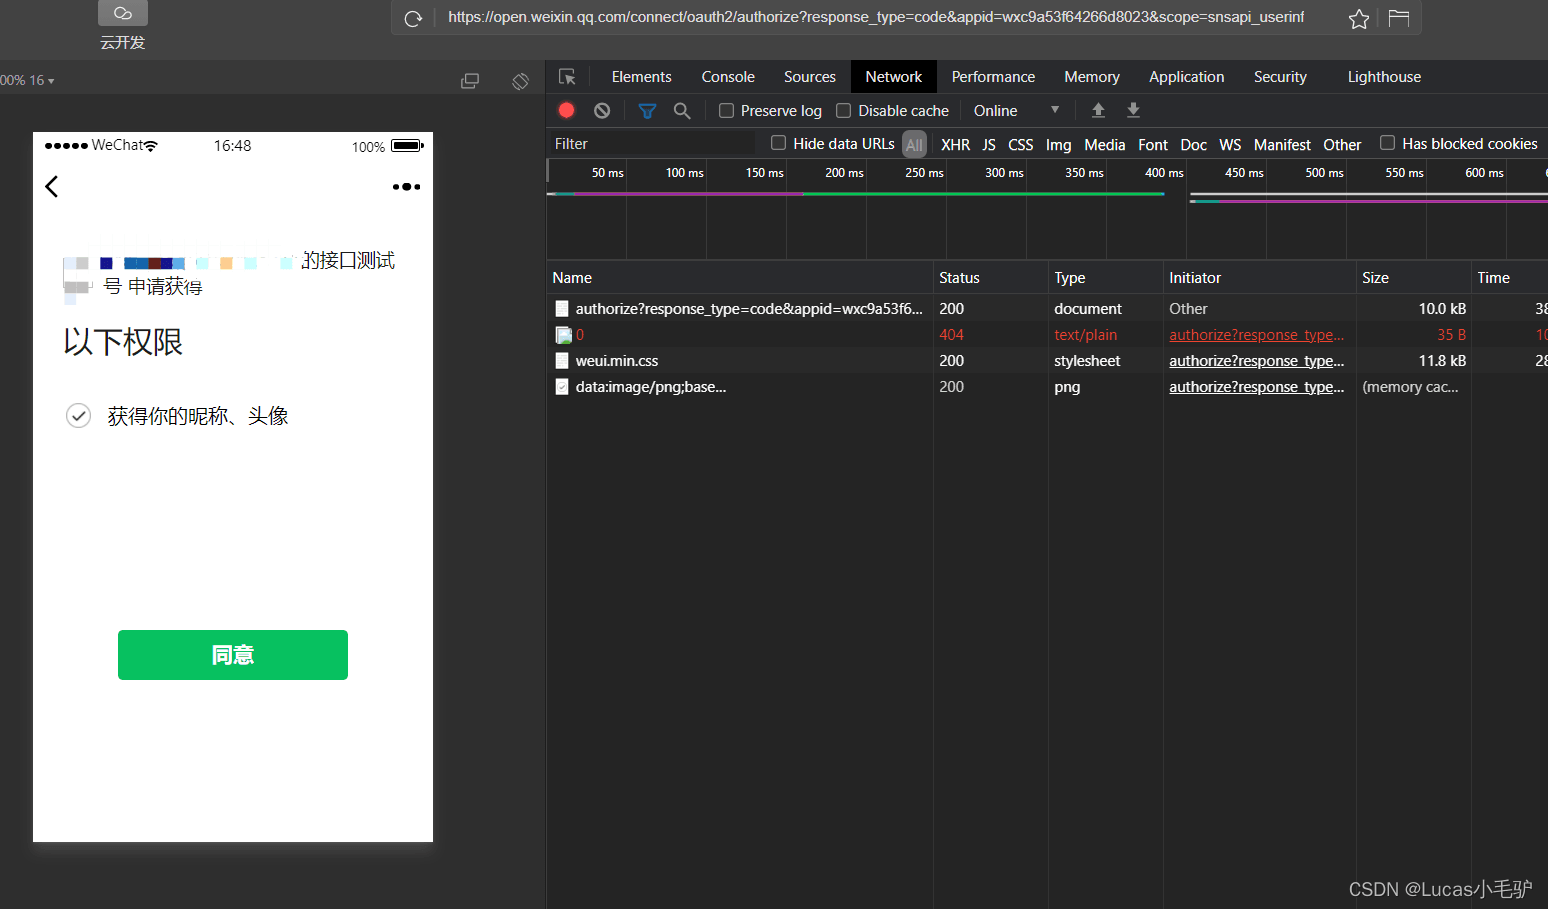
最后访问到资源:
注意:关于获取用户信息,性别和地区等字段是空的问题,不要慌,是因为微信他不再返回这些字段的值了。
具体可以查看这个:微信公众平台用户信息相关接口调整公告


四. 总结
这一篇主要是介绍了对于微信的第三方登录自定义,讲的可能比较乱,还是得结合源码理解理解,我只想把思路和为什么尽量都分享清楚,当然这只是测试,真正的支持微信第三方还得需要在微信登记公众号等操作,那些是需要认证啥的,我们当前学习的话目前的已经足够了。
到此这篇关于SpringSecurityOAuth2实现微信授权登录的文章就介绍到这了,更多相关SpringSecurityOAuth2微信授权登录内容请搜索脚本之家以前的文章或继续浏览下面的相关文章希望大家以后多多支持脚本之家!
相关文章
 这是一个使用了java+Springboot+Maven+mybatis+Vue+mysql+wd开发的食品溯源系统,是一个毕业设计的实战练习,具有食品溯源该有的所有功能,感兴趣的朋友快来看看吧2022-01-01
SpringBoot实现监控Actuator,关闭redis监测
这篇文章主要介绍了SpringBoot实现监控Actuator,关闭redis监测,具有很好的参考价值,希望对大家有所帮助。如有错误或未考虑完全的地方,望不吝赐教2021-11-11
SpringMVC中的DispatcherServlet详细解析
这篇文章主要介绍了SpringMVC中的DispatcherServlet详细解析,DispatcherServlet也是一个Servlet,它也能通过Servlet的API来响应请求,从而成为一个前端控制器,Web容器会调用Servlet的doGet()以及doPost()等方法,需要的朋友可以参考下2023-12-12 说起分页机制,相信我们程序员都不陌生,今天,我就给大家分享一下Mybatis-plus的分页机制,供大家学习和Copy,感兴趣的可以了解一下2022-06-06
 与其明天开始,不如现在行动,本文为你带来几个Java书写的实际案例,对巩固编程的基础能力很有帮助,快来一起往下看看吧2022-03-03
 这篇文章主要介绍了SpringBoot 导出数据生成excel文件返回方式,具有很好的参考价值,希望对大家有所帮助。一起跟随小编过来看看吧2020-10-10
 这篇文章主要介绍了Springboot+mybais配置多数据源过程解析,文中通过示例代码介绍的非常详细,对大家的学习或者工作具有一定的参考学习价值,需要的朋友可以参考下2020-03-03
Springboot2以代码的方式统一配置Jackson教程
这篇文章主要介绍了Springboot2以代码的方式统一配置Jackson教程,具有很好的参考价值,希望对大家有所帮助。如有错误或未考虑完全的地方,望不吝赐教2021-11-11 这篇文章主要为大家详细介绍了Java新手环境搭建的相关资料,Tomcat安装配置教程,具有一定的参考价值,感兴趣的小伙伴们可以参考一下2018-03-03
 这篇文章主要介绍了Java中对象序列化与反序列化,较为详细的分析了java中对象序列化的概念、原理、实现方法及相关注意事项,具有一定参考借鉴价值,需要的朋友可以参考下2015-09-09


最新评论