
Java多线程中的CountDownLatch详细解读
简介
一个同步辅助类,在完成一组正在其他线程中执行的操作之前,它允许一个或多个线程一直等待。用给定的计数 初始化 CountDownLatch。
由于调用了 countDown() 方法会使初始化的计数减一,所以在当前计数到达零之前,await()方法会一直受阻塞。
之后,会释放所有等待的线程,await 的所有后续调用都将立即返回。这种现象只出现一次——计数无法被重置。 一个线程(或者多个), 等待另外N个线程完成某个事情之后才能执行
CountDownLatch和CyclicBarrier的区别
- CountDownLatch的作用是允许1或N个线程等待其他线程完成执行;而CyclicBarrier则是允许N个线程相互等待。
- CountDownLatch的计数器无法被重置;CyclicBarrier的计数器可以被重置后使用,因此它被称为是循环的barrier。 CountDownLatch类的方法

源码:
package java.util.concurrent;
import java.util.concurrent.locks.AbstractQueuedSynchronizer;
public class CountDownLatch {

    private static final class Sync extends AbstractQueuedSynchronizer {
        private static final long serialVersionUID = 4982264981922014374L;

        Sync(int count) {
            setState(count);
        }

        int getCount() {
            return getState();
        }

        protected int tryAcquireShared(int acquires) {
            return (getState() == 0) ? 1 : -1;
        }

        protected boolean tryReleaseShared(int releases) {
            for (;;) {
                int c = getState();
                if (c == 0)
                    return false;
                int nextc = c-1;
                if (compareAndSetState(c, nextc))
                    return nextc == 0;
            }
        }
    }

    private final Sync sync;

    public CountDownLatch(int count) {
        if (count < 0) throw new IllegalArgumentException("count < 0");
        this.sync = new Sync(count);
    }

    public void await() throws InterruptedException {
        sync.acquireSharedInterruptibly(1);
    }

    public boolean await(long timeout, TimeUnit unit)
        throws InterruptedException {
        return sync.tryAcquireSharedNanos(1, unit.toNanos(timeout));
    }

    public void countDown() {
        sync.releaseShared(1);
    }

    public long getCount() {
        return sync.getCount();
    }

    public String toString() {
        return super.toString() + "[Count = " + sync.getCount() + "]";
    }
}
CountDownLatch的数据结构很简单,它是通过共享锁实现的。它包含了sync对象,sync是Sync类型。Sync是实例类,它继承于AQS。
核心方法
下面,我们分析CountDownLatch中3个核心方法: CountDownLatch(int count), await(), countDown()。
CountDownLatch(int count)
public CountDownLatch(int count) {
        if (count < 0) throw new IllegalArgumentException("count < 0");
        this.sync = new Sync(count);
    }
此方法创建了一个Sync对象,而Sync是继承于AQS类。Sync构造函数如下:
Sync(int count) {
  setState(count);
 }
setState()在AQS中实现,源码如下:
private volatile int state; //state在AQS中的声明

protected final void setState(int newState) {
        state = newState;
    }
说明:在AQS中,state是一个private volatile long类型的对象。对于CountDownLatch而言,state表示的”锁计数器“。CountDownLatch中的getCount()最终是调用AQS中的getState(),返回的state对象,即”锁计数器“。
//CountDownLatch类的getCount方法
public long getCount() {
        return sync.getCount();
    }
//Sync类中的方法
int getCount() {
   return getState();//调用AQS中的getState()方法
 }
//AQS中的方法
protected final int getState() {
        return state;
    }
countDown()
//CountDownLatch类中的countDown()方法
public void countDown() {
        sync.releaseShared(1);//调用的是AQS中的releaseShared()方法
    }

//AQS类中的releaseShared()方法
public final boolean releaseShared(int arg) {
        if (tryReleaseShared(arg)) {
            doReleaseShared();
            return true;
        }
        return false;
    }
说明:releaseShared()的目的是让当前线程释放它所持有的共享锁。 它首先会通过tryReleaseShared()去尝试释放共享锁。尝试成功,则直接返回;尝试失败,则通过doReleaseShared()去释放共享锁。
tryReleaseShared()在CountDownLatch.java中被重写,源码如下:
protected boolean tryReleaseShared(int releases) {
    // Decrement count; signal when transition to zero
    for (;;) {
        // 获取“锁计数器”的状态
        int c = getState();
        if (c == 0)
            return false;
        // “锁计数器”-1
        int nextc = c-1;
        // 通过CAS函数进行赋值。
        if (compareAndSetState(c, nextc))
            return nextc == 0;
    }
}
说明:tryReleaseShared()的作用是释放共享锁,将“锁计数器”的值-1。
await()、await(long timeout, TimeUnit unit)
当计数值不为零,调用await(),会一直阻塞当前线程,直到计数值为0,才会唤醒执行。
有参的awaitawait(long timeout, TimeUnit unit)方法,设置一个阻塞的超时 时间timeout。最多阻塞这个时间
public void await() throws InterruptedException {
        sync.acquireSharedInterruptibly(1);
    }

public boolean await(long timeout, TimeUnit unit)
        throws InterruptedException {
        return sync.tryAcquireSharedNanos(1, unit.toNanos(timeout));
    }
接下来说无参构造方法await():
说明:该函数实际上是调用的AQS的acquireSharedInterruptibly(1);
AQS中的acquireSharedInterruptibly()的源码如下:
public final void acquireSharedInterruptibly(long arg)
        throws InterruptedException {
    if (Thread.interrupted())
        throw new InterruptedException();
    if (tryAcquireShared(arg) < 0)
        doAcquireSharedInterruptibly(arg);
}
说明:acquireSharedInterruptibly()的作用是获取共享锁。 如果当前线程是中断状态,则抛出异常InterruptedException。否则,调用tryAcquireShared(arg)尝试获取共享锁;尝试成功则返回,否则就调用doAcquireSharedInterruptibly()。doAcquireSharedInterruptibly()会使当前线程一直等待,直到当前线程获取到共享锁(或被中断)才返回。
tryAcquireShared()在CountDownLatch.java中被重写,它的源码如下:
protected int tryAcquireShared(int acquires) {
    return (getState() == 0) ? 1 : -1;
}
说明:tryAcquireShared()的作用是尝试获取共享锁。 如果"锁计数器=0",即锁是可获取状态,则返回1;否则,锁是不可获取状态,则返回-1。
AQS中的doAcquireSharedInterruptibly(long arg)方法
private void doAcquireSharedInterruptibly(long arg)
    throws InterruptedException {
    // 创建"当前线程"的Node节点,且Node中记录的锁是"共享锁"类型;并将该节点添加到CLH队列末尾。
    final Node node = addWaiter(Node.SHARED);
    boolean failed = true;
    try {
        for (;;) {
            // 获取上一个节点。
            // 如果上一节点是CLH队列的表头,则"尝试获取共享锁"。
            final Node p = node.predecessor();
            if (p == head) {
                long r = tryAcquireShared(arg);
                if (r >= 0) {
                    setHeadAndPropagate(node, r);
                    p.next = null; // help GC
                    failed = false;
                    return;
                }
            }
            // (上一节点不是CLH队列的表头) 当前线程一直等待,直到获取到共享锁。
            // 如果线程在等待过程中被中断过,则再次中断该线程(还原之前的中断状态)。
            if (shouldParkAfterFailedAcquire(p, node) &&
                parkAndCheckInterrupt())
                throw new InterruptedException();
        }
    } finally {
        if (failed)
            cancelAcquire(node);
    }
}
说明:
(1) addWaiter(Node.SHARED)的作用是,创建”当前线程“的Node节点,且Node中记录的锁的类型是”共享锁“(Node.SHARED);并将该节点添加到CLH队列末尾。
(2) node.predecessor()的作用是,获取上一个节点。如果上一节点是CLH队列的表头,则”尝试获取共享锁“。
(3) shouldParkAfterFailedAcquire()的作用和它的名称一样,如果在尝试获取锁失败之后,线程应该等待,则返回true;否则,返回false。
(4) 当shouldParkAfterFailedAcquire()返回ture时,则调用parkAndCheckInterrupt(),当前线程会进入等待状态,直到获取到共享锁才继续运行。
总结:
CountDownLatch是通过“共享锁”实现的。在创建CountDownLatch中时,会传递一个int类型参数count,该参数是“锁计数器”的初始状态,表示该“共享锁”最多能被count给线程同时获取。当某线程调用该CountDownLatch对象的await()方法时,该线程会等待“共享锁”可用时,才能获取“共享锁”进而继续运行。而“共享锁”可用的条件,就是“锁计数器”的值为0!而“锁计数器”的初始值为count,每当一个线程调用该CountDownLatch对象的countDown()方法时,才将“锁计数器”-1;通过这种方式,必须有count个线程调用countDown()之后,“锁计数器”才为0,而前面提到的等待线程才能继续运行!
以上,就是CountDownLatch的实现原理。
CountDownLatch示例
/**
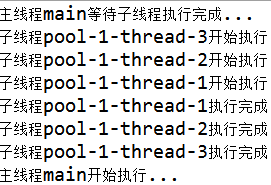
* 主线程等待子线程执行完成再执行
*/
public class CountdownLatchTest1 {
public static void main(String[] args) {
ExecutorService service = Executors.newFixedThreadPool(3);
final CountDownLatch latch = new CountDownLatch(3);
for (int i = 0; i < 3; i++) {
Runnable runnable = new Runnable() {
@Override
public void run() {
try {
System.out.println("子线程" + Thread.currentThread().getName() + "开始执行");
Thread.sleep((long) (Math.random() * 10000));
System.out.println("子线程"+Thread.currentThread().getName()+"执行完成");
latch.countDown();//当前线程调用此方法,则计数减一
} catch (InterruptedException e) {
e.printStackTrace();
}
}
};
service.execute(runnable);
}
try {
System.out.println("主线程"+Thread.currentThread().getName()+"等待子线程执行完成...");
latch.await();//阻塞当前线程,直到计数器的值为0
System.out.println("主线程"+Thread.currentThread().getName()+"开始执行...");
} catch (InterruptedException e) {
e.printStackTrace();
}
}
}执行结果:
public class CountdownLatchTest2 {
    public static void main(String[] args) {
        ExecutorService service = Executors.newCachedThreadPool();
        final CountDownLatch cdOrder = new CountDownLatch(1);
        final CountDownLatch cdAnswer = new CountDownLatch(4);
        for (int i = 0; i < 4; i++) {
            Runnable runnable = new Runnable() {
                @Override
                public void run() {
                    try {
                        System.out.println("选手" + Thread.currentThread().getName() + "正在等待裁判发布口令");
                        cdOrder.await();
                        System.out.println("选手" + Thread.currentThread().getName() + "已接受裁判口令");
                        Thread.sleep((long) (Math.random() * 10000));
                        System.out.println("选手" + Thread.currentThread().getName() + "到达终点");
                        cdAnswer.countDown();
                    } catch (InterruptedException e) {
                        e.printStackTrace();
                    }
                }
            };
            service.execute(runnable);
        }
        try {
            Thread.sleep((long) (Math.random() * 10000));
            System.out.println("裁判"+Thread.currentThread().getName()+"即将发布口令");
            cdOrder.countDown();
            System.out.println("裁判"+Thread.currentThread().getName()+"已发送口令,正在等待所有选手到达终点");
            cdAnswer.await();
            System.out.println("所有选手都到达终点");
            System.out.println("裁判"+Thread.currentThread().getName()+"汇总成绩排名");
        } catch (InterruptedException e) {
            e.printStackTrace();
        }
        service.shutdown();
    }
}
执行结果:

到此这篇关于Java多线程中的CountDownLatch详细解读的文章就介绍到这了,更多相关CountDownLatch详细解读内容请搜索脚本之家以前的文章或继续浏览下面的相关文章希望大家以后多多支持脚本之家!
相关文章
 这篇文章主要介绍了java面向对象设计原则之单一职责与依赖倒置原则的分析详解,有需要的朋友可以借鉴参考下,希望可以有所帮助,祝大家多多进步早日升职加薪2021-10-10
 这篇文章主要为大家详细介绍了Spring使用注解和配置文件配置事务,文中示例代码介绍的非常详细,具有一定的参考价值,感兴趣的小伙伴们可以参考一下2022-08-08
RestTemplate实现多种底层HTTP客户端类库的切换用法
这篇文章主要为大家详细的讲解了RestTemplate实现多种底层HTTP客户端类库的切换示例,有需要的朋友可以借鉴参考下,希望能够有所帮助祝大家多多进步2022-03-03
Java根据模板导出Excel报表并复制模板生成多个Sheet页
本文主要介绍了Java根据模板导出Excel报表并复制模板生成多个Sheet页的方法,具有很好的参考价值。下面跟着小编一起来看下吧2017-03-03 这篇文章主要介绍了Java中实现文件上传下载的三种解决方案的相关资料,非常不错,具有参考借鉴价值,需要的朋友可以参考下2016-07-07
 这篇文章主要介绍了hashtable桶数通常会取一个素数分析的相关资料,需要的朋友可以参考下2016-12-12
 这篇文章主要介绍了java 中多线程生产者消费者问题详细介绍的相关资料,希望通过本文能帮助到大家,需要的朋友可以参考下2017-09-09
 这篇文章主要介绍了Java 容器类源码详解 Set,Set 表示由无重复对象组成的集合,也是集合框架中重要的一种集合类型,直接扩展自 Collection 接口。,需要的朋友可以参考下2019-06-06
 本文主要介绍了如何设计一个秒杀系统的web层相关知识。具有很好的参考价值。下面跟着小编一起来看下吧,希望能够给你带来帮助2021-10-10
如何获取springboot打成jar后的classpath
这篇文章主要介绍了如何获取springboot打成jar后的classpath问题,具有很好的参考价值,希望对大家有所帮助。如有错误或未考虑完全的地方,望不吝赐教2023-07-07


最新评论