
SpringBoot实现多数据源的实战案例
1.前言
大家好,今天给大家带来一篇关于SpringBoot实现多数据源的实战案例。好了,话不多说让我们开始吧.
2.概述
在实际开发中,我们往往面临一个应用需要访问多个数据库的情况。例如下面两种场景。
- 业务复杂: 数据分布在不同的数据库,数据库拆了,应用没拆,一个公司有多个子项目,各用各的数据库。
- 读写分离: 为了解决数据库的读性能瓶颈(读比写性能更高,写锁会影响读阻塞,从而影响读的性能)
- 很多数据库拥有主从架构,也就是说,一台 主数据库服务器,是对外提供增删改查业务的生产服务器;
- 另一台从数据库服务器,主要进行读的操作。
- 读写分离:解决高并发下读写受影响。数据更新在主库上进行,主库将数据变更信息同步给从库。在查询时,在从库上进行,从而分担主库的压力。
我们可以在代码层面解决这种动态数据源切换的问题,而不需要使用 mycat、shardingJDBC 等其他中间件。本文将主要以自定义注解 + 继承 AbstractRoutingDataSource 实现读写分离。
3.如何实现多数据源
在 SpringBoot 项目中实现读写分离通常需要以下几步:
- 配置数据源:你需要为读操作和写操作分别配置一个数据源。
- 创建数据源路由逻辑:这通常通过扩展 Spring 的
AbstractRoutingDataSource来实现。它允许你根据一定的逻辑来决定使用哪个数据源(读或写)。 - 配置事务管理器:这使得你能够在使用不同数据源时保持事务的一致性。
- 服务层或DAO层设计:确保在执行读操作时使用读数据源,在执行写操作时使用写数据源。
- 自定义切面,在切面中解析 @DataSource 注解。当一个方法或者类上面,有 @DataSource 注解的时候,将 @DataSource 注解所标记的数据源列出来存入到 ThreadLocal 中。
注意:这里使用ThreadLocal的原因是为了保证我们的线程安全。
4.案例实现
接下来我们就按照以上步骤进行编码实现。
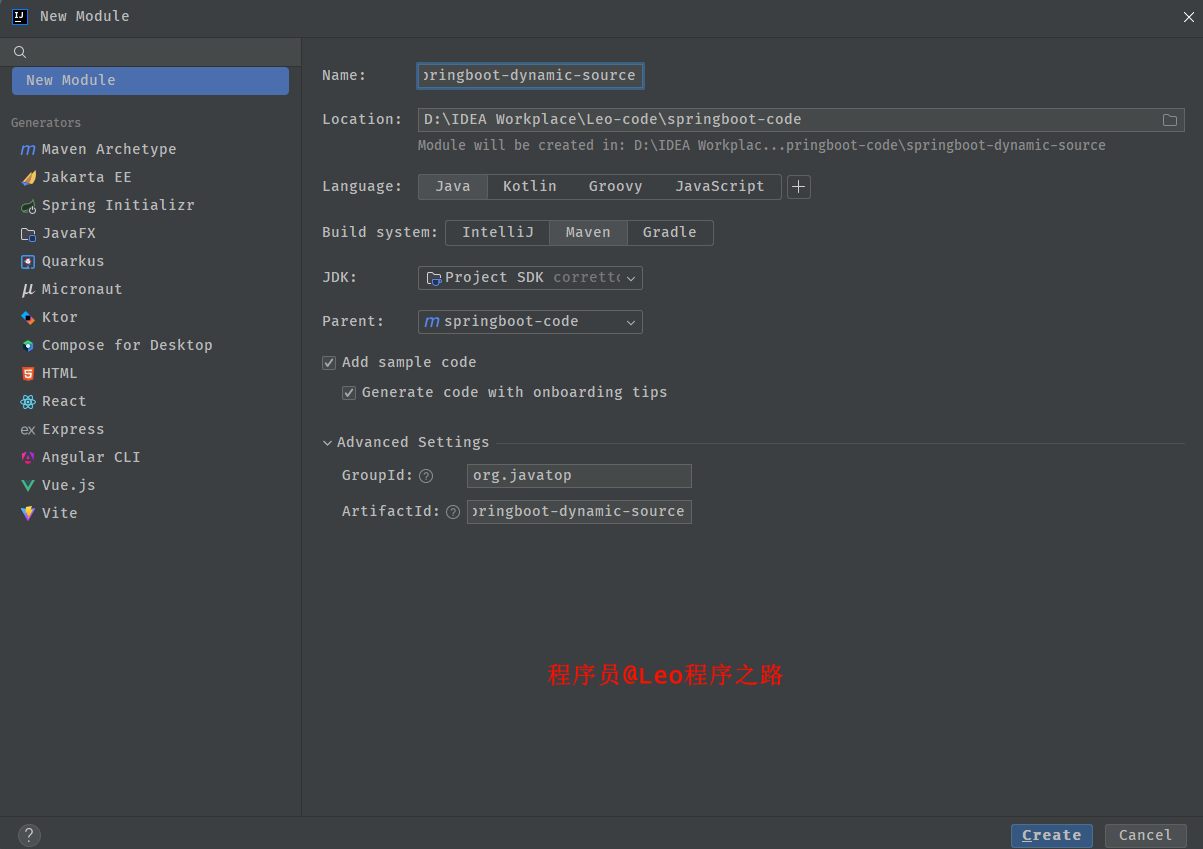
4.1 创建新模块
首先我们创建一个新的模块命名为:springboot-dynamic-source
1.导入依赖
<dependencies>
        <dependency>
            <groupId>org.springframework.boot</groupId>
            <artifactId>spring-boot-starter-web</artifactId>
        </dependency>
        <dependency>
            <groupId>mysql</groupId>
            <artifactId>mysql-connector-java</artifactId>
        </dependency>
        <dependency>
            <groupId>cn.hutool</groupId>
            <artifactId>hutool-all</artifactId>
        </dependency>
        <dependency>
            <groupId>com.alibaba</groupId>
            <artifactId>druid-spring-boot-starter</artifactId>
        </dependency>
        <!--mybatis plus-->
        <dependency>
            <groupId>com.baomidou</groupId>
            <artifactId>mybatis-plus-boot-starter</artifactId>
        </dependency>
        <dependency>
            <groupId>org.springframework.boot</groupId>
            <artifactId>spring-boot-starter-aop</artifactId>
        </dependency>
        <dependency>
            <groupId>org.springframework.boot</groupId>
            <artifactId>spring-boot-starter-test</artifactId>
        </dependency>
        <dependency>
            <groupId>org.springframework</groupId>
            <artifactId>spring-jdbc</artifactId>
        </dependency>
    </dependencies>
2.创建yml配置文件
server:
  port: 8007


spring:
  application:
    name:  dynamic-source
  jackson:
    date-format: yyyy-MM-dd HH:mm:ss
    time-zone: GMT+8
  datasource:
    type: com.alibaba.druid.pool.DruidDataSource
    driverClassName: com.mysql.cj.jdbc.Driver
    ds:
      # 主库数据源
      master:
        url: jdbc:mysql://localhost:3307/test01?useUnicode=true&characterEncoding=utf8&zeroDateTimeBehavior=convertToNull&useSSL=true&serverTimezone=GMT%2B8
        username: root
        password: root
      # 从库数据源
      slave:
        url: jdbc:mysql://localhost:3307/test02?useUnicode=true&characterEncoding=utf8&zeroDateTimeBehavior=convertToNull&useSSL=true&serverTimezone=GMT%2B8
        username: root
        password: root
    # 初始连接数
    initialSize: 5
    # 最小连接池数量
    minIdle: 10
    # 最大连接池数量
    maxActive: 20
    # 配置获取连接等待超时的时间
    maxWait: 60000
    # 配置间隔多久才进行一次检测,检测需要关闭的空闲连接,单位是毫秒
    timeBetweenEvictionRunsMillis: 60000
    # 配置一个连接在池中最小生存的时间,单位是毫秒
    minEvictableIdleTimeMillis: 300000
    # 配置一个连接在池中最大生存的时间,单位是毫秒
    maxEvictableIdleTimeMillis: 900000
    # 配置检测连接是否有效
    validationQuery: SELECT 1 FROM DUAL
    testWhileIdle: true
    testOnBorrow: false
    testOnReturn: false
    webStatFilter:
      enabled: true
    statViewServlet:
      enabled: true
      # 设置白名单,不填则允许所有访问
      allow:
      url-pattern: /druid/*
      # 控制台管理用户名和密码
      login-username: admin
      login-password: 123456
    filter:
      stat:
        enabled: true
        # 慢SQL记录
        log-slow-sql: true
        slow-sql-millis: 1000
        merge-sql: true
      wall:
        config:
          multi-statement-allow: true


logging:
  level:
    org.javatop: debug
  pattern:
    dateformat: HH:mm:ss:SSS
  file:
    path: "logs/${spring.application.name}"
ds 中是我们的所有数据源。master 是默认的数据源,不可修改,其他的数据源可以修改并添加多个。
3.准备数据库
我这里需要提前准备两个数据库,一个是主数据库master,一个是从数据库slave。
我们会后面会通过一个自定义注解去实现动态切换数据库。
这里给出我们创建的一个user表的SQL语句。
CREATE TABLE `user` (
  `id` int NOT NULL AUTO_INCREMENT,
  `username` varchar(50) DEFAULT NULL,
  `age` int DEFAULT NULL,
  PRIMARY KEY (`id`)
) ENGINE=InnoDB AUTO_INCREMENT=101 DEFAULT CHARSET=utf8mb4 COLLATE=utf8mb4_0900_ai_ci;
4.2 加载数据源
我们可以通过@ConfigurationProperties 注解加载定义的配置文件。spring.datasource 对应的注解都会匹配到。
package org.javatop.dynamic.config;

import com.alibaba.druid.pool.DruidDataSource;
import org.springframework.boot.context.properties.ConfigurationProperties;

import javax.sql.DataSource;
import java.util.Map;

/**
 * @author : Leo
 * @version 1.0
 * @date 2024-01-02 15:10
 * @description :
 */
@ConfigurationProperties(prefix = "spring.datasource")
public class DruidProperties {
    private String type;
    private String driverClassName;
    private Map<String, Map<String,String>> ds;

    private Integer initialSize;
    private Integer minIdle;
    private Integer maxActive;
    private Integer maxWait;

    /**
     *一会在外部构建好一个 DruidDataSource 对象,包含三个核心属性 url、username、password
     * 在这个方法中设置公共属性
     * @param druidDataSource
     * @return
     */
    public DataSource dataSource(DruidDataSource druidDataSource){
        druidDataSource.setInitialSize(initialSize);
        druidDataSource.setMinIdle(minIdle);
        druidDataSource.setMaxActive(maxActive);
        druidDataSource.setMaxWait(maxWait);
        return druidDataSource;
    }
    public String getType() {
        return type;
    }

    public void setType(String type) {
        this.type = type;
    }

    public String getDriverClassName() {
        return driverClassName;
    }

    public void setDriverClassName(String driverClassName) {
        this.driverClassName = driverClassName;
    }

    public Map<String, Map<String, String>> getDs() {
        return ds;
    }

    public void setDs(Map<String, Map<String, String>> ds) {
        this.ds = ds;
    }

    public Integer getInitialSize() {
        return initialSize;
    }

    public void setInitialSize(Integer initialSize) {
        this.initialSize = initialSize;
    }

    public Integer getMinIdle() {
        return minIdle;
    }

    public void setMinIdle(Integer minIdle) {
        this.minIdle = minIdle;
    }

    public Integer getMaxActive() {
        return maxActive;
    }

    public void setMaxActive(Integer maxActive) {
        this.maxActive = maxActive;
    }

    public Integer getMaxWait() {
        return maxWait;
    }

    public void setMaxWait(Integer maxWait) {
        this.maxWait = maxWait;
    }
}
然后我们开始通过进行加载DruidProperties来加载数据源。
@EnableConfigurationProperties :这个注解的意思是使 ConfigurationProperties 注解生效。
package org.javatop.dynamic.config;

import com.alibaba.druid.pool.DruidDataSource;
import com.alibaba.druid.pool.DruidDataSourceFactory;
import org.springframework.beans.factory.annotation.Autowired;
import org.springframework.boot.context.properties.EnableConfigurationProperties;
import org.springframework.stereotype.Component;

import javax.sql.DataSource;
import java.util.HashMap;
import java.util.Map;
import java.util.Set;

/**
 * @author : Leo
 * @version 1.0
 * @date 2024-01-02 15:12
 * @description : 加载数据源
 */

@Component
@EnableConfigurationProperties(DruidProperties.class)
public class LoadDataSource {

    @Autowired
    DruidProperties druidProperties;

    public Map<String, DataSource> loadAllDataSource()   {
        Map<String, DataSource> map =new HashMap<>();
        Map<String, Map<String, String>> ds = druidProperties.getDs();
        try {
            Set<String> keySet = ds.keySet();
            for (String key : keySet) {
                map.put(key, druidProperties.dataSource((DruidDataSource) DruidDataSourceFactory.createDataSource(ds.get(key))));
            }
        } catch (Exception e) {
            e.printStackTrace();
        }
        return map;
    }
}
loadAllDataSource() 方法可以通过读取application.yml配置文件中所有数据源对象。(我们这里有一个master主数据库,和一个slave从数据库)
druidProperties.dataSource(DruidDataSource druidDataSource) 这个方法为每个数据源配置其他额外的属性(最大连接池等信息)。
DruidDataSourceFactory.createDataSource(ds.get(key):创建一个数据源,赋予三个核心的属性。(username、url、password)
最终,所有的数据源都会存入map中。
4.3 自定义ThreadLocal工具类
我们这里定义一个简单的ThreadLocal工具类
package org.javatop.dynamic.utils;

/**
 * @author : Leo
 * @version 1.0
 * @date 2024-01-02 15:13
 * @description : ThreadLocal工具类
 */
public class DynamicDataSourceUtil {

    private static final ThreadLocal<String> CONTEXT_HOLDER =new ThreadLocal<>();

    public static void setDataSourceType(String dsType){
        CONTEXT_HOLDER.set(dsType);
    }
    public static String getDataSourceType(){
        return CONTEXT_HOLDER.get();
    }

    public static void clear(){
        CONTEXT_HOLDER.remove();
    }
}
4.4 自定义注解
首先需要通过一个枚举类来设定一下我们的默认数据源,也是是master主数据库。
package org.javatop.dynamic.constant;

/**
 * @author : Leo
 * @version 1.0
 * @date 2024-01-02 15:13
 * @description :
 */
public interface DataSourceType {
    String default_ds_name ="master";
}
然后自定义一个注解,后面也就是通过这个注解来动态的配置切换我们的数据源,这里就也叫Datasource吧。
package org.javatop.dynamic.annotation;

import org.javatop.dynamic.constant.DataSourceType;

import java.lang.annotation.ElementType;
import java.lang.annotation.Retention;
import java.lang.annotation.RetentionPolicy;
import java.lang.annotation.Target;

/**
 * @author : Leo
 * @version 1.0
 * @date 2024-01-02 15:14
 * @description :  这个注解将来可以加在某一个 service 类上或者方法上,通过 value 属性来指定类或者方法应该使用哪个数据源
 */
@Retention(RetentionPolicy.RUNTIME)
@Target({ElementType.TYPE, ElementType.METHOD})
public @interface DataSource{

    /**
     * 如果一个方法上加了 @DataSource 注解,但是却没有指定数据源的名称,那么默认使用 Master 数据源
     * @return
     */
    String value() default DataSourceType.default_ds_name;
}
4.5 AOP解析自定义注解
package org.javatop.dynamic.annotation;

import org.aspectj.lang.ProceedingJoinPoint;
import org.aspectj.lang.annotation.Around;
import org.aspectj.lang.annotation.Aspect;
import org.aspectj.lang.annotation.Pointcut;
import org.aspectj.lang.reflect.MethodSignature;
import org.javatop.dynamic.utils.DynamicDataSourceUtil;
import org.springframework.core.annotation.AnnotationUtils;
import org.springframework.stereotype.Component;

/**
 * @author : Leo
 * @version 1.0
 * @date 2024-01-02 15:15
 * @description : AOP解析自定义注解
 */
@Component
@Aspect
public class DataSourceAspect {


    /**
     * @annotation(org.javatop.dynamic.annotation.DataSource) 表示方法上有 @DataSource 注解 就将方法拦截下来。
     * @within :如果类上面有 @DataSource 注解,就将类中的方法拦截下来。
     */
    @Pointcut("@annotation(org.javatop.dynamic.annotation.DataSource) || " +
            "@within(org.javatop.dynamic.annotation.DataSource)")
    public void pc(){

    }

    @Around("pc()")
    public Object around(ProceedingJoinPoint point){
        //获取方法上面的注解
        DataSource dataSource =getDataSource(point);
        if(dataSource!=null){
            // 注解中数据源的名称
            String value = dataSource.value();
            DynamicDataSourceUtil.setDataSourceType(value);
        }
        try {
            return point.proceed();
        } catch (Throwable throwable) {
            throwable.printStackTrace();
        }finally {
            DynamicDataSourceUtil.clear();
        }
        return null;
    }

    private DataSource getDataSource(ProceedingJoinPoint point) {
        /**
         * 先去查找方法上的注解,如果没有,再去类中找。
         */
        MethodSignature signature = (MethodSignature)point.getSignature();
        DataSource annotation = AnnotationUtils.findAnnotation(signature.getMethod(), DataSource.class);
        if(annotation!=null){
            return annotation;
        }
        return AnnotationUtils.findAnnotation(signature.getDeclaringType(),DataSource.class);
    }
}
@Pointcut 定义
@Pointcut("@annotation(org.javatop.dynamic.annotation.DataSource) || " +
          "@within(org.javatop.dynamic.annotation.DataSource)")
public void pc() {

}
@Pointcut是一个定义在方法上的注解,用来指定一个切点(即在何处进行拦截)。"@annotation(org.javatop.dynamic.annotation.DataSource)"表示拦截所有被@DataSource注解标记的方法。"@within(org.javatop.dynamic.annotation.DataSource)"表示拦截所有在类级别被@DataSource注解标记的类中的方法。pc()方法本身是空的,因为所有的逻辑都将在与这个切点相关的通知(advice)中定义。
@Around 通知
e@Around("pc()")
public Object around(ProceedingJoinPoint point) {
    DataSource dataSource = getDataSource(point);
    if (dataSource != null) {
        String value = dataSource.value();
        DynamicDataSourceUtil.setDataSourceType(value);
    }
    try {
        return point.proceed();
    } catch (Throwable throwable) {
        throwable.printStackTrace();
    } finally {
        DynamicDataSourceUtil.clear();
    }
    return null;
}
@Around("pc()")表示这是一个环绕通知,它会在pc()方法所定义的切点前后执行。ProceedingJoinPoint point是连接点的信息,它包含了方法的所有相关信息,如方法名、参数等。getDataSource(point)用来获取方法或类上的@DataSource注解。- 如果存在
@DataSource注解,它会从注解中获取数据源的名称,并通过DynamicDataSourceUtil.setDataSourceType(value)设置当前线程的数据源。 point.proceed()是调用原始方法的地方。finally块中的DynamicDataSourceUtil.clear()用于在方法执行完毕后清理数据源设置,确保不会影响其他的数据库操作。
最后获取@DataSource注解
4.6 自定义动态数据源
package org.javatop.dynamic.config;

import org.javatop.dynamic.constant.DataSourceType;
import org.javatop.dynamic.utils.DynamicDataSourceUtil;
import org.springframework.jdbc.datasource.lookup.AbstractRoutingDataSource;
import org.springframework.stereotype.Component;

import javax.sql.DataSource;
import java.util.HashMap;
import java.util.Map;

/**
 * @author : Leo
 * @version 1.0
 * @date 2024-01-02 15:18
 * @description : 定义动态数据源
 */
@Component
public class DynamicDataSource extends AbstractRoutingDataSource {

    public DynamicDataSource(LoadDataSource loadDataSource) {
        // 1、设置所有的数据源
        Map<String, DataSource> stringDataSourceMap = loadDataSource.loadAllDataSource();
        super.setTargetDataSources(new HashMap<>(stringDataSourceMap));
        // 2、设置默认的数据源
        super.setDefaultTargetDataSource(stringDataSourceMap.get(DataSourceType.default_ds_name));

        super.afterPropertiesSet();
    }

    /**
     * 这个方法用来返回数据源名称,当系统需要获取数据源的时候,会自动调用该方法获取数据源的名称
     * @return
     */
    @Override
    protected Object determineCurrentLookupKey() {
        return DynamicDataSourceUtil.getDataSourceType();
    }
}
DynamicDataSource类扩展自AbstractRoutingDataSource类,这是Spring框架提供的一个抽象类,用于实现数据源的动态路由。- 构造函数
public DynamicDataSource(LoadDataSource loadDataSource)接收一个LoadDataSource类型的参数。这个参数被用于加载所有的数据源配置。Map<String, DataSource> stringDataSourceMap = loadDataSource.loadAllDataSource();这行代码调用了loadDataSource的loadAllDataSource方法来加载所有数据源配置,并将其存储在一个名为stringDataSourceMap的Map中,其中键是数据源的名称,值是对应的DataSource对象。super.setTargetDataSources(new HashMap<>(stringDataSourceMap));这行代码设置了目标数据源。它将前面加载的所有数据源stringDataSourceMap设置为目标数据源。super.setDefaultTargetDataSource(stringDataSourceMap.get(DataSourceType.default_ds_name));这行代码设置了默认的数据源。它通过DataSourceType.default_ds_name从stringDataSourceMap中获取默认的数据源,并设置为默认数据源。super.afterPropertiesSet();是一个初始化方法,确保所有属性都被正确设置。
determineCurrentLookupKey()方法是AbstractRoutingDataSource的一个抽象方法,必须要实现。这个方法用于决定使用哪个数据源,通常情况下是根据某种条件动态返回数据源名称。return DynamicDataSourceUtil.getDataSourceType();这行代码返回当前线程所使用的数据源的名称。DynamicDataSourceUtil是一个工具类,可能提供了线程局部变量(ThreadLocal)来存储每个线程所选择的数据源名称。
这样,当应用程序需要与数据库进行交互时,就会通过 DynamicDataSource 获取到当前线程所指定的数据源,并进行相应的数据库操作。这种方式能够在不同业务场景中灵活切换数据源,非常适合多租户、读写分离等复杂的数据库应用场景。
4.7 编写业务层
我们编写一个service层
package org.javatop.dynamic.service;

import org.javatop.dynamic.annotation.DataSource;
import org.javatop.dynamic.domain.User;
import org.javatop.dynamic.mapper.UserMapper;
import org.springframework.beans.factory.annotation.Autowired;
import org.springframework.stereotype.Service;

import java.util.List;

/**
 * @author : Leo
 * @version 1.0
 * @date 2024-01-02 15:26
 * @description :
 */
@Service
public class UserService{
    @Autowired
    private UserMapper userMapper;

    @DataSource("slave")
//    @DataSource
    public List<User> getAll(){
        List<User> all = userMapper.getAll();
        return all;
    }
}
我们在getAll()方法上加上@DataSource(“slave”),并指定slave从数据库。
然后再编写一个mapper,去操作数据库。
package org.javatop.dynamic.mapper;

import org.apache.ibatis.annotations.Mapper;
import org.apache.ibatis.annotations.Select;
import org.javatop.dynamic.domain.User;

import java.util.List;

/**
 * @author : Leo
 * @version 1.0
 * @date 2024-01-02 15:26
 * @description :
 */
@Mapper
public interface UserMapper {
    @Select("select * from user")
    List<User> getAll();
}
4.8 测试
package org.javatop.dynamic;

import org.javatop.dynamic.domain.User;
import org.javatop.dynamic.service.UserService;
import org.junit.jupiter.api.Test;
import org.springframework.beans.factory.annotation.Autowired;
import org.springframework.boot.test.context.SpringBootTest;

import java.util.List;

/**
 * @author : Leo
 * @version 1.0
 * @date 2024-01-02 15:32
 * @description :
 */
@SpringBootTest
public class DynamicTest {

    @Autowired
    private UserService userService;

    /**
     *  用于测试:
     */
    @Test
    public void test() {
        List<User> all = userService.getAll();
        if(all !=null){
            for (User user : all) {
                System.out.println(user);
            }
        }
    }
}
我们查看控制台。

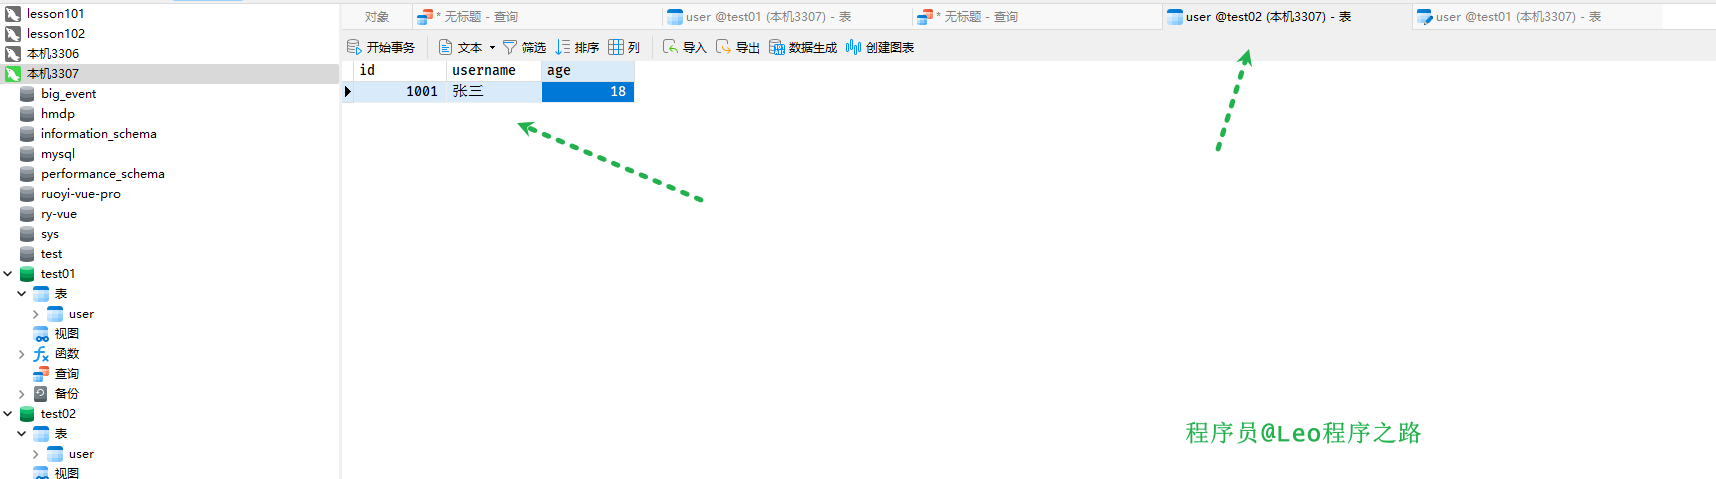
可以看出来我们去查询的是test02库中的user数据。
大功告成!!!
5.总结
以上就是SpringBoot实现多数据源的实战案例的详细内容,更多关于SpringBoot实现多数据源的资料请关注脚本之家其它相关文章!
相关文章
 这篇文章主要介绍了Java编程redisson实现分布式锁代码示例,小编觉得还是比较不错的,这里给大家分享下,供需要的朋友参考。2017-10-10
 这篇文章主要介绍了Spring-data-redis操作redis知识总结,spring-data-redis是spring-data模块的一部分,专门用来支持在spring管理项目对redis的操作。2017-04-04
 本篇文章主要介绍了Java LocalCache 本地缓存的实现实例,具有一定的参考价值,感兴趣的小伙伴们可以参考一下。2017-05-05
 这篇文章主要为大家介绍了SpringBoot2入门自动配置原理及源码分析,有需要的朋友可以借鉴参考下,希望能够有所帮助,祝大家多多进步,早日升职加薪2022-05-05
关于mybatis3中@SelectProvider的使用问题
这篇文章主要介绍了mybatis3中@SelectProvider的使用技巧,@SelectProvide指定一个Class及其方法,并且通过调用Class上的这个方法来获得sql语句,本文通过实例代码给大家介绍的非常详细,需要的朋友可以参考下2021-12-12 在我们实际工作中,总会遇到这样需求,在项目启动的时候需要做一些初始化的操作,比如初始化线程池,提前加载好加密证书等,本文主要介绍了Springboot 启动之后初始化资源的几种方法,感兴趣的可以了解一下2024-01-01
 这篇文章主要介绍了MybatisPlus使用注解的多对多级联查询方式,具有很好的参考价值,希望对大家有所帮助,如有错误或未考虑完全的地方,望不吝赐教2023-07-07
 这篇文章主要为大家详细介绍了Java从服务端下载Excel模板文件的两种方法,文中示例代码介绍的非常详细,具有一定的参考价值,感兴趣的小伙伴们可以参考一下2022-08-08
 Redis想必大家都或多或少听过吧,我们在工作学习中通常用它来作为缓存使用,既然是作为缓存,大家的第一反应肯定是:这家伙很快2022-02-02
Springboot2.x结合Mabatis3.x下Hikari连接数据库报超时错误
本文针对Springboot2.x与Mybatis3.x结合使用时,Hikari连接数据库出现超时错误的问题进行了深入分析,并提供了一系列有效的解决方法,感兴趣的可以了解一下2023-11-11


最新评论