
Weex开发之地图篇的具体使用
在移动应用开发中,地图是一个很重要的工具,基于地图的定位、导航等特点衍生出了很多著名的移动应用。在Weex开发中,如果要使用定位、导航和坐标计算等常见的地图功能,可以使用weex-amap插件。
weex-amap是高德针对Weex开发的一款地图插件,在Eros开发中,Eros对weex-amap进行二次封装,以便让开发者更集成地图功能。和其他的插件一样,集成此插件需要在原生平台中进行集成。
本文介绍的是如何在iOS中集成weex-amap,以及它的一些核心功能。本文将要介绍的内容如下:
1.高德地图开发准备工作
- 1.1 iOS高德地图开发流程简单介绍
- 1.2 android高德地图开发流程简单介绍
- 1.3 web高德地图开发流程简单介绍
2. weex-iOS地图组件扩展方式介绍
- 2.1 dwd-weex-amap
- 2.2 dwd-weex-amap-marker
- 2.3 dwd-weex-amap-info-window
- 2.4 dwd-weex-amap-circle
- 2.5 dwd-weex-amap-polygon
- 2.5 dwd-weex-amap-polyline
3.weex-android地图组件扩展方式介绍
- 3.1 dwd-weex-amap
- 3.2 dwd-weex-amap-marker
- 3.3 dwd-weex-amap-info-window
- 3.4 dwd-weex-amap-circle
- 3.5 dwd-weex-amap-polygon
- 3.6 dwd-weex-amap-polyline
4.weex-html5地图组件扩展方式介绍
- 4.1 dwd-weex-amap
- 4.2 dwd-weex-amap-marker
- 4.3 dwd-weex-amap-info-window
- 4.4 dwd-weex-amap-circle
- 4.5 dwd-weex-amap-polygon
- 4.6 dwd-weex-amap-polyline
5.获取地图数据(例如骑行路径规划)
- 5.1 weex-iOS地图骑行路径规划
- 5.2 weex-android地图骑行路径规划
- 5.3 weex-web地图骑行路径规划

准备工作
1.1 开发流程简绍
1.使用 CocoaPods 安装AMapSearch,AMap3DMap SDK
2.前往高德开放平台控制台申请 iOS Key
3.配置高德Key至AppDelegate.m文件
1.2 android高德地图开发流程简绍
1.使用 CocoaPods 安装AMapSearch,AMap3DMap SDK
2.前往高德开放平台控制台申请 android Key
3.AndroidManifest.xml的application标签中配置Key
4.AndroidManifest.xml中配置权限
1.3 HTML5高德地图开发流程简绍
1.前往高德开放平台控制台申请 jsAPI Key
2.可通过CDN同步加载方式或使用require异步方式来加载key
weex-iOS地图组件扩展
2.1 weex-amap
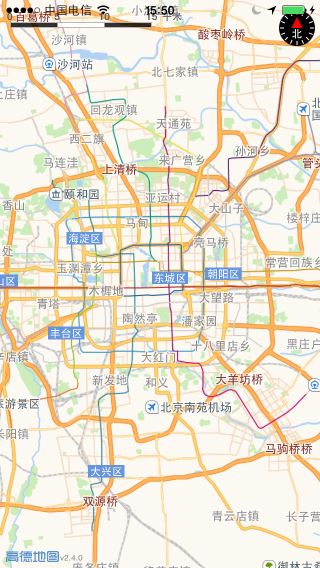
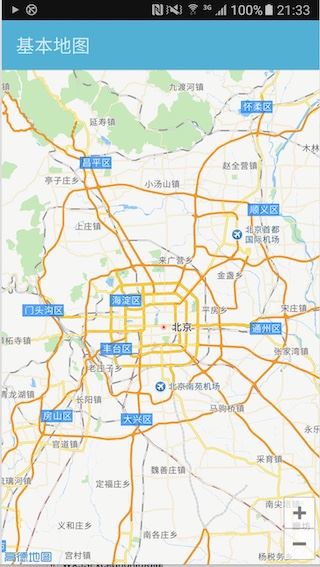
地图展示是地图最基本的功能,其常见的效果如下:
如有要在iOS中自定义weex-amap可以从以下几个步骤完成:
1.新建DMapViewComponent类继承WXComponent;
2.在DMapViewComponent实现文件中实现MAMapViewDelegate代理;
3. 重写DMapViewComponent的loadView方法加载地图视图并设置自身为代理对象;
4.在DMapViewComponent的初始化函数viewDidLoad中做一些准备工作;
5.在DMapViewComponent的initWithRef方法中实现属性绑定;
6.通过fireEvent添加适当时机可以触发的事件;
7.重写insertSubview方法来添加子组建包括覆盖物,线,圆等等。
下面是部分的业务实现代码:
@implementation DMapViewComponent
...
// 属性绑定
- (instancetype)initWithRef:(NSString *)ref
            type:(NSString*)type
           styles:(nullable NSDictionary *)styles
         attributes:(nullable NSDictionary *)attributes
           events:(nullable NSArray *)events
        weexInstance:(WXSDKInstance *)weexInstance
{
  self = [super initWithRef:ref type:type styles:styles attributes:attributes events:events weexInstance:weexInstance];
  if (self) {
    // 中心点
    NSArray *center = [attributes map_safeObjectForKey:@"center"];
    _zoomLevel = [[attributes map_safeObjectForKey:@"zoom"] floatValue];
    // 是否允许显示指南针
    _compass = [[attributes map_safeObjectForKey:@"compass"] boolValue];
    // sdkKey
    if ([attributes map_safeObjectForKey:@"sdkKey"]) {
      [self setAPIKey:[attributes[@"sdkKey"] objectForKey:@"ios"] ? : @""];
    }
...
  }
  return self;
}
// 重写DMapViewComponent的loadView方法加载地图视图并设置自身为代理对象
- (UIView *) loadView
{
  UIWindow *window = [UIApplication sharedApplication].keyWindow;
  CGSize windowSize = window.rootViewController.view.frame.size;
  self.mapView = [[MAMapView alloc] initWithFrame:CGRectMake(0, 0, windowSize.width, windowSize.height)];
  self.mapView.showsUserLocation = _showGeolocation;
  self.mapView.delegate = self;
  self.mapView.customMapStyleEnabled = YES;
  [self.mapView setCustomMapStyleWithWebData:[self getMapData]];

  return self.mapView;
}
// 设置地图样式
- (NSData *)getMapData
{
  NSString *path = [NSString stringWithFormat:@"%@/gaodeMapStyle.data", [NSBundle mainBundle].bundlePath];
  NSData *data = [NSData dataWithContentsOfFile:path];
  return data;
}

- (void)viewDidLoad
{
  [super viewDidLoad];
  self.mapView.showsScale = _showScale;
  self.mapView.showsCompass = _compass;
  [self.mapView setCenterCoordinate:_centerCoordinate];
  [self.mapView setZoomLevel:_zoomLevel];
}

// 添加覆盖物
- (void)insertSubview:(WXComponent *)subcomponent atIndex:(NSInteger)index
{
  if ([subcomponent isKindOfClass:[DMapRenderer class]]) {
    DMapRenderer *overlayRenderer = (DMapRenderer *)subcomponent;
    [self addOverlay:overlayRenderer];
  }else if ([subcomponent isKindOfClass:[DMapViewMarkerComponent class]]) {
    [self addMarker:(DMapViewMarkerComponent *)subcomponent];
  }
}
// 更新属性
- (void)updateAttributes:(NSDictionary *)attributes
{
...
  if (attributes[@"zoom"]) {
    [self setZoomLevel:[attributes[@"zoom"] floatValue]];
  }
 ...
}
#pragma mark - component interface
- (void)setAPIKey:(NSString *)appKey
{
  [AMapServices sharedServices].apiKey = appKey;
}
- (void)setZoomLevel:(CGFloat)zoom
{
  [self.mapView setZoomLevel:zoom animated:YES];
}
#pragma mark - publish method
- (NSDictionary *)getUserLocation
{
  if(self.mapView.userLocation.updating && self.mapView.userLocation.location) {
    NSArray *coordinate = @[[NSNumber numberWithDouble:self.mapView.userLocation.location.coordinate.longitude],[NSNumber numberWithDouble:self.mapView.userLocation.location.coordinate.latitude]];
    NSDictionary *userDic = @{@"result":@"success",@"data":@{@"position":coordinate,@"title":@""}};
    return userDic;
  }
  return @{@"resuldt":@"false",@"data":@""};
}

#pragma mark - mapview delegate
/*!
 @brief 根据anntation生成对应的View
 */
- (MAAnnotationView*)mapView:(MAMapView *)mapView viewForAnnotation:(id <MAAnnotation>)annotation
{
  if ([annotation isKindOfClass:[MAPointAnnotation class]])
  {
    MAPointAnnotation *pointAnnotation = (MAPointAnnotation *)annotation;
    if ([pointAnnotation.component isKindOfClass:[WXMapInfoWindowComponent class]]) {
      return [self _generateCustomInfoWindow:mapView viewForAnnotation:pointAnnotation];

    }else {
      return [self _generateAnnotationView:mapView viewForAnnotation:pointAnnotation];
    }
  }

  return nil;
}

/**
 * @brief 当选中一个annotation views时,调用此接口
 * @param mapView 地图View
 * @param view 选中的annotation views
 */
- (void)mapView:(MAMapView *)mapView didSelectAnnotationView:(MAAnnotationView *)view
{
  MAPointAnnotation *annotation = view.annotation;
  for (WXComponent *component in self.subcomponents) {
    if ([component isKindOfClass:[WXMapViewMarkerComponent class]] &&
      [component.ref isEqualToString:annotation.component.ref]) {
      WXMapViewMarkerComponent *marker = (WXMapViewMarkerComponent *)component;
      if (marker.clickEvent) {
        [marker fireEvent:marker.clickEvent params:[NSDictionary dictionary]];
      }
    }
  }
}

/**
 * @brief 当取消选中一个annotation views时,调用此接口
 * @param mapView 地图View
 * @param view 取消选中的annotation views
 */
- (void)mapView:(MAMapView *)mapView didDeselectAnnotationView:(MAAnnotationView *)view
{

}

/**
 * @brief 地图移动结束后调用此接口
 * @param mapView    地图view
 * @param wasUserAction 标识是否是用户动作
 */
- (void)mapView:(MAMapView *)mapView mapDidMoveByUser:(BOOL)wasUserAction
{
  if (_isDragend) {
    [self fireEvent:@"dragend" params:[NSDictionary dictionary]];
  }
}

/**设置地图缩放级别 */
- (void)setMapViewRegion:(NSMutableArray *)poiArray animated:(BOOL)animated {
  NSMutableArray *arrays = [NSMutableArray array];
  for (MAPointAnnotation *anot in self.mapView.annotations) {
    CLLocationCoordinate2D coordinate = anot.coordinate;
    NSDictionary *poidic = [NSDictionary dictionaryWithObjectsAndKeys:[NSNumber numberWithInt:coordinate.latitude * 1000000], @"lat",
                [NSNumber numberWithInt:coordinate.longitude * 1000000], @"lng", nil];
    [arrays addObject:poidic];
  }

  MACoordinateRegion region = [self getCoordinateMapSpan:arrays];
  [self.mapView setRegion:region animated:animated];
}

/**配置地图region */
- (MACoordinateRegion)getCoordinateMapSpan:(NSMutableArray *)knightArray {
  MACoordinateRegion region;
  MACoordinateSpan span;

  CLLocationDegrees maxLat = -90;
  CLLocationDegrees maxLon = -180;
  CLLocationDegrees minLat = 90;
  CLLocationDegrees minLon = 180;

  if (knightArray && knightArray.count > 1) {
    for (int i = 0; i < knightArray.count; i++) {
      NSDictionary *knightDictionary = [knightArray objectAtIndex:i];
      float lat = [[knightDictionary objectForKey:@"lat"] floatValue] / 1000000;
      float lng = [[knightDictionary objectForKey:@"lng"] floatValue] / 1000000;

      if(lat > maxLat)
        maxLat = lat;
      if(lat < minLat)
        minLat = lat;
      if(lng > maxLon)
        maxLon = lng;
      if(lng < minLon)
        minLon = lng;
    }

    span.latitudeDelta = (maxLat - minLat) * 2 + 0.005;
    span.longitudeDelta = (maxLon - minLon) * 2 + 0.005;
    region.center.latitude = (maxLat + minLat) / 2;
    region.center.longitude = (maxLon + minLon) / 2;
    region.span = span;
  } else {
    NSDictionary *knightDictionary = [knightArray objectAtIndex:0];
    span.latitudeDelta = 0.01;
    span.longitudeDelta = 0.01;
    float lat = [[knightDictionary objectForKey:@"lat"] floatValue] / 1000000;
    float lng = [[knightDictionary objectForKey:@"lng"] floatValue] / 1000000;
    if (lat !=0 && lng != 0) {
      region.center.longitude = lng;
      region.center.latitude = lat;
    } else {
      region.center = [[ShopLocateManager shared] getLocationCoordinate];
    }
    region.span = span;
  }

  return region;
}
...
@end
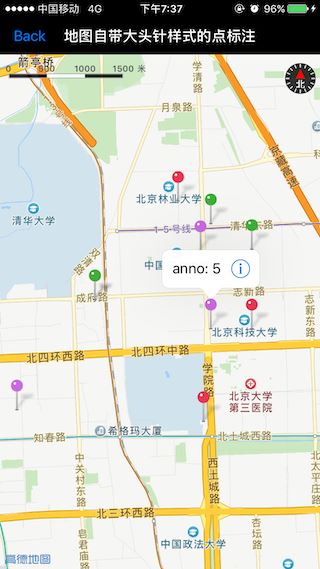
2.2 weex-amap-marker
marker主要用于实现锚点,其效果如下:
要在Weex中自定义锚点,需要遵循以下几步:
- 新建DMapViewMarkerComponent类继承WXComponent;
- 在DMapViewComponent中使用mapview的addAnnotation方法添加DMapViewMarkerComponent组件;
- 在DMapViewComponent重写insertSubview方法来添加子组建覆盖物。
部分实现代码如下:
- (instancetype)initWithRef:(NSString *)ref
            type:(NSString*)type
           styles:(nullable NSDictionary *)styles
         attributes:(nullable NSDictionary *)attributes
           events:(nullable NSArray *)events
        weexInstance:(WXSDKInstance *)weexInstance
{
  self = [super initWithRef:ref type:type styles:styles attributes:attributes events:events weexInstance:weexInstance];
  if (self) {
    if ([events containsObject:@"click"]) {
      _clickEvent = @"click";
    }
    NSArray *offset = attributes[@"offset"];
    if ([WXConvert isValidatedArray:offset]) {
      _offset = CGPointMake([WXConvert CGFloat:offset[0]],
                 [WXConvert CGFloat:offset[1]]);//[WXConvert sizeToWXPixelType:attributes[@"offset"] withInstance:self.weexInstance];
    }
    if (styles[@"zIndex"]) {
      _zIndex = [styles[@"zIndex"] integerValue];
    }
    _hideCallout = [[attributes map_safeObjectForKey:@"hideCallout"] boolValue];
    NSArray *position = [attributes map_safeObjectForKey:@"position"];
    if ([WXConvert isValidatedArray:position]) {
      _location = [attributes map_safeObjectForKey:@"position"];
    }
    _title = [attributes map_safeObjectForKey:@"title"];
    _icon = [attributes map_safeObjectForKey:@"icon"];
  }
  return self;
}

- (void)updateAttributes:(NSDictionary *)attributes
{
  DMapViewComponent *mapComponent = (DMapViewComponent *)self.supercomponent;
  if (attributes[@"title"]) {
    _title = attributes[@"title"];
    [mapComponent updateTitleMarker:self];
  }

  if ([attributes map_safeObjectForKey:@"icon"]) {
    _icon = attributes[@"icon"];
    [mapComponent updateIconMarker:self];
  }

  NSArray *position = [attributes map_safeObjectForKey:@"position"];
  if ([WXConvert isValidatedArray:position]) {
    _location = position;
    [mapComponent updateLocationMarker:self];
  }
}
weex-amap-info-window
weex-amap-info-window组件主要用于显示地图信息,如地图的图片模式,其效果如下:

要自定义窗体组件,需要用到以下几个步骤:
- 新建DMapInfoWindowComponent类继承WXComponent;
- 在DMapViewComponent中使用mapview的addAnnotation方法添加DMapInfoWindowComponent组件;
- 在DMapViewComponent重写insertSubview方法来添加子组建信息窗体。
部分实现代码如下:
- (instancetype)initWithRef:(NSString *)ref
            type:(NSString*)type
           styles:(nullable NSDictionary *)styles
         attributes:(nullable NSDictionary *)attributes
           events:(nullable NSArray *)events
        weexInstance:(WXSDKInstance *)weexInstance
{
  self = [super initWithRef:ref type:type styles:styles attributes:attributes events:events weexInstance:weexInstance];
  if (self) {
    if (attributes[@"open"]) {
      _isOpen = [attributes[@"open"] boolValue];
    }

  }
  return self;
}

- (UIView *) loadView
{
  return [[DMapInfoWindow alloc] initWithAnnotation:_annotation reuseIdentifier:_identifier];
}

- (void)insertSubview:(WXComponent *)subcomponent atIndex:(NSInteger)index{}
- (void)updateAttributes:(NSDictionary *)attributes
{
  [super updateAttributes:attributes];
  if (attributes[@"open"])
  {
    _isOpen = [attributes[@"open"] boolValue];
    if (_isOpen) {
      [self _addSubView];
    }else {
      [self _removeViewFromSuperView];
    }
  }
}

#pragma mark - private method
 1. (void)_addSubView
{
  [self _removeViewFromSuperView];
  [(DMapViewComponent *)self.supercomponent addMarker:self];
}

 2. (void)_removeViewFromSuperView
{
  [(DMapViewComponent *)self.supercomponent removeMarker:self];
}
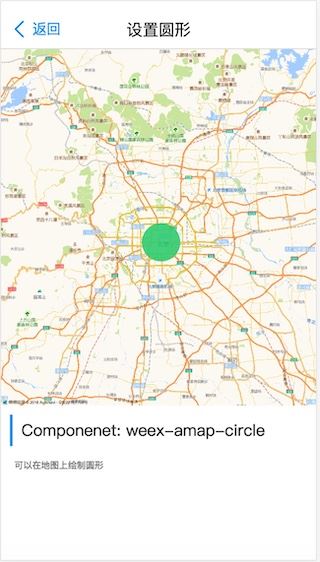
2.4 weex-amap-circle
weex-amap-circle组件主要用于实现画圈功能,如地图范围,其效果如下图所示:
- 新建DMapCircleComponent类继承WXComponent;
- 在DMapViewComponent中使用mapview的addOverlay方法添加DMapCircleComponent组件;
- 在DMapViewComponent重写insertSubview方法来添加子组建圆。
下面是部分实现逻辑:
- (instancetype)initWithRef:(NSString *)ref
            type:(NSString*)type
           styles:(nullable NSDictionary *)styles
         attributes:(nullable NSDictionary *)attributes
           events:(nullable NSArray *)events
        weexInstance:(WXSDKInstance *)weexInstance
{
  self = [super initWithRef:ref type:type styles:styles attributes:attributes events:events weexInstance:weexInstance];
  if (self) {
    NSArray *centerArray = [attributes map_safeObjectForKey:@"center"];
    if ([WXConvert isValidatedArray:centerArray]) {
      _center = centerArray;
    }
    _radius = [[attributes map_safeObjectForKey:@"radius"] doubleValue];
  }
  return self;
}

- (void)updateAttributes:(NSDictionary *)attributes
{
  NSArray *centerArray = [attributes map_safeObjectForKey:@"center"];
  DMapViewComponent *parentComponent = (DMapViewComponent *)self.supercomponent;
  if ([WXConvert isValidatedArray:centerArray]) {
    _center = centerArray;
    [parentComponent removeOverlay:self];
    [parentComponent addOverlay:self];
  }else if ([[attributes map_safeObjectForKey:@"radius"] doubleValue] >= 0) {
    _radius = [[attributes map_safeObjectForKey:@"radius"] doubleValue];
    [parentComponent removeOverlay:self];
    [parentComponent addOverlay:self];
  }else {
    [super updateAttributes:attributes];
  }
}
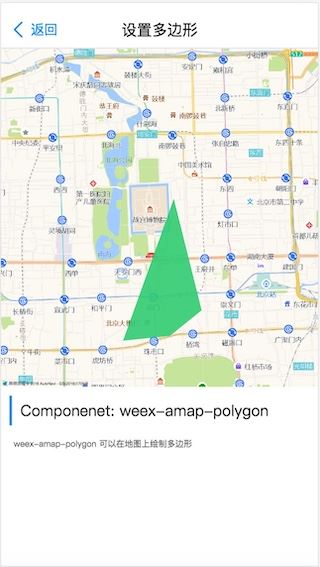
2.5 weex-amap-polygon
weex-amap-polygon主要用于绘制多边形,其效果如下图:
要自定义weex-amap-polygon,可以从以下步骤着手:
- 新建DMapPolygonComponent类继承WXComponent;
- 在DMapViewComponent中使用mapview的addOverlay方法添加DMapPolygonComponent组件;
- 在DMapViewComponent重写insertSubview方法来添加子组建多边形。
部分实现代码如下:
- (instancetype)initWithRef:(NSString *)ref
            type:(NSString*)type
           styles:(nullable NSDictionary *)styles
         attributes:(nullable NSDictionary *)attributes
           events:(nullable NSArray *)events
        weexInstance:(WXSDKInstance *)weexInstance
{
  self = [super initWithRef:ref type:type styles:styles attributes:attributes events:events weexInstance:weexInstance];
  if (self) {
    _fillColor = [attributes map_safeObjectForKey:@"fillColor"];
    _fillOpacity = [attributes map_safeObjectForKey:@"fillOpacity"];
  }
  return self;
}

- (void)updateAttributes:(NSDictionary *)attributes
{
  if ([attributes map_safeObjectForKey:@"fillColor"]) {
    _fillColor = [attributes map_safeObjectForKey:@"fillColor"];
  }else if ([attributes map_safeObjectForKey:@"fillOpacity"]) {
    _fillOpacity = [attributes map_safeObjectForKey:@"fillOpacity"];
  }else {
    [super updateAttributes:attributes];
  }
}
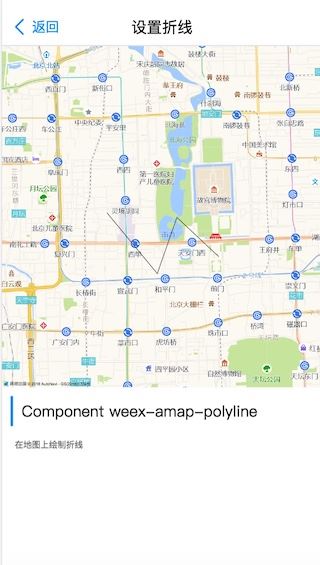
2.6 weex-amap-polyline
weex-amap-polyline组件主要用于在地图上实现划线操作,其最终效果如下图:
在iOS中,自定义直接需要从以下几步着手:
- 新建DMapPolylineComponent类继承WXComponent;
- 在DMapViewComponent中使用mapview的addOverlay方法添加DMapPolylineComponent组件;
- 在DMapViewComponent重写insertSubview方法来添加子组建折线。
@implementation DMapPolylineComponent


- (instancetype)initWithRef:(NSString *)ref
            type:(NSString*)type
           styles:(nullable NSDictionary *)styles
         attributes:(nullable NSDictionary *)attributes
           events:(nullable NSArray *)events
        weexInstance:(WXSDKInstance *)weexInstance
{
  self = [super initWithRef:ref type:type styles:styles attributes:attributes events:events weexInstance:weexInstance];
  if (self) {
    NSArray * pathArray = [attributes map_safeObjectForKey:@"path"];
    if ([WXConvert isValidatedArray:pathArray]) {
      _path = pathArray;
    }
    _strokeColor = [attributes map_safeObjectForKey:@"strokeColor"];
    _strokeWidth = [[attributes map_safeObjectForKey:@"strokeWidth"] doubleValue];
    _strokeOpacity = [[attributes map_safeObjectForKey:@"strokeOpacity"] doubleValue];
    _strokeStyle = [attributes map_safeObjectForKey:@"strokeStyle"];
  }
  _viewLoaded = NO;
  return self;
}

- (void)updateAttributes:(NSDictionary *)attributes
{
  NSArray * pathArray = [attributes map_safeObjectForKey:@"path"];
  DMapViewComponent *parentComponent = (DMapViewComponent *)self.supercomponent;
  if (pathArray) {
    if ([WXConvert isValidatedArray:pathArray]) {
      _path = pathArray;
    }
    [parentComponent removeOverlay:self];
    [parentComponent addOverlay:self];
    return;
  }else if ([attributes map_safeObjectForKey:@"strokeColor"]) {
    _strokeColor = [attributes map_safeObjectForKey:@"strokeColor"];
  }else if ([[attributes map_safeObjectForKey:@"strokeWidth"] doubleValue] >= 0) {
    _strokeWidth = [[attributes map_safeObjectForKey:@"strokeWidth"] doubleValue];
  }else if ([[attributes map_safeObjectForKey:@"strokeOpacity"] doubleValue] >= 0) {
    _strokeOpacity = [[attributes map_safeObjectForKey:@"strokeOpacity"] doubleValue];
  }else if ([attributes map_safeObjectForKey:@"strokeStyle"]) {
    _strokeStyle = [attributes map_safeObjectForKey:@"strokeStyle"];
  }
  [parentComponent updateOverlayAttributes:self];
}

@end
地图组件扩展
当然,我们也可以不使用weex-amap,而是直接使用高德地图进行扩展。
3.1 weex-amap
例如,我们自己扩展一个基于原生高德SDK生成的weex-amap组件。
要实现这么一个地图显示的功能,实现的步骤如下:
- 新建DMapViewComponent类继承WXVContainer实现LocationSource;
- 使用initComponentHostView(context)初始化;
- 在DMapViewComponent实现文件中实现初始化map对象initMap,设置map的key;
- @WXComponentProp注解实现属性绑定;
- 通过fireEvent添加适当时机可以触发的事件;
- 设置mapview的setInfoWindowAdapter,addPolyline,addPolygon,addCircle,addMarker等方式来实现覆盖物,,线,圆等等。
实现代码可以参考下面的代码:
 @Override
  protected FrameLayout initComponentHostView(@NonNull Context context) {
    mapContainer = new FrameLayout(context) {
      @Override
      public boolean onInterceptTouchEvent(MotionEvent ev) {
        // 解决与Scroller的滑动冲突
        if (ev.getAction() == MotionEvent.ACTION_UP) {
          requestDisallowInterceptTouchEvent(false);
        } else {
          requestDisallowInterceptTouchEvent(true);
        }
        return false;
      }
    };
    mapContainer.setBackgroundColor(fakeBackgroundColor);
    if (context instanceof Activity) {
      mActivity = (Activity) context;
    }

    return mapContainer;
  }

  @Override
  protected void setHostLayoutParams(FrameLayout host, int width, int height, int left, int right, int top, int bottom) {
    super.setHostLayoutParams(host, width, height, left, right, top, bottom);
    if (!isMapLoaded.get() && !isInited.get()) {
      isInited.set(true);
      mapContainer.postDelayed(new Runnable() {
        @Override
        public void run() {
          mMapView = new TextureMapView(getContext());
          mapContainer.addView(mMapView, new FrameLayout.LayoutParams(ViewGroup.LayoutParams.MATCH_PARENT,
              ViewGroup.LayoutParams.MATCH_PARENT));
          WXLogUtils.e(TAG, "Create MapView " + mMapView.toString());
          initMap();
        }
      }, 0);
    }
  }

  private void initMap() {
    mMapView.onCreate(null);
    isMapLoaded.set(false);
    if (mAMap == null) {
      mAMap = mMapView.getMap();

      mAMap.setInfoWindowAdapter(new InfoWindowAdapter(this));
      mAMap.setOnMapLoadedListener(new AMap.OnMapLoadedListener() {
        @Override
        public void onMapLoaded() {
          WXLogUtils.e(TAG, "Map loaded");
          isMapLoaded.set(true);
          mZoomLevel = mAMap.getCameraPosition().zoom;
          mMapView.postDelayed(new Runnable() {
            @Override
            public void run() {
              execPaddingTasks();
            }
          }, 16);
        }
      });

      // 绑定 Marker 被点击事件
      mAMap.setOnMarkerClickListener(new AMap.OnMarkerClickListener() {
        // marker 对象被点击时回调的接口
        // 返回 true 则表示接口已响应事件,否则返回false
        @Override
        public boolean onMarkerClick(Marker marker) {

          if (marker != null) {
            for (int i = 0; i < getChildCount(); i++) {
              if (getChild(i) instanceof DMapMarkerComponent) {
                DMapMarkerComponent child = (DMapMarkerComponent) getChild(i);
                if (child.getMarker() != null && child.getMarker().getId() == marker.getId()) {
                  child.onClick();
                }
              }
            }
          }
          return false;
        }
      });
      mAMap.setOnCameraChangeListener(new AMap.OnCameraChangeListener() {

        private boolean mZoomChanged;

        @Override
        public void onCameraChange(CameraPosition cameraPosition) {
          mZoomChanged = mZoomLevel != cameraPosition.zoom;
          mZoomLevel = cameraPosition.zoom;
        }

        @Override
        public void onCameraChangeFinish(CameraPosition cameraPosition) {
          if (mZoomChanged) {

            float scale = mAMap.getScalePerPixel();
            float scaleInWeex = scale / WXViewUtils.getWeexPxByReal(scale);

            VisibleRegion visibleRegion = mAMap.getProjection().getVisibleRegion();
            WXLogUtils.d(TAG, "Visible region: " + visibleRegion.toString());
            Map<String, Object> region = new HashMap<>();
            region.put("northeast", convertLatLng(visibleRegion.latLngBounds.northeast));
            region.put("southwest", convertLatLng(visibleRegion.latLngBounds.southwest));

            Map<String, Object> data = new HashMap<>();
            data.put("targetCoordinate", cameraPosition.target.toString());
            data.put("zoom", cameraPosition.zoom);
            data.put("tilt", cameraPosition.tilt);
            data.put("bearing", cameraPosition.bearing);
            data.put("isAbroad", cameraPosition.isAbroad);
            data.put("scalePerPixel", scaleInWeex);
            data.put("visibleRegion", region);
            getInstance().fireEvent(getRef(), WeexConstant.EVENT.ZOOM_CHANGE, data);
          }
        }
      });

      mAMap.setOnMapTouchListener(new AMap.OnMapTouchListener() {
        boolean dragged = false;

        @Override
        public void onTouch(MotionEvent motionEvent) {

          switch (motionEvent.getAction()) {
            case MotionEvent.ACTION_MOVE:
              dragged = true;
              break;
            case MotionEvent.ACTION_UP:
              if (dragged)
                getInstance().fireEvent(getRef(), WeexConstant.EVENT.DRAG_CHANGE);
              dragged = false;
              break;
          }
        }
      });
      setUpMap();
    }
  }
}
3.2 weex-amap-info-window
当然,我们也可以使用它实现weex-amap-info-window功能,虽然weex-amap-info-window已经被内置到weex-amap中。是的的思路如下:
新建DMapViewMarkerComponent类继承WXComponent;
在DMapViewComponent中使用mapview的addMarker方法添加DMapViewMarkerComponent组件 。
在DMapViewComponent中使用mapview的addMarker方法添加DMapViewMarkerComponent组件 。
private static class InfoWindowAdapter implements AMap.InfoWindowAdapter {

    private DMapViewComponent mWXMapViewComponent;

    InfoWindowAdapter(DMapViewComponent wxMapViewComponent) {
      mWXMapViewComponent = wxMapViewComponent;
    }

    @Override
    public View getInfoWindow(Marker marker) {
      return render(marker);
    }

    @Override
    public View getInfoContents(Marker marker) {
      return null;
//      return render(marker);
    }

    private View render(Marker marker) {
      WXMapInfoWindowComponent wxMapInfoWindowComponent = mWXMapViewComponent.mInfoWindowHashMap.get(marker.getId());
      if (wxMapInfoWindowComponent != null) {
        WXFrameLayout host = wxMapInfoWindowComponent.getHostView();
//        WXFrameLayout content = (WXFrameLayout) host.getChildAt(0);
        host.getLayoutParams().width = ViewGroup.LayoutParams.WRAP_CONTENT;
        host.getLayoutParams().height = ViewGroup.LayoutParams.WRAP_CONTENT;
        WXLogUtils.d(TAG, "Info size: " + host.getMeasuredWidth() + ", " + host.getMeasuredHeight());
        return host;
      } else {
        WXLogUtils.e(TAG, "WXMapInfoWindowComponent with marker id " + marker.getId() + " not found");
      }
      return null;
    }
  }
html5地图组件扩展
当然,我们可以使用对html5的amap进行扩展,例如扩展weex-amap。
4.1 weex-amap
示例代码如下:
<template>
  <div class="amap-page-container">
   <el-amap ref="map" vid="amapDemo" :amap-manager="amapManager" :center="center" :zoom="zoom" :plugin="plugin" :events="events" class="amap-demo">
   </el-amap>

   <div class="toolbar">
    <button @click="getMap()">get map</button>
   </div>
  </div>
 </template>

 <style>
  .amap-demo {
   height: 300px;
  }
 </style>

 <script>
  // NPM 方式
  // import { AMapManager } from 'vue-amap';
  // CDN 方式
  let amapManager = new VueAMap.AMapManager();
  module.exports = {
   data: function() {
    return {
     amapManager,
     zoom: 12,
     center: [121.59996, 31.197646],
     events: {
      init: (o) => {
       console.log(o.getCenter())
       console.log(this.$refs.map.$$getInstance())
       o.getCity(result => {
        console.log(result)
       })
      },
      'moveend': () => {
      },
      'zoomchange': () => {
      },
      'click': (e) => {
       alert('map clicked');
      }
     },
     plugin: ['ToolBar', {
      pName: 'MapType',
      defaultType: 0,
      events: {
       init(o) {
        console.log(o);
       }
      }
     }]
    };
   },

   methods: {
    getMap() {
     // amap vue component
     console.log(amapManager._componentMap);
     // gaode map instance
     console.log(amapManager._map);
    }
   }
  };
</script>
4.2 weex-amap-marker
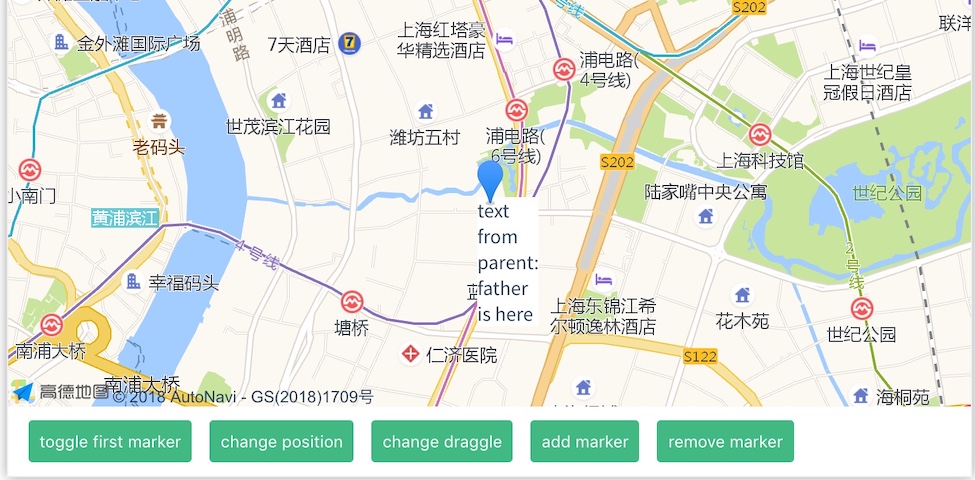
实现代码如下:
<template>
  <div class="amap-page-container">
   <el-amap vid="amapDemo" :zoom="zoom" :center="center" class="amap-demo">
    <el-amap-marker vid="component-marker" :position="componentMarker.position" :content-render="componentMarker.contentRender" ></el-amap-marker>
    <el-amap-marker v-for="(marker, index) in markers" :position="marker.position" :events="marker.events" :visible="marker.visible" :draggable="marker.draggable" :vid="index"></el-amap-marker>
   </el-amap>
   <div class="toolbar">
    <button type="button" name="button" v-on:click="toggleVisible">toggle first marker</button>
    <button type="button" name="button" v-on:click="changePosition">change position</button>
    <button type="button" name="button" v-on:click="chnageDraggle">change draggle</button>
    <button type="button" name="button" v-on:click="addMarker">add marker</button>
    <button type="button" name="button" v-on:click="removeMarker">remove marker</button>
   </div>
  </div>
 </template>

 <style>
  .amap-demo {
   height: 300px;
  }
 </style>

 <script>
  const exampleComponents = {
   props: ['text'],
   template: `<div>text from parent: {{text}}</div>`
  }
  module.exports = {
   name: 'amap-page',
   data() {
    return {
     count: 1,
     slotStyle: {
      padding: '2px 8px',
      background: '#eee',
      color: '#333',
      border: '1px solid #aaa'
     },
     zoom: 14,
     center: [121.5273285, 31.21515044],
     markers: [
      {
       position: [121.5273285, 31.21515044],
       events: {
        click: () => {
         alert('click marker');
        },
        dragend: (e) => {
         console.log('---event---: dragend')
         this.markers[0].position = [e.lnglat.lng, e.lnglat.lat];
        }
       },
       visible: true,
       draggable: false,
       template: '<span>1</span>',
      }
     ],
     renderMarker: {
      position: [121.5273285, 31.21715058],
      contentRender: (h, instance) => {
       // if use jsx you can write in this
       // return <div style={{background: '#80cbc4', whiteSpace: 'nowrap', border: 'solid #ddd 1px', color: '#f00'}} onClick={() => ...}>marker inner text</div>
       return h(
        'div',
        {
         style: {background: '#80cbc4', whiteSpace: 'nowrap', border: 'solid #ddd 1px', color: '#f00'},
         on: {
          click: () => {
           const position = this.renderMarker.position;
           this.renderMarker.position = [position[0] + 0.002, position[1] - 0.002];
          }
         }
        },
        ['marker inner text']
       )
      }
     },
     componentMarker: {
      position: [121.5273285, 31.21315058],
      contentRender: (h, instance) => h(exampleComponents,{style: {backgroundColor: '#fff'}, props: {text: 'father is here'}}, ['xxxxxxx'])
     },
     slotMarker: {
      position: [121.5073285, 31.21715058]
     }
    };
   },
   methods: {
    onClick() {
     this.count += 1;
    },
    changePosition() {
     let position = this.markers[0].position;
     this.markers[0].position = [position[0] + 0.002, position[1] - 0.002];
    },
    chnageDraggle() {
     let draggable = this.markers[0].draggable;
     this.markers[0].draggable = !draggable;
    },
    toggleVisible() {
     let visableVar = this.markers[0].visible;
     this.markers[0].visible = !visableVar;
    },
    addMarker() {
     let marker = {
      position: [121.5273285 + (Math.random() - 0.5) * 0.02, 31.21515044 + (Math.random() - 0.5) * 0.02]
     };
     this.markers.push(marker);
    },
    removeMarker() {
     if (!this.markers.length) return;
     this.markers.splice(this.markers.length - 1, 1);
    }
   }
  };
</script>
4.3 weex-amap-info-window
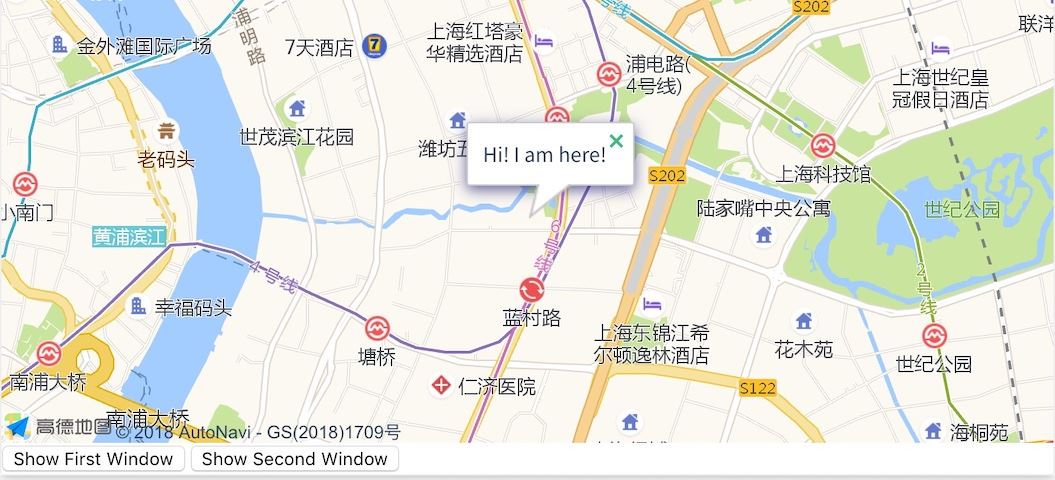
<template>
  <div class="amap-page-container">
   <el-amap vid="amap" :zoom="zoom" :center="center" class="amap-demo">
    <el-amap-info-window
     :position="currentWindow.position"
     :content="currentWindow.content"
     :visible="currentWindow.visible"
     :events="currentWindow.events">
    </el-amap-info-window>
   </el-amap>
   <button @click="switchWindow(0)">Show First Window</button>
   <button @click="switchWindow(1)">Show Second Window</button>
  </div>
 </template>

 <style>
  .amap-demo {
   height: 300px;
  }
 </style>

 <script>
  module.exports = {
   data () {
    return {
     zoom: 14,
     center: [121.5273285, 31.21515044],
     windows: [
      {
       position: [121.5273285, 31.21515044],
       content: 'Hi! I am here!',
       visible: true,
       events: {
        close() {
         console.log('close infowindow1');
        }
       }
      }, {
       position: [121.5375285, 31.21515044],
       content: 'Hi! I am here too!',
       visible: true,
       events: {
        close() {
         console.log('close infowindow2');
        }
       }
      }
     ],
     slotWindow: {
      position: [121.5163285, 31.21515044]
     },
     currentWindow: {
      position: [0, 0],
      content: '',
      events: {},
      visible: false
     }
    }
   },

   mounted() {
    this.currentWindow = this.windows[0];
   },

   methods: {
    switchWindow(tab) {
     this.currentWindow.visible = false;
     this.$nextTick(() => {
      this.currentWindow = this.windows[tab];
      this.currentWindow.visible = true;
     });
    }
   }
  };
</script>
API
当然,除了组件之外,我们还可以使用weex-amap的API来直接操作地图。
5.1 骑行路径Android实现
- (void)searchRidingRouteFromLat:(int)fromLat fromLng:(int)fromLng toLat:(int)toLat toLng:(int)toLng {

  AMapRidingRouteSearchRequest *request = [[AMapRidingRouteSearchRequest alloc] init];
  request.origin = [AMapGeoPoint locationWithLatitude:INT_2_FLOAT(fromLat) / 1000000
                       longitude:INT_2_FLOAT(fromLng) / 1000000];
  request.destination = [AMapGeoPoint locationWithLatitude:INT_2_FLOAT(toLat) / 1000000
                          longitude:INT_2_FLOAT(toLng) / 1000000];
  //发起路径搜索
  [self.aMapSearch AMapRidingRouteSearch:request];
}

- (void)onRouteSearchDone:(AMapRouteSearchBaseRequest *)request response:(AMapRouteSearchResponse *)response {
  if(response.route == nil) {
    return;
  }
  //通过AMapNavigationSearchResponse对象处理搜索结果
  AMapRoute *route = response.route;
  if (route.paths.count > 0) {
    AMapPath *amapPath = route.paths[0];
    NSArray *coordArray = amapPath.steps;
    NSMutableArray *mArray = [NSMutableArray array];
    NSArray *start = @[[NSString stringWithFormat:@"%f", request.origin.longitude], [NSString stringWithFormat:@"%f", request.origin.latitude]];
    [mArray insertObject:start atIndex:0];
    for (AMapStep *step in coordArray) {
      NSString *polistring = step.polyline;
      NSArray *array = [polistring componentsSeparatedByString:@";"];
      for (NSString *str in array) {
        NSArray *loc =[str componentsSeparatedByString:@","];
        [mArray addObject:loc];
      }
    }
    NSArray *end = @[[NSString stringWithFormat:@"%f", request.destination.longitude], [NSString stringWithFormat:@"%f", request.destination.latitude]];
    [mArray insertObject:end atIndex:mArray.count];
    [[DMessageChannelManager shared] postMessage:@"mapLines" andData:@{@"result": @"success", @"data": @{@"mapLines":mArray}}];
  }
}

- (void)AMapSearchRequest:(id)request didFailWithError:(NSError *)error
{
  NSLog(@"Error: %@", error);
}

@end
5.2 骑行路径iOS实现
private RouteTask.OnRouteCalculateListener calculateListener = new RouteTask.OnRouteCalculateListener() {
    @Override
    public void onRouteCalculate(RideRouteResult result, int code) {
      HashMap<String, Object> res = new HashMap<>(2);
      if (code == 1000 && result != null) {
        Map<String, Object> data = new HashMap<>(1);
        data.put("mapLines", getLatLngList(result.getPaths().get(0), routeTask.getStartPoint(), routeTask.getEndPoint()));
        res.put("result", "success");
        res.put("data", data);
      } else {
        res.put("result", "fail");
      }
      String dataJson = new Gson().toJson(res);
      NotifyDataManager.getInstance().postMessage("mapLines", dataJson);
      WXLogUtils.d("RideRouteResult Json: " + dataJson);
    }
  };
     routeTask.addRouteCalculateListener(calculateListener);

  /**
   * 通过首尾经纬度计算走路规划路径中所有经纬度
   *
   * @param fromLat
   * @param fromLng
   * @param toLat
   * @param toLng
   */
  @JSMethod
  public void searchRidingRouteFromLat(float fromLat, float fromLng, float toLat, float toLng) {
    LocationEntity fromLe = new LocationEntity();
    fromLe.lat = fromLat / 1e6;
    fromLe.lng = fromLng / 1e6;
    LocationEntity toLe = new LocationEntity();
    toLe.lat = toLat / 1e6;
    toLe.lng = toLng / 1e6;
    if (routeTask == null) {
      routeTask = RouteTask.getInstance(mWXSDKInstance.getContext());
      routeTask.addRouteCalculateListener(calculateListener);
    }
    routeTask.search(fromLe, toLe);
  }
5.3 骑行路径Web实现
 let stream = weex.requireModule('stream')
  stream.fetch({
   timeout:20000,
   method: 'GET',
   url: 'https://restapi.amap.com/v4/direction/bicycling?key=87453539f02a65cd6585210fa2e64dc9&origin='+fromLng/1000000+','+fromLat/1000000+'&destination='+toLng/1000000+','+toLat/1000000,
 }, (response) => {
  if (response.status == 200) {
   let apiData = JSON.parse(response.data)

   if(apiData.data){
    var polyline= new Array();
    polyline[0] = apiData.data.origin.split(",");
    var polylineList = apiData.data.paths['0'].steps[0].polyline.split(";");

    for(var i=0;i<polylineList.length;i++) {
     var polylinePoint = polylineList[i].split(",");
     polyline.push(polylinePoint);
    }
    polyline.push(apiData.data.destination.split(",")); //字符分割
    callback({"result":"success","data": {"mapLines":polyline}});

   }
  }
 }, () => {})
以上就是本文的全部内容,希望对大家的学习有所帮助,也希望大家多多支持脚本之家。
相关文章

在Bootstrap开发框架中使用dataTable直接录入表格行数据的方法
这篇文章主要介绍了在Bootstrap开发框架中使用dataTable直接录入表格行数据的方法,这个可以提高数据的录入方便,特别是在一些简单业务的明细数据的时候,看起来会比弹出窗口录入方便一些,非常具有实用价值,需要的朋友可以参考下2018-10-10 这篇文章主要介绍了js如何操作localstorage,具有很好的参考价值,希望对大家有所帮助。如有错误或未考虑完全的地方,望不吝赐教2022-04-04
 这篇文章主要介绍了JS+HTML5 Canvas实现简单的写字板功能,结合实例形式分析了js结合HTML5 canvas特性的图形绘制相关操作技巧,需要的朋友可以参考下2018-08-08
 单击复制文字的js找了很久,由于之前没有接触过,完全不知道兼容ie及标准dom浏览器,不仅仅要通过js,而且需要flash的帮忙,下面与大家分享下具体的实现方法2013-07-07
 本文主要介绍了浅谈JS数组内置遍历方法有哪些和区别,文中通过示例代码介绍的非常详细,具有一定的参考价值,感兴趣的小伙伴们可以参考一下2021-11-11
 这篇文章主要介绍了Javascript中默认参数值的设置,很简单,但很实用,需要的朋友可以参考下2014-09-09
 有了语音识别,交流就会变得很简单,下面这篇文章主要给大家介绍了关于如何在uni-app使用微软的文字转语音服务的相关资料,需要的朋友可以参考下2022-06-06
 本周学习了navigtor到导航组件,目前我想使用navigtor组件实现跳转以及返回功能,下面这篇文章主要给大家介绍了关于微信小程序使用navigator实现页面跳转功能的相关资料,文中通过实例代码介绍的非常详细,需要的朋友可以参考下2022-08-08
ECharts formatter属性设置的3种方法(字符串模板,函数模板,回调函数)
formatter有两种写法,一种字符串模板,另一种是回调函数,下面这篇文章主要给大家介绍了关于ECharts formatter属性设置的3种方法,分别是字符串模板,函数模板,回调函数,需要的朋友可以参考下2023-02-02 这篇文章主要给大家介绍了利用原生JS如何实现图片高斯模糊切换效果的焦点图,文中给出了完整的实例代码,相信对大家的理解和学习具有一定的参考借鉴价值,下面来一起看看吧。2017-01-01


最新评论