
Django+python服务器部署与环境部署教程详解
需要准备环境:python3.6、vultr(或者其他服务器)、xshell
第一步:python安装必备环境Django库
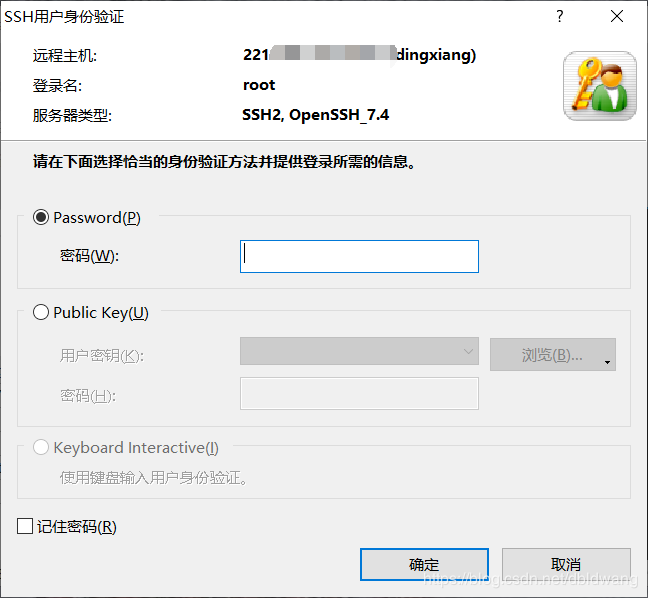
Xshell链接远程主机:

点击连接之后:弹窗输入访问用户及密码,一般为root用户

成功连接到目标服务器:
[root@vultr ~]#
安装python以及需要环境(此为安装完python3.6环境),运行pip安装即可:
pip install django
提示Success安装成功
第二步:项目创建
首先cd到自己想要新建项目的路径:
我这里选择的是在data下新建文件夹pytest来保存项目
cd /data
mkdir pytest
cd pytest
接下来进行新建项目 django-admin startproject +(你的项目名:此处使用的是pytest)
django-admin startproject pytest
cd pytest #进入项目
cd pytest #进入项目配置列表
此时项目的状态是
[root@vultr pytest]# tree
.
├── db.sqlite3
├── manage.py
└── pytest
 ├── asgi.py
 ├── __init__.py
 ├── __pycache__
 │ ├── __init__.cpython-36.pyc
 │ ├── settings.cpython-36.pyc
 │ ├── urls.cpython-36.pyc
 │ └── wsgi.cpython-36.pyc
 ├── settings.py
 ├── urls.py
 └── wsgi.py
接下来重要的一步在setting.py中设置访问权限:
划重点——这个地方是可以访问的外部主机地址,为了方便访问我们改为['*'],意思为任何主机都可访问
# SECURITY WARNING: don't run with debug turned on in production!
DEBUG = True

ALLOWED_HOSTS = ['*'] #划重点——这个地方是可以访问的外部主机地址,为了方便访问我们改为['*'],意思为任何主机都可访问


# Application definition

INSTALLED_APPS = [
 'django.contrib.admin',
 'django.contrib.auth',
 'django.contrib.contenttypes',
 'django.contrib.sessions',
"settings.py" 120L, 3093C
修改完成后(确保开放8000端口的访问,防火墙中设置):
python manage.py runserver 0.0.0.0:8000
成功开启:
[root@vultr pytest]# python manage.py runserver 0.0.0.0:8000
Watching for file changes with StatReloader
Performing system checks...

System check identified no issues (0 silenced).

You have 17 unapplied migration(s). Your project may not work properly until you apply the migrations for app(s): admin, auth, contenttypes, sessions.
Run 'python manage.py migrate' to apply them.

March 28, 2020 - 02:27:55
Django version 3.0.4, using settings 'pytest.settings'
Starting development server at http://0.0.0.0:8000/
Quit the server with CONTROL-C.
然后访问浏览器输入服务器ip+端口号例如:22.21.21.200:8000

之后可以在服务器端查看日志:
[28/Mar/2020 02:28:42] "GET / HTTP/1.1" 200 16299
总结
到此这篇关于Django+python服务器部署与环境部署教程详解的文章就介绍到这了,更多相关django python服务器部署内容请搜索脚本之家以前的文章或继续浏览下面的相关文章希望大家以后多多支持脚本之家!
相关文章
 今天小编就为大家分享一篇Pycharm2017版本设置启动时默认自动打开项目的方法,具有很好的参考价值,希望对大家有所帮助。一起跟随小编过来看看吧2018-10-10
 今天小编就为大家分享一篇python判断列表的连续数字范围并分块的方法,具有很好的参考价值,希望对大家有所帮助。一起跟随小编过来看看吧2018-11-11
 这篇文章主要介绍了Python的内建模块itertools的使用解析,itertools是python的迭代器模块,itertools提供的工具相当高效且节省内存,Python的内建模块itertools提供了非常有用的用于操作迭代对象的函数,需要的朋友可以参考下2023-09-09
 下面小编就为大家分享一篇pandas创建新Dataframe并添加多行的实例,具有很好的参考价值,希望对大家有所帮助。一起跟随小编过来看看吧2018-04-04
 这篇文章主要介绍了使用Python破解RAR文件密码的代码实例,rar 压缩文件资源又不少是被加密的,密码通常也比较简单,我们可以通过暴力破解的方式来获取,通常耗时也比较小,需要的朋友可以参考下2023-11-11
Python使用ThreadPoolExecutor一次开启多个线程
通过使用ThreadPoolExecutor,您可以同时开启多个线程,从而提高程序的并发性能,本文就来介绍一下Python使用ThreadPoolExecutor一次开启多个线程,感兴趣的可以了解一下2023-11-11 这篇文章主要介绍了python数字图像处理之估计噪声参数,图像复原与重建,想了解图像处理的同学,一定要好好看看2021-04-04
python使用Selenium和cookie绕过验证码实现登录示例代码
文章介绍了如何使用Selenium获取登录过程中的cookie信息,并通过抓包工具获取cookie,通过示例展示了如何在Dsmall和CRM系统中实现免登陆操作,总结了两种方法:一种是在获取到cookie后直接添加到当前会话中,另一种是将cookie存储到本地文件并在后续请求中使用2025-01-01 这篇文章主要介绍了使用Python中的线程进行网络编程的入门教程,本文来自于IBM官方网站技术文档,需要的朋友可以参考下2015-04-04
自定义Django_rest_framework_jwt登陆错误返回的解决
这篇文章主要介绍了自定义Django_rest_framework_jwt登陆错误返回的解决,文中通过示例代码介绍的非常详细,对大家的学习或者工作具有一定的参考学习价值,需要的朋友们下面随着小编来一起学习学习吧2020-10-10


最新评论