
Python爬虫实战之使用Scrapy爬取豆瓣图片
更新时间:2021年06月02日 11:29:24 作者:濯君
在用Python的urllib和BeautifulSoup写过了很多爬虫之后,本人决定尝试著名的Python爬虫框架——Scrapy.本次分享将详细讲述如何利用Scrapy来下载豆瓣名人图片,需要的朋友可以参考下
使用Scrapy爬取豆瓣某影星的所有个人图片
以莫妮卡·贝鲁奇为例

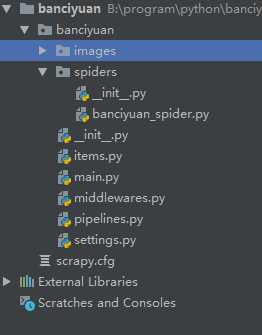
1.首先我们在命令行进入到我们要创建的目录,输入 scrapy startproject banciyuan 创建scrapy项目
创建的项目结构如下
2.为了方便使用pycharm执行scrapy项目,新建main.py
from scrapy import cmdline

cmdline.execute("scrapy crawl banciyuan".split())
再edit configuration

然后进行如下设置,设置后之后就能通过运行main.py运行scrapy项目了

3.分析该HTML页面,创建对应spider

from scrapy import Spider
import scrapy

from banciyuan.items import BanciyuanItem


class BanciyuanSpider(Spider):
    name = 'banciyuan'
    allowed_domains = ['movie.douban.com']
    start_urls = ["https://movie.douban.com/celebrity/1025156/photos/"]
    url = "https://movie.douban.com/celebrity/1025156/photos/"

    def parse(self, response):
        num = response.xpath('//div[@class="paginator"]/a[last()]/text()').extract_first('')
        print(num)
        for i in range(int(num)):
            suffix = '?type=C&start=' + str(i * 30) + '&sortby=like&size=a&subtype=a'
            yield scrapy.Request(url=self.url + suffix, callback=self.get_page)

    def get_page(self, response):
        href_list = response.xpath('//div[@class="article"]//div[@class="cover"]/a/@href').extract()
        # print(href_list)
        for href in href_list:
            yield scrapy.Request(url=href, callback=self.get_info)

    def get_info(self, response):
        src = response.xpath(
            '//div[@class="article"]//div[@class="photo-show"]//div[@class="photo-wp"]/a[1]/img/@src').extract_first('')
        title = response.xpath('//div[@id="content"]/h1/text()').extract_first('')
        # print(response.body)
        item = BanciyuanItem()
        item['title'] = title
        item['src'] = [src]
        yield item
4.items.py
# Define here the models for your scraped items
#
# See documentation in:
# https://docs.scrapy.org/en/latest/topics/items.html

import scrapy


class BanciyuanItem(scrapy.Item):
    # define the fields for your item here like:
    src = scrapy.Field()
    title = scrapy.Field()
pipelines.py
# Define your item pipelines here
#
# Don't forget to add your pipeline to the ITEM_PIPELINES setting
# See: https://docs.scrapy.org/en/latest/topics/item-pipeline.html


# useful for handling different item types with a single interface
from itemadapter import ItemAdapter
from scrapy.pipelines.images import ImagesPipeline
import scrapy

class BanciyuanPipeline(ImagesPipeline):
    def get_media_requests(self, item, info):
        yield scrapy.Request(url=item['src'][0], meta={'item': item})

    def file_path(self, request, response=None, info=None, *, item=None):
        item = request.meta['item']
        image_name = item['src'][0].split('/')[-1]
        # image_name.replace('.webp', '.jpg')
        path = '%s/%s' % (item['title'].split(' ')[0], image_name)

        return path
settings.py
# Scrapy settings for banciyuan project
#
# For simplicity, this file contains only settings considered important or
# commonly used. You can find more settings consulting the documentation:
#
#     https://docs.scrapy.org/en/latest/topics/settings.html
#     https://docs.scrapy.org/en/latest/topics/downloader-middleware.html
#     https://docs.scrapy.org/en/latest/topics/spider-middleware.html

BOT_NAME = 'banciyuan'

SPIDER_MODULES = ['banciyuan.spiders']
NEWSPIDER_MODULE = 'banciyuan.spiders'


# Crawl responsibly by identifying yourself (and your website) on the user-agent
USER_AGENT = {'User-Agent':'Mozilla/5.0 (Windows NT 10.0; Win64; x64) AppleWebKit/537.36 (KHTML, like Gecko) Chrome/71.0.3578.80 Safari/537.36'}


# Obey robots.txt rules
ROBOTSTXT_OBEY = False

# Configure maximum concurrent requests performed by Scrapy (default: 16)
#CONCURRENT_REQUESTS = 32

# Configure a delay for requests for the same website (default: 0)
# See https://docs.scrapy.org/en/latest/topics/settings.html#download-delay
# See also autothrottle settings and docs
#DOWNLOAD_DELAY = 3
# The download delay setting will honor only one of:
#CONCURRENT_REQUESTS_PER_DOMAIN = 16
#CONCURRENT_REQUESTS_PER_IP = 16

# Disable cookies (enabled by default)
#COOKIES_ENABLED = False

# Disable Telnet Console (enabled by default)
#TELNETCONSOLE_ENABLED = False

# Override the default request headers:
#DEFAULT_REQUEST_HEADERS = {
#   'Accept': 'text/html,application/xhtml+xml,application/xml;q=0.9,*/*;q=0.8',
#   'Accept-Language': 'en',
#}

# Enable or disable spider middlewares
# See https://docs.scrapy.org/en/latest/topics/spider-middleware.html
#SPIDER_MIDDLEWARES = {
#    'banciyuan.middlewares.BanciyuanSpiderMiddleware': 543,
#}

# Enable or disable downloader middlewares
# See https://docs.scrapy.org/en/latest/topics/downloader-middleware.html
#DOWNLOADER_MIDDLEWARES = {
#    'banciyuan.middlewares.BanciyuanDownloaderMiddleware': 543,
#}

# Enable or disable extensions
# See https://docs.scrapy.org/en/latest/topics/extensions.html
#EXTENSIONS = {
#    'scrapy.extensions.telnet.TelnetConsole': None,
#}

# Configure item pipelines
# See https://docs.scrapy.org/en/latest/topics/item-pipeline.html
ITEM_PIPELINES = {
   'banciyuan.pipelines.BanciyuanPipeline': 1,
}
IMAGES_STORE = './images'

# Enable and configure the AutoThrottle extension (disabled by default)
# See https://docs.scrapy.org/en/latest/topics/autothrottle.html
#AUTOTHROTTLE_ENABLED = True
# The initial download delay
#AUTOTHROTTLE_START_DELAY = 5
# The maximum download delay to be set in case of high latencies
#AUTOTHROTTLE_MAX_DELAY = 60
# The average number of requests Scrapy should be sending in parallel to
# each remote server
#AUTOTHROTTLE_TARGET_CONCURRENCY = 1.0
# Enable showing throttling stats for every response received:
#AUTOTHROTTLE_DEBUG = False

# Enable and configure HTTP caching (disabled by default)
# See https://docs.scrapy.org/en/latest/topics/downloader-middleware.html#httpcache-middleware-settings
#HTTPCACHE_ENABLED = True
#HTTPCACHE_EXPIRATION_SECS = 0
#HTTPCACHE_DIR = 'httpcache'
#HTTPCACHE_IGNORE_HTTP_CODES = []
#HTTPCACHE_STORAGE = 'scrapy.extensions.httpcache.FilesystemCacheStorage'
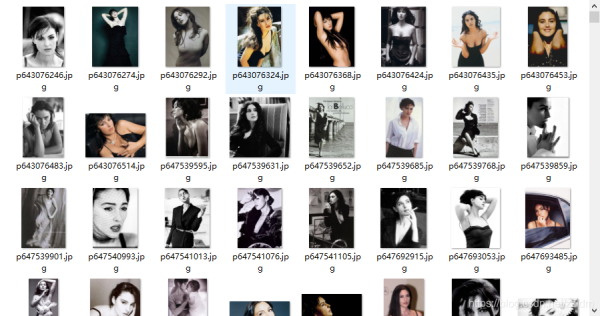
5.爬取结果
到此这篇关于Python爬虫实战之使用Scrapy爬取豆瓣图片的文章就介绍到这了,更多相关Scrapy爬取豆瓣图片内容请搜索脚本之家以前的文章或继续浏览下面的相关文章希望大家以后多多支持脚本之家!
相关文章
 这篇文章主要介绍了keras修改backend的简单方法,具有很好的参考价值,希望对大家有所帮助。如有错误或未考虑完全的地方,望不吝赐教2021-05-05
 今天小编就为大家分享一篇Django--权限Permissions的例子,具有很好的参考价值,希望对大家有所帮助。一起跟随小编过来看看吧2019-08-08
 这篇文章主要介绍了在 Python 中使用变量创建文件名,格式化的字符串文字使我们能够通过在字符串前面加上 f 来在字符串中包含表达式和变量,本文给大家详细讲解,需要的朋友可以参考下2023-03-03
python使用reportlab实现图片转换成pdf的方法
这篇文章主要介绍了python使用reportlab实现图片转换成pdf的方法,涉及Python使用reportlab模块操作图片转换的相关技巧,需要的朋友可以参考下2015-05-05 基于opencv可以显示图片,并进行相应的处理,下面这篇文章主要给大家介绍了关于如何使用Python的OpenCV库处理图像和视频的相关资料,需要的朋友可以参考下2022-10-10
 这篇文章主要介绍了Python 二叉树的层序建立与三种遍历实现详解,文中通过示例代码介绍的非常详细,对大家的学习或者工作具有一定的参考学习价值,需要的朋友可以参考下2019-07-07
 本文主要介绍了Python实现列表拼接和去重,详细的介绍了列表拼接和列表去重三种方式,具有一定的参考价值,感兴趣的小伙伴们可以参考一下2021-07-07
TensorFlow2.X结合OpenCV 实现手势识别功能
这篇文章主要介绍了TensorFlow2.X结合OpenCV 实现手势识别功能,本文通过实例代码给大家介绍的非常详细,对大家的学习或工作具有一定的参考借鉴价值,需要的朋友可以参考下2020-04-04 这篇文章主要介绍了Python单例模式的四种创建方式实例解析,文中通过示例代码介绍的非常详细,对大家的学习或者工作具有一定的参考学习价值,需要的朋友可以参考下2020-03-03
 灰度变换是指根据某种目标条件按一定变换关系逐点改变源图像中每个像素灰度值的方法。目的是改善画质,使图像显示效果更加清晰。图像的灰度变换处理是图像增强处理技术中的一种非常基础、直接的空间域图像处理方法,也是图像数字化软件和图像显示软件的一个重要组成部分2022-10-10


最新评论