
爬虫Python验证码识别入门
更新时间:2021年08月27日 17:01:00 作者:李国宝
这篇文章主要介绍了爬虫Python验证码识别,属于入门级别的介绍,刚接触爬虫的朋友可以参考如下
爬虫Python验证码识别
前言:
二值化、普通降噪、8邻域降噪
tesseract、tesserocr、PIL
参考文献--代码地址:https://github.com/liguobao/python-verify-code-ocr
1、批量下载验证码图片
import shutil
import requests
from loguru import logger

for i in range(100):
    url = 'http://xxxx/create/validate/image'
    response = requests.get(url, stream=True)
    with open(f'./imgs/{i}.png', 'wb') as out_file:
        response.raw.decode_content = True
        shutil.copyfileobj(response.raw, out_file)
        logger.info(f"download {i}.png successfully.")
    del response
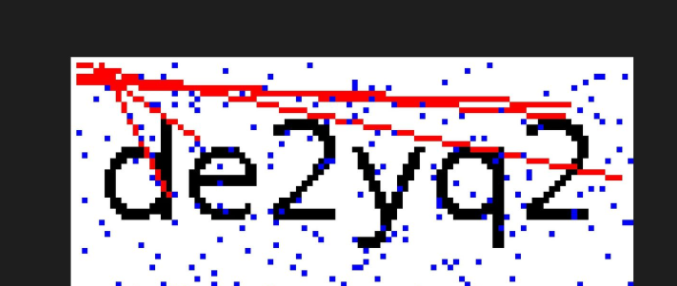
2、识别代码看看效果
from PIL import Image
import tesserocr
img = Image.open("./imgs/98.png")
img.show()
img_l = img.convert("L")# 灰阶图
img_l.show()
verify_code1 = tesserocr.image_to_text(img)
verify_code2 = tesserocr.image_to_text(img_l)
print(f"verify_code1:{verify_code1}")
print(f"verify_code2:{verify_code2}")
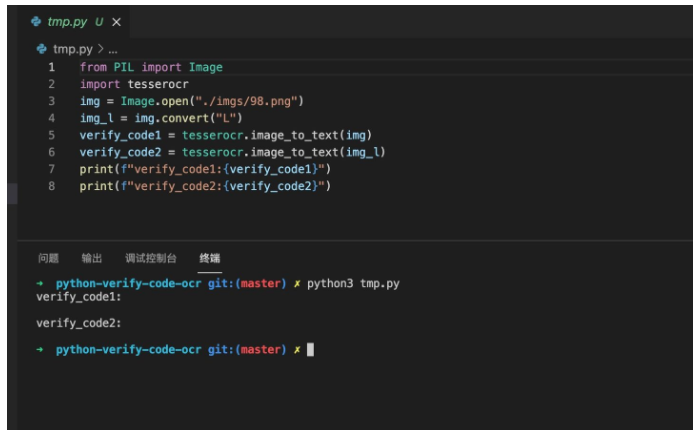
毫无疑问,无论是原图还是灰阶图,一无所有。
3、折腾降噪、去干扰
from PIL import Image
# https://www.cnblogs.com/jhao/p/10345853.html Python图片验证码降噪 — 8邻域降噪


def noise_remove_pil(image_name, k):
    """
    8邻域降噪
    Args:
        image_name: 图片文件命名
        k: 判断阈值
    Returns:
    """

    def calculate_noise_count(img_obj, w, h):
        """
        计算邻域非白色的个数
        Args:
            img_obj: img obj
            w: width
            h: height
        Returns:
            count (int)
        """
        count = 0
        width, height = img_obj.size
        for _w_ in [w - 1, w, w + 1]:
            for _h_ in [h - 1, h, h + 1]:
                if _w_ > width - 1:
                    continue
                if _h_ > height - 1:
                    continue
                if _w_ == w and _h_ == h:
                    continue
                if img_obj.getpixel((_w_, _h_)) < 230:  # 这里因为是灰度图像,设置小于230为非白色
                    count += 1
        return count

    img = Image.open(image_name)
    # 灰度
    gray_img = img.convert('L')

    w, h = gray_img.size
    for _w in range(w):
        for _h in range(h):
            if _w == 0 or _h == 0:
                gray_img.putpixel((_w, _h), 255)
                continue
            # 计算邻域非白色的个数
            pixel = gray_img.getpixel((_w, _h))
            if pixel == 255:
                continue

            if calculate_noise_count(gray_img, _w, _h) < k:
                gray_img.putpixel((_w, _h), 255)
    return gray_img


if __name__ == '__main__':
    image = noise_remove_pil("./imgs/1.png", 4)
    image.show()
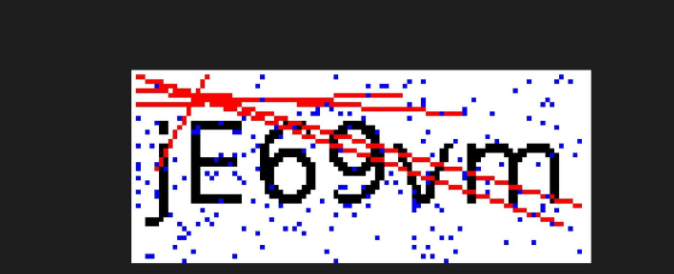
看下图效果:
这样差不多了,不过还可以提升
提升新思路:
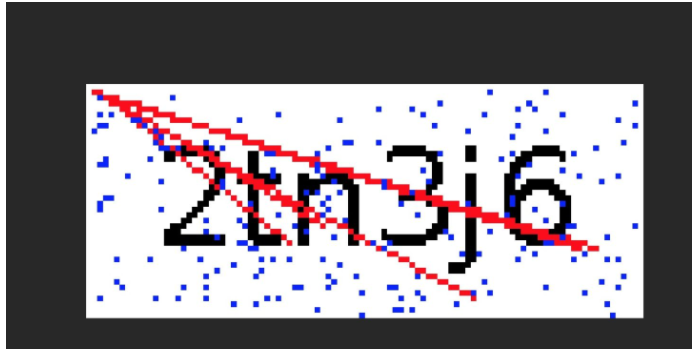
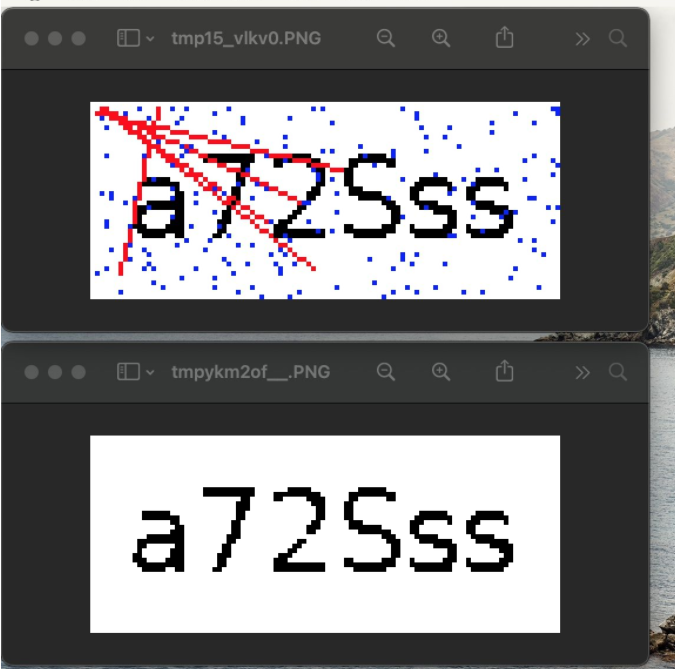
这边的干扰线是从某个点发出来的红色线条,
其实我只需要把红色的像素点都干掉,这个线条也会被去掉。
from PIL import Image
import tesserocr
img = Image.open("./imgs/98.png")
img.show()
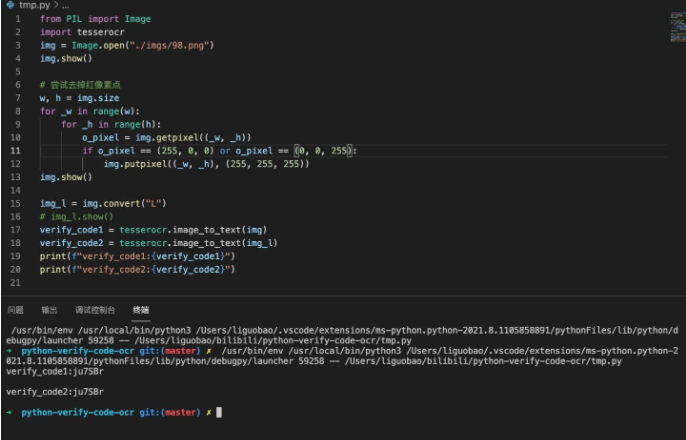
# 尝试去掉红像素点
w, h = img.size
for _w in range(w):
for _h in range(h):
o_pixel = img.getpixel((_w, _h))
if o_pixel == (255, 0, 0):
img.putpixel((_w, _h), (255, 255, 255))
img.show()
img_l = img.convert("L")
# img_l.show()
verify_code1 = tesserocr.image_to_text(img)
verify_code2 = tesserocr.image_to_text(img_l)
print(f"verify_code1:{verify_code1}")
print(f"verify_code2:{verify_code2}")
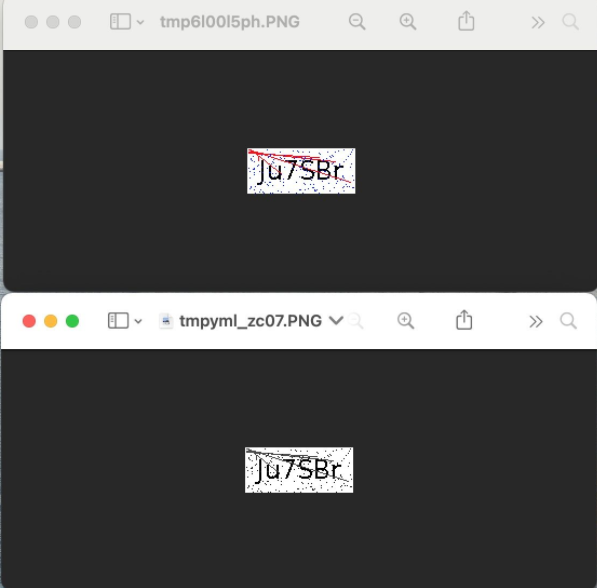
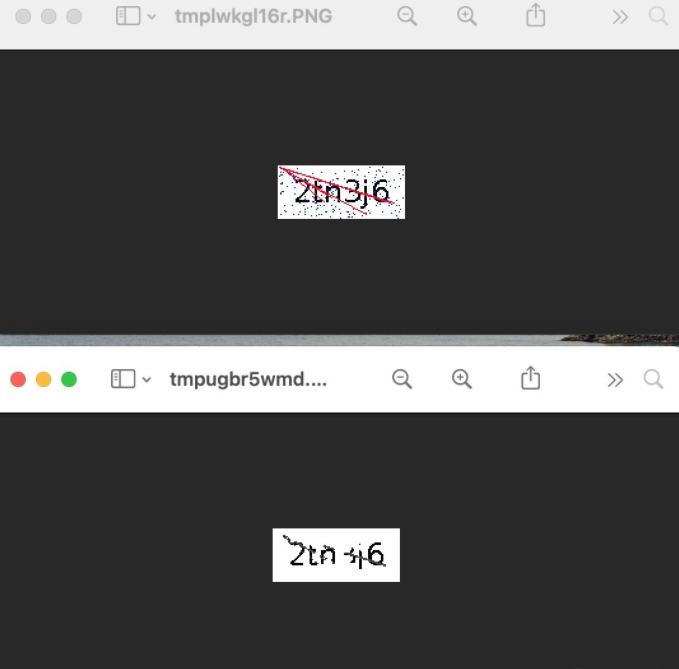
看起来OK,上面还有零星的蓝色像素掉,也可以用同样的方法一起去掉。
甚至OCR都直接出效果了
好了,完结撒花。
不过,后面发现,有些红色线段和蓝色点,是和验证码重合的。
这个时候,如果直接填成白色,就容易把字母切开,导致识别效果变差。
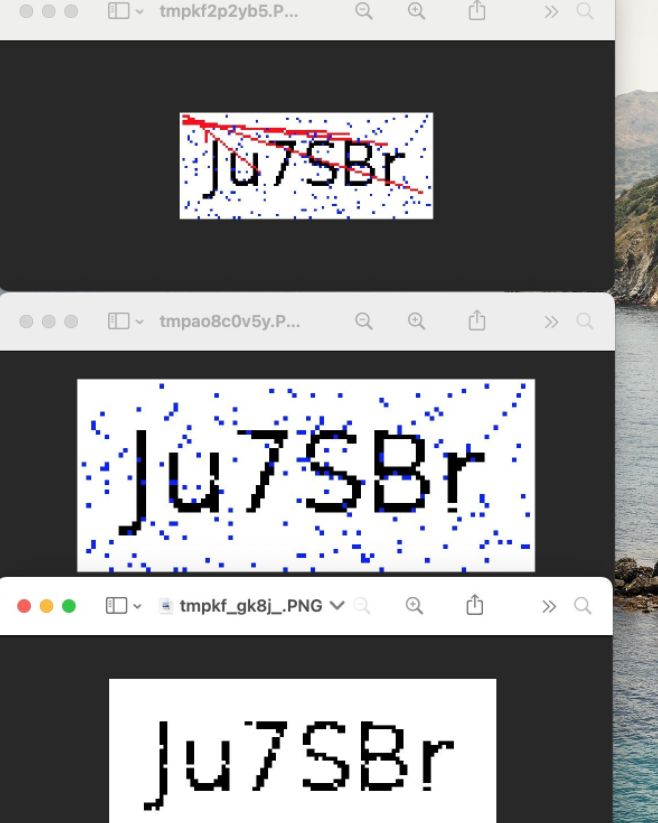
当前点是红色或者蓝色,判断周围点是不是超过两个像素点是黑色。
是,填充为黑色。
否,填充成白色。
最终完整代码:
from PIL import Image
import tesserocr
from loguru import logger


class VerfyCodeOCR():
    def __init__(self) -> None:
        pass

    def ocr(self, img):
        """ 验证码OCR

        Args:
            img (img): imgObject/imgPath

        Returns:
            [string]: 识别结果
        """
        img_obj = Image.open(img) if type(img) == str else img
        self._remove_pil(img_obj)
        verify_code = tesserocr.image_to_text(img_obj)
        return verify_code.replace("\n", "").strip()

    def _get_p_black_count(self, img: Image, _w: int, _h: int):
        """ 获取当前位置周围像素点中黑色元素的个数

        Args:
            img (img): 图像信息
            _w (int): w坐标
            _h (int): h坐标

        Returns:
            int: 个数
        """
        w, h = img.size
        p_round_items = []
        # 超过了横纵坐标
        if _w == 0 or _w == w-1 or 0 == _h or _h == h-1:
            return 0
        p_round_items = [img.getpixel(
            (_w, _h-1)), img.getpixel((_w, _h+1)), img.getpixel((_w-1, _h)), img.getpixel((_w+1, _h))]
        p_black_count = 0
        for p_item in p_round_items:
            if p_item == (0, 0, 0):
                p_black_count = p_black_count+1
        return p_black_count

    def _remove_pil(self, img: Image):
        """清理干扰识别的线条和噪点

        Args:
            img (img): 图像对象

        Returns:
            [img]: 被清理过的图像对象
        """
        w, h = img.size
        for _w in range(w):
            for _h in range(h):
                o_pixel = img.getpixel((_w, _h))
                # 当前像素点是红色(线段) 或者 绿色(噪点)
                if o_pixel == (255, 0, 0) or o_pixel == (0, 0, 255):
                    # 周围黑色数量大于2,则把当前像素点填成黑色;否则用白色覆盖
                    p_black_count = self._get_p_black_count(img, _w, _h)
                    if p_black_count >= 2:
                        img.putpixel((_w, _h), (0, 0, 0))
                    else:
                        img.putpixel((_w, _h), (255, 255, 255))

        logger.info(f"_remove_pil finish.")
        # img.show()
        return img


if __name__ == '__main__':
    verfyCodeOCR = VerfyCodeOCR()
    img_path = "./imgs/51.png"
    img= Image.open(img_path)
    img.show()
    ocr_result = verfyCodeOCR.ocr(img)
    img.show()
    logger.info(ocr_result)
到此这篇关于爬虫Python验证码识别入门的文章就介绍到这了,更多相关Python验证码识别内容请搜索脚本之家以前的文章或继续浏览下面的相关文章希望大家以后多多支持脚本之家!
相关文章
 今天小编就为大家分享一篇对Python中画图时候的线类型详解,具有很好的参考价值,希望对大家有所帮助。一起跟随小编过来看看吧2019-07-07
 本篇文章主要介绍了用python处理图片之打开\显示\保存图像的方法,小编觉得挺不错的,现在分享给大家,也给大家做个参考。一起跟随小编过来看看吧2018-05-05
 这篇文章主要介绍了mac下Redis安装和使用步骤详解,并将python如何操作Redis做了简单介绍,文中通过示例代码介绍的非常详细,对大家的学习或者工作具有一定的参考学习价值,需要的朋友可以参考下2019-07-07
 这篇文章主要介绍了python爬虫selenium模块详解,本文给大家介绍的非常详细,对大家的学习或工作具有一定的参考借鉴价值,需要的朋友可以参考下2021-03-03
Python Django安装配置模板系统及使用实战全面详解
本文首先介绍了Django模板系统的基础知识,接着探讨了如何安装和配置Django模板系统,然后深入解析了Django模板的基本结构、标签和过滤器的用法,阐述了如何在模板中展示模型数据,最后使用一个实际项目的例子来演示如何在实际开发中使用Django模板系统2023-09-09
关于sklearn包导入错误:ImportError: cannot import name Type解
这篇文章主要介绍了关于sklearn包导入错误:ImportError: cannot import name‘Type‘解决方案,具有很好的参考价值,希望对大家有所帮助,如有错误或未考虑完全的地方,望不吝赐教2024-02-02 这篇文章主要介绍了Python和Excel的完美结合的常用操作案例汇总,文章通过围绕主题展开详细的内容介绍,具有一定的参考价值,需要的小伙伴可以参考一下2022-09-09
 这篇文章主要介绍了django框架中间件原理与用法,结合实例形式详细分析了Django框架常用中间件与基本使用技巧,需要的朋友可以参考下2019-12-12
 这篇文章主要介绍了python 实现logging动态变更输出日志文件名的案例,具有很好的参考价值,希望对大家有所帮助。一起跟随小编过来看看吧2021-03-03
 这篇博客将学习如何使用霍夫圆变换在图像中找到圆圈,OpenCV使用cv2.HoughCircles()实现霍夫圆变换,具有一定的参考价值,感兴趣的小伙伴们可以参考一下2021-07-07


最新评论