
一小时学会TensorFlow2之基本操作2实例代码
索引操作

简单索引
索引 (index) 可以帮助我们快速的找到张量中的特定信息.
例子:
a = tf.reshape(tf.range(12), [2, 2, 3])
print(a)

print(a[0])
print(a[0][0])
输出结果:
tf.Tensor(
[[[ 0 1 2]
[ 3 4 5]][[ 6 7 8]
[ 9 10 11]]], shape=(2, 2, 3), dtype=int32)
tf.Tensor(
[[0 1 2]
[3 4 5]], shape=(2, 3), dtype=int32)
tf.Tensor([0 1 2], shape=(3,), dtype=int32)
Numpy 式索引
我们也可以按照 numpy 的写法来操作索引.
例子:
a = tf.reshape(tf.range(12), [2, 2, 3])
print(a)

print(a[0])
print(a[0, 0])
输出结果:
tf.Tensor(
[[[ 0 1 2]
[ 3 4 5]][[ 6 7 8]
[ 9 10 11]]], shape=(2, 2, 3), dtype=int32)
tf.Tensor(
[[0 1 2]
[3 4 5]], shape=(2, 3), dtype=int32)
tf.Tensor([0 1 2], shape=(3,), dtype=int32)
使用 : 进行索引
例子:
c = tf.ones([4, 14, 14, 4])
print(c[0, :, :, :].shape)
print(c[0, 1, :, :].shape)
输出结果:
(14, 14, 4)
(14, 4)
tf.gather
我们假设一个有 3 个餐馆, 每个餐馆有 8 种菜系, 128 道菜data: [resturants, cuisines, dishes].

例子:
data = tf.zeros([3, 8, 128])

g1 = tf.gather(data, axis=0, indices=[0, 2])
print(g1.shape)

g2 = tf.gather(data, axis=1, indices=[0, 1, 2, 3])
print(g2.shape)
输出结果:
(2, 8, 128)
(3, 4, 128)
tf.gather_nd
例子:
g1 = tf.gather_nd(data, [0])
print(g1.shape)

g2 = tf.gather_nd(data, [0, 1])
print(g2.shape)

g3 = tf.gather_nd(data, [0, 1, 2])
print(g3.shape)
输出结果:
(8, 128)
(128,)
()
tf.boolean_mask
格式:
tf.boolean_mask(
    tensor, mask, axis=None, name='boolean_mask'
)
例子:
data = tf.zeros([3, 8, 128])

b1 = tf.boolean_mask(data, mask=[True, True, False])
print(b1.shape)

b2 = tf.boolean_mask(data, mask=[True, False, True, False, True, False, True, False], axis=1)
print(b2.shape)
输出结果:
(2, 8, 128)
(3, 4, 128)
切片操作
借助切片技术, 我们可以灵活的处理张量对象.

简单切片
格式:
tensor[start : end]
其中 start 为开始索引, end 为结束索引 (不包括)
例子:
tf.Tensor([0 1 2], shape=(3,), dtype=int32)
tf.Tensor([9], shape=(1,), dtype=int32)
tf.Tensor([0 1 2 3 4 5 6 7 8], shape=(9,), dtype=int32)
step 切片
格式:
tensor[start : end: step]
例子:
d = tf.range(6)
print(d[::-1])  # 实现倒序
print(d[::2])  # 步长为2
输出结果:
tf.Tensor([5 4 3 2 1 0], shape=(6,), dtype=int32)
tf.Tensor([0 2 4], shape=(3,), dtype=int32)
维度变换

tf.reshape
tf.reshape 可以帮助我们进行维度转换.
格式:
tf.reshape(
    tensor, shape, name=None
)
参数:
- tensor: 传入的张量
- shape: 张量的形状
- name: 数据名称
例子:
a = tf.random.normal([3, 8, 128])
print(a.shape)

b = tf.reshape(a, [3, 1024])
print(b.shape)

c = tf.reshape(a, [3, -1])
print(c.shape)
输出结果:
(3, 8, 128)
(3, 1024)
(3, 1024)
tf.transpose
格式:
tf.transpose(
    a, perm=None, conjugate=False, name='transpose'
)
例子:
a = tf.random.normal([4, 3, 2, 1])
print(a.shape)

b = tf.transpose(a)
print(b.shape)

c = tf.transpose(a, perm=[0, 1, 3, 2])
print(c.shape)
输出结果:
(4, 3, 2, 1)
(1, 2, 3, 4)
(4, 3, 1, 2)
tf.expand_dims
格式:
tf.expand_dims(
    input, axis, name=None
)
参数:
- input: 输入
- axis: 操作的维度
- name: 数据名称
例子:
a = tf.random.normal([4, 3, 2, 1])
print(a.shape)

b = tf.expand_dims(a, axis=0)
print(b.shape)

c = tf.expand_dims(a, axis=1)
print(c.shape)

d = tf.expand_dims(a, axis=-1)
print(d.shape)
输出结果:
(4, 3, 2, 1)
(1, 4, 3, 2, 1)
(4, 1, 3, 2, 1)
(4, 3, 2, 1, 1)
tf.squeeze
tf.squeeze 可以帮助我们删去所有维度为1 的维度.

格式:
tf.squeeze(
    input, axis=None, name=None
)
参数:
- input: 输入
- axis: 操作的维度
- name: 数据名称
例子:
a = tf.zeros([2, 1, 1, 3, 5])

s1 = tf.squeeze(a)
print(s1.shape)

s2 = tf.squeeze(a, axis=1)
print(s2.shape)

s3 = tf.squeeze(a, axis=2)
print(s3.shape)
输出结果:
(2, 3, 5)
(2, 1, 3, 5)
(2, 1, 3, 5)
Boardcasting
广播机制 (Boardcasting) 是一种张量复制的手段. Boardcasting 可以帮助我们扩张张量的形状但无需实际复制数据.
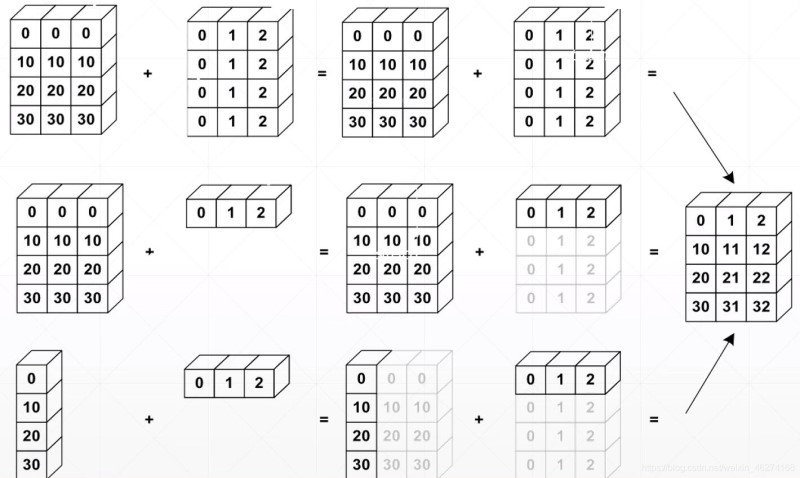
广播机制允许我们在隐式情况下进行填充, 从而使得我们的代码更加简洁, 更有效率地使用内存.
tf.boardcast_to
boardcast_to:
tf.broadcast_to(
    input, shape, name=None
)
参数:
- input: 输入
- shape: 数据形状
- name: 数据名称
例子:
a = tf.broadcast_to(tf.random.normal([4, 1, 1, 1]), [4, 32, 32, 3])
print(a.shape)

b = tf.broadcast_to(tf.zeros([128, 1, 1, 1]), [128, 32, 32, 3])
print(b.shape)
输出结果:
(4, 32, 32, 3)
(128, 32, 32, 3)
tf.tile
格式:
tf.tile(
    input, multiples, name=None
)
参数:
- input: 输入
- multiples: 同一纬度上复制的次数
- name: 数据名称
例子:
a = tf.zeros([4, 1, 1, 1])
print(a.shape)

b = tf.tile(a, [1, 32, 32, 3])
print(b.shape)
输出结果:
(4, 1, 1, 1)
(4, 32, 32, 3)
注: boardcast_to 和 tile 的区别在于 boardcast_to 可以在不复制内存的情况下自动扩张 tensor.
数学运算

加减乘除
例子:
# 定义张量
t1 = tf.ones([3, 3])
t2 = tf.fill([3, 3], 3.0)

# 加
add = t1 + t2
print(add)

# 减
minus = t1 - t2
print(minus)

# 乘
multiply = t1 * t2
print(multiply)

# 除
divide = t1 / t2
print(divide)
输出结果:
tf.Tensor(
[[4. 4. 4.]
[4. 4. 4.]
[4. 4. 4.]], shape=(3, 3), dtype=float32)
tf.Tensor(
[[-2. -2. -2.]
[-2. -2. -2.]
[-2. -2. -2.]], shape=(3, 3), dtype=float32)
tf.Tensor(
[[3. 3. 3.]
[3. 3. 3.]
[3. 3. 3.]], shape=(3, 3), dtype=float32)
tf.Tensor(
[[0.33333334 0.33333334 0.33333334]
[0.33333334 0.33333334 0.33333334]
[0.33333334 0.33333334 0.33333334]], shape=(3, 3), dtype=float32)
log & exp
例子:
# log
a = tf.fill([2], 100.0)
print(a)

b = tf.math.log(a)  # 以e为底
print(b)

# exp
c = tf.ones([2])
print(c)

d = tf.exp(c)
print(d)
输出结果:
tf.Tensor([100. 100.], shape=(2,), dtype=float32)
tf.Tensor([4.6051702 4.6051702], shape=(2,), dtype=float32)
tf.Tensor([1. 1.], shape=(2,), dtype=float32)
tf.Tensor([2.7182817 2.7182817], shape=(2,), dtype=float32)
pow & sqrt
例子:
# 定义张量
a = tf.fill([2], 4.0)
print(a)

# pow
b = tf.pow(a, 2)
print(b)

# sqrt
c = tf.sqrt(a, 2)
print(c)
输出结果:
tf.Tensor([4. 4.], shape=(2,), dtype=float32)
tf.Tensor([16. 16.], shape=(2,), dtype=float32)
tf.Tensor([2. 2.], shape=(2,), dtype=float32)
矩阵相乘 @
我们可以使用tf.matmul或@来实现矩阵相乘.

例子:
# 定义张量
a = tf.fill([2, 2], 2)
b = tf.fill([2, 2], 3)

# matmul
c = tf.matmul(a, b)
print(c)

# @
d = a@b
print(d)
输出结果:
tf.Tensor(
[[12 12]
[12 12]], shape=(2, 2), dtype=int32)
tf.Tensor(
[[12 12]
[12 12]], shape=(2, 2), dtype=int32)
到此这篇关于一小时学会TensorFlow2之基本操作2实例代码的文章就介绍到这了,更多相关TensorFlow2基本操作内容请搜索脚本之家以前的文章或继续浏览下面的相关文章希望大家以后多多支持脚本之家!
相关文章
 在Python中最重要的数据类型包括字符串、列表、元组和字典等。本篇文章主要讲述Python的字符串基础知识。下面跟着小编一起来看下吧2017-03-03
mac下pip、conda、homebrew修改为清华镜像源的方法
本文主要介绍了mac下pip、conda、homebrew修改为清华镜像源的方法,文中通过示例代码介绍的非常详细,具有一定的参考价值,感兴趣的小伙伴们可以参考一下2021-08-08 这篇文章主要介绍了Python数据类型之列表和元组的相关知识,列表是一组有序项目的集合 ,可变的数据类型可 进行增删改查,本文通过实例文字相结合的形式给大家介绍的非常详细 ,需要的朋友可以参考下2019-07-07
 这篇文章主要介绍了python tkinter组件使用详解,文中通过示例代码介绍的非常详细,对大家的学习或者工作具有一定的参考学习价值,需要的朋友可以参考下2019-09-09
 本文主要介绍了python中opencv K均值聚类的实现示例,文中通过示例代码介绍的非常详细,对大家的学习或者工作具有一定的参考学习价值,需要的朋友们下面随着小编来一起学习学习吧2022-06-06
 本文主要介绍了Flask快速实现分页效果示例,文中通过示例代码介绍的非常详细,对大家的学习或者工作具有一定的参考学习价值,需要的朋友们下面随着小编来一起学习学习吧2022-08-08
 这篇文章主要介绍了keras之权重初始化方式,具有很好的参考价值,希望对大家有所帮助。一起跟随小编过来看看吧2020-05-05
 在PyCharm中创建Django项目时,若使用之前项目的环境编译器,且已修改其根目录,则新建项目路径可能出错。解决办法是在设置中选择Project,通过齿轮图标进入Show All,选择编译器路径,点击笔形图修改Development configuration的Root path为/,以确保新项目能正确创建2024-09-09
 这篇文章主要介绍了用Python实现一个简单的能够上传下载的HTTP服务器,是Python网络编程学习当中的基础,本文示例基于Windows操作系统实现,需要的朋友可以参考下2015-05-05
 这篇文章主要给大家介绍了关于利用Tkinter(python3.6)实现一个简单计算器的相关资料,文中通过示例代码介绍的非常详细,对大家的学习或者工作具有一定的参考学习价值,需要的朋友们下面随着小编来一起学习学习吧。2017-12-12


最新评论