
TensorFlow2基本操作之 张量排序 填充与复制 查找与替换
张量排序

tf.sort
tf.sort函数可以帮我们对张量进行排序.
格式:
tf.sort(
    values, axis=-1, direction='ASCENDING', name=None
)
参数:
- values: 要进行排序的张量
- axis: 操作维度
- direction: 正序或者倒序
- name: 数据名称
例子:
# 创建张量0~9, 并打乱顺序
a = tf.random.shuffle(tf.range(10))
print(a)

# 从小到大
b = tf.sort(a)  # direction="ASCENDING"
print(b)

# 从大到小
c = tf.sort(a, direction="DESCENDING")
print(c)
输出结果:
tf.Tensor([6 3 7 5 4 0 2 9 8 1], shape=(10,), dtype=int32)
tf.Tensor([0 1 2 3 4 5 6 7 8 9], shape=(10,), dtype=int32)
tf.Tensor([9 8 7 6 5 4 3 2 1 0], shape=(10,), dtype=int32)
tf.argsort
tf.argsort返回张量的索引排序, 沿给的轴排序.
格式:
tf.argsort(
    values, axis=-1, direction='ASCENDING', stable=False, name=None
)
参数:
- 要进行排序的张量
- axis: 操作维度
- direction: 正序或者倒序
- stable: 如果为 True, 则原始张量中的相等元素将不会按返回的顺序重新排序
- name: 数据名称
例子:
# 创建张量0~9, 并打乱顺序
a = tf.random.shuffle(tf.range(10))
print(a)

# 从小到大
b = tf.argsort (a)
print(b)

# 从大到小
c = tf.argsort (a, direction="DESCENDING")
print(c)
输出结果:
tf.Tensor([9 4 3 1 2 6 0 5 7 8], shape=(10,), dtype=int32)
tf.Tensor([6 3 4 2 1 7 5 8 9 0], shape=(10,), dtype=int32)
tf.Tensor([0 9 8 5 7 1 2 4 3 6], shape=(10,), dtype=int32)
tf.math.top_k
tf.math.top_k可以帮助我们查找最后一个维度的 k 个最大条目的值和索引.
格式:
tf.math.top_k(
    input, k=1, sorted=True, name=None
)
参数:
- input: 传入张量
- k=1: 前 k 位
- sorted: 是否排序
- name: 数据名称
例子:
# 创建张量0~9, 并打乱顺序, 形状为 3*3
a = tf.reshape(tf.random.shuffle(tf.range(9)), [3, 3])
print(a)

# 取top2
b = tf.math.top_k(a, 2)
print(b)
输出结果:
tf.Tensor(
[[2 1 4]
[5 7 0]
[8 6 3]], shape=(3, 3), dtype=int32)
TopKV2(values=<tf.Tensor: shape=(3, 2), dtype=int32, numpy=
array([[4, 2],
[7, 5],
[8, 6]])>, indices=<tf.Tensor: shape=(3, 2), dtype=int32, numpy=
array([[2, 0],
[1, 0],
[0, 1]])>)
填充与复制
tf.pad
tf.pad可以帮我们对一个 tensor 四周进行填充.

格式:
tf.pad(
    tensor, paddings, mode='CONSTANT', constant_values=0, name=None
)
参数:
- tensor: 传入的张量
- paddings: 要扩展的维度
- mode: 模式, 默认为 “CONSTANT”
- constant_value: 在 “CONSTANT” 模式下, 要使用的标量填充值 (必须与张量类型相同)
- name: 数据名称
例子:
# pad
a = tf.reshape(tf.range(9), [3, 3])
print(a)

# 上下左右填充一圈0
b = tf.pad(a, [[1, 1], [1, 1]])
print(b)
输出结果:
tf.Tensor(
[[0 1 2]
[3 4 5]
[6 7 8]], shape=(3, 3), dtype=int32)
tf.Tensor(
[[0 0 0 0 0]
[0 0 1 2 0]
[0 3 4 5 0]
[0 6 7 8 0]
[0 0 0 0 0]], shape=(5, 5), dtype=int32)
tf.tile
tf.tile可以帮助我们实现 tensor 的复制.
格式:
tf.tile(
    input, multiples, name=None
)
参数:
- input: 传入的张量
- multiples: 复制的次数
- name: 数据名称
例子:
# tile
a = tf.reshape(tf.range(9), [3, 3])
print(a)

b = tf.tile(a, [2, 2])
print(b)
输出结果:
tf.Tensor(
[[0 1 2]
[3 4 5]
[6 7 8]], shape=(3, 3), dtype=int32)
tf.Tensor(
[[0 1 2 0 1 2]
[3 4 5 3 4 5]
[6 7 8 6 7 8]
[0 1 2 0 1 2]
[3 4 5 3 4 5]
[6 7 8 6 7 8]], shape=(6, 6), dtype=int32)
查找与替换

tf.where (第一种)
返回元素为 True 的位置.
格式:
tf.where(
    condition, name=None
)
参数:
- condition: 判断条件
- name: 数据名称
例子:
# 第一种用法(单参数)
mask = tf.constant([[True, True, True], [False, True, True], [True, False, False]])
print(mask)

indices = tf.where(mask)
print(indices)
输出结果:
tf.Tensor(
[[ True True True]
[False True True]
[ True False False]], shape=(3, 3), dtype=bool)
tf.Tensor(
[[0 0]
[0 1]
[0 2]
[1 1]
[1 2]
[2 0]], shape=(6, 2), dtype=int64)
tf.where (第二种)
类似三元运算符的用法.
格式:
tf.where(
    condition, x=None, y=None, name=None
)
参数:
- condition: 判断条件
- x: 如果条件为 True 赋值
- y: 如果条件为 False 赋值
- name: 数据名称
例子:
# 第二种用法(三个参数)
zeros = tf.zeros([3, 3])
print(zeros)

ones = tf.ones([3, 3])
print(ones)

mask = tf.constant([[True, True, True], [False, True, True], [True, False, False]])
print(mask)

result = tf.where(mask, zeros, ones)
print(result)
输出结果:
tf.Tensor(
[[0. 0. 0.]
[0. 0. 0.]
[0. 0. 0.]], shape=(3, 3), dtype=float32)
tf.Tensor(
[[1. 1. 1.]
[1. 1. 1.]
[1. 1. 1.]], shape=(3, 3), dtype=float32)
tf.Tensor(
[[ True True True]
[False True True]
[ True False False]], shape=(3, 3), dtype=bool)
tf.Tensor(
[[0. 0. 0.]
[1. 0. 0.]
[0. 1. 1.]], shape=(3, 3), dtype=float32)
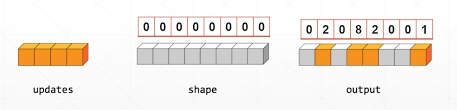
tf.scatter_nd
使用索引更新张量.
格式:
tf.scatter_nd(
    indices, updates, shape, name=None
)
参数:
- indices: 索引
- updates: 更新的值
- shape: 形状
- name: 数据名称
例子:
# scatter_nd
indices = tf.constant([[4], [3], [1], [7]])
print(indices)

updates = tf.constant([9, 10, 11, 12])
print(updates)

shape = tf.constant([8])
print(shape)

result = tf.scatter_nd(indices, updates, shape)
print(result)
输出结果:
tf.Tensor(
[[4]
[3]
[1]
[7]], shape=(4, 1), dtype=int32)
tf.Tensor([ 9 10 11 12], shape=(4,), dtype=int32)
tf.Tensor([8], shape=(1,), dtype=int32)
tf.Tensor([ 0 11 0 10 9 0 0 12], shape=(8,), dtype=int32)
到此这篇关于TensorFlow2基本操作之 张量排序 填充与复制 查找与替换的文章就介绍到这了,更多相关TensorFlow2基本操作内容请搜索脚本之家以前的文章或继续浏览下面的相关文章希望大家以后多多支持脚本之家!
相关文章
 这篇文章主要介绍了Python常用编译器原理及特点解析,文中通过示例代码介绍的非常详细,对大家的学习或者工作具有一定的参考学习价值,需要的朋友可以参考下2020-03-03
 Python提供了一些内建的库以支持各种常见的编程任务,Contextlib库是其中之一,它提供了一些用于支持上下文管理协议(即with语句)的函数,这篇文章将详细介绍如何使用Contextlib库中的功能,需要的朋友可以参考下2023-06-06
 这篇文章主要为大家详细介绍了python如何生成网页验证码,具有一定的参考价值,感兴趣的小伙伴们可以参考一下2018-07-07
 今天小编就为大家分享一篇python装饰器相当于函数的调用方式,具有很好的参考价值,希望对大家有所帮助。一起跟随小编过来看看吧2019-12-12
 这篇文章主要介绍了如何使用虚拟环境和pip来管理Python项目的依赖和包版本,虚拟环境可以帮助隔离不同项目的依赖,避免版本冲突,文中通过代码介绍的非常详细,需要的朋友可以参考下2025-01-01
 FlashText是GitHub上的一个开源Python库,正如之前所提到的,它在提取关键字和替换关键字任务上有着极高的性能。本文将详解一下flashtext的使用,需要的可以参考一下2022-06-06
 flatten是numpy.ndarray.flatten的一个函数,即返回一个一维数组,这篇文章主要给大家介绍了关于python中flatten()参数的相关资料,文中通过实例代码介绍的非常详细,需要的朋友可以参考下2022-03-03
 这篇文章主要介绍了python如何利用joblib保存训练模型问题,具有很好的参考价值,希望对大家有所帮助。如有错误或未考虑完全的地方,望不吝赐教2023-06-06
 Python中的元组和列表很相似,元组也是Python语言提供的内置数据结构之一,可以在代码中直接使用,这篇文章主要介绍了Python中元组的概念以及应用,需要的朋友可以参考下2023-01-01
 这篇文章主要介绍了Linux下安装python3.6和第三方库的教程详解,需要的朋友可以参考下2018-11-11


最新评论