
Django+Bootstrap实现计算器的示例代码
更新时间:2021年11月08日 16:11:26 作者:小旺不正经
本文主要介绍了Django+Bootstrap实现计算器的示例代码,文中通过示例代码介绍的非常详细,具有一定的参考价值,感兴趣的小伙伴们可以参考一下
准备工作
创建一个应用

添加应用到配置

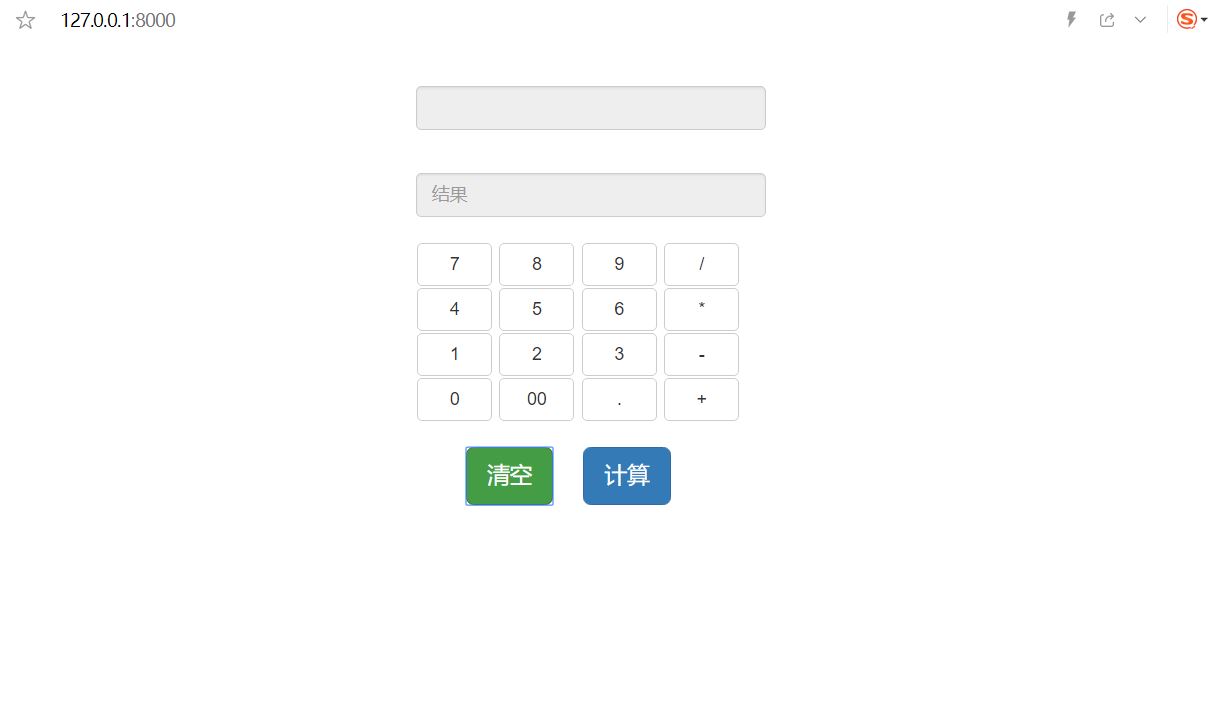
创建一个html
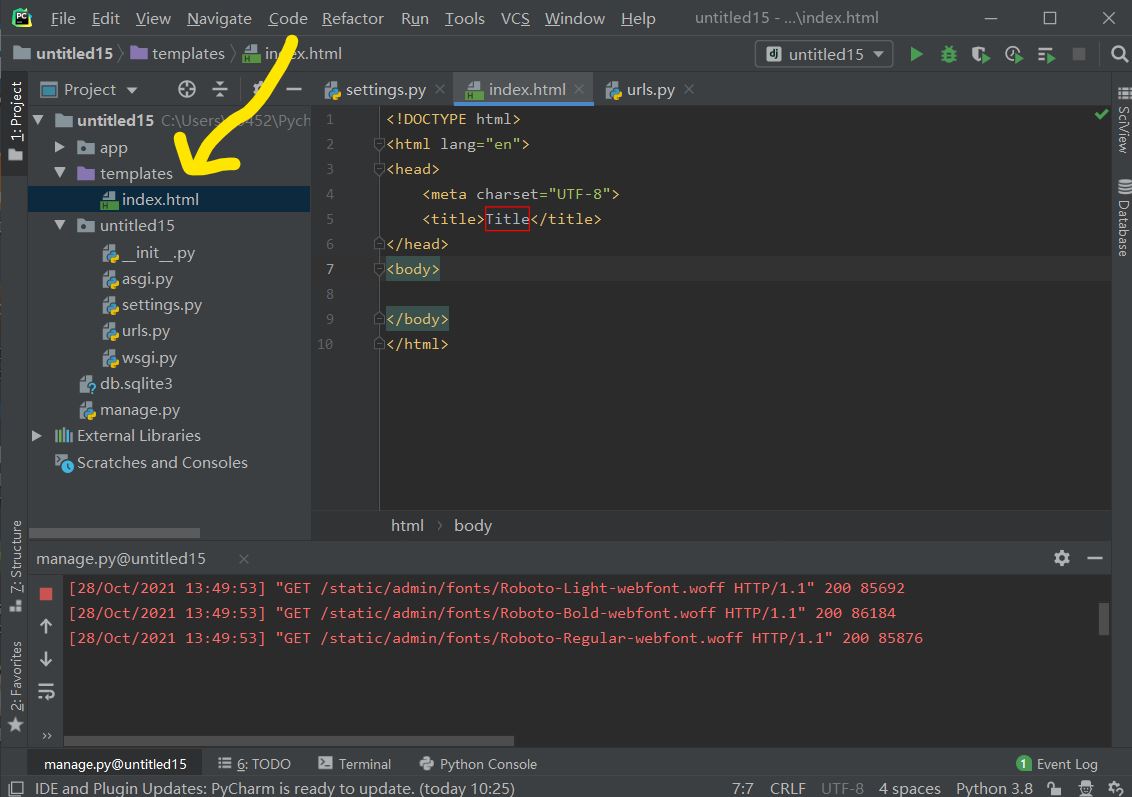
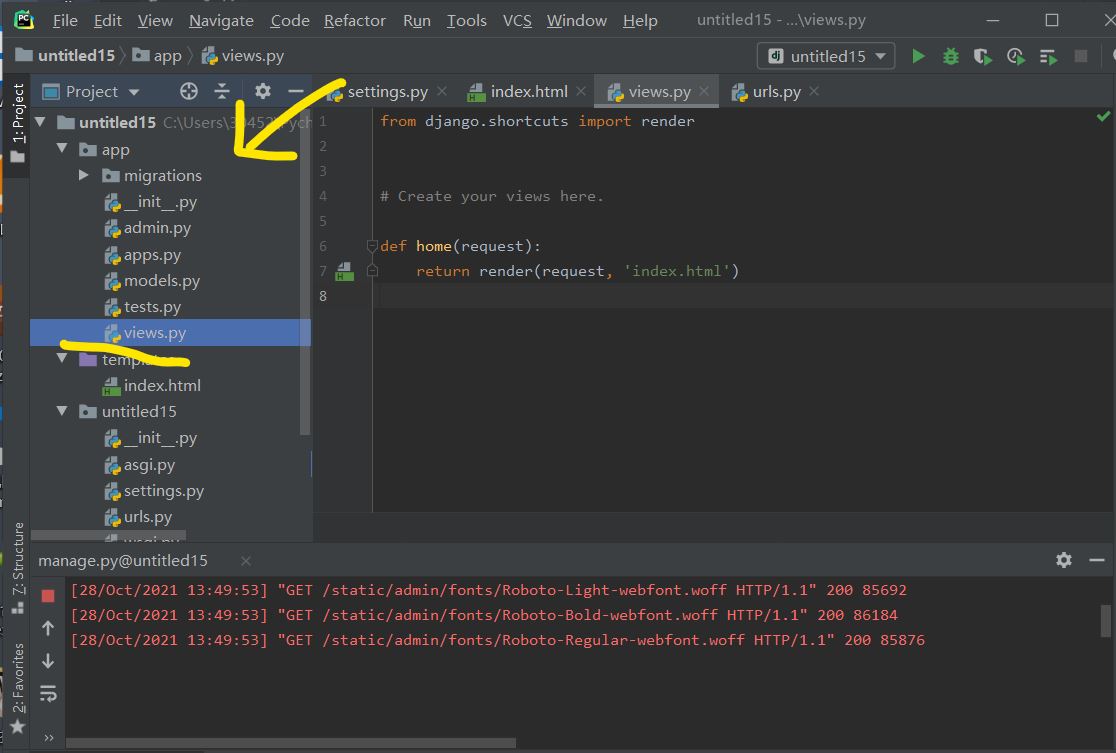
编写视图函数
from django.shortcuts import render


# Create your views here.

def home(request):
    return render(request, 'index.html')
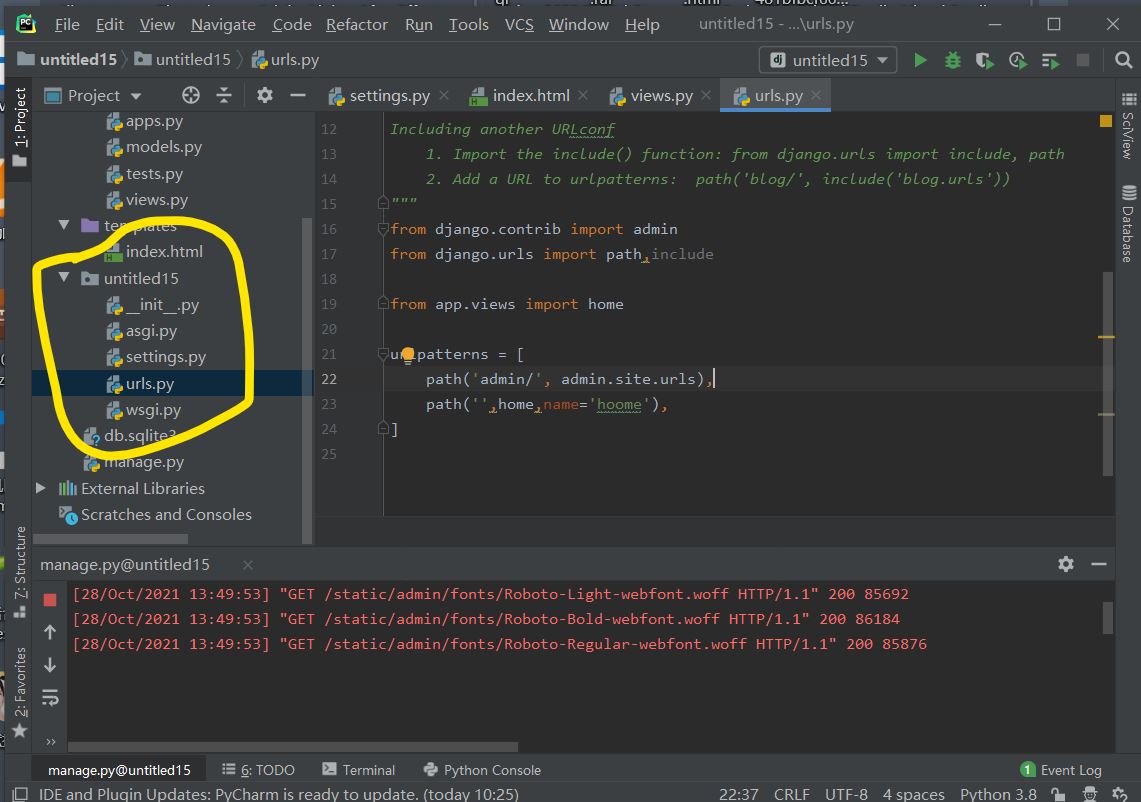
配置路由
from django.contrib import admin
from django.urls import path,include

from app.views import home

urlpatterns = [
    path('admin/', admin.site.urls),
    path('',home,name='hoome'),
]
导入Bootstrap前端框架
将css、fonts、js复制到static文件夹下 没有则创建该文件夹

编写前端内容
{% load static %}
<!DOCTYPE html>
<html lang="en">
<head>
    <meta charset="UTF-8">
    <title>计算器</title>
    <link rel="stylesheet" href="{% static 'css/bootstrap.min.css' %}" rel="external nofollow" >
    <script src="https://cdn.jsdelivr.net/npm/jquery@1.12.4/dist/jquery.min.js"></script>
    <script src="{% static 'js/bootstrap.min.js' %}"></script>

    <style>
        body{
            background-position: center 0;
            background-repeat: no-repeat;
            background-attachment: fixed;
            background-size: cover;
            -webkit-background-size: cover;
            -o-background-size: cover;
            -moz-background-size: cover;
            -ms-background-size:cover;
        }
        .input_show{
            margin-top: 35px;
            max-width: 280px;
            height: 35px;
        }
        .btn_num{
            margin:1px 1px 1px 1px;
            width: 60px;
        }
        .btn_clear{
            margin-left: 40px;
            margin-right: 20px;
        }
        .extenContent{
            height: 300px;
        }
    </style>
</head>
<body>
<div class="container-fluid">
    <div class="row">
        <div class="col-xs-1 col-sm-4"> </div>
        <div id="computer" class="col-xs-1 col-sm-6">
            <input type="text" id="txt_code" name="txt_code" value="" class="form-control input_show" placeholder="" disabled>
            <input type="text" id="txt_result" name="txt_result" value="" class="form-control input_show" placeholder="结果" disabled>
            <br>
            <div>
                <button type="button" class="btn btn-default btn_num" onclick="fun_7()">7</button>
                <button type="button" class="btn btn-default btn_num" onclick="fun_8()">8</button>
                <button type="button" class="btn btn-default btn_num" onclick="fun_9()">9</button>
                <button type="button" class="btn btn-default btn_num" onclick="fun_div()">/</button>
                <br>
                <button type="button" class="btn btn-default btn_num" onclick="fun_4()">4</button>
                <button type="button" class="btn btn-default btn_num" onclick="fun_5()">5</button>
                <button type="button" class="btn btn-default btn_num" onclick="fun_6()">6</button>
                <button type="button" class="btn btn-default btn_num" onclick="fun_mul()">*</button>
                <br>
                <button type="button" class="btn btn-default btn_num" onclick="fun_1()">1</button>
                <button type="button" class="btn btn-default btn_num" onclick="fun_2()">2</button>
                <button type="button" class="btn btn-default btn_num" onclick="fun_3()">3</button>
                <button type="button" class="btn btn-default btn_num" onclick="fun_sub()">-</button>
                <br>
                <button type="button" class="btn btn-default btn_num" onclick="fun_0()">0</button>
                <button type="button" class="btn btn-default btn_num" onclick="fun_00()">00</button>
                <button type="button" class="btn btn-default btn_num" onclick="fun_dot()">.</button>
                <button type="button" class="btn btn-default btn_num" onclick="fun_add()">+</button>
            </div>
        <div>
        <br>
        <button type="button" class="btn btn-success btn-lg btn_clear" id="lgbut_clear" onclick="fun_clear()">
    清空
</button>
<button type="button" class="btn btn-primary btn-lg" id="lgbut_compute" >
    计算
</button>
    </div>
        </div>
            <div class="col-xs-1 col-sm-2"></div>
</div>
    </div>
<div class="extenContent"></div>
<script>
    var x=document.getElementById("txt_code");
    var y=document.getElementById("txt_result");
    function fun_7() {
        x.value+='7';
    }
    function fun_8() {
        x.value+='8';
    }
    function fun_9() {
        x.value+='9';
    }
    function fun_div() {
        x.value+='/';
    }
    function fun_4() {
        x.value+='4';
    }
    function fun_5() {
        x.value+='5';
    }
    function fun_6() {
        x.value+='6';
    }
    function fun_mul() {
        x.value+='*';
    }
    function fun_1() {
        x.value+='1';
    }
    function fun_2() {
        x.value+='2';
    }
    function fun_3() {
        x.value+='3';
    }
    function fun_sub() {
        x.value+='-';
    }
    function fun_0() {
        x.value+='0';
    }
    function fun_00() {
        x.value+='00';
    }
    function fun_dot() {
        x.value+='.';
    }
    function fun_add() {
        x.value+='+';
    }
    function fun_clear() {
        x.value='';
        y.value='';

    }
</script>
<script>
    function ShowResult(data) {
        var y = document.getElementById('txt_result');
        y.value = data['result'];
    }
</script>
<script>
    $('#lgbut_compute').click(function () {
        $.ajax({
            url:'compute/',
            type:'POST',
            data:{
                'code':$('#txt_code').val()
            },
            dataType:'json',
            success:ShowResult
        })
    })
</script>
</body>
</html>
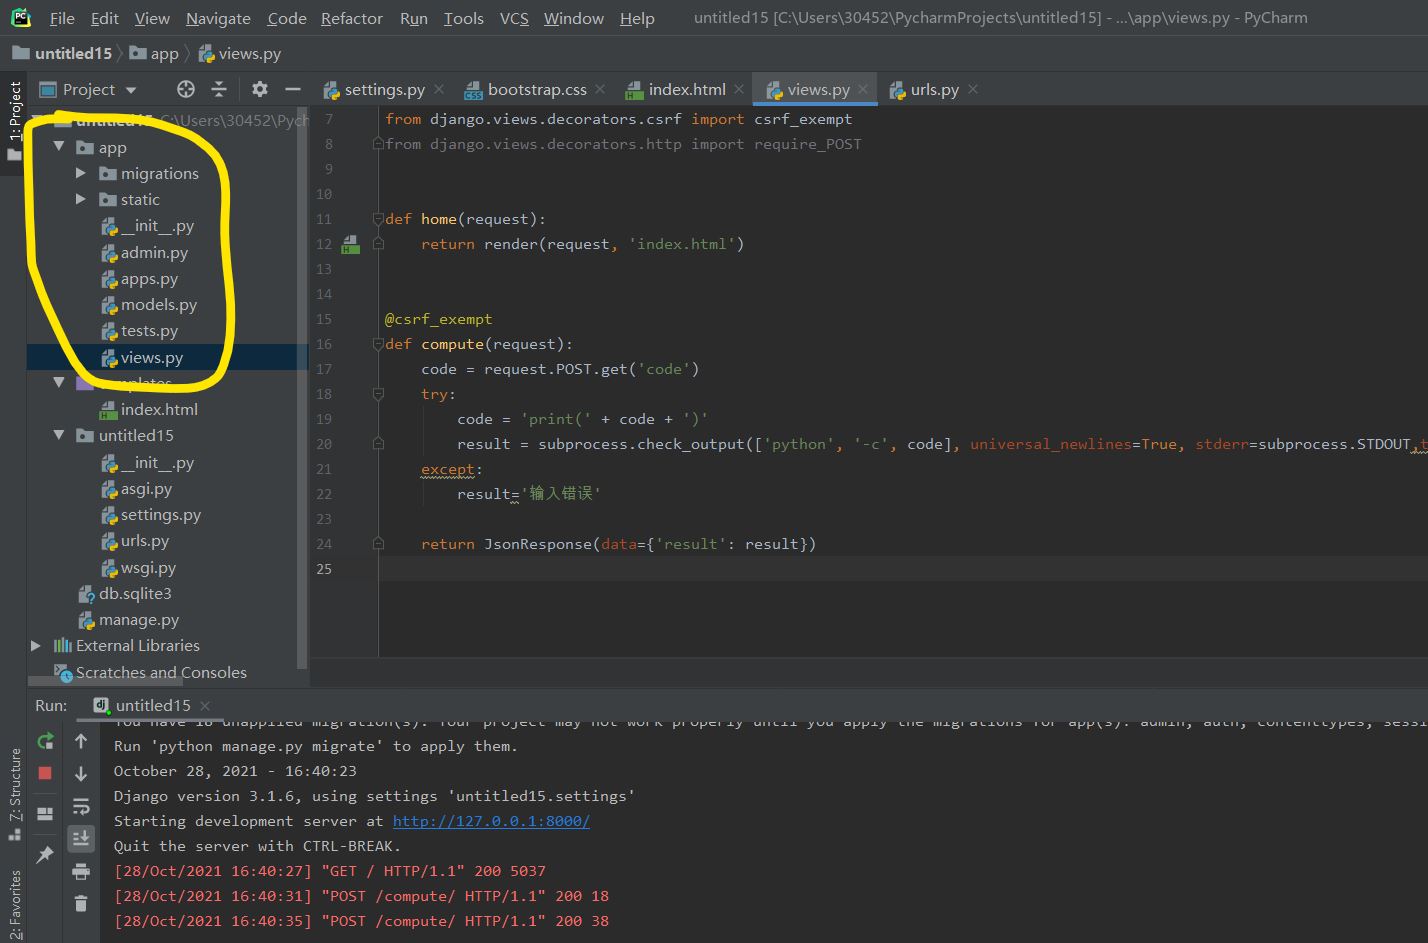
编写视图函数
import subprocess

from django.http import JsonResponse
from django.shortcuts import render

# Create your views here.
from django.views.decorators.csrf import csrf_exempt
from django.views.decorators.http import require_POST


def home(request):
    return render(request, 'index.html')


@csrf_exempt
def compute(request):
    code = request.POST.get('code')
    try:
        code = 'print(' + code + ')'
        result = subprocess.check_output(['python', '-c', code], universal_newlines=True, stderr=subprocess.STDOUT,timeout=30)
    except:
        result='输入错误'

    return JsonResponse(data={'result': result})
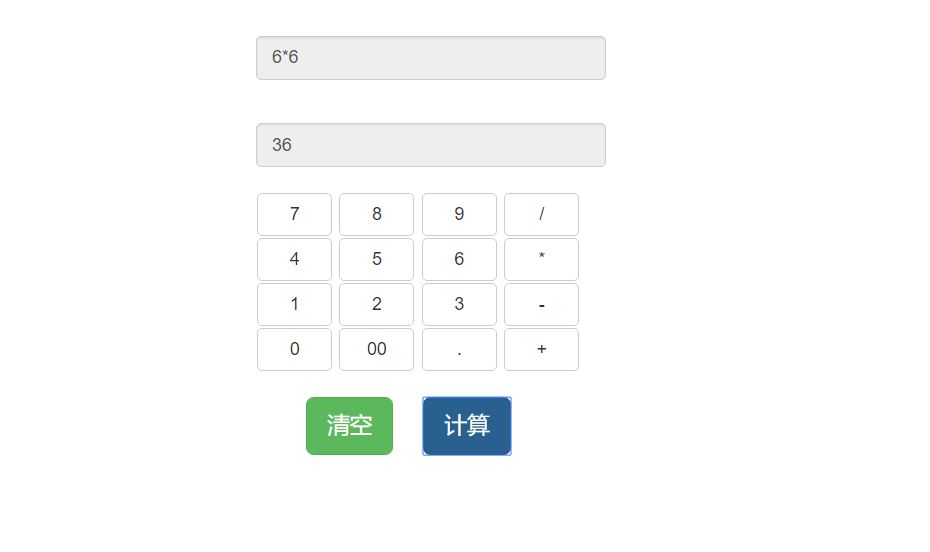
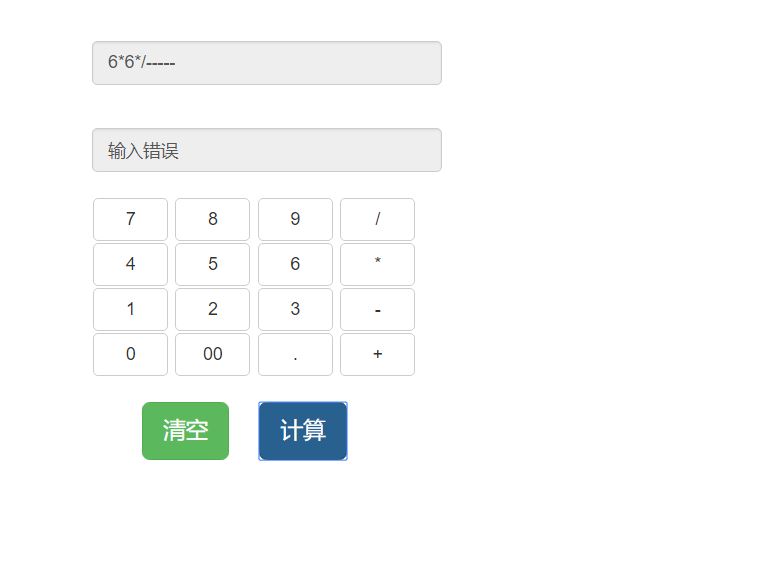
测试
到此这篇关于Django+Bootstrap实现计算器的示例代码的文章就介绍到这了,更多相关Django+Bootstrap计算器内容请搜索脚本之家以前的文章或继续浏览下面的相关文章希望大家以后多多支持脚本之家!
相关文章
 最近项目中采用了前后端分离的技术,感觉有必要给大家总结下,所以下面这篇文章主要给大家介绍了关于python+html实现前后端数据交互界面显示的相关资料,需要的朋友可以参考下2022-06-06
 本文主要介绍了pyinstaller生成的exe文件启动时间漫长的原因,文中通过示例代码介绍的非常详细,对大家的学习或者工作具有一定的参考学习价值,需要的朋友们下面随着小编来一起学习学习吧2024-01-01
Python利用subplots_adjust方法解决图表与画布的间距问题
这篇文章主要介绍了如何在使用python 的 matplotlib库绘图时, 使用subplots_adjust()方法来调整图表与画布之间的间距,以及图表与图表之间的间距,感兴趣的可以了解一下2022-04-04 这篇文章主要介绍了Python爬取阿拉丁统计信息过程图解,文中通过示例代码介绍的非常详细,对大家的学习或者工作具有一定的参考学习价值,需要的朋友可以参考下2020-05-05
Python中使用OpenCV库来进行简单的气象学遥感影像计算
这篇文章主要介绍了Python中使用OpenCV库来进行简单的气象学图像计算的例子,文中是用来进行光谱辐射定标、大气校正和计算反射率,需要的朋友可以参考下2016-02-02 这篇文章主要介绍了Python读写txt文本文件的操作方法全解析,包括对文本的查找和替换等技巧的讲解,需要的朋友可以参考下2016-06-06
 ChatGPT的编程能力也不差,本文将一步一步提出要求,让ChatGPT根据我们的要求,编写出一个可用的,可打包运行的桌面便签,感兴趣的可以了解一下2023-06-06
 这篇文章主要介绍了python 通⽤爬⾍和聚焦爬⾍的相关资料,帮助大家更好的了解和使用python 爬虫,感兴趣的朋友可以了解下2020-09-09
 这篇文章主要给大家介绍了关于Python第三方库安装缓慢的解决方法,文中通过示例代码介绍的非常详细,对大家的学习或者工作具有一定的参考学习价值,需要的朋友们下面随着小编来一起学习学习吧2021-02-02
 今天小编就为大家分享一篇用pyqt5 给按钮设置图标和css样式的方法,具有很好的参考价值,希望对大家有所帮助。一起跟随小编过来看看吧2019-06-06


最新评论