
Appium+Python+pytest自动化测试框架的实战
菜鸟一枚,写的不好勿喷,大家一起学习
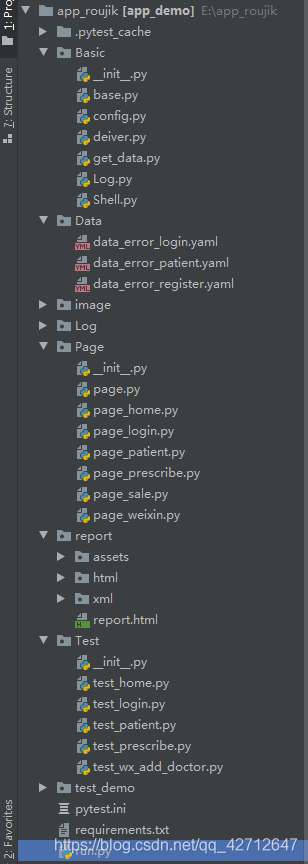
先简单介绍一下目录,再贴一些代码,代码里有注释
Basic目录下写的是一些公共的方法,Data目录下写的是测试数据,image存的是测试失败截图,Log日志文件,Page测试的定位元素,report测试报告,Test测试用例,pytest.ini是pytest启动配置文件,requirements.txt需要安装的py模块,run.py运行文件
Basic/base.py
里面封装了 一些方法,元素的点击,输入,查找,还有一些自己需要的公共方法也封装在里面,如果你们有别的需要可以自己封装调用
# coding=utf-8
import random
import allure
import pymysql
import time
from selenium.webdriver.common.by import By
from selenium.webdriver.support.ui import WebDriverWait
from Basic import Log
import os

log = Log.MyLog()


class Base(object):
    def __init__(self, driver):
        self.driver = driver

    # 自定义一个元素查找方法
    def find_element(self, feature,timeout=5, poll=1.0):
        # feature = By.XPATH,"//*[@text='显示']"
        """
        依据用户传入的元素信息特征,然后返回当前用户想要查找元素
        :param feature: 元组类型,包含用户希望的查找方式,及该方式对应的值
        :return: 返回当前用户查找的元素
        """
        by = feature[0]
        value = feature[1]
        wait = WebDriverWait(self.driver, timeout, poll)
        if by == By.XPATH:
            # print( "说明了用户想要使用 xpath 路径的方式来获取元素" )
            value = self.make_xpath(value)
        return wait.until(lambda x: x.find_element(by,value))

    def find_elements(self, feature):
        wait = WebDriverWait(self.driver, 5, 1)
        return wait.until(lambda x: x.find_elements(feature[0], feature[1]))

    def click_element(self, loc):
        '''
            封装点击操作函数
        '''
        self.find_element(loc).click()

    def input_text(self, loc, text):
        '''
            封装输入操作函数
        '''
        self.fm = self.find_element(loc)
        self.fm.clear()  # 需要先清空输入框,防止有默认内容
        self.fm.send_keys(text)

    # 自定义了一个可以自动帮我们拼接 xpath 路径的工具函数
    def make_xpath(self, feature):
        start_path = "//*["
        end_path = "]"
        res_path = ""

        if isinstance(feature, str):

            # 如果是字符串 我们不能直接上来就拆我们可以判断一下它是否是默认正确的 xpath 写法
            if feature.startswith("//*["):
                return feature

            # 如果用户输入的是字符串,那么我们就拆成列表再次进行判断
            split_list = feature.split(",")
            if len(split_list) == 2:
                # //*[contains(@text,'设')]
                res_path = "%scontains(@%s,'%s')%s" % (start_path, split_list[0], split_list[1], end_path)
            elif len(split_list) == 3:
                # //[@text='设置']
                res_path = "%s@%s='%s'%s" % (start_path, split_list[0], split_list[1], end_path)
            else:
                print("请按规则使用")
        elif isinstance(feature, tuple):
            for item in feature:
                # 默认用户在元组当中定义的数据都是字符串
                split_list2 = item.split(',')
                if len(split_list2) == 2:
                    res_path += "contains(@%s,'%s') and " % (split_list2[0], split_list2[1])
                elif len(split_list2) == 3:
                    res_path += "@%s='%s' and " % (split_list2[0], split_list2[1])
                else:
                    print("请按规则使用")
            andIndex = res_path.rfind(" and")
            res_path = res_path[0:andIndex]
            res_path = start_path + res_path + end_path
        else:
            print("请按规则使用")

        return res_path

    def assert_ele_in(self, text, element):
        '''
            封装断言操作函数
        '''
        try:
            assert text in self.find_element(element).text
            assert 0
        except Exception:
            assert 1

    def get_assert_text(self, element):
        ele = self.find_element(element, timeout=5, poll=0.1)
        return ele.text

    # 自定义一个获取 toast内容的方法
    def get_toast_content(self, message):
        tmp_feature = By.XPATH, "//*[contains(@text,'%s')]" % message
        ele = self.find_element(tmp_feature)
        return ele.text

    # 自定义一个工具函数,可以接收用户传递的部分 toast 信息,然后返回一个布尔值,来告诉
    # 用户,目标 toast 到底是否存在
    def is_toast_exist(self, mes):
        # 拿着用户传过来的 message 去判断一下包含该内容的 toast 到底是否存在。
        try:
            self.get_toast_content(mes)
            return True
        except Exception:
            # 如果目标 toast 不存在那么就说明我们的实际结果和预期结果不一样
            # 因此我们想要的是断言失败
            return False

    def get_mysql(self,  table, value):
        '''连接数据库'''
        # 打开数据库连接
        db = pymysql.connect(host='', port=, db=, user='', passwd='', charset='utf8')
        # 使用 cursor() 方法创建一个游标对象 cursor
        cursor = db.cursor()
        try:
            # 使用 execute()  方法执行 SQL 查询
            cursor.execute(value)
            db.commit()
        except Exception as e:
            print(e)
            db.rollback()
        # 使用 fetchone() 方法获取单条数据.
        data = cursor.fetchone()
        # 关闭数据库连接
        db.close()
        return data

    def get_xpath(self, value):
        '''封装获取xpath方法'''
        text = By.XPATH, '//*[@text="%s"]' % value
        return text

    # 自定义一个获取当前设备尺寸的功能
    def get_device_size(self):
        x = self.driver.get_window_size()["width"]
        y = self.driver.get_window_size()["height"]
        return x, y

    # 自定义一个功能,可以实现向左滑屏操作。
    def swipe_left(self):
        start_x = self.get_device_size()[0] * 0.9
        start_y = self.get_device_size()[1] * 0.5
        end_x = self.get_device_size()[0] * 0.4
        end_y = self.get_device_size()[1] * 0.5
        self.driver.swipe(start_x, start_y, end_x, end_y)

    # 自定义一个功能,可以实现向上滑屏操作。
    def swipe_up(self):
        start_x = self.get_device_size()[0] * 1/2
        start_y = self.get_device_size()[1] * 1/2
        end_x = self.get_device_size()[0] * 1/2
        end_y = self.get_device_size()[1] * 1/7
        self.driver.swipe(start_x, start_y, end_x, end_y, 500)

    # 切换到微信
    def switch_weixxin(self):
        self.driver.start_activity("com.tencent.mm", ".ui.LauncherUI")

    # 切换到医生端
    def switch_doctor(self):
        self.driver.start_activity("com.rjjk_doctor", ".MainActivity")

    # 切换到销售端
    def switch_sale(self):
        self.driver.start_activity("com.rjjk_sales", ".MainActivity")

    def switch_webview(self):
        # 切换到webview
        print(self.driver.contexts)
        time.sleep(5)
        self.driver.switch_to.context("WEBVIEW_com.tencent.mm:tools")
        print("切换成功")
        time.sleep(3)

    # 自定义根据坐标定位
    def taptest(self, a, b):
        # 设定系数,控件在当前手机的坐标位置除以当前手机的最大坐标就是相对的系数了
        # 获取当前手机屏幕大小X,Y
        X = self.driver.get_window_size()['width']
        Y = self.driver.get_window_size()['height']
        # 屏幕坐标乘以系数即为用户要点击位置的具体坐标
        self.driver.tap([(a * X, b * Y)])

    # 自定义截图函数
    def take_screenShot(self):
        '''
        测试失败截图,并把截图展示到allure报告中
        '''
        tm = time.strftime("%Y-%m-%d-%H-%M-%S", time.localtime(time.time()))
        self.driver.get_screenshot_as_file(
            os.getcwd() + os.sep + "image/%s.png" % tm)
        allure.attach.file(os.getcwd() + os.sep + "image/%s.png" %
                           tm, attachment_type=allure.attachment_type.PNG)

    # 自定义随机生成11位手机号
    def create_phone(self):
        # 第二位数字
        second = [3, 4, 5, 7, 8][random.randint(0, 4)]
        # 第三位数字
        third = {
            3: random.randint(0, 9),
            4: [5, 7, 9][random.randint(0, 2)],
            5: [i for i in range(10) if i != 4][random.randint(0, 8)],
            7: [i for i in range(10) if i not in [4, 9]][random.randint(0, 7)],
            8: random.randint(0, 9),
        }[second]
        # 最后八位数字
        suffix = random.randint(9999999, 100000000)
        # 拼接手机号
        return "1{}{}{}".format(second, third, suffix)
Basic/deiver.py
APP启动的前置条件,一个是普通的app,一个是微信公众号,配置微信公众号自动化测试和一般的APP是有点区别的,微信需要切换webview才能定位到公众号
from appium import webdriver


def init_driver():
    desired_caps = {}
    # 手机 系统信息
    desired_caps['platformName'] = 'Android'
    desired_caps['platformVersion'] = '9'
    # 设备号
    desired_caps['deviceName'] = 'emulator-5554'
    # 包名
    desired_caps['appPackage'] = ''
    # 启动名
    desired_caps['appActivity'] = ''
    desired_caps['automationName'] = 'Uiautomator2'
    # 允许输入中文
    desired_caps['unicodeKeyboard'] = True
    desired_caps['resetKeyboard'] = True
    desired_caps['autoGrantPermissions'] = True
    desired_caps['noReset'] = False
    # 手机驱动对象
    driver = webdriver.Remote("http://127.0.0.1:4723/wd/hub", desired_caps)
    return driver


def driver_weixin():
    desired_caps = {}
    # 手机 系统信息
    desired_caps['platformName'] = 'Android'
    desired_caps['platformVersion'] = '9'
    # 设备号
    desired_caps['deviceName'] = ''
    # 包名
    desired_caps['appPackage'] = 'com.tencent.mm'
    # 启动名
    desired_caps['appActivity'] = '.ui.LauncherUI'
    # desired_caps['automationName'] = 'Uiautomator2'
    # 允许输入中文
    desired_caps['unicodeKeyboard'] = True
    desired_caps['resetKeyboard'] = True
    desired_caps['noReset'] = True
    # desired_caps["newCommandTimeout"] = 30
    # desired_caps['fullReset'] = 'false'
    # desired_caps['newCommandTimeout'] = 10
    # desired_caps['recreateChromeDriverSessions'] = True
    desired_caps['chromeOptions'] = {'androidProcess': 'com.tencent.mm:tools'}
    # 手机驱动对象
    driver = webdriver.Remote("http://127.0.0.1:4723/wd/hub", desired_caps)
    return driver
Basic/get_data.py
这是获取测试数据的方法
import os
import yaml


def getData(funcname, file):
    PATH = os.getcwd() + os.sep

    with open(PATH + 'Data/' + file + '.yaml', 'r', encoding="utf8") as f:
        data = yaml.load(f, Loader=yaml.FullLoader)

    # 1 先将我们获取到的所有数据都存放在一个变量当中
    tmpdata = data[funcname]

    # 2 所以此时我们需要使用循环走进它的内心。
    res_arr = list()
    for value in tmpdata.values():
        tmp_arr = list()
        for j in value.values():
            tmp_arr.append(j)

        res_arr.append(tmp_arr)

    return res_arr
Basic/Log.py
日志文件,不多介绍
# -*- coding: utf-8 -*-

"""
封装log方法

"""

import logging
import os
import time

LEVELS = {
    'debug': logging.DEBUG,
    'info': logging.INFO,
    'warning': logging.WARNING,
    'error': logging.ERROR,
    'critical': logging.CRITICAL
}

logger = logging.getLogger()
level = 'default'


def create_file(filename):
    path = filename[0:filename.rfind('/')]
    if not os.path.isdir(path):
        os.makedirs(path)
    if not os.path.isfile(filename):
        fd = open(filename, mode='w', encoding='utf-8')
        fd.close()
    else:
        pass


def set_handler(levels):
    if levels == 'error':
        logger.addHandler(MyLog.err_handler)
    logger.addHandler(MyLog.handler)


def remove_handler(levels):
    if levels == 'error':
        logger.removeHandler(MyLog.err_handler)
    logger.removeHandler(MyLog.handler)


def get_current_time():
    return time.strftime(MyLog.date, time.localtime(time.time()))


class MyLog:
    path = os.path.dirname(os.path.dirname(os.path.abspath(__file__)))
    log_file = path+'/Log/log.log'
    err_file = path+'/Log/err.log'
    logger.setLevel(LEVELS.get(level, logging.NOTSET))
    create_file(log_file)
    create_file(err_file)
    date = '%Y-%m-%d %H:%M:%S'

    handler = logging.FileHandler(log_file, encoding='utf-8')
    err_handler = logging.FileHandler(err_file, encoding='utf-8')

    @staticmethod
    def debug(log_meg):
        set_handler('debug')
        logger.debug("[DEBUG " + get_current_time() + "]" + log_meg)
        remove_handler('debug')

    @staticmethod
    def info(log_meg):
        set_handler('info')
        logger.info("[INFO " + get_current_time() + "]" + log_meg)
        remove_handler('info')

    @staticmethod
    def warning(log_meg):
        set_handler('warning')
        logger.warning("[WARNING " + get_current_time() + "]" + log_meg)
        remove_handler('warning')

    @staticmethod
    def error(log_meg):
        set_handler('error')
        logger.error("[ERROR " + get_current_time() + "]" + log_meg)
        remove_handler('error')

    @staticmethod
    def critical(log_meg):
        set_handler('critical')
        logger.error("[CRITICAL " + get_current_time() + "]" + log_meg)
        remove_handler('critical')


if __name__ == "__main__":
    MyLog.debug("This is debug message")
    MyLog.info("This is info message")
    MyLog.warning("This is warning message")
    MyLog.error("This is error")
    MyLog.critical("This is critical message")
Basic/Shell.py
执行shell语句方法
# -*- coding: utf-8 -*-
# @Time    : 2018/8/1 下午2:54
# @Author  : WangJuan
# @File    : Shell.py

"""
封装执行shell语句方法

"""

import subprocess


class Shell:
    @staticmethod
    def invoke(cmd):
        output, errors = subprocess.Popen(cmd, shell=True, stdout=subprocess.PIPE, stderr=subprocess.PIPE).communicate()
        o = output.decode("utf-8")
        return o
Page/page.py
class Page:
    def __init__(self, driver):
        self.driver = driver

    @property
    def initloginpage(self):
        return Login_Page(self.driver)
Test/test_login.py
登陆的测试用,我贴一条使用数据文件的用例
class Test_login:
    @pytest.mark.parametrize("args", getData("test_login_error", 'data_error_login'))
    def test_error_login(self, args):
        """错误登陆"""
        self.page.initloginpage.input_user(args[0])
        self.page.initloginpage.input_pwd(args[1])
        self.page.initloginpage.click_login()
        toast_status = self.page.initloginpage.is_toast_exist(args[2])
        if toast_status == False:
            self.page.initpatientpage.take_screenShot()
            assert False
pytest.ini
pytest配置文件,注释的是启动失败重试3次,因为appium会因为一些不可控的原因失败,所有正式运行脚本的时候需要加上这个
[pytest]
;addopts = -s --html=report/report.html --reruns 3
addopts = -s --html=report/report.html
testpaths = ./Test
python_files = test_*.py
python_classes = Test*
python_functions = test_add_prescription_list


requirements.txt
框架中需要的患教,直接pip install -r requirements.txt 安装就可以了,可能会失败,多试几次

```python
adbutils==0.3.4
allure-pytest==2.7.0
allure-python-commons==2.7.0
Appium-Python-Client==0.46
atomicwrites==1.3.0
attrs==19.1.0
certifi==2019.6.16
chardet==3.0.4
colorama==0.4.1
coverage==4.5.3
decorator==4.4.0
deprecation==2.0.6
docopt==0.6.2
enum34==1.1.6
facebook-wda==0.3.4
fire==0.1.3
humanize==0.5.1
idna==2.8
importlib-metadata==0.18
logzero==1.5.0
lxml==4.3.4
more-itertools==7.1.0
namedlist==1.7
packaging==19.0
Pillow==6.1.0
pluggy==0.12.0
progress==1.5
py==1.8.0
PyMySQL==0.9.3
pyparsing==2.4.0
pytest==5.0.0
pytest-cov==2.7.1
pytest-html==1.21.1
pytest-metadata==1.8.0
pytest-repeat==0.8.0
pytest-rerunfailures==7.0
PyYAML==5.1.1
requests==2.22.0
retry==0.9.2
selenium==3.141.0
six==1.12.0
tornado==6.0.3
uiautomator2==0.3.3
urllib3==1.25.3
wcwidth==0.1.7
weditor==0.2.3
whichcraft==0.6.0
zipp==0.5.1
到此这篇关于Appium+Python+pytest自动化测试框架的实战的文章就介绍到这了,更多相关Appium Python pytest自动化测试内容请搜索脚本之家以前的文章或继续浏览下面的相关文章希望大家以后多多支持脚本之家!
相关文章

Python cookbook(字符串与文本)针对任意多的分隔符拆分字符串操作示例
这篇文章主要介绍了Python cookbook(字符串与文本)针对任意多的分隔符拆分字符串操作,结合实例形式分析了Python使用split()及正则表达式进行字符串拆分操作相关实现技巧,需要的朋友可以参考下2018-04-04 这篇文章主要介绍了Python fileinput模块使用实例,fileinput模块可以遍历文本文件的所有行,本文就给出它的使用代码实例,需要的朋友可以参考下2015-05-05
 模板匹配就是在一幅图像中寻找另一幅模板图像最匹配,本文主要实现了多模板匹配,具有一定的参考价值,感兴趣的小伙伴们可以参考一下2021-06-06
 这篇文章主要介绍了Python中的进制转换详解,python内置函数进行进制转换的原理是将读入的一个字符串(python默认读入的都是字符串形式)转为10进制,然后再用相关函数进行其他进制转换,需要的朋友可以参考下2023-08-08
 借助于Python中的python-jenkins模块,我们可以轻松地编写脚本来连接到Jenkins服务器,并执行各种操作,如创建、删除、构建Jobs等,这种自动化的方式不仅提高了效率,还使得CI/CD流程更加灵活和可控,本文介绍如何使用Python操作Jenkins的相关资料,需要的朋友可以参考下2024-05-05
 这篇文章主要介绍了python读取mat文件中的struct问题,具有很好的参考价值,希望对大家有所帮助。如有错误或未考虑完全的地方,望不吝赐教2022-07-07
 这篇文章主要介绍了python变量与简单数据类型详解,文中通过示例代码介绍的非常详细,对大家的学习或者工作具有一定的参考学习价值,需要的朋友们下面随着小编来一起学习学习吧2019-04-04
 这篇文章主要介绍了python获取元素在数组中索引号的方法,实例分析了Python中index方法的相关使用技巧,具有一定参考借鉴价值,需要的朋友可以参考下2015-07-07
 这篇文章主要介绍了python中的set类型,本文给大家介绍的非常详细,对大家的学习或工作具有一定的参考借鉴价值,需要的朋友可以参考下2022-06-06
解决Python找不到ssl模块问题 No module named _ssl的方法
这篇文章主要介绍了解决Python找不到ssl模块问题 No module named _ssl的方法,小编觉得挺不错的,现在分享给大家,也给大家做个参考。一起跟随小编过来看看吧2019-04-04


最新评论