
一篇文章告诉你如何用事件委托实现JavaScript留言板功能
更新时间:2021年12月27日 09:53:33 作者:小高今天早睡了吗?
这篇文章主要为大家介绍了事件委托实现JavaScript留言板功能,具有一定的参考价值,感兴趣的小伙伴们可以参考一下,希望能够给你带来帮助
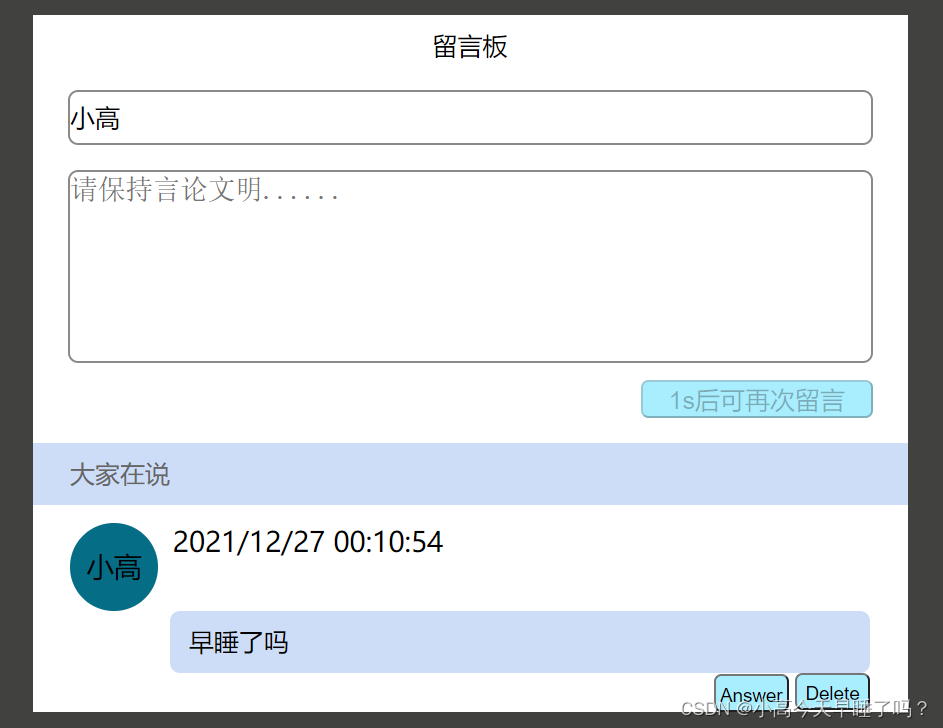
用事件委托实现留言板功能。
<!DOCTYPE html>
<html lang="en">
<head>
<meta charset="UTF-8">
<meta http-equiv="X-UA-Compatible" content="IE=edge">
<meta name="viewport" content="width=device-width, initial-scale=1.0">
<title>Document</title>
<style>
* {
padding: 0;
margin: 0;
}
body {
width: 100%;
height: 100%;
background: rgb(65, 65, 63);
}
.bacground {
width: 700px;
height: 100%;
background: white;
margin: auto;
margin-top: 20px;
}
.head,
.pop-head {
height: 50px;
font-size: 20px;
text-align: center;
line-height: 50px;
}
.name {
width: 640px;
height: 40px;
font-size: 20px;
margin: 10px 28px;
line-height: 50px;
border-radius: 8px;
border: 2px solid rgb(139, 137, 137);
outline: none;
}
.content,
.pop-reply {
width: 640px;
height: 150px;
font-size: 22px;
margin: 10px 28px;
border: 2px solid rgb(139, 137, 137);
outline: none;
border-radius: 8px;
resize: none;
}
.btn,
.pop-btn {
float: right;
height: 30px;
margin-right: 28px;
border-radius: 6px;
outline: none;
font-size: 20px;
padding: 0 20px;
background: rgb(169, 238, 255);
}
h3 {
font-size: 20px;
color: rgb(102, 102, 102);
background: rgb(205, 221, 248);
margin-top: 50px;
line-height: 50px;
text-indent: 30px;
font-weight: 545;
}
li {
list-style: none;
width: 640px;
font-size: 22px;
margin: 15px 30px;
}
.message-head {
display: flex;
}
.message-head .photo {
width: 70px;
height: 70px;
background: rgb(6, 109, 134);
display: inline-block;
border-radius: 50%;
text-align: center;
line-height: 70px;
overflow: hidden;
}
.message-head .time {
margin-left: 12px;
}
.liuyan,
.reply p {
width: 560px;
/* height: 76px; */
line-height: 50px;
display: block;
background: rgb(205, 221, 248);
font-size: 20px;
margin-left: 80px;
border-radius: 8px;
text-indent: 15px;
}
.delete {
width: 60px;
height: 30px;
display: block;
line-height: 30px;
margin-left: 580px;
/* margin-bottom: 0px; */
border-radius: 6px;
outline: none;
font-size: 15px;
background: rgb(169, 238, 255);
}
.answer {
width: 60px;
height: 30px;
display: block;
line-height: 30px;
margin-top: -29px;
margin-left: 515px;
border-radius: 6px;
outline: none;
font-size: 15px;
background: rgb(169, 238, 255);
}
.popup {
width: 100vw;
height: 100vh;
position: fixed;
background: rgba(0, 0, 0, .3);
left: 0;
top: 0;
z-index: 10;
display: flex;
align-items: center;
justify-content: center;
display: none;
}
.pop-content {
width: 700px;
background: #fff;
border-radius: 10px;
overflow: hidden;
padding-bottom: 20px;
}
.reply p {
margin-top: 10px;
background: rgba(100, 100, 100, .1);
}
</style>
</head>
<body>
<div class="bacground">
<div class="head">留言板</div>
<input class="name" type="text" placeholder="请输入您的昵称">
<textarea class="content" placeholder="请保持言论文明......"></textarea>
<button class="btn">留言</button>
<h3>大家在说</h3>
<ul class="text">
<!-- <li>
<div class="message-head">
<span class="photo">系统</span>
<p class="time">2019-9-27 0:47:38</p>
</div>
<p class="liuyan">测试留言</p>
<div class="reply">
<p>测试回复</p>
</div>
<button class="delete">Delete</button>
<button class="answer">Answer</button>
</li> -->
</ul>
</div>
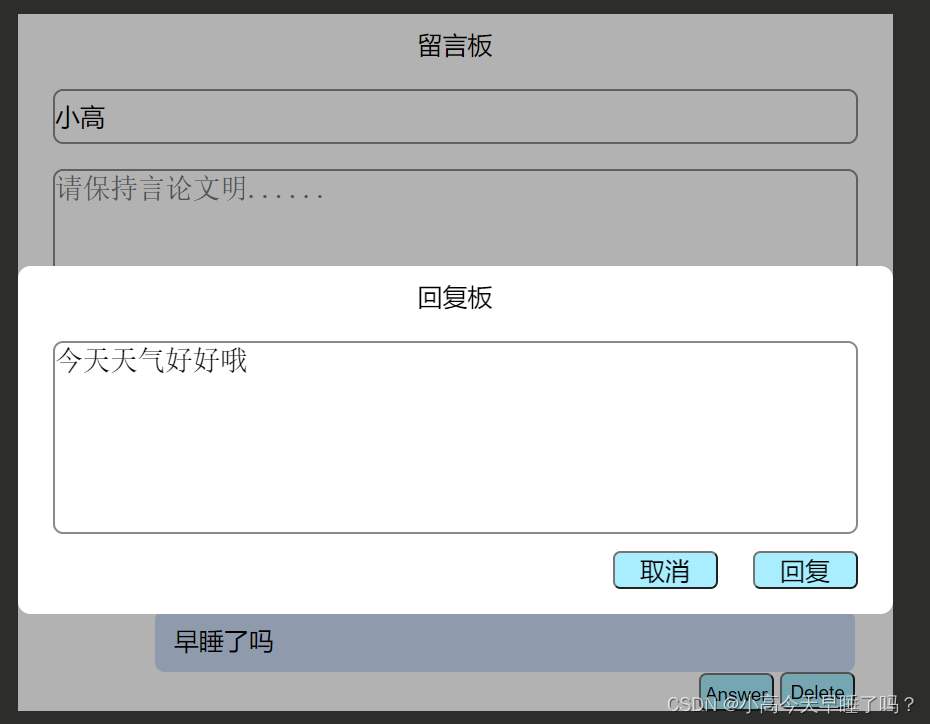
<div class="popup">
<div class="pop-content">
<div class="pop-head">回复板</div>
<textarea class="pop-reply" placeholder="请保持言论文明......"></textarea>
<button class="pop-btn huiFu">回复</button>
<button class="pop-btn quXiao">取消</button>
</div>
</div>
<script>
//在事件委托中,每一个if都相当于一个独立的函数,因为每一次点击都会重新触发事件处理函数
var oAns ;
//分析:事件委托给谁? --- 共同的父元素
document.onclick = function (e) {
//事件处理对象,兼容IE8及以下版本的浏览器
e = e || event ;
// target目标 --- 具体是由哪个标签触发的
var target = e.target ;
//留言
if(target.className === 'btn'){
//获取对象
var nickname = $('.name').value ;
var content = $('.content').value ;
//判断输入是否为空
if(nickname && content){
//创建一个标签
var oLi = document.createElement('li') ;
//插入新内容
oLi.innerHTML = `
<div class="message-head">
<span class="photo">${nickname}</span>
<p class="time">2019-9-27 0:47:38</p>
</div>
<p class="liuyan">${content}</p>
<div class="reply">
</div>
<button class="delete">Delete</button>
<button class="answer">Answer</button>
`
//将最新的留言插入到最上面
$('.text').insertBefore(oLi , $('.text').firstChild) ;
//倒计时
clock(target , 3) ;
//留言完后清空留言板内容
$('.content').value = '' ;
}else{
alert('输入不能为空!')
}
return
}
//删除
if(target.className === 'delete'){
//删除留言
target.parentNode.remove() ;
return
}
//回复
if(target.className === 'answer'){
//显示弹窗
$('.popup').style.display = 'flex' ;
//找到回复留言的地方
oAns = target.previousElementSibling.previousElementSibling ;
return
}
//确认回复
if(target.className === 'pop-btn huiFu'){
//拿到回复的内容
var huiFuContent = $('.pop-reply').value ;
if(huiFuContent){
//创建一个标签
var oP = document.createElement('p') ;
//将内容插入标签中
oP.innerHTML = huiFuContent ;
//将回复插入到留言的地方
oAns.appendChild(oP) ;
}
//关闭弹窗
$('.popup').style.display = 'none' ;
return
}
//取消回复
if(target.className === 'pop-btn quXiao'){
$('.popup').style.display = 'none' ;
return
}
}
//倒计时
function clock(ele , time){
if(!ele.disabled){
ele.disabled = true ;
ele.innerHTML = time + 's后可再次留言' ;
var t = setInterval(function () {
time-- ;
ele.innerHTML = time + 's后可再次留言' ;
if(time <= 0){
clearInterval(t) ;
ele.disabled = false ;
ele.innerHTML = '留言' ;
}
},1000)
}
}
//获取对象
function $(selector){
return document.querySelector(selector) ;
}
</script>
</body>
</html>
总结
本篇文章就到这里了,希望能够给你带来帮助,也希望您能够多多关注脚本之家的更多内容!
相关文章
 这篇文章主要介绍了VCalendar的安装和使用方法,包括如何通过官网地址引入API,并在项目中全局引入main.js文件,使用VCalendar可以实现日历功能,需要的朋友可以参考下2025-01-01
 js 判断一个元素是否存在此功能在项目中很实用,本人搜集整理了一些常用技巧,需要了解的朋友可以参考下2012-12-12
 这篇文章主要介绍了javascript中in运算符用法,实例分析了in运算符的相关使用技巧,非常具有实用价值,需要的朋友可以参考下2015-04-04
 下面小编就为大家分享一篇js的函数的按值传递参数的实例,具有很好的参考价值,一起跟随小编过来看看吧,希望对大家有所帮助2017-11-11
 这篇文章主要介绍了基于JS实现省市联动效果代码的相关资料,非常实用,在日常项目开发过程中经常遇到此需求,下面小编给大家分享实现代码,需要的朋友可以参考下2016-06-06
 最近在开发小程序,产品经理提了一个需求,要求微信小程序换头像,用户剪裁图片必须是圆形。这篇文章主要介绍了微信小程序之裁剪图片成圆形 ,需要的朋友可以参考下2018-10-10
 这篇文章主要介绍了详解webpack+gulp实现自动构建部署,具有一定的参考价值,感兴趣的小伙伴们可以参考一下2017-06-06
 js 回车提交一些新手朋友还是比较陌生的,本文介绍两种实现方法:jQuery方法、JavaScript方法,感兴趣的朋友可以研究下2012-12-12
 下面小编就为大家分享一篇移动前端图片压缩上传的实例。具有很好的参考价值,希望对大家有所帮助。一起小编过来看看吧2017-12-12
 今天小编就为大家分享一篇layui问题之模拟select点击事件的实例讲解,具有很好的参考价值,希望对大家有所帮助。一起跟随小编过来看看吧2018-08-08


最新评论