
python目标检测YoloV4当中的Mosaic数据增强方法
更新时间:2022年05月09日 11:16:54 作者:Bubbliiiing
这篇文章主要为大家介绍了python目标检测YoloV4当中的Mosaic数据增强方法,有需要的朋友可以借鉴参考下,希望能够有所帮助,祝大家多多进步,早日升职加薪
什么是Mosaic数据增强方法
Yolov4的mosaic数据增强参考了CutMix数据增强方式,理论上具有一定的相似性!
CutMix数据增强方式利用两张图片进行拼接。

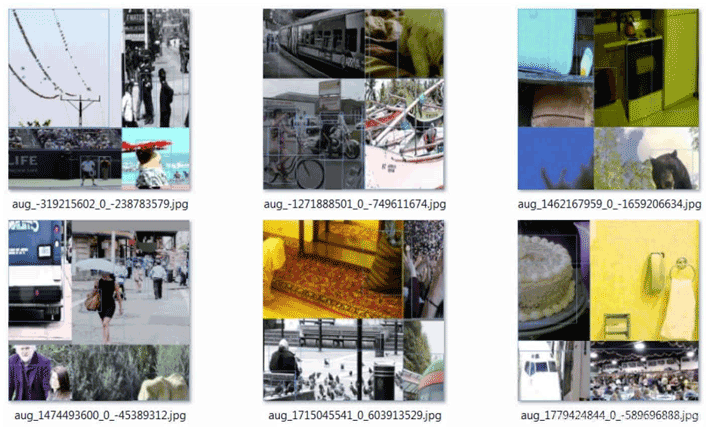
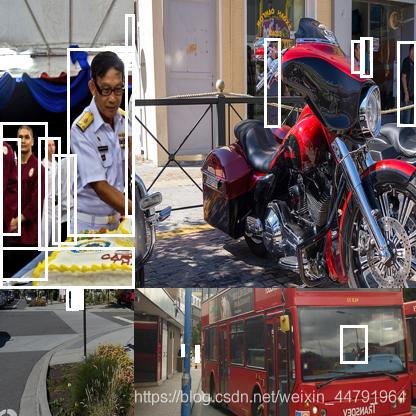
但是mosaic利用了四张图片,根据论文所说其拥有一个巨大的优点是丰富检测物体的背景!且在BN计算的时候一下子会计算四张图片的数据!就像下图这样:
实现思路
1、每次读取四张图片。

2、分别对四张图片进行翻转、缩放、色域变化等,并且按照四个方向位置摆好。


3、进行图片的组合和框的组合
全部代码
全部代码构成如下:
from PIL import Image, ImageDraw
import numpy as np
from matplotlib.colors import rgb_to_hsv, hsv_to_rgb
import math
def rand(a=0, b=1):
    return np.random.rand()*(b-a) + a
def merge_bboxes(bboxes, cutx, cuty):
    merge_bbox = []
    for i in range(len(bboxes)):
        for box in bboxes[i]:
            tmp_box = []
            x1,y1,x2,y2 = box[0], box[1], box[2], box[3]
            if i == 0:
                if y1 > cuty or x1 > cutx:
                    continue
                if y2 >= cuty and y1 <= cuty:
                    y2 = cuty
                    if y2-y1 < 5:
                        continue
                if x2 >= cutx and x1 <= cutx:
                    x2 = cutx
                    if x2-x1 < 5:
                        continue
            if i == 1:
                if y2 < cuty or x1 > cutx:
                    continue
                if y2 >= cuty and y1 <= cuty:
                    y1 = cuty
                    if y2-y1 < 5:
                        continue
                if x2 >= cutx and x1 <= cutx:
                    x2 = cutx
                    if x2-x1 < 5:
                        continue
            if i == 2:
                if y2 < cuty or x2 < cutx:
                    continue
                if y2 >= cuty and y1 <= cuty:
                    y1 = cuty
                    if y2-y1 < 5:
                        continue
                if x2 >= cutx and x1 <= cutx:
                    x1 = cutx
                    if x2-x1 < 5:
                        continue
            if i == 3:
                if y1 > cuty or x2 < cutx:
                    continue
                if y2 >= cuty and y1 <= cuty:
                    y2 = cuty
                    if y2-y1 < 5:
                        continue
                if x2 >= cutx and x1 <= cutx:
                    x1 = cutx
                    if x2-x1 < 5:
                        continue
            tmp_box.append(x1)
            tmp_box.append(y1)
            tmp_box.append(x2)
            tmp_box.append(y2)
            tmp_box.append(box[-1])
            merge_bbox.append(tmp_box)
    return merge_bbox
def get_random_data(annotation_line, input_shape, random=True, hue=.1, sat=1.5, val=1.5, proc_img=True):
    '''random preprocessing for real-time data augmentation'''
    h, w = input_shape
    min_offset_x = 0.4
    min_offset_y = 0.4
    scale_low = 1-min(min_offset_x,min_offset_y)
    scale_high = scale_low+0.2
    image_datas = []
    box_datas = []
    index = 0
    place_x = [0,0,int(w*min_offset_x),int(w*min_offset_x)]
    place_y = [0,int(h*min_offset_y),int(w*min_offset_y),0]
    for line in annotation_line:
        # 每一行进行分割
        line_content = line.split()
        # 打开图片
        image = Image.open(line_content[0])
        image = image.convert("RGB")
        # 图片的大小
        iw, ih = image.size
        # 保存框的位置
        box = np.array([np.array(list(map(int,box.split(',')))) for box in line_content[1:]])
        # image.save(str(index)+".jpg")
        # 是否翻转图片
        flip = rand()<.5
        if flip and len(box)>0:
            image = image.transpose(Image.FLIP_LEFT_RIGHT)
            box[:, [0,2]] = iw - box[:, [2,0]]
        # 对输入进来的图片进行缩放
        new_ar = w/h
        scale = rand(scale_low, scale_high)
        if new_ar < 1:
            nh = int(scale*h)
            nw = int(nh*new_ar)
        else:
            nw = int(scale*w)
            nh = int(nw/new_ar)
        image = image.resize((nw,nh), Image.BICUBIC)
        # 进行色域变换
        hue = rand(-hue, hue)
        sat = rand(1, sat) if rand()<.5 else 1/rand(1, sat)
        val = rand(1, val) if rand()<.5 else 1/rand(1, val)
        x = rgb_to_hsv(np.array(image)/255.)
        x[..., 0] += hue
        x[..., 0][x[..., 0]>1] -= 1
        x[..., 0][x[..., 0]<0] += 1
        x[..., 1] *= sat
        x[..., 2] *= val
        x[x>1] = 1
        x[x<0] = 0
        image = hsv_to_rgb(x)
        image = Image.fromarray((image*255).astype(np.uint8))
        # 将图片进行放置,分别对应四张分割图片的位置
        dx = place_x[index]
        dy = place_y[index]
        new_image = Image.new('RGB', (w,h), (128,128,128))
        new_image.paste(image, (dx, dy))
        image_data = np.array(new_image)/255
        # Image.fromarray((image_data*255).astype(np.uint8)).save(str(index)+"distort.jpg")
        index = index + 1
        box_data = []
        # 对box进行重新处理
        if len(box)>0:
            np.random.shuffle(box)
            box[:, [0,2]] = box[:, [0,2]]*nw/iw + dx
            box[:, [1,3]] = box[:, [1,3]]*nh/ih + dy
            box[:, 0:2][box[:, 0:2]<0] = 0
            box[:, 2][box[:, 2]>w] = w
            box[:, 3][box[:, 3]>h] = h
            box_w = box[:, 2] - box[:, 0]
            box_h = box[:, 3] - box[:, 1]
            box = box[np.logical_and(box_w>1, box_h>1)]
            box_data = np.zeros((len(box),5))
            box_data[:len(box)] = box
        image_datas.append(image_data)
        box_datas.append(box_data)
        img = Image.fromarray((image_data*255).astype(np.uint8))
        for j in range(len(box_data)):
            thickness = 3
            left, top, right, bottom  = box_data[j][0:4]
            draw = ImageDraw.Draw(img)
            for i in range(thickness):
                draw.rectangle([left + i, top + i, right - i, bottom - i],outline=(255,255,255))
        img.show()
    # 将图片分割,放在一起
    cutx = np.random.randint(int(w*min_offset_x), int(w*(1 - min_offset_x)))
    cuty = np.random.randint(int(h*min_offset_y), int(h*(1 - min_offset_y)))
    new_image = np.zeros([h,w,3])
    new_image[:cuty, :cutx, :] = image_datas[0][:cuty, :cutx, :]
    new_image[cuty:, :cutx, :] = image_datas[1][cuty:, :cutx, :]
    new_image[cuty:, cutx:, :] = image_datas[2][cuty:, cutx:, :]
    new_image[:cuty, cutx:, :] = image_datas[3][:cuty, cutx:, :]
    # 对框进行进一步的处理
    new_boxes = merge_bboxes(box_datas, cutx, cuty)
    return new_image, new_boxes
def normal_(annotation_line, input_shape):
    '''random preprocessing for real-time data augmentation'''
    line = annotation_line.split()
    image = Image.open(line[0])
    box = np.array([np.array(list(map(int,box.split(',')))) for box in line[1:]])
    iw, ih = image.size
    image = image.transpose(Image.FLIP_LEFT_RIGHT)
    box[:, [0,2]] = iw - box[:, [2,0]]
    return image, box
if __name__ == "__main__":
    with open("2007_train.txt") as f:
        lines = f.readlines()
    a = np.random.randint(0,len(lines))
    # index = 0
    # line_all = lines[a:a+4]
    # for line in line_all:
    #     image_data, box_data = normal_(line,[416,416])
    #     img = image_data
    #     for j in range(len(box_data)):
    #         thickness = 3
    #         left, top, right, bottom  = box_data[j][0:4]
    #         draw = ImageDraw.Draw(img)
    #         for i in range(thickness):
    #             draw.rectangle([left + i, top + i, right - i, bottom - i],outline=(255,255,255))
    #     img.show()
    #     # img.save(str(index)+"box.jpg")
    #     index = index+1
    line = lines[a:a+4]
    image_data, box_data = get_random_data(line,[416,416])
    img = Image.fromarray((image_data*255).astype(np.uint8))
    for j in range(len(box_data)):
        thickness = 3
        left, top, right, bottom  = box_data[j][0:4]
        draw = ImageDraw.Draw(img)
        for i in range(thickness):
            draw.rectangle([left + i, top + i, right - i, bottom - i],outline=(255,255,255))
    img.show()
    # img.save("box_all.jpg")
以上就是python目标检测YoloV4当中的Mosaic数据增强方法的详细内容,更多关于YoloV4 Mosaic数据增强的资料请关注脚本之家其它相关文章!
相关文章
 这篇文章主要介绍了Python爬虫代理池搭建的方法步骤,文中通过示例代码介绍的非常详细,对大家的学习或者工作具有一定的参考学习价值,需要的朋友们下面随着小编来一起学习学习吧2020-09-09
 今天小编就为大家分享一篇在tensorflow中实现屏蔽输出的log信息,具有很好的参考价值,希望对大家有所帮助。一起跟随小编过来看看吧2020-02-02
 这篇文章主要为大家介绍了python编写第一个交互程序示例教程,有需要的朋友可以借鉴参考下,希望能够有所帮助,祝大家多多进步,早日升职加薪2022-06-06
 本文主要介绍了Python的pdfplumber库将pdf转为图片的实现,文中通过示例代码介绍的非常详细,对大家的学习或者工作具有一定的参考学习价值,需要的朋友们下面随着小编来一起学习学习吧2023-06-06
 这篇文章主要为大家详细介绍了python GUI实现小球满屏乱跑效果,具有一定的参考价值,感兴趣的小伙伴们可以参考一下2019-05-05
 这篇文章主要给大家介绍了关于Python网络爬虫神器PyQuery的基本使用教程,文中通过示例代码介绍的非常详细,对大家学习使用PyQuery具有一定的参考学习价值,需要的朋友们下面随着小编来一起学习学习吧。2018-02-02
 这篇文章主要介绍了在Python3中的一些基本的小技巧,有利于刚刚上手Python的初学者提升开发效率,需要的朋友可以参考下2015-03-03
 这篇文章主要为大家详细介绍了如何使用Django实现接口token检测,文中的示例代码简洁易懂,感兴趣的小伙伴可以跟随小编一起学习一下2025-03-03
 这篇文章主要介绍了使用 Python为你的在线会议创建一个假的摄像头,在 Python 的帮助下,不再强制开启摄像头,将向你展示如何为你的在线会议创建一个假的摄像头,需要的朋友可以参考下2022-08-08
 这篇文章主要介绍了Pandas DataFrame分组求和、分组乘积的实例,具有很好的参考价值,希望对大家有所帮助,如有错误或未考虑完全的地方,望不吝赐教2024-02-02


最新评论