
详解如何通过Python实现批量数据提取
每天面对成堆的发票,无论是发票还是承兑单据,抑或是其他各类公司数据要从照片、PDF等不同格式的内容中提取,我们都有必要进行快速办公的能力提升。
因此,我们的目标要求就十分明显了,首先要从图片中获取数据,其次将数据统一导入到EXCEL中。
配置需求
1.ImageMagick
2.tesseract-OCR
3.Python3.7
4.from PIL import Image as PI
5.import io
6.import os
7.import pyocr.builders
8.from cnocr import CnOcr
9.import xlwt

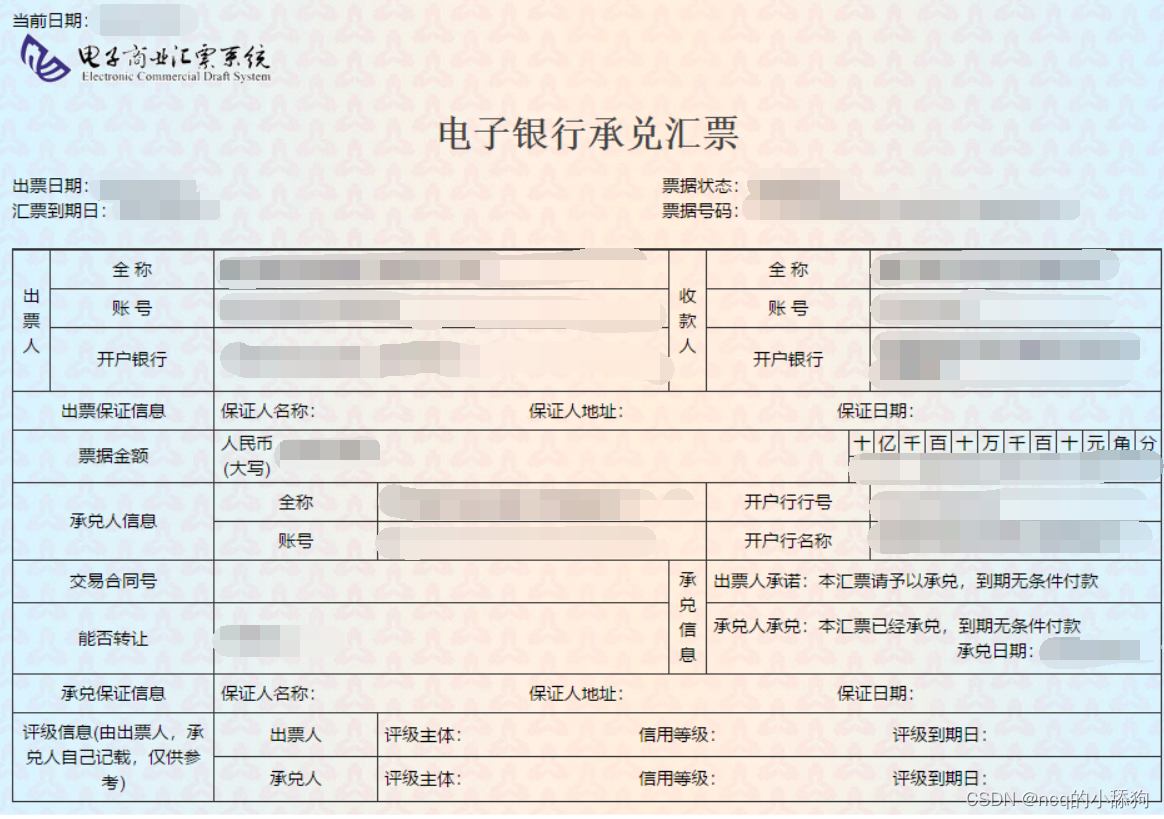
分析上图发现票据金额为“贰拾万元整”,数据金额为大写中文,因此在导入Excel之前我们需要将金额票据的数据转换成数字的格式,基于此,我们需要首先完成大写汉字和数字的转换。
def chineseNumber2Int(strNum: str):
    result = 0
    temp = 1  # 存放一个单位的数字如:十万
    count = 0  # 判断是否有chArr
    cnArr = ['壹', '贰', '叁', '肆', '伍', '陆', '柒', '捌', '玖']
    chArr = ['拾', '佰', '仟', '万', '亿']
    for i in range(len(strNum)):
        b = True
        c = strNum[i]
        for j in range(len(cnArr)):
            if c == cnArr[j]:
                if count != 0:
                    result += temp
                    count = 0
                temp = j + 1
                b = False
                break
        if b:
            for j in range(len(chArr)):
                if c == chArr[j]:
                    if j == 0:
                        temp *= 10
                    elif j == 1:
                        temp *= 100
                    elif j == 2:
                        temp *= 1000
                    elif j == 3:
                        temp *= 10000
                    elif j == 4:
                        temp *= 100000000
                count += 1
        if i == len(strNum) - 1:
            result += temp
    return result
通过上述代码即可实现大写字母与数字的转换,例如输入“贰拾万元整”即可导出“200000”,再将其转换成数字后即可极大地简化表格的操作,也可以在完成表格操作的同时有利于数据归档。
接下来,我们需要分析发票的内部内容,分析下图可知,我们需要获取以下几个数据内容:“出票日期”、“汇票到账日期”、“票据号码”、“收款人”、“票据金额”、“出票人”,可以通过画图软件获取精准定位。
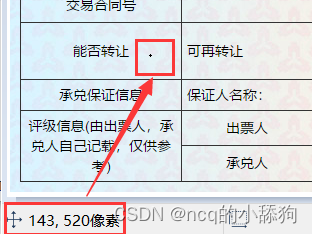
如图,小黑点即鼠标所在地,画图软件左下角即他的坐标。
提取出票日期
def text1(new_img):
    #提取出票日期
    left = 80
    top = 143
    right = 162
    bottom = 162
    image_text1 = new_img.crop((left, top, right, bottom))
    #展示图片
    #image_text1.show()
    txt1 = tool.image_to_string(image_text1)
    print(txt1)
    return str(txt1)
提取金额
def text2(new_img):
    #提取金额
    left = 224
    top = 355
    right = 585
    bottom = 380
    image_text2 = new_img.crop((left, top, right, bottom))
    #展示图片
    #image_text2.show()
    image_text2.save("img/tmp.png")
    temp = ocr.ocr("img/tmp.png")
    temp="".join(temp[0])
    txt2=chineseNumber2Int(temp)
    print(txt2)
    return txt2
提取出票人
def text3(new_img):
    #提取出票人
    left = 177
    top = 207
    right = 506
    bottom = 231
    image_text3 = new_img.crop((left, top, right, bottom))
    #展示图片
    #image_text3.show()
    image_text3.save("img/tmp.png")
    temp = ocr.ocr("img/tmp.png")
    txt3="".join(temp[0])
    print(txt3)
    return txt3
提取付款行
def text4(new_img):
    #提取付款行
    left = 177
    top = 274
    right = 492
    bottom = 311
    image_text4 = new_img.crop((left, top, right, bottom))
    #展示图片
    #image_text4.show()
    image_text4.save("img/tmp.png")
    temp = ocr.ocr("img/tmp.png")
    txt4="".join(temp[0])
    print(txt4)
    return txt4
提取汇票到账日期
def text5(new_img):
    #提取汇票到日期
    left = 92
    top = 166
    right = 176
    bottom = 184
    image_text5 = new_img.crop((left, top, right, bottom))
    #展示图片
    #image_text5.show()
    txt5 = tool.image_to_string(image_text5)
    print(txt5)
    return txt5
提取票据单据
def text6(new_img):
    #提取票据号码
    left = 598
    top = 166
    right = 870
    bottom = 182
    image_text6 = new_img.crop((left, top, right, bottom))
    #展示图片
    #image_text6.show()
    txt6 = tool.image_to_string(image_text6)
    print(txt6)
    return txt6
在将数据全部提取完成之后,即进入设置环节,我们需要首先将所有账单文件进行提取,获取他们的文件名和路径。
ocr=CnOcr()
tool = pyocr.get_available_tools()[0]
filePath='img'
img_name=[]
for i,j,name in os.walk(filePath):
    img_name=name
在获取完整后,即可进行数据导入Excel的操作。
count=1
book = xlwt.Workbook(encoding='utf-8',style_compression=0)
sheet = book.add_sheet('test',cell_overwrite_ok=True)
for i in img_name:
    img_url = filePath+"/"+i
    with open(img_url, 'rb') as f:
        a = f.read()
    new_img = PI.open(io.BytesIO(a))
    ## 写入csv
    col = ('年份','出票日期','金额','出票人','付款行全称','汇票到日期','备注')
    for j in range(0,7):
        sheet.write(0,j,col[j])
    book.save('1.csv')
    shijian=text1(new_img)
    sheet.write(count,0,shijian[0:4])
    sheet.write(count,1,shijian[5:])
    sheet.write(count,2,text2(new_img))
    sheet.write(count,3,text3(new_img))
    sheet.write(count,4,text4(new_img))
    sheet.write(count,5,text5(new_img))
    sheet.write(count,6,text6(new_img))
    count = count + 1
至此,完整流程结束。
附上源码全部
from  wand.image import  Image
from PIL import Image as PI
import pyocr
import io
import re
import os
import shutil
import pyocr.builders
from cnocr import CnOcr
import requests
import xlrd
import xlwt
from openpyxl import load_workbook

def chineseNumber2Int(strNum: str):
    result = 0
    temp = 1  # 存放一个单位的数字如:十万
    count = 0  # 判断是否有chArr
    cnArr = ['壹', '贰', '叁', '肆', '伍', '陆', '柒', '捌', '玖']
    chArr = ['拾', '佰', '仟', '万', '亿']
    for i in range(len(strNum)):
        b = True
        c = strNum[i]
        for j in range(len(cnArr)):
            if c == cnArr[j]:
                if count != 0:
                    result += temp
                    count = 0
                temp = j + 1
                b = False
                break
        if b:
            for j in range(len(chArr)):
                if c == chArr[j]:
                    if j == 0:
                        temp *= 10
                    elif j == 1:
                        temp *= 100
                    elif j == 2:
                        temp *= 1000
                    elif j == 3:
                        temp *= 10000
                    elif j == 4:
                        temp *= 100000000
                count += 1
        if i == len(strNum) - 1:
            result += temp
    return result


def text1(new_img):
    #提取出票日期

    left = 80
    top = 143
    right = 162
    bottom = 162
    image_text1 = new_img.crop((left, top, right, bottom))
    #展示图片
    #image_text1.show()
    txt1 = tool.image_to_string(image_text1)

    print(txt1)
    return str(txt1)
def text2(new_img):
    #提取金额

    left = 224
    top = 355
    right = 585
    bottom = 380
    image_text2 = new_img.crop((left, top, right, bottom))
    #展示图片
    #image_text2.show()
    image_text2.save("img/tmp.png")

    temp = ocr.ocr("img/tmp.png")

    temp="".join(temp[0])
    txt2=chineseNumber2Int(temp)
    print(txt2)

    return txt2

def text3(new_img):
    #提取出票人

    left = 177
    top = 207
    right = 506
    bottom = 231
    image_text3 = new_img.crop((left, top, right, bottom))
    #展示图片
    #image_text3.show()
    image_text3.save("img/tmp.png")

    temp = ocr.ocr("img/tmp.png")
    txt3="".join(temp[0])

    print(txt3)
    return txt3
def text4(new_img):
    #提取付款行

    left = 177
    top = 274
    right = 492
    bottom = 311
    image_text4 = new_img.crop((left, top, right, bottom))
    #展示图片
    #image_text4.show()
    image_text4.save("img/tmp.png")

    temp = ocr.ocr("img/tmp.png")
    txt4="".join(temp[0])

    print(txt4)
    return txt4
def text5(new_img):
    #提取汇票到日期

    left = 92
    top = 166
    right = 176
    bottom = 184
    image_text5 = new_img.crop((left, top, right, bottom))
    #展示图片
    #image_text5.show()
    txt5 = tool.image_to_string(image_text5)

    print(txt5)
    return txt5
def text6(new_img):
    #提取票据号码

    left = 598
    top = 166
    right = 870
    bottom = 182
    image_text6 = new_img.crop((left, top, right, bottom))
    #展示图片
    #image_text6.show()
    txt6 = tool.image_to_string(image_text6)

    print(txt6)
    return txt6


ocr=CnOcr()

tool = pyocr.get_available_tools()[0]

filePath='img'
img_name=[]
for i,j,name in os.walk(filePath):
    img_name=name
count=1

book = xlwt.Workbook(encoding='utf-8',style_compression=0)
sheet = book.add_sheet('test',cell_overwrite_ok=True)

for i in img_name:
    img_url = filePath+"/"+i
    with open(img_url, 'rb') as f:
        a = f.read()
    new_img = PI.open(io.BytesIO(a))
    ## 写入csv
    col = ('年份','出票日期','金额','出票人','付款行全称','汇票到日期','备注')
    for j in range(0,7):
        sheet.write(0,j,col[j])
    book.save('1.csv')
    shijian=text1(new_img)
    sheet.write(count,0,shijian[0:4])
    sheet.write(count,1,shijian[5:])
    sheet.write(count,2,text2(new_img))
    sheet.write(count,3,text3(new_img))
    sheet.write(count,4,text4(new_img))
    sheet.write(count,5,text5(new_img))
    sheet.write(count,6,text6(new_img))
    count = count + 1
以上就是详解如何通过Python实现批量数据提取的详细内容,更多关于Python批量数据提取的资料请关注脚本之家其它相关文章!
相关文章
 这篇文章主要介绍了Python操作Oracle数据库的简单方法和封装类,结合实例形式分析了Python简单连接、查询、关闭Oracle数据库基本操作,并给出了一个Python针对Oracle各种操作的封装类,需要的朋友可以参考下2018-05-05
 今天小编就为大家分享一篇python调用matlab的m自定义函数方法,具有很好的参考价值,希望对大家有所帮助。一起跟随小编过来看看吧2019-02-02
 这篇文章主要介绍了如何基于Python语言实现随机从大量的Excel表格文件中选取一部分数据,并将全部文件中随机获取的数据合并为一个新的Excel表格文件的方法,希望对大家有所帮助2023-05-05
 差分进化算法是广义的遗传算法的一种,核心思想是变异,这篇文章主要为大家介绍的则是著名的scipy库中对差分进化算法的实现,希望对大家有所帮助2023-08-08
pandas.DataFrame.to_json按行转json的方法
今天小编就为大家分享一篇pandas.DataFrame.to_json按行转json的方法,具有很好的参考价值,希望对大家有所帮助。一起跟随小编过来看看吧2018-06-06 今天小编就为大家分享一篇对python中执行DOS命令的3种方法总结,具有很好的参考价值,希望对大家有所帮助一起。一起跟随小编过来看看吧2018-05-05
Python3 循环语句(for、while、break、range等)
这篇文章主要介绍了Python3 循环语句(for、while、break、range等),大家把下面的文章看完就基本上就可以了解了python的循环实现方式了2017-11-11 这篇文章主要给大家介绍了关于pytorch ssim计算的相关资料,结构相似性(SSIM)是一种测量两幅图像的相似度的方法,文中通过代码介绍的非常详细,需要的朋友可以参考下2023-12-12
 在python的输出结果中,尤其是浮点数的输出,当我们需要写入文本文件时,最好是采用统一的输出格式,这样也能够增强结果的可读性,这篇文章主要介绍了控制Python浮点数输出位数的方法,需要的朋友可以参考下2022-04-04
 这篇文章主要介绍了Python高阶函数之filter()函数代码示例,获取了一个序列的时候,想要把一些内容去掉,保留一部分内容的时候可以使用高效的filter()函数,需要的朋友可以参考下2023-07-07


最新评论