
uniapp 使用 tree.js 解决模型加载不出来的问题及解决方法
更新时间:2025年02月11日 09:41:12 作者:hardWork_yulu
本文介绍了在uniapp中使用tree.js时遇到的模型加载不出来的问题,并最终发现是由于缩放问题导致的,通过调用`getFitScaleValue()`方法解决了这个问题,感兴趣的朋友一起看看吧
网上有很多uniapp使用tree.js的教程,但是我在使用测试中,发现tree.js的官方3d模型中有很多加载不出来,但是也没有报错,全网搜也没搜到方法,最后发现是缩放的问题,这里将代码贴出来,关键的方法是getFitScaleValue()这个方法
<template>
<view id="app">
<canvas id="webgl" ref="webgl" canvas-id="webgl" type="webgl"
:style="'width:'+mSceneWidth+'px; height:'+mSceneHeight+'px;'">
</canvas>
</view>
</template>
<script>
import * as THREE from 'three'
import {
OrbitControls
} from 'three/examples/jsm/controls/OrbitControls.js'
import {
GLTFLoader
} from 'three/examples/jsm/loaders/GLTFLoader.js';
import {
FBXLoader
} from 'three/examples/jsm/loaders/FBXLoader.js';
import {
DRACOLoader
} from "three/examples/jsm/loaders/DRACOLoader.js";
import {
OBJLoader
} from "three/examples/jsm/loaders/OBJLoader.js";
export default {
//Soldier
data() {
return {
mSceneWidth: 0, // 手机屏幕宽度
mSceneHeight: 0, // 手机屏幕高度
canvas: null,
worldFocus: null, // 世界焦点(模型放置,相机围绕的中心)
renderer: null,
mCanvasId: null,
scene: null,
mesh: null,
camera: null,
clock: null,
renderAnimFrameId: null, // 渲染帧动画id
controls: null,
timeS: 0,
changeFlag: true,
mixer: null,
previousTime: 0,
modelUrl: "/static/Soldier.glb"
};
},
mounted() {
// uni.createSelectorQuery().in(this).select('#webgl').fields({
// node: true
// }).exec(res=> {
// console.log(JSON.stringify(res))
// this.mCanvasId = res[0].node.id;
// // 注册画布
// const mCanvas = THREE.global.registerCanvas(this.mCanvasId, res[0].node);
// // 开始初始化
// this.init(mCanvas);
// })
},
// 页面加载时
onLoad(option) {
// 获取手机屏幕宽高
this.mSceneWidth = uni.getWindowInfo().windowWidth;
this.mSceneHeight = uni.getWindowInfo().windowHeight;
// 设置世界中心
this.worldFocus = new THREE.Vector3(0, 0, 0);
},
// 页面加载完毕后
onReady() {
this.init()
},
onShow() {
},
onHide() {
this.disposes()
cancelAnimationFrame(this.animate())
},
methods: {
// 在不需要时释放资源
disposes() {
// 释放几何体
this.scene.traverse((object) => {
if (object.geometry) {
object.geometry.dispose();
}
// 释放材质
if (object.material) {
if (Array.isArray(object.material)) {
object.material.forEach(material => material.dispose());
} else {
object.material.dispose();
}
}
});
// 释放渲染器
if (this.renderer) {
this.renderer.dispose();
}
// 清除场景
while (this.scene.children.length > 0) {
this.scene.remove(this.scene.children[0]);
}
},
getFitScaleValue(scene) {
let box=new THREE.BoxGeometry(3,3,3)
let mail=new THREE.MeshBasicMaterial({color:0xff6600})
let mesh=new THREE.Mesh(box,mail)
var boxes = new THREE.Box3().setFromObject( scene );
var maxDiameter = Math.max((boxes.max.x - boxes.min.x), (boxes.max.y - boxes.min.y), (boxes.max.z - boxes.min.z)); //数值越大,模型越小
console.log(maxDiameter)
return Math.ceil(this.mSceneHeight / maxDiameter/4);
},
init() {
// 创建一个场景
this.scene = new THREE.Scene()
//三位坐标线
// const axesHelper = new THREE.AxesHelper(5);
// this.scene.add(axesHelper);
//创建相机对象,45是相机的视角 , 宽高比是屏幕的宽高比 , 最近能看到0.1 , 最远能看到10000
// this.camera = new THREE.OrthographicCamera(-s * k, s * k, s , -s, 1, 1000);
// this.camera.position.set(0, 20, 300);
const lod = new THREE.LOD();
// 创建不同细节级别的几何体
const highDetailGeometry = new THREE.BoxGeometry(1, 1, 1);
const mediumDetailGeometry = new THREE.BoxGeometry(0.5, 0.5, 0.5);
const lowDetailGeometry = new THREE.BoxGeometry(0.25, 0.25, 0.25);
// 创建材质
const material = new THREE.MeshBasicMaterial({
color: 0xff0000
});
// 创建不同细节级别的网格
const highDetailMesh = new THREE.Mesh(highDetailGeometry, material);
const mediumDetailMesh = new THREE.Mesh(mediumDetailGeometry, material);
const lowDetailMesh = new THREE.Mesh(lowDetailGeometry, material);
// 将不同细节级别的网格添加到LOD对象中
lod.addLevel(highDetailMesh, 0); // 距离0
lod.addLevel(mediumDetailMesh, 5); // 距离5
lod.addLevel(lowDetailMesh, 10); // 距离10
this.scene.add(lod);
this.camera = new THREE.PerspectiveCamera(75, this.mSceneWidth / this.mSceneHeight, 0.1, 2000);
//100,300 ,500
this.camera.position.set(0, 0, 5); //设置相机位置
//this.camera.position.set(100, -800, 500);
this.scene.add(this.camera)
this.camera.lookAt(this.scene.position); //设置相机方向(指向的场景对象)
// 执行一个渲染函数
this.rendererGLR()
/* 光源设置*/
this.pointLight()
this.clock = new THREE.Clock()
//创建控件对象
this.change()
//更新轨道控件
let fileName = this.modelUrl.lastIndexOf(".")
let fileFormat = this.modelUrl.substring(fileName + 1, this.modelUrl.length).toLowerCase()
if (fileFormat == 'fbx') {
this.fbxLoader()
} else if (fileFormat == 'glb') {
this.gblLoader()
} else if (fileFormat == 'obj') {
this.objLoader()
}
//this.renderer.render(this.scene, this.camera);
},
pointLight() {
let ambientLight = new THREE.AmbientLight(0xffffff, 1);
this.scene.add(ambientLight);
const directional_light = new THREE.DirectionalLight(0xffffff, 1);
directional_light.position.set(0, 1, 0);
directional_light.castShadow = true;
this.scene.add(directional_light);
let a = 1,
b = 0.6,
c = 10;
let directionalLight1 = new THREE.DirectionalLight(0xffffff, b);
directionalLight1.position.set(-a, -a, a * c).normalize();
let directionalLight2 = new THREE.DirectionalLight(0xffffff, b);
directionalLight2.position.set(a, -a, -a * c).normalize();
let directionalLight3 = new THREE.DirectionalLight(0xffffff, b);
directionalLight3.position.set(-a, a, -a * c).normalize();
let directionalLight4 = new THREE.DirectionalLight(0xffffff, b);
directionalLight4.position.set(a, a, a * c).normalize();
this.scene.add(directionalLight1);
this.scene.add(directionalLight2);
this.scene.add(directionalLight3);
this.scene.add(directionalLight4);
},
//渲染函数
rendererGLR() {
this.$nextTick(() => {
const element = document.getElementById('webgl')
this.canvas = element
this.renderer.setSize(element.clientWidth, element.clientHeight);
element.appendChild(this.renderer.domElement);
})
this.renderer = new THREE.WebGLRenderer({
alpha: true,
antialias: true,
powerPreference: "high-performance",
precision: "mediump"
}); //alpha:true背景透明
this.renderer.setPixelRatio(window.devicePixelRatio * 2);
this.renderer.toneMapping = THREE.ACESFilmicToneMapping;
this.renderer.toneMappingExposure = 1.0;
this.renderer.outputColorSpace = THREE.SRGBColorSpace;
this.renderer.shadowMap.enabled = true;
this.renderer.shadowMap.type = THREE.PCFSoftShadowMap;
},
//创建控件对象
change() {
this.controls = new OrbitControls(this.camera, this.renderer.domElement);
this.controls.minDistance = 300
this.controls.maxDistance = 1000
this.controls.addEventListener('change', () => {
this.renderer.render(this.scene, this.camera);
}); //监听鼠标、键盘事件
//禁止缩放
this.controls.enableZoom = this.changeFlag
//禁止旋转
this.controls.enableRotate = this.changeFlag
//禁止右键拖拽
this.controls.enablePan = this.changeFlag
},
//更新轨道控件
animate() {
if (this.renderer) {
// console.log(this.stats)
// this.stats.update()
let T = this.clock.getDelta()
let renderT = 1 / 30
this.timeS = this.timeS + T
if (this.timeS > renderT) {
this.controls.update();
this.renderer.render(this.scene, this.camera);
this.timeS = 0
}
requestAnimationFrame(this.animate);
if (!this.changeFlag) {
this.controls.autoRotateSpeed = 16
}
this.controls.autoRotate = false // 是否自动旋转
}
//创建一个时钟对象
//this.clock = new THREE.Clock()
//this.scene.rotateY(0.01)
//获得两帧的时间间隔 更新混合器相关的时间
if (this.mixer) {
this.mixer.update(this.clock.getDelta()*100)
}
},
objLoader() {
let that = this
const loader = new OBJLoader();
uni.showLoading({
title: "正在加载"
})
// load a resource
loader.load(
// resource URL
that.modelUrl,
// called when resource is loaded
function(object) {
console.log(object)
uni.hideLoading()
var scale = that.getFitScaleValue(object)
console.log(scale)
object.scale.set(scale, scale, scale);
that.scene.add(object);
setTimeout(function() {
//that.renderer.render(that.scene, that.camera);
that.animate()
}, 1000);
},
// called when loading is in progress
function(xhr) {
console.log((xhr.loaded / xhr.total * 100) + '% loaded');
},
// called when loading has errors
function(error) {
console.log('An error happened');
}
);
},
//导入FBX模型文件
fbxLoader() {
let that = this
const loader = new FBXLoader();
loader.load(this.modelUrl, function(mesh) {
that.scene.add(mesh);
that.ownerInstance.callMethod('onload')
})
},
//导入GLB模型文件
gblLoader() {
uni.showLoading({
title: "正在加载",
})
let that = this
const loader = new GLTFLoader();
const dracoloader = new DRACOLoader();
dracoloader.setDecoderPath("/static/draco/");
loader.setDRACOLoader(dracoloader);
loader.load(that.modelUrl, function(gltf) {
uni.hideLoading()
//that.mesh = gltf.scene
if (gltf.animations.length > 0) {
that.mixer = new THREE.AnimationMixer(gltf.scene)
const action = that.mixer.clipAction(gltf.animations[0])
// 让动画进入播放状态
action.play()
}
var scale = that.getFitScaleValue(gltf.scene)
console.log(scale)
gltf.scene.scale.set(scale, scale, scale);
that.scene.add(gltf.scene);
setTimeout(function() {
//that.renderer.render(that.scene, that.camera);
that.animate()
}, 1000);
}, function(xhr) {
console.log((xhr.loaded / xhr.total * 100) + '% loaded');
}, function(err) {
console.log(err)
});
},
// 触摸开始
// 触摸事件处理
onTouchStart(event) {
const touch = event.touches[0];
const rect = this.canvas.getBoundingClientRect();
const x = touch.clientX - rect.left;
const y = touch.clientY - rect.top;
// 在这里处理触摸开始事件
},
onTouchMove(event) {
const touch = event.touches[0];
const rect = this.canvas.getBoundingClientRect();
const x = touch.clientX - rect.left;
const y = touch.clientY - rect.top;
// 在这里处理触摸移动事件
},
onTouchEnd() {
// 在这里处理触摸结束事件
}
}
}
</script>
<style lang="scss">
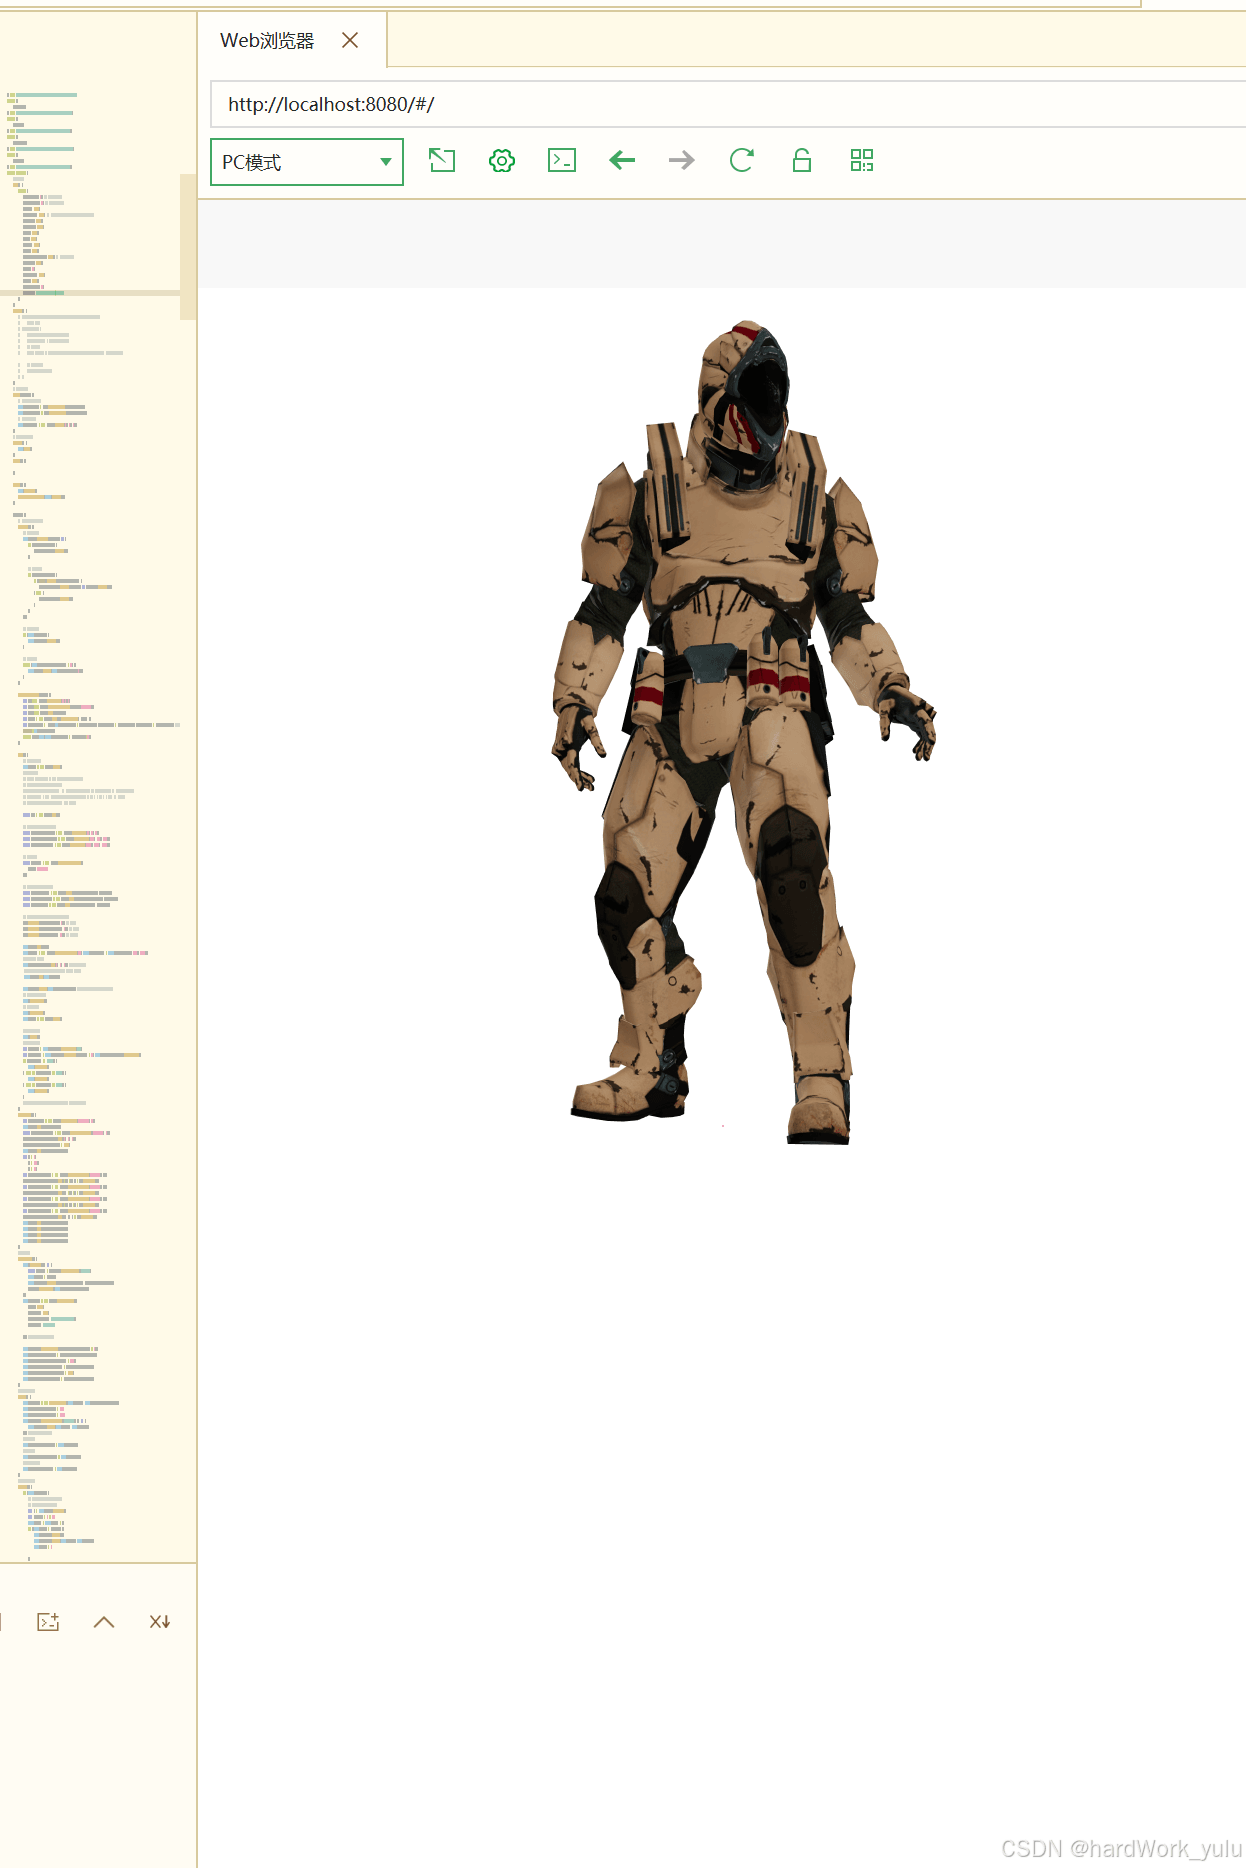
</style>未调用缩放方法,就是空白,调用后:
到此这篇关于uniapp 使用 tree.js 解决模型加载不出来的问题的文章就介绍到这了,更多相关uniapp tree.js 模型加载不出来内容请搜索脚本之家以前的文章或继续浏览下面的相关文章希望大家以后多多支持脚本之家!
相关文章
 这篇文章主要给大家介绍了关于微信小程序实现自定义动画弹框/提示框的相关资料,文中通过示例代码介绍的非常详细,对大家的学习或者工作具有一定的参考学习价值,需要的朋友们下面随着小编来一起学习学习吧2020-11-11
 这篇文章主要为大家详细介绍了原生JS发送异步数据请求的相关资料,具有一定的参考价值,感兴趣的小伙伴们可以参考一下2017-06-06
 动态加载脚本可以有效提升javascript性能,下面有个不错的示例,大家可以参考下2014-02-02
 本文将详细介绍如何使用JavaScript内置的Date对象来创建、操作和比较日期时间,以及如何使用getTime()方法和比较运算符来判断两个日期的大小,感兴趣的朋友跟随小编一起看看吧2025-08-08
javascript full screen 全屏显示页面元素的方法
要想让页面的某个元素全屏显示,就像在网页上看视频的时候,可以全屏观看一样,该怎么实现呢2013-09-09
big.js与bignumber.js的差异、统一配置与避坑技巧完全指南
big.js是一个小巧、快速且易于使用的JavaScript库,专门用于任意精度的十进制算术运算,这篇文章主要介绍了big.js与bignumber.js的差异、统一配置与避坑技巧完全指南,需要的朋友可以参考下2026-01-01 这篇文章主要给大家介绍了如何通过一篇文章弄懂ECMAScript中操作符的相关资料,其中包括一元操作符、布尔操作符、乘性操作符、加性操作符、关系操作符、相等操作符、条件操作符、赋值操作符 以及逗号操作符,需要的朋友可以参考下2021-07-07
javascript 循环语句 while、do-while、for-in、for用法区别
本文章介绍了在学习javascript中的循环语句的用法,包while、do-while、for-in、for它们之间的区别,也是常用的循环语句了,有需要的朋友可以了解一下2012-03-03 这篇文章主要介绍了Javascript控制input输入时间格式的方法,涉及鼠标事件及正则表达式的灵活应用,需要的朋友可以参考下2015-01-01
 在前端开发中总会遇到各种各样需要使用或计算坐标和距离的情况,于是便有了整理记录的想法,即加深了印象,又方便随时查阅。2019-05-05


最新评论