
Ubuntu 16.04 Server Edition安装教程
下载 ubuntu
该教程演示的版本是:ubuntu-16.04-server-amd64
选择语言-English3. 选择操作-Install Ubuntu Server4. 选择安装过程和的默认语言-English
选择区域-other
选择亚洲-Asia
选择国家-China
选择字符集编码-United States
是否扫描和配置键盘,选择否-No
选择键盘类型-English (US)
选择键盘布局-English (US) 选择后等待加载
配置网络,因为内网没开DHCP ,暂时等装完在进行配置 出现该页面选择
设置主机名称(自行设置,这里我设置为“ubuntu”)-Continue
设置用户全名(这里为“xiaxuele”)-Continue
设置登录账号(这里为“xiaxuele”)-Continue;
设置登录密码(空格选择“Show Password in Clear”可以显示密码)-Continue;弱密有提示,为避免麻烦,请设转置复杂密码
重复上一步设置的登录密码-Continue
是否加密home文件夹,选择否-No,等待加载中
配置时钟,选择是-Yes,等待加载
选择分区方式(分区向导-使用整个磁盘)-“Guided - use entire disk and set up LVM”
选择要分区的磁盘(这里只有一块)
是否将变更写入磁盘,选择是-Yes,出现磁盘容量页面,选择继续-continue
磁盘分区选择-NO,这里要把boot分区给删了(出现该页面选择)
选择/boot回车后-delete the partition
完成分区
选择-Yes 等待加载中
选择升级方式,No automatic updates
选择要安装的软件,多加一个OpenSSH Server(空格键选择,tab键移到continue)
是否安装GRUB引导程序,选择是-Yes 等待加载中
完成安装,选择下一步-Continue
相关文章
小米Book Pro 14 2022 锐龙版笔记本重装Win11系统图文方法
小米Book Pro 14 2022 锐龙版笔记本如何使用u启动u盘装机安装win11系统呢?本文就为大家带来了详细的重装系统方法,需要的朋友一起看看吧2023-04-04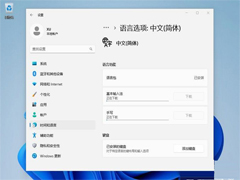 Win11精简版被命名为Tiny11,但是Tiny11 镜像中只有英文这一种语言,如何设置中文呢?本文就为大家带来了详细介绍,需要的朋友一起看看吧2023-03-19
正版Win10如何升级Win11?正版Win10一键升级Win11图文方法
不少用户咨询正版Win10如何升级Win11?其实方法很简单,本文就为大家带来了正版Win10一键升级Win11方法,需要的朋友一起看看吧2023-03-13 有用户使用的Dynabook电脑想要进行Win11系统的安装,但是不知道怎么安装,本文就为大家带来了详细的安装教程,需要的朋友一起看看吧2023-03-13
暗影精灵9Plus如何重装系统?暗影精灵9Plus重装电脑系统的方法
暗影精灵系列的电脑也是很多用户首次购买电脑的第一选择,但是不知道暗影精灵9Plus怎么重装电脑系统,下文就为大家带来了详细介绍,需要的朋友一起看看吧2023-02-10
七彩虹将星X15如何重装Win11系统?七彩虹将星X15重装系统Win11的教程
将星X15是七彩虹一份十分优秀的游戏本,如何去重装Win11系统呢?本文就为大家带来的七彩虹将星X15重装系统Win11的教程,需要的朋友一起看看吧2023-02-02
ThinkPad X13如何用U盘重装系统?ThinkPad X13使用U盘重装系统方法
ThinkPad X13如何用U盘重装系统?其实方法很简单,本文就为大家带来了ThinkPad X13使用U盘重装系统方法,需要的朋友一起看看吧2023-01-04 有用户在使用中的小米Book Pro16笔记本电脑系统是Win10的,最近想要将自己的电脑系统升级到Win11系统来使用,那么如何去进行Win11系统的安装呢2022-12-26
暗影精灵8Pro如何重装Win11系统?暗影精灵8Pro重装Win11系统教程
暗影精灵8Pro是惠普所发布的最新游戏本,不仅在配置上拥有多种选择,而且狂暴模式下能够实现满功耗输出,助力热血玩家畅玩各种主流3A游戏大作,那么这台笔记本应该如何去进2022-12-16
红米Redmi G Pro如何重装Win11?Redmi G Pro重装Win11的方法
Redmi G Pro是红米旗下一款十分优秀的笔记本,如何给这台笔记本重装Win11系统,本文就为大家带来了详细的安装方法,需要的朋友一起看看吧2022-12-12


最新评论