
Fedora 20 安装试用体验全程讲解
5、修改相关的配置文件
首先修改/etc/php.ini:
- 把下面一行的注释去掉 [...]
- cgi.fix_pathinfo=1 [...]
- 然后修改/etc/lighttpd/conf.d/fastcgi.conf配置文件为如下格式: [...]
- server.modules += ( "mod_fastcgi" ) [...]
- 注意fastcgi.server 字段内容如下: [...]
- ## ## PHP Example
- ## For PHP don't forget to set cgi.fix_pathinfo = 1 in the php.ini. ##
- ## The number of php processes you will get can be easily calculated: ##
- ## num-procs = max-procs * ( 1 + PHP_FCGI_CHILDREN ) ##
- ## for the php-num-procs example it means you will get 17*5 = 85 php ## processes. you always should need this high number for your very
- ## busy sites. And if you have a lot of RAM. :) ##
- fastcgi.server += ( ".php" => ((
- "host" => "127.0.0.1", "port" => "9000",
- "broken-scriptfilename" => "enable" ))
- ) #fastcgi.server = ( ".php" =>
- # ( "php-local" => # (
- # "socket" => socket_dir + "/php-fastcgi-1.socket", # "bin-path" => server_root + "/cgi-bin/php5",
- # "max-procs" => 1, # "broken-scriptfilename" => "enable",
- # ) # ),
- # ( "php-tcp" => # (
- # "host" => "127.0.0.1", # "port" => 9999,
- # "check-local" => "disable", # "broken-scriptfilename" => "enable",
- # ) # ),
- # # ( "php-num-procs" =>
- # ( # "socket" => socket_dir + "/php-fastcgi-2.socket",
- # "bin-path" => server_root + "/cgi-bin/php5", # "bin-environment" => (
- # "PHP_FCGI_CHILDREN" => "16", # "PHP_FCGI_MAX_REQUESTS" => "10000",
- # ), # "max-procs" => 5,
- # "broken-scriptfilename" => "enable", # )
- # ), # )
- ), [...]
然后还要激活这个模块,修改配置文件/etc/lighttpd/conf.d/fastcgi.conf
- [...] ## FastCGI (mod_fastcgi)
- ## include "conf.d/fastcgi.conf"
- [...]
就是去掉include "conf.d/fastcgi.conf"前面的注释符号。
下面测试一下php脚本:
- # vi /var/www/lighttpd/info.php <?php
- phpinfo(); ?>
- # systemctl restart lighttpd.service
然后使用浏览器查看如图6 ,大家看红色圈框部分(Server API FPM/FastCGI )

图6 测试一下php脚本
图6显示则表明web服务器可以解析静态页面和php页面(但目前还无法连接mysql数据库)。
下面设置为PHP安装MySQL支持:
php5支持MySQL很简单,只要安装php-mysql软件包即可;但php程序要运行可能需要多个php模块的支持
- # yum install php-mysqlnd php-gd php-imap php-ldap php-odbc php-pear php-xml php-xmlrpc php-magickwand php-mbstring php-mcrypt php-mssql php-shout php-snmp php-soap php-tidy php-opcache
安装完成后重启:
- #systemctl reload php-fpm.service
重新访问浏览器查看安装的php模块 如mysql:(如下图7)

图7 为PHP安装MySQL支持
Unix域Socket通信设置
Unix域Socket因为不走网络,的确可以提高web服务器和php-fpm通信的性能,但在高并发时会不稳定。设置如下:
- vi /etc/php-fpm.d/www.conf 修改为如下内容
- [...] ;listen = 127.0.0.1:9000
- listen = /tmp/php5-fpm.sock [...]
- 然后重启服务: # systemctl reload php-fpm.service
- 下面修改etc/lighttpd/conf.d/fastcgi.conf 文件,修改为如下内容 vi /etc/lighttpd/conf.d/fastcgi.conf
- fastcgi.server += ( ".php" => ((
- "socket" => "/tmp/php5-fpm.sock", "broken-scriptfilename" => "enable"
- )) )
- 然后重启服务: # systemctl restart lighttpd.service
五、简单介绍一下NFS 服务器和客户端设置
这里笔者的安装环境如下:
NFS 服务器端,ip 10.0.0.20 ,计算机名称 www.cjh.net NFS 客户端端,ip 10.0.0.21 ,计算机名称 www.cjh1.netNFS 服务器端配置
安装软件包:
- 安装软件包 #yum -y install nfs-utils
- 修改配置文件: #vi /etc/idmapd.conf
- # line 5: 修改为相对应的名称 Domain = cjh.net
- 修改文件 #vi /etc/exports
- # write like below *note /home 10.0.0.0/24(rw,sync,no_root_squash,no_all_squash)
- # *note /home ? shared directory
- 10.0.0.0/24 ? range of networks NFS permits accesses rw ? writable
- sync ? synchronize no_root_squash ? enable root privilege
- no_all_squash ? enable users' authority 启动相关服务
- # systemctl start rpcbind.service # systemctl start nfs-server.service
- # systemctl start nfs-lock.service # systemctl start nfs-idmap.service
- # systemctl enable rpcbind.service # systemctl enable nfs-server.service
- # systemctl enable nfs-lock.service # systemctl enable nfs-idmap.service
- NFS 客户端端设置: 安装软件包
- # yum -y install nfs-utils 修改配置文件
- # vi /etc/idmapd.conf # line 5: 修改为相对应的名称
- Domain = cjh.net 启动服务
- # systemctl start rpcbind.service # systemctl start nfs-lock.service
- # systemctl start nfs-idmap.service # systemctl start nfs-mountd.service
- # systemctl enable rpcbind.service # systemctl enable nfs-lock.service
- # systemctl enable nfs-idmap.service # systemctl enable nfs-mountd.service
- 挂载磁盘 # mount -t nfs dlp.server.world:/home /home
fedora 20的不足之处
介绍一下 Gnome 开发的软件中心,这个软件中心还在完善当中,所以我打开软件中心,感觉有BUG,一是软件加载很慢,可能是服务器在国外的原因,二是无法添加直接其他软件源。使用界面分成三个部分:全部软件、已经安装、更新。不过目前没有软件课提供更新。

图8 软件中心
这个软件中心设计思路和Ubuntu软件中心相似,不过却没有任何设置选项,笔者使用它首先安装另外一个软件包工具:Gonme Package 后才能设置其他软件源等工作。
总结:
总体感觉Fedora 20的 使用感觉和上个版本Fedora 19变化不大,所以笔者就不多赘述了,大家还是关注2014 年 即将发布的Red Hat Enterprise Linux 7 吧 。
相关文章
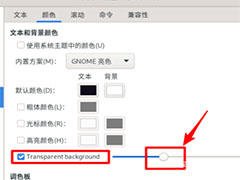
fedora终端怎么自定义透明效果? linux透明效果的设置方法
fedora终端怎么自定义透明效果?fedora系统想要设置透明效果,该怎么设置呢?透明效果看上去很好看,下面我们就来看看linux透明效果的设置方法2021-10-09
Fedora音量很小怎么办? Fedora音量调到最大声音还是小的解决办法
Fedora音量很小怎么办?Fedora系统把声音开到最大还是很小,想要调大一些音量,该怎么办你额?下面我们就来看看Fedora音量调到最大声音还是小的解决办法2021-07-12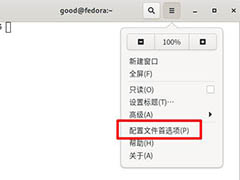
Fedora怎么设置主菜单快捷键? Fedora快捷键的设置方法
Fedora怎么设置主菜单快捷键?Fedora系统中疆场使用主菜单,想要给主菜单添加快捷键,方便操作,该怎么添加呢?下面我们就来看看Fedora快捷键的设置方法,详细请看下文介绍2021-07-12
Fedora怎么设置图标主题? Linux系统图标主题的设置方法
Fedora怎么设置图标主题?Fedora系统想要设置自己细化的图标主题,该怎么设置呢?下面我们就来看看Linux系统图标主题的设置方法,详细请看下文介绍2021-06-11
Fedora文件历史记录怎么开启? Fedora历史记录的显示方法
Fedora文件历史记录怎么开启?Fedora中想要显示历史记录,该怎么显示呢?下面我们就来看看Fedora历史记录的显示方法,需要的朋友可以参考下2021-02-26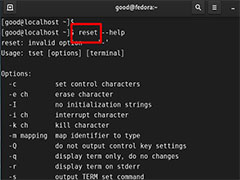 Linux怎么清屏?Linux中想要进行复位清屏,该怎么操作呢?下面我们就来看看Fedora终端复位清屏的两种方法,需要的朋友可以参考下2021-02-26
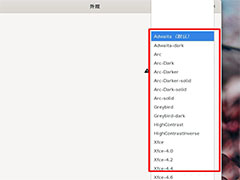
Fedora系统外观怎么设置? Fedora Linux外观主题设置技巧
Fedora系统外观怎么设置?Fedora系统想要设置外观主题,该怎么设置呢?下面我们就来看看Fedora Linux外观主题设置技巧,需要的朋友可以参考下2021-02-07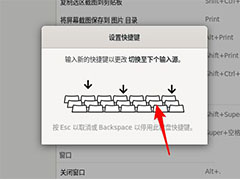 Fedora输入法切换快捷键怎么更改?想要设置设置输入法切换快捷键,该怎么自己设置成常用的键呢?下面我们就来看看详细的教程,需要的朋友可以参考下2021-02-07
 Fedora系统怎么设置打开新终端时默认打开新标签页?Fedora系统想要设置默认打开新的标签页,该怎么设置呢?下面我们就来看看详细的教程,需要的朋友可以参考下2021-02-04
Fedora怎样设置锁屏时显示通知内容? Fedora打开锁屏通知的技巧
Fedora怎样设置锁屏时显示通知内容?Fedora自动锁屏后如果有消息通知,想要直接显示,该怎么设置呢?下面我们就来看看Fedora锁屏后显示通知的技巧,需要的朋友可以参考下2021-01-22


最新评论