

python使用django调用deepseek api搭建ai网站
更新时间:2025年02月26日 10:23:50 作者:陈王卜
DeepSeek是一家人工智能公司,致力于通过创新的技术和算法,推动人工智能领域的发展,本文给大家介绍了python使用django调用deepseek api搭建ai网站,文中有相关的代码示例供大家参考,感兴趣的小伙伴跟着小编一起来看看吧
一、deepseek简介
DeepSeek是一家人工智能公司,专注于开发先进的人工智能模型和技术。以下是关于DeepSeek的一些详细介绍:
1.公司背景
DeepSeek由杭州深度求索人工智能基础技术研究有限公司开发,致力于通过创新的技术和算法,推动人工智能领域的发展。
2.技术与模型
- DeepSeek-V3:这是DeepSeek开发的一个大型语言模型,具有超过600B的参数,在多项性能指标上与国际顶尖模型相当。
- DeepSeek-R1:这是DeepSeek的第一代推理模型,通过大规模强化学习(RL)进行训练,展示出了在推理任务上的优异性能。
- DeepSeek-R1-Distill:这些是从DeepSeek-R1中蒸馏出的小模型,具有更好的性能和效率,适合在资源受限的环境中使用。
3.应用领域
- 自然语言处理:DeepSeek的模型在文本生成、知识问答、推理等任务中表现出色,能够为用户提供高质量的语言交互服务。
- 智能助手:DeepSeek开发了AI智能助手,可用于搜索、写作、阅读、解题、翻译等多种任务,帮助用户提高效率。
4.优势与特点
- 成本优势:DeepSeek的模型训练成本低,调用接口成本也较低,具有较高的性价比。
- 中文处理能力强:对中文语法、成语、文化背景理解更深入,在中文文本生成、摘要、情感分析等任务中表现自然。
- 开源优势:DeepSeek-R1模型权重和技术报告开源,便于开发者二次开发和创新。
5.产品与服务
- DeepSeek API:提供与OpenAI兼容的API,方便开发者将DeepSeek的模型集成到自己的应用中。
- DeepSeek App:提供AI智能助手应用,可在App Store上下载,支持多种功能,如智能对话、搜索、写作等。
二、获取apikey
deepseek官方的api暂时无法充值,我使用的是阿里云的百炼平台的deepseek v1模型,阿里云百炼平台注册送百万token,可以白嫖。打开百炼控制台,开通服务,随便选择一个模型,点击右上角的“查看我的apikey”,获取apikey。
三、创建django项目,并startapp
使用django创建一个新的项目,python manage.py startapp chat新建app作为主要代码文件夹。
四、编写代码
chat\views.py
from django.shortcuts import render
from openai import OpenAI
import os
from django.conf import settings


def get_ai_response(messages):
client = OpenAI(
api_key="xxx",//填写apikey
base_url="https://dashscope.aliyuncs.com/compatible-mode/v1",
)


try:
    completion = client.chat.completions.create(
        model="qwen2.5-14b-instruct-1m",
        messages=messages
    )
    return {
        'content': completion.choices[0].message.content,
        'reasoning': getattr(completion.choices[0].message, 'reasoning_content', '')
    }
except Exception as e:
    return {
        'content': f"发生错误:{str(e)}",
        'reasoning': ''
    }

def chat_view(request):
if 'messages' not in request.session:
request.session['messages'] = []


if request.method == 'POST':
    user_message = request.POST.get('message', '')
    if user_message:
        request.session['messages'].append({'role': 'user', 'content': user_message})

        response = get_ai_response(request.session['messages'])

        request.session['messages'].append({
            'role': 'assistant',
            'content': response['content'],
            'reasoning': response['reasoning']
        })

        request.session.modified = True

return render(request, 'chat.html', {
    'messages': request.session['messages']
})
要将api_key="xxx"中xxx替换为自己的apikey。
urls.py
from django.contrib import admin
from django.urls import path
from chat import views

urlpatterns = [
    path('admin/', admin.site.urls),
    path('', views.chat_view, name='chat'),
]
前端代码
<!DOCTYPE html>
<html>
<head>
    <title>AI对话助手(Markdown支持版)</title>
    <!-- Markdown 渲染依赖 -->
    <link rel="stylesheet" href="https://cdn.jsdelivr.net/npm/github-markdown-css@5.2.0/github-markdown.min.css" rel="external nofollow" >
    <link rel="stylesheet" href="https://cdnjs.cloudflare.com/ajax/libs/highlight.js/11.7.0/styles/github-dark.min.css" rel="external nofollow" >
    <style>
        :root {
            --user-color: #1a73e8;
            --assistant-color: #0b8043;
        }
        body {
            max-width: 800px;
            margin: 0 auto;
            padding: 20px;
            font-family: -apple-system, BlinkMacSystemFont, "Segoe UI", Roboto, sans-serif;
            background-color: #f8f9fa;
        }
        .chat-container {
            background: white;
            border-radius: 12px;
            box-shadow: 0 2px 8px rgba(0,0,0,0.1);
            padding: 20px;
            margin-bottom: 20px;
        }
        .message {
            margin: 15px 0;
            padding: 12px 16px;
            border-radius: 8px;
        }
        .user-message {
            background-color: #e8f0fe;
            border: 1px solid var(--user-color);
            margin-left: 30px;
        }
        .assistant-message {
            background-color: #e6f4ea;
            border: 1px solid var(--assistant-color);
            margin-right: 30px;
        }
        .role-label {
            font-weight: 500;
            margin-bottom: 8px;
            display: flex;
            align-items: center;
            gap: 8px;
        }
        .role-label::before {
            content: '';
            display: inline-block;
            width: 12px;
            height: 12px;
            border-radius: 50%;
        }
        .user-message .role-label::before {
            background: var(--user-color);
        }
        .assistant-message .role-label::before {
            background: var(--assistant-color);
        }
        form {
            display: flex;
            gap: 10px;
            margin-top: 20px;
        }
        input[type="text"] {
            flex: 1;
            padding: 12px;
            border: 1px solid #ddd;
            border-radius: 8px;
            font-size: 16px;
        }
        button {
            padding: 12px 24px;
            background-color: var(--user-color);
            color: white;
            border: none;
            border-radius: 8px;
            cursor: pointer;
            transition: background 0.2s;
        }
        button:hover {
            background-color: #1557b0;
        }
        .markdown-body pre {
            padding: 16px;
            border-radius: 8px;
            overflow-x: auto;
        }
        .reasoning-box {
            margin-top: 12px;
            padding: 12px;
            background: #fff8e5;
            border-left: 4px solid #ffd700;
            border-radius: 4px;
        }
    </style>
</head>
<body>
    <div class="chat-container">
        <h1 style="color: var(--user-color); text-align: center;">AI对话助手</h1>

        <div class="messages">
            {% for message in messages %}
                <div class="message {% if message.role == 'user' %}user-message{% else %}assistant-message{% endif %}">
                    <div class="role-label">
                        {% if message.role == 'user' %}
                            👤 用户
                        {% else %}
                            🤖 助手
                        {% endif %}
                    </div>
                    <!-- Markdown 内容容器 -->
                    <div class="markdown-body"
                         data-markdown="{{ message.content|escape }}"
                         data-raw="{{ message.content|escape }}">
                        {{ message.content|safe }}
                    </div>

                    {% if message.reasoning %}
                    <div class="reasoning-box">
                        <div class="reasoning-label">💡 思考过程</div>
                        <div class="markdown-body"
                             data-markdown="{{ message.reasoning|escape }}"
                             data-raw="{{ message.reasoning|escape }}">
                            {{ message.reasoning|safe }}
                        </div>
                    </div>
                    {% endif %}
                </div>
            {% endfor %}
        </div>

        <form method="post">
            {% csrf_token %}
            <input type="text" name="message" placeholder="请输入您的问题..." required autofocus>
            <button type="submit">发送</button>
        </form>
    </div>

    <!-- 依赖库 -->
    <script src="https://cdn.jsdelivr.net/npm/marked@12.0.0/lib/marked.min.js"></script>
    <script src="https://cdn.jsdelivr.net/npm/dompurify@3.0.5/dist/purify.min.js"></script>
    <script src="https://cdnjs.cloudflare.com/ajax/libs/highlight.js/11.7.0/highlight.min.js"></script>

    <script>
        // 初始化配置
        marked.setOptions({
            breaks: true,
            highlight: (code, lang) => {
                const language = hljs.getLanguage(lang) ? lang : 'plaintext';
                return hljs.highlight(code, { language }).value;
            }
        });

        // Markdown 渲染函数
        const renderMarkdown = () => {
            document.querySelectorAll('.markdown-body').forEach(container => {
                try {
                    // 优先使用 data-markdown 属性
                    const raw = container.dataset.markdown || container.dataset.raw;
                    const clean = DOMPurify.sanitize(raw, {
                        ALLOWED_TAGS: ['b', 'i', 'em', 'strong', 'code', 'pre', 'blockquote',
                                     'ul', 'ol', 'li', 'h1', 'h2', 'h3', 'a', 'p', 'br', 'hr'],
                        ALLOWED_ATTR: ['href', 'target']
                    });
                    container.innerHTML = marked.parse(clean);
                } catch (e) {
                    console.error('Markdown渲染失败:', e);
                    container.innerHTML = container.dataset.raw;
                }
            });

            // 触发代码高亮
            hljs.highlightAll();
        };

        // 确保依赖加载完成后执行
        const checkDependencies = () => {
            if (window.marked && window.DOMPurify && window.hljs) {
                renderMarkdown();
            } else {
                setTimeout(checkDependencies, 100);
            }
        };

        // 启动渲染流程
        document.addEventListener('DOMContentLoaded', checkDependencies);
    </script>
</body>
</html>
迁移数据库
python manage.py makemigrations
python manage.py migrate
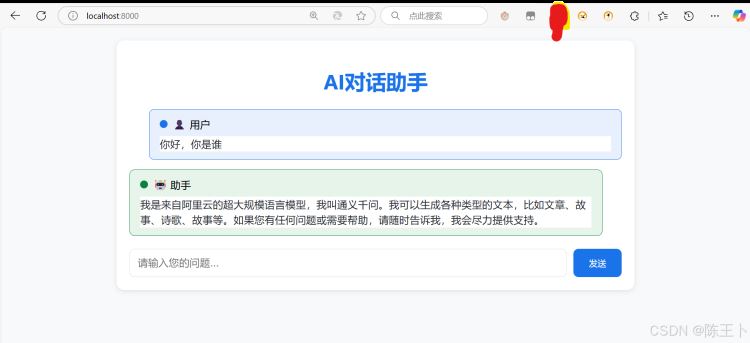
五、效果展示
六、将模型切换为deepseek
切换模型只要修改model="qwen2.5-14b-instruct-1m"为deepseek.
到此这篇关于python使用django调用deepseek api搭建ai网站的文章就介绍到这了,更多相关django deepseek api搭建ai网站内容请搜索脚本之家以前的文章或继续浏览下面的相关文章希望大家以后多多支持脚本之家!
相关文章

Python线程池ThreadPoolExecutor使用方式
这篇文章主要介绍了Python线程池ThreadPoolExecutor使用方式,具有很好的参考价值,希望对大家有所帮助,如有错误或未考虑完全的地方,望不吝赐教2024-02-02 这篇文章主要介绍了Django csrf校验的实现,文中通过示例代码介绍的非常详细,对大家的学习或者工作具有一定的参考学习价值,需要的朋友们下面随着小编来一起学习学习吧2021-05-05
 在Python编程中,合理选择数据类型是编写高效、可维护代码的关键,本文将对Python中常用的几种数据类型进行全面对比分析,帮助读者更好地理解它们的特性,并做出明智的选择2025-09-09
 这篇文章主要介绍了Python中Random和Math模块学习笔记,本文讲解了math模块的数学常量、常用简单函数、三角函数等,讲解了random模块的常用函数、随机挑选和排序等内容,需要的朋友可以参考下2015-05-05
 anaconda是一个非常好用的python发行版本,其中包含了大部分常用的库,下面这篇文章主要给大家介绍了关于升级anaconda中python到3.10版本的简单步骤,需要的朋友可以参考下2024-03-03
python检测文件夹变化,并拷贝有更新的文件到对应目录的方法
今天小编就为大家分享一篇python检测文件夹变化,并拷贝有更新的文件到对应目录的方法。具有很好的参考价值,希望对大家有所帮助。一起跟随小编过来看看吧2018-10-10 今天小编就为大家分享一篇python Tcp协议发送和接收信息的例子,具有很好的参考价值,希望对大家有所帮助。一起跟随小编过来看看吧2019-07-07
 在本篇内容里小编给大家分享的是关于python如何判断模块是否安装的技术文章,有兴趣的朋友们可以参考下。2020-06-06
 下面小编就为大家分享一篇python多维数组切片方法,具有很好的参考价值,希望对大家有所帮助。一起跟随小编过来看看吧2018-04-04
 这篇文章主要介绍了Pycharm中切换pytorch的环境和配置,本文给大家介绍的非常详细,对大家的工作或学习具有一定的参考借鉴价值,需要的朋友可以参考下2020-03-03
最新评论