
TensorFlow安装CPU版本和GPU版本的实现步骤
前言
下载的Anaconda是Anaconda3-2024.02-1-Windows-x86_64版本
一、TensorFlow安装CPU版本
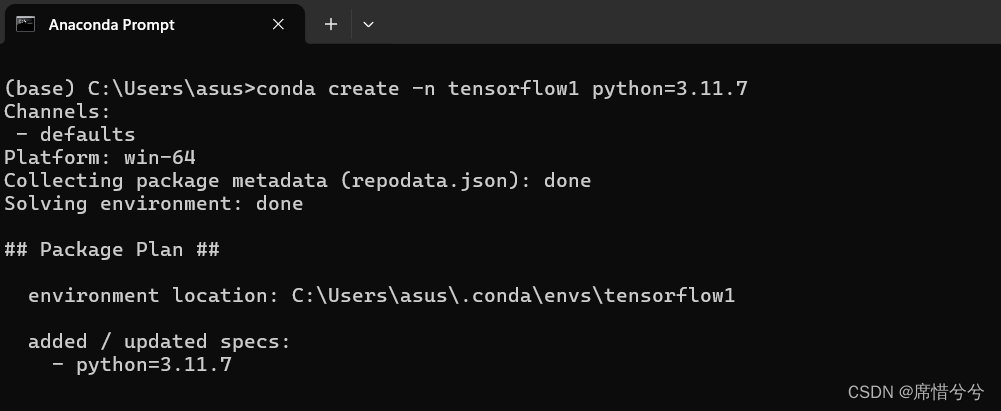
本例子,下载的Python版本为3.11.7和tensorflow版本为2.16.1
1.新建虚拟环境
打开Anaconda Prompt,输入
conda create -n myenvname python=3.11.7
“myenvname”为自己的虚拟环境名字
2.激活虚拟环境
继续输入
activate myenvname
“myenvname”为自己的虚拟环境名字

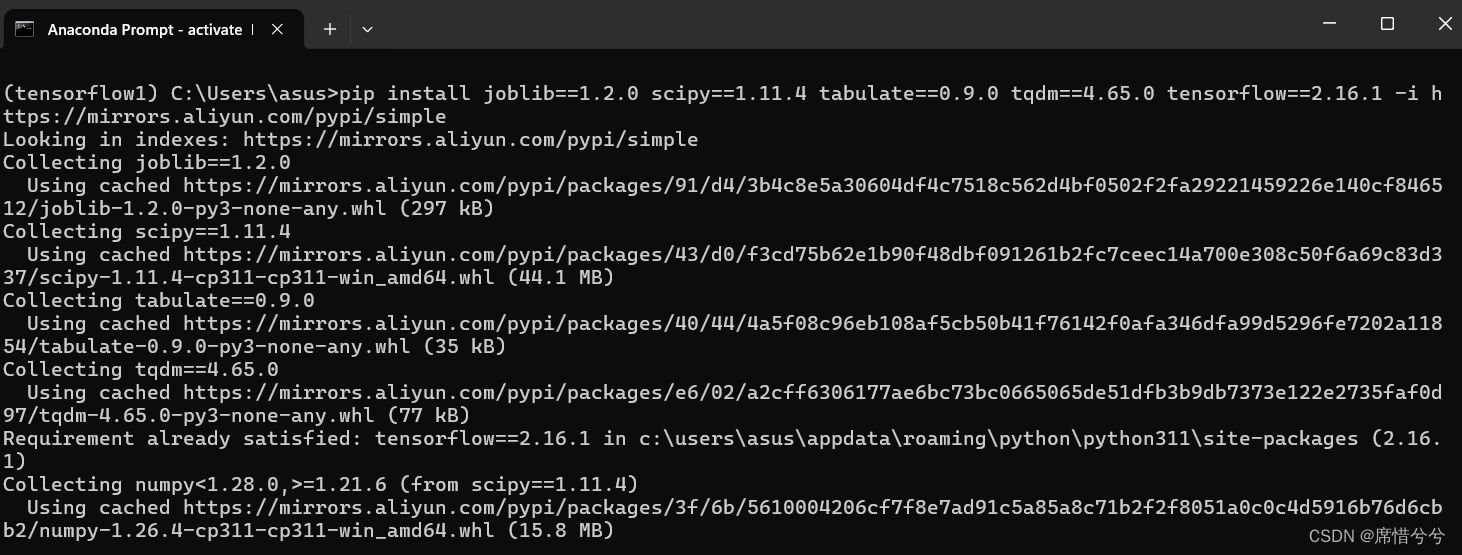
3.下载tensorflow
直接安装tensorflow会遇到以下报错,这是提示有一些依赖没有安装
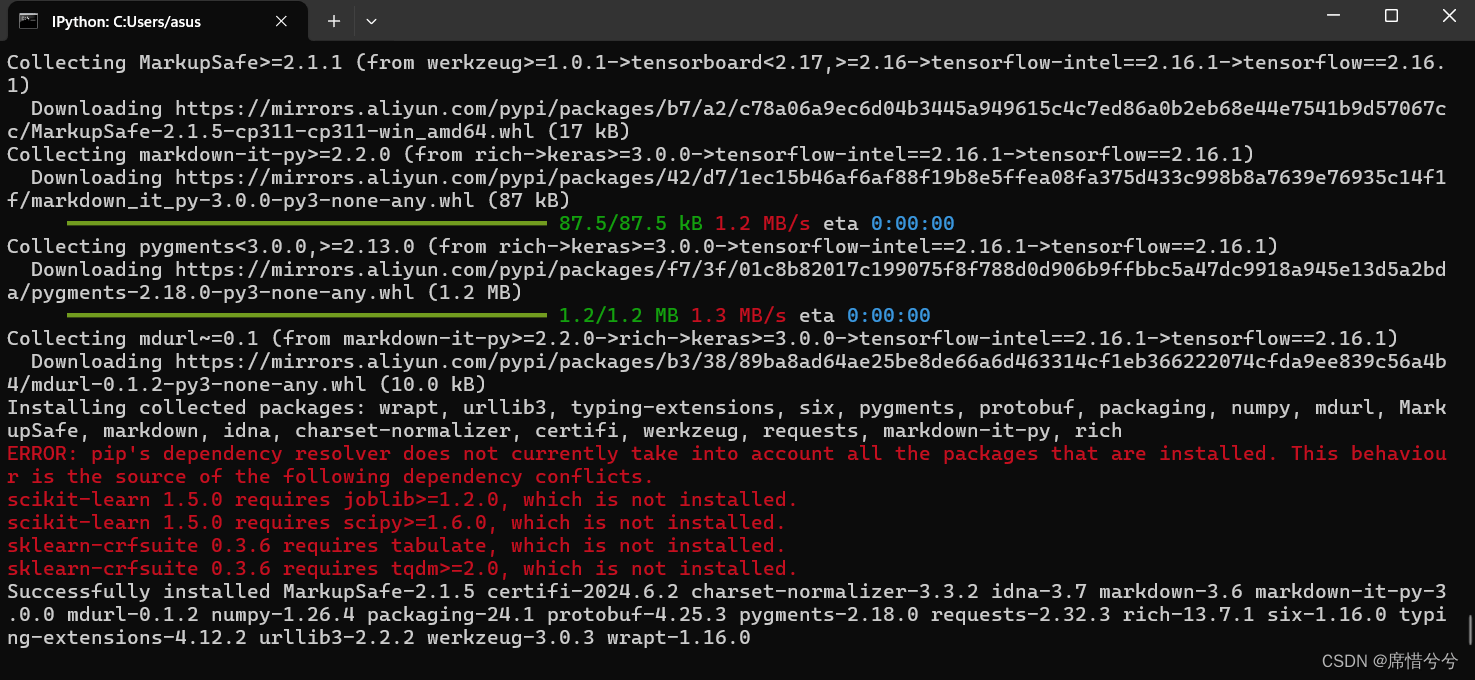
所以我先安装了依赖再下载tensorflow
pip install joblib==1.2.0 scipy==1.11.4 tabulate==0.9.0 tqdm==4.65.0 tensorflow==2.16.1 -i https://mirrors.aliyun.com/pypi/simple
4.验证是否下载成功
输入ipython,进入交互环境(要是报错,那可能是没有ipython,可以pip list查看一下,没有的话需要下载一个)
导入tensorflow
import tensorflow as tf
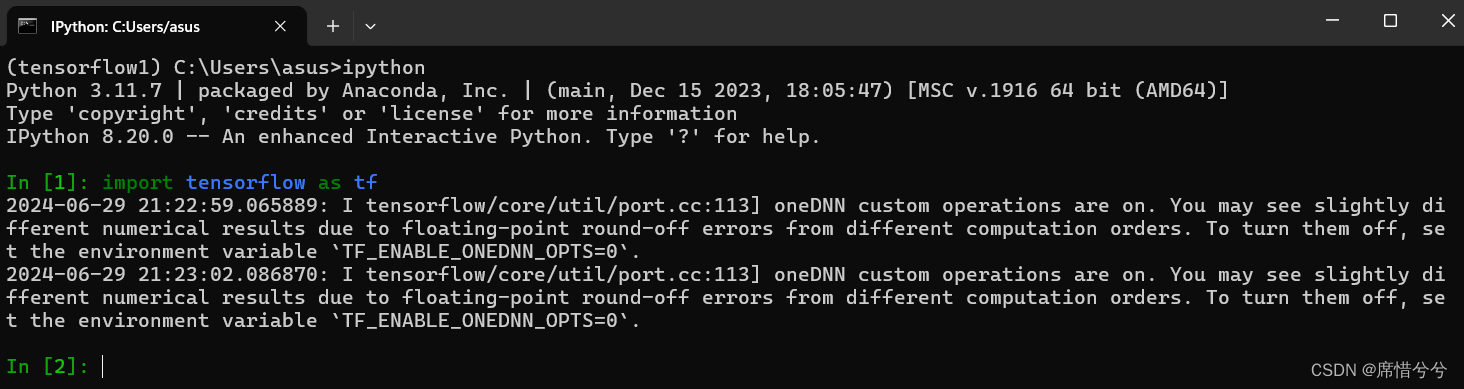
成功
二、TensorFlow安装GPU版本
本例子,下载的CUDA版本是11.5.2,cuDNN的版本是8.3.2,Python环境是3.9,tensorflow-gpu的版本是2.7.0。注:CUDA、cuDNN、python的环境要对应,不然会安装失败(很重要!!!)。
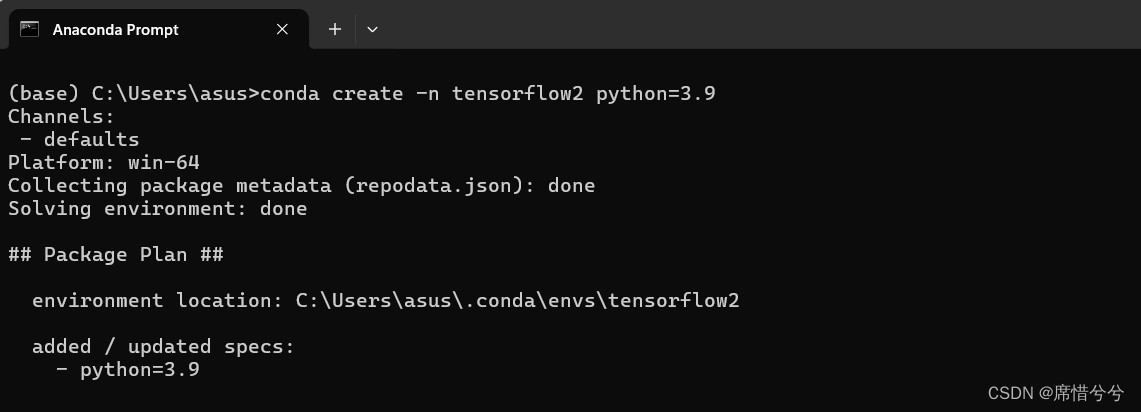
1.新建虚拟环境
打开Anaconda Prompt,输入
conda create -n myenvname python=3.9
“myenvname”为自己的虚拟环境名字
2.激活虚拟环境
activate myenvname
“myenvname”为自己的虚拟环境名字

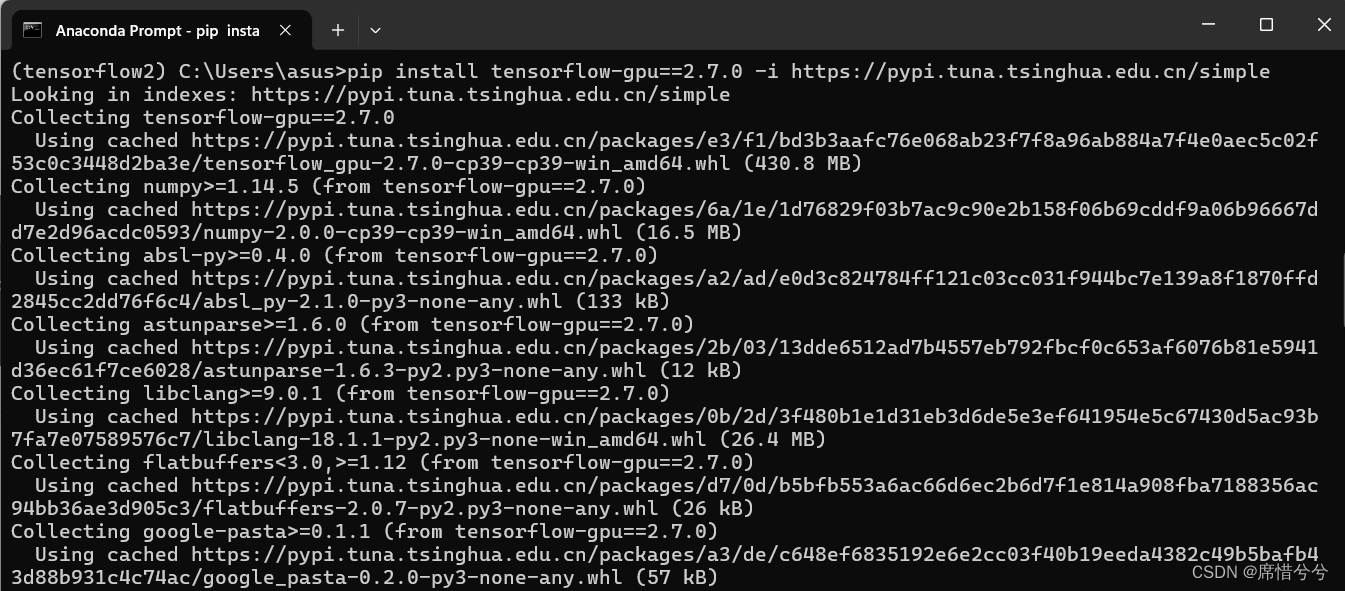
3.安装tensorflow-gpu
pip install tensorflow-gpu==2.7.0 -i https://pypi.tuna.tsinghua.edu.cn/simple
4.验证是否下载成功
进入python环境,导入tensorflow
import tensorflow as tf
要是遇到这个问题,提示protobuf版本过低
(tensorflow2) C:\Users\asus>python
Python 3.9.19 (main, May  6 2024, 20:12:36) [MSC v.1916 64 bit (AMD64)] on win32
Type "help", "copyright", "credits" or "license" for more information.
>>> import tensorflow as tf
Traceback (most recent call last):
  File "<stdin>", line 1, in <module>
  File "C:\Users\asus\.conda\envs\tensorflow2\lib\site-packages\tensorflow\__init__.py", line 41, in <module>
    from tensorflow.python.tools import module_util as _module_util
  File "C:\Users\asus\.conda\envs\tensorflow2\lib\site-packages\tensorflow\python\__init__.py", line 41, in <module>
    from tensorflow.python.eager import context
  File "C:\Users\asus\.conda\envs\tensorflow2\lib\site-packages\tensorflow\python\eager\context.py", line 33, in <module>
    from tensorflow.core.framework import function_pb2
  File "C:\Users\asus\.conda\envs\tensorflow2\lib\site-packages\tensorflow\core\framework\function_pb2.py", line 16, in <module>
    from tensorflow.core.framework import attr_value_pb2 as tensorflow_dot_core_dot_framework_dot_attr__value__pb2
  File "C:\Users\asus\.conda\envs\tensorflow2\lib\site-packages\tensorflow\core\framework\attr_value_pb2.py", line 16, in <module>
    from tensorflow.core.framework import tensor_pb2 as tensorflow_dot_core_dot_framework_dot_tensor__pb2
  File "C:\Users\asus\.conda\envs\tensorflow2\lib\site-packages\tensorflow\core\framework\tensor_pb2.py", line 16, in <module>
    from tensorflow.core.framework import resource_handle_pb2 as tensorflow_dot_core_dot_framework_dot_resource__handle__pb2
  File "C:\Users\asus\.conda\envs\tensorflow2\lib\site-packages\tensorflow\core\framework\resource_handle_pb2.py", line 16, in <module>
    from tensorflow.core.framework import tensor_shape_pb2 as tensorflow_dot_core_dot_framework_dot_tensor__shape__pb2
  File "C:\Users\asus\.conda\envs\tensorflow2\lib\site-packages\tensorflow\core\framework\tensor_shape_pb2.py", line 36, in <module>
    _descriptor.FieldDescriptor(
  File "C:\Users\asus\.conda\envs\tensorflow2\lib\site-packages\google\protobuf\descriptor.py", line 553, in __new__
    _message.Message._CheckCalledFromGeneratedFile()
TypeError: Descriptors cannot be created directly.
If this call came from a _pb2.py file, your generated code is out of date and must be regenerated with protoc >= 3.19.0.
If you cannot immediately regenerate your protos, some other possible workarounds are:
 1. Downgrade the protobuf package to 3.20.x or lower.
 2. Set PROTOCOL_BUFFERS_PYTHON_IMPLEMENTATION=python (but this will use pure-Python parsing and will be much slower).

More information: https://developers.google.com/protocol-buffers/docs/news/2022-05-06#python-updates
>>>
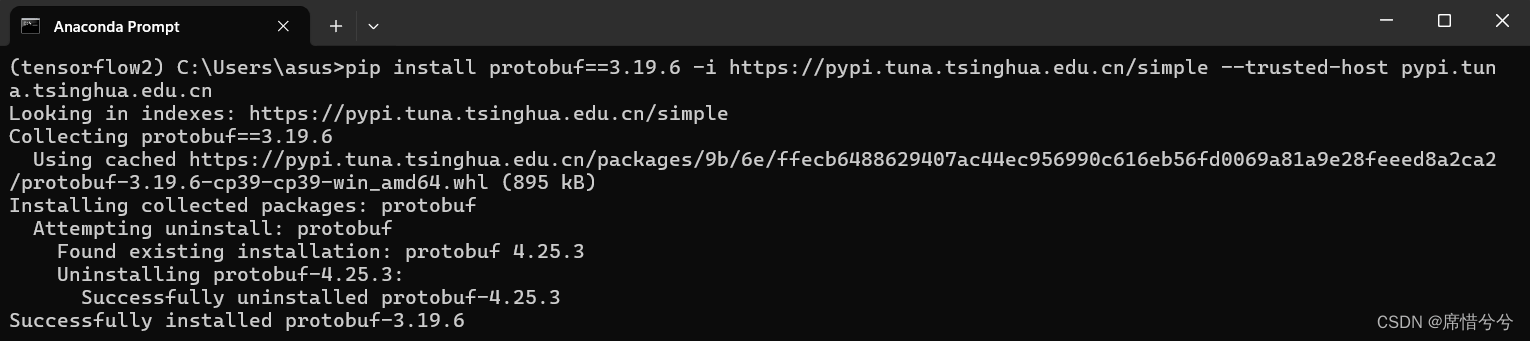
输入exit()退出python环境,回到虚拟环境
pip install protobuf==3.19.6 -i https://pypi.tuna.tsinghua.edu.cn/simple --trusted-host pypi.tuna.tsinghua.edu.cn
再次进入python环境,输入“import tensorflow as tf”,要是遇到如下问题,提示TensorFlow与NumPy的版本不兼容
(tensorflow2) C:\Users\asus>python
Python 3.9.19 (main, May  6 2024, 20:12:36) [MSC v.1916 64 bit (AMD64)] on win32
Type "help", "copyright", "credits" or "license" for more information.
>>> import tensorflow as tf

A module that was compiled using NumPy 1.x cannot be run in
NumPy 2.0.0 as it may crash. To support both 1.x and 2.x
versions of NumPy, modules must be compiled with NumPy 2.0.
Some module may need to rebuild instead e.g. with 'pybind11>=2.12'.

If you are a user of the module, the easiest solution will be to
downgrade to 'numpy<2' or try to upgrade the affected module.
We expect that some modules will need time to support NumPy 2.

Traceback (most recent call last):  File "<stdin>", line 1, in <module>
  File "C:\Users\asus\.conda\envs\tensorflow2\lib\site-packages\tensorflow\__init__.py", line 41, in <module>
    from tensorflow.python.tools import module_util as _module_util
  File "C:\Users\asus\.conda\envs\tensorflow2\lib\site-packages\tensorflow\python\__init__.py", line 41, in <module>
    from tensorflow.python.eager import context
  File "C:\Users\asus\.conda\envs\tensorflow2\lib\site-packages\tensorflow\python\eager\context.py", line 38, in <module>
    from tensorflow.python.client import pywrap_tf_session
  File "C:\Users\asus\.conda\envs\tensorflow2\lib\site-packages\tensorflow\python\client\pywrap_tf_session.py", line 23, in <module>
    from tensorflow.python.client._pywrap_tf_session import *
AttributeError: _ARRAY_API not found

A module that was compiled using NumPy 1.x cannot be run in
NumPy 2.0.0 as it may crash. To support both 1.x and 2.x
versions of NumPy, modules must be compiled with NumPy 2.0.
Some module may need to rebuild instead e.g. with 'pybind11>=2.12'.

If you are a user of the module, the easiest solution will be to
downgrade to 'numpy<2' or try to upgrade the affected module.
We expect that some modules will need time to support NumPy 2.

Traceback (most recent call last):  File "<stdin>", line 1, in <module>
  File "C:\Users\asus\.conda\envs\tensorflow2\lib\site-packages\tensorflow\__init__.py", line 41, in <module>
    from tensorflow.python.tools import module_util as _module_util
  File "C:\Users\asus\.conda\envs\tensorflow2\lib\site-packages\tensorflow\python\__init__.py", line 46, in <module>
    from tensorflow.python import data
  File "C:\Users\asus\.conda\envs\tensorflow2\lib\site-packages\tensorflow\python\data\__init__.py", line 25, in <module>
    from tensorflow.python.data import experimental
  File "C:\Users\asus\.conda\envs\tensorflow2\lib\site-packages\tensorflow\python\data\experimental\__init__.py", line 98, in <module>
    from tensorflow.python.data.experimental import service
  File "C:\Users\asus\.conda\envs\tensorflow2\lib\site-packages\tensorflow\python\data\experimental\service\__init__.py", line 374, in <module>
    from tensorflow.python.data.experimental.ops.data_service_ops import distribute
  File "C:\Users\asus\.conda\envs\tensorflow2\lib\site-packages\tensorflow\python\data\experimental\ops\data_service_ops.py", line 27, in <module>
    from tensorflow.python.data.experimental.ops import compression_ops
  File "C:\Users\asus\.conda\envs\tensorflow2\lib\site-packages\tensorflow\python\data\experimental\ops\compression_ops.py", line 20, in <module>
    from tensorflow.python.data.util import structure
  File "C:\Users\asus\.conda\envs\tensorflow2\lib\site-packages\tensorflow\python\data\util\structure.py", line 26, in <module>
    from tensorflow.python.data.util import nest
  File "C:\Users\asus\.conda\envs\tensorflow2\lib\site-packages\tensorflow\python\data\util\nest.py", line 40, in <module>
    from tensorflow.python.framework import sparse_tensor as _sparse_tensor
  File "C:\Users\asus\.conda\envs\tensorflow2\lib\site-packages\tensorflow\python\framework\sparse_tensor.py", line 28, in <module>
    from tensorflow.python.framework import constant_op
  File "C:\Users\asus\.conda\envs\tensorflow2\lib\site-packages\tensorflow\python\framework\constant_op.py", line 29, in <module>
    from tensorflow.python.eager import execute
  File "C:\Users\asus\.conda\envs\tensorflow2\lib\site-packages\tensorflow\python\eager\execute.py", line 27, in <module>
    from tensorflow.python.framework import dtypes
  File "C:\Users\asus\.conda\envs\tensorflow2\lib\site-packages\tensorflow\python\framework\dtypes.py", line 30, in <module>
    from tensorflow.python.lib.core import _pywrap_bfloat16
AttributeError: _ARRAY_API not found
ImportError: numpy.core._multiarray_umath failed to import
ImportError: numpy.core.umath failed to import
Traceback (most recent call last):
  File "<stdin>", line 1, in <module>
  File "C:\Users\asus\.conda\envs\tensorflow2\lib\site-packages\tensorflow\__init__.py", line 41, in <module>
    from tensorflow.python.tools import module_util as _module_util
  File "C:\Users\asus\.conda\envs\tensorflow2\lib\site-packages\tensorflow\python\__init__.py", line 46, in <module>
    from tensorflow.python import data
  File "C:\Users\asus\.conda\envs\tensorflow2\lib\site-packages\tensorflow\python\data\__init__.py", line 25, in <module>
    from tensorflow.python.data import experimental
  File "C:\Users\asus\.conda\envs\tensorflow2\lib\site-packages\tensorflow\python\data\experimental\__init__.py", line 98, in <module>
    from tensorflow.python.data.experimental import service
  File "C:\Users\asus\.conda\envs\tensorflow2\lib\site-packages\tensorflow\python\data\experimental\service\__init__.py", line 374, in <module>
    from tensorflow.python.data.experimental.ops.data_service_ops import distribute
  File "C:\Users\asus\.conda\envs\tensorflow2\lib\site-packages\tensorflow\python\data\experimental\ops\data_service_ops.py", line 27, in <module>
    from tensorflow.python.data.experimental.ops import compression_ops
  File "C:\Users\asus\.conda\envs\tensorflow2\lib\site-packages\tensorflow\python\data\experimental\ops\compression_ops.py", line 20, in <module>
    from tensorflow.python.data.util import structure
  File "C:\Users\asus\.conda\envs\tensorflow2\lib\site-packages\tensorflow\python\data\util\structure.py", line 26, in <module>
    from tensorflow.python.data.util import nest
  File "C:\Users\asus\.conda\envs\tensorflow2\lib\site-packages\tensorflow\python\data\util\nest.py", line 40, in <module>
    from tensorflow.python.framework import sparse_tensor as _sparse_tensor
  File "C:\Users\asus\.conda\envs\tensorflow2\lib\site-packages\tensorflow\python\framework\sparse_tensor.py", line 28, in <module>
    from tensorflow.python.framework import constant_op
  File "C:\Users\asus\.conda\envs\tensorflow2\lib\site-packages\tensorflow\python\framework\constant_op.py", line 29, in <module>
    from tensorflow.python.eager import execute
  File "C:\Users\asus\.conda\envs\tensorflow2\lib\site-packages\tensorflow\python\eager\execute.py", line 27, in <module>
    from tensorflow.python.framework import dtypes
  File "C:\Users\asus\.conda\envs\tensorflow2\lib\site-packages\tensorflow\python\framework\dtypes.py", line 33, in <module>
    _np_bfloat16 = _pywrap_bfloat16.TF_bfloat16_type()
TypeError: Unable to convert function return value to a Python type! The signature was
        () -> handle
>>>
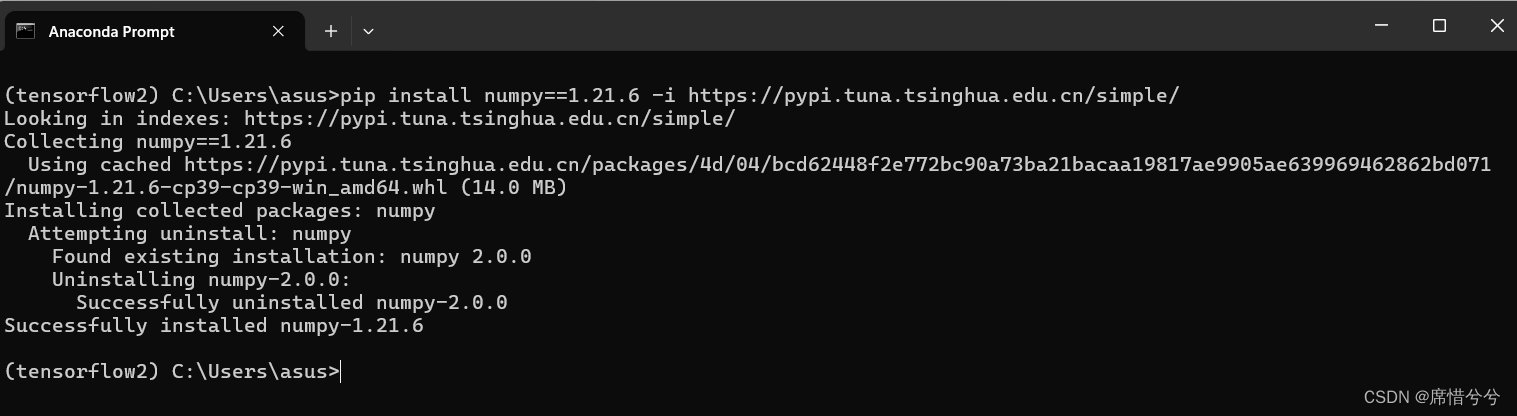
输入exit()退出python环境,回到虚拟环境
pip install numpy==1.21.6 -i https://pypi.tuna.tsinghua.edu.cn/simple/
进入python环境,输入
import tensorflow as tf
tf.__version__
tf.test.is_gpu_available()
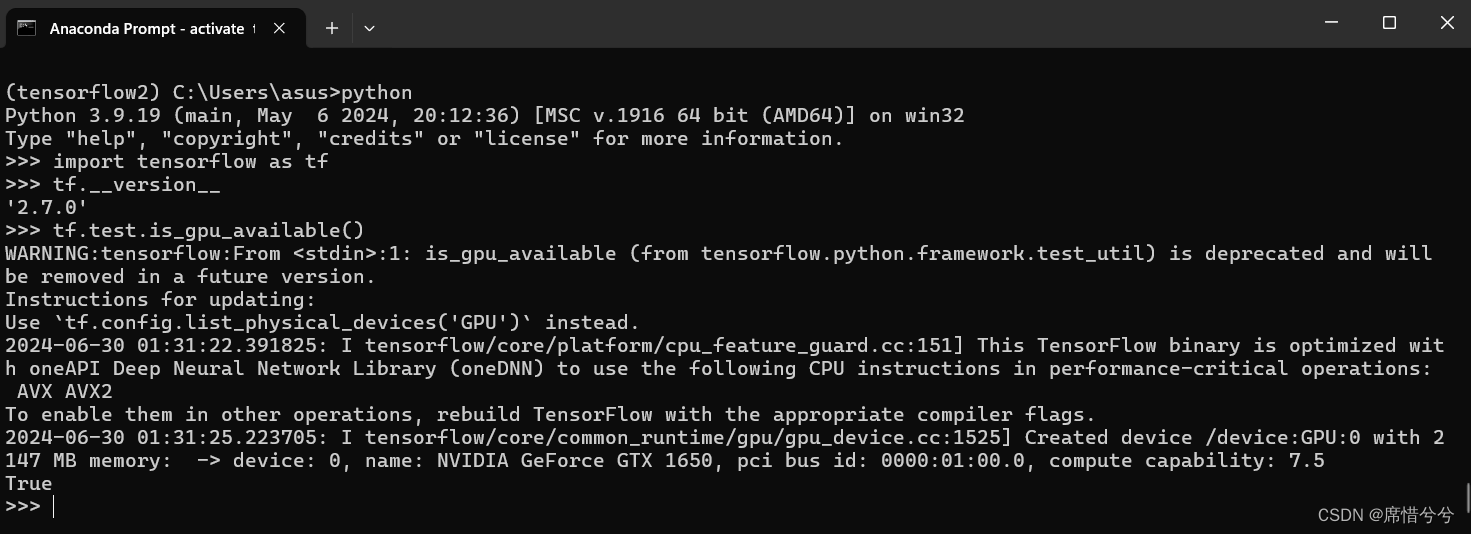
查看版本2.7.0,版本正确。末尾显示True,TensorFlow检测到可用的GPU,安装成功,exit()退出python环境
后续我想用ipython查看是否安装成功,出现以下问题进入ipython环境,输入
import tensorflow as tf
tf.__version__
tf.test.is_gpu_available()
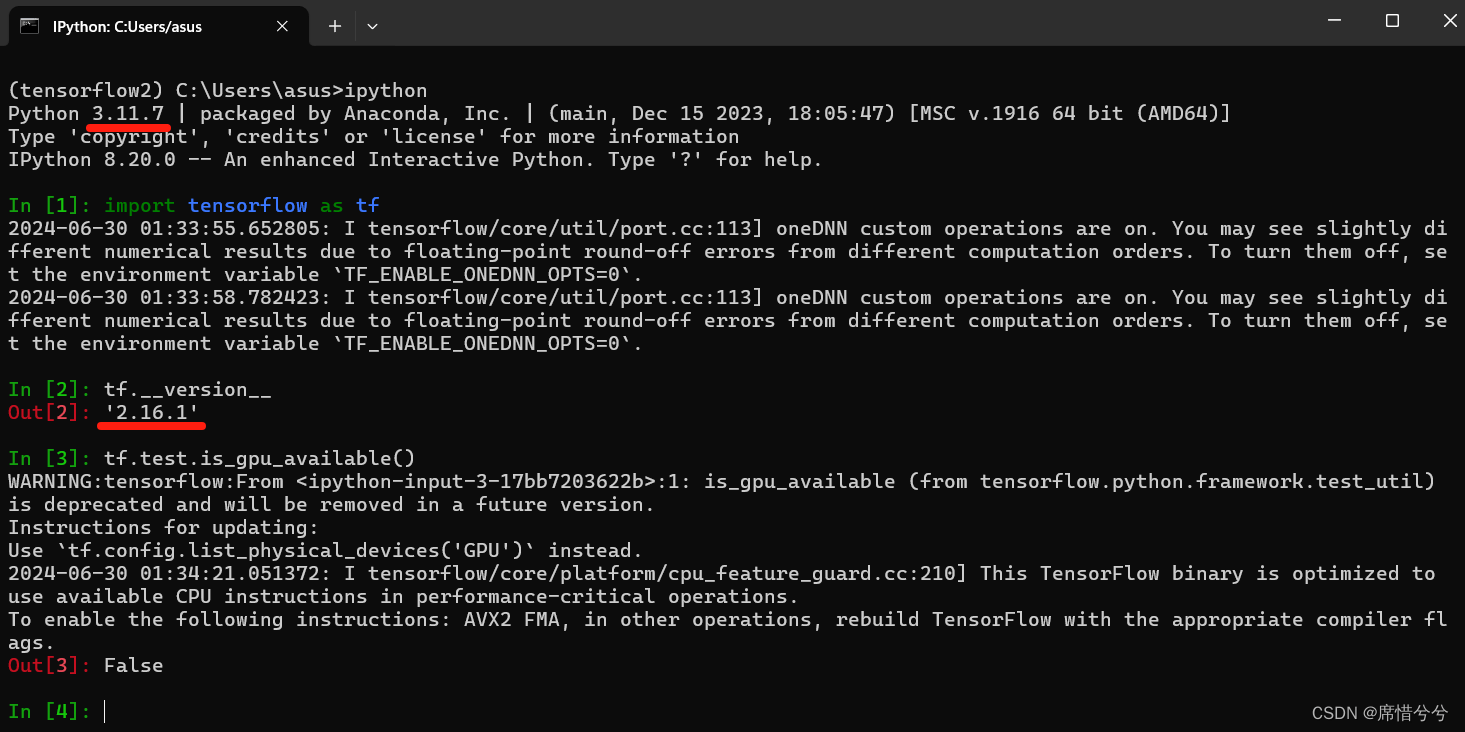
创建虚拟环境的时候指定python版本为3.9,但是这里却显示3.11.7。
末尾显示False,TensorFlow没有检测到可用的GPU。
猜测可能是这个虚拟环境没有ipython,可能用了其他环境的ipython。
解决方案,可以在虚拟环境中用pip list查看虚拟环境中是否有ipython,要是没有,需要安装一个,然后就可以解决了
到此这篇关于TensorFlow安装CPU版本和GPU版本的实现步骤的文章就介绍到这了,更多相关TensorFlow安装CPU和GPU内容请搜索脚本之家以前的文章或继续浏览下面的相关文章希望大家以后多多支持脚本之家!
- 运行tensorflow python程序,限制对GPU和CPU的占用操作
- 基于Tensorflow使用CPU而不用GPU问题的解决
- 在tensorflow中设置使用某一块GPU、多GPU、CPU的操作
- tensorflow指定CPU与GPU运算的方法实现
- 卸载tensorflow-cpu重装tensorflow-gpu操作
- 使用Tensorflow-GPU禁用GPU设置(CPU与GPU速度对比)
- 详解tf.device()指定tensorflow运行的GPU或CPU设备实现
- 用gpu训练好的神经网络,用tensorflow-cpu跑出错的原因及解决方案
- Tensorflow中使用cpu和gpu有什么区别
- tensorflow之如何使用GPU而不是CPU问题
相关文章
 这篇文章主要介绍了python序列化与数据持久化,结合实例形式详细分析了Python序列化与数据持久化相关原理、实现技巧与操作注意事项,需要的朋友可以参考下2019-12-12
 今天我们来聊聊Python里最 平平无奇却又无处不在的print()函数,作为Python开发者,我们几乎每天都在用它,但你真的了解它的所有玩法吗,下面就跟随小编来看看五个你不知道的print函数用法吧2026-01-01
 在Python中,heapq模块提供了实现最小堆算法的数据结构,能够用作优先队列,本文将详细介绍heapq模块,包括堆的基本概念、heapq的功能和示例代码,需要的可以参考下2023-12-12
基于Python自制一个图片批量处理工具实现格式统一和大小压缩
在日常工作和生活中,我们经常需要处理大量图片,今天就给大家分享一款自制的Python图片批量处理工具,无需复杂操作,图形化界面一键搞定所有需求2025-11-11
Python(Pandas、Dask、PySpark等库)在大数据处理中的学习心得
作者分享了他对Python在大数据处理中的学习心得,介绍了大数据的概念、特点及处理挑战,讨论了Python的优势及常用的大数据处理库,比较了Python与Rust在大数据处理中的优劣,并提出了大数据处理的最佳实践2026-04-04 这篇文章主要和大家讲解一下常见的图像锐化和边缘检测方法,即Roberts算子和Prewitt算子。文中的示例代码讲解详细,感兴趣的小伙伴可以了解一下2022-12-12
 在中文信息处理中,繁体字与简体字的转换是一个常见需求,无论是处理港澳台地区的文本数据,还是开发面向不同中文用户群体的应用,繁简转换都是不可或缺的功能,本文将详细介绍如何在Python中实现高效准确的繁体转简体功能,需要的朋友可以参考下2025-11-11
 这篇文章主要介绍了python机器学习高数篇之函数极限和导数,本文给大家介绍的非常详细,对大家的学习或工作具有一定的参考借鉴价值,需要的朋友可以参考下2021-08-08
 Python 是一种代表简单思想的语言,其语法相对简单,很容易上手。本文精心筛选了Python中的八大核心语句,快来看看你都掌握了几个呢2023-02-02
 这篇文章主要介绍了Pycharm+Python+PyQt5使用详解,文中通过示例代码介绍的非常详细,对大家的学习或者工作具有一定的参考学习价值,需要的朋友们下面随着小编来一起学习学习吧2019-09-09


最新评论