
Python+PyQt5实现智能网络驱动器映射工具
更新时间:2025年06月13日 08:51:44 作者:创客白泽
在企业IT运维和日常办公环境中,网络驱动器映射是一项基础但至关重要的功能,本文将详细介绍如何使用Python的PyQt5库开发一款智能网络驱动器映射工具,有需要的可以了解下
概述
在企业IT运维和日常办公环境中,网络驱动器映射是一项基础但至关重要的功能。传统的手动映射方式不仅效率低下,而且在处理复杂网络环境时容易出错。本文将详细介绍如何使用Python的PyQt5库开发一款智能网络驱动器映射工具,该工具具备以下特点:
- 图形化操作界面:告别命令行操作,提供直观的用户体验
- 一键式操作:集成映射、清理、测试等完整功能链
- 智能错误处理:自动处理常见网络连接问题
- 持久化配置:支持重启后自动重连
- 深度清理机制:彻底解决Windows网络连接残留问题
通过本工具的开发过程,我们不仅能掌握PyQt5的界面开发技巧,还能深入理解Windows网络驱动器的底层工作机制。
功能清单
| 功能模块 | 实现要点 | 技术亮点 |
|---|---|---|
| 驱动器映射 | 支持IP、共享路径、凭证等完整参数 | 多线程防阻塞、自动错误重试 |
| 连接清理 | 彻底清除残留连接和凭据 | 组合使用CMD命令和Win32 API |
| 状态监控 | 实时反馈操作状态 | 自定义状态栏动画效果 |
| 持久化配置 | 支持重启自动重连 | 注册表自动配置技术 |
| 兼容性处理 | 适配不同Windows版本 | 自动降级处理机制 |
界面展示效果
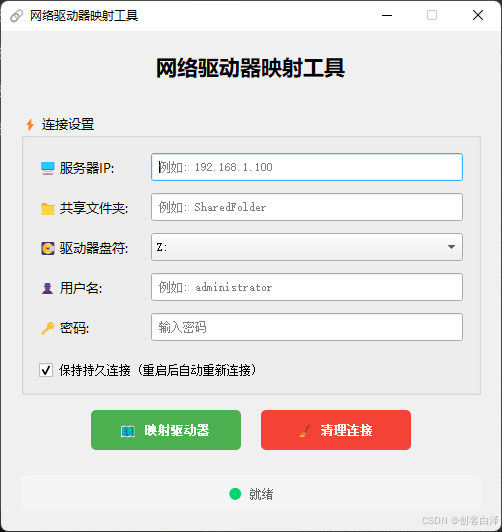

工具主界面采用现代化设计,包含:
- 服务器连接参数输入区
- 凭证信息加密输入框
- 驱动器盘符智能选择
- 操作状态实时反馈区
- 美化后的功能按钮组
开发步骤详解
1. 环境准备
# 必需库安装
pip install pyqt5 pywin32
2. 核心类结构设计

3. 关键技术实现
3.1 Emoji图标渲染
def emoji_icon(self, emoji):
    """使用QPainter绘制Emoji图标"""
    pixmap = QPixmap(32, 32)
    pixmap.fill(Qt.transparent)

    painter = QPainter(pixmap)
    font = painter.font()
    font.setPointSize(20)  # 调整字号控制Emoji大小
    painter.setFont(font)
    painter.drawText(pixmap.rect(), Qt.AlignCenter, emoji)
    painter.end()

    return QIcon(pixmap)
3.2 深度清理机制
def nuclear_cleanup(self, server_ip):
    """组合使用多种方式确保彻底清理"""
    # 1. 标准net命令清理
    self.run_cmd("net use * /delete /y")

    # 2. Windows凭据管理器清理
    self.run_cmd(f"cmdkey /delete:\\\\{server_ip}")

    # 3. Win32 API强制断开
    windll.mpr.WNetCancelConnection2W(
        create_unicode_buffer(f"\\\\{server_ip}"),
        0,
        True
    )

    # 4. 重启网络服务
    self.run_cmd("net stop workstation /y")
    time.sleep(2)
    self.run_cmd("net start workstation")
3.3 驱动器映射逻辑
def map_drive(self):
    # 参数验证
    if not all([server_ip, share, drive, user, pwd]):
        QMessageBox.warning(self, "警告", "请填写所有必填字段")
        return

    # 构造UNC路径
    path = f"\\\\{server_ip}\\{share}"

    # 执行映射命令
    result = self.run_cmd(
        f"net use {drive} {path} {pwd} /user:{user} "
        f"{'/persistent:yes' if self.persistent_check.isChecked() else ''}"
    )

    # 结果验证
    if result and "成功" in result:
        self._verify_drive_access(drive)
代码深度解析
1. 命令执行安全机制
def run_cmd(self, command):
    try:
        result = subprocess.run(
            command,
            shell=True,
            check=True,
            stdout=subprocess.PIPE,
            stderr=subprocess.PIPE,
            encoding='gbk',  # 中文系统编码处理
            text=True
        )
        return result.stdout.strip()
    except subprocess.CalledProcessError as e:
        self._handle_command_error(e)
关键点说明:
- 使用subprocess.run()替代已废弃的os.system
- 显式指定GBK编码解决中文乱码
- 完整的错误捕获和处理链
2. 界面布局技巧
# 使用QHBoxLayout和QVBoxLayout嵌套实现复杂布局
connection_layout = QVBoxLayout()
ip_layout = QHBoxLayout()
ip_layout.addWidget(QLabel("🖥️ 服务器IP:"))
ip_layout.addWidget(self.ip_input)
connection_layout.addLayout(ip_layout)

# 添加弹性空间使按钮居中
button_layout.addItem(QSpacerItem(
    20, 20,
    QSizePolicy.Expanding,
    QSizePolicy.Minimum
))
3. 样式表美化
/* 按钮悬停效果 */
QPushButton {
background-color: #4CAF50;
border-radius: 5px;
padding: 8px;
}
QPushButton:hover {
background-color: #45a049;
box-shadow: 0 2px 5px rgba(0,0,0,0.2);
}
/* 状态栏样式 */
QLabel#status_bar {
background-color: #f5f5f5;
border-radius: 5px;
padding: 8px;
color: #666;
}源码下载
import subprocess
import sys
import os
import time
from ctypes import windll, create_unicode_buffer
import win32wnet
import win32netcon
from PyQt5.QtWidgets import (QApplication, QMainWindow, QWidget, QVBoxLayout, QHBoxLayout,
QLabel, QLineEdit, QPushButton, QGroupBox, QCheckBox,
QMessageBox, QComboBox, QSpacerItem, QSizePolicy)
from PyQt5.QtCore import Qt, QSize
from PyQt5.QtGui import QIcon, QFont, QPixmap, QPainter
class DriveMapperApp(QMainWindow):
def __init__(self):
super().__init__()
self.setWindowTitle("网络驱动器映射工具")
self.setWindowIcon(self.emoji_icon("🔗"))
self.setFixedSize(500, 500) # 稍微增大窗口尺寸
# 主窗口部件
self.main_widget = QWidget()
self.setCentralWidget(self.main_widget)
# 主布局
self.main_layout = QVBoxLayout()
self.main_layout.setContentsMargins(20, 20, 20, 20) # 设置边距
self.main_layout.setSpacing(15) # 设置控件间距
self.main_widget.setLayout(self.main_layout)
# 初始化UI
self.init_ui()
def emoji_icon(self, emoji):
"""创建emoji图标"""
pixmap = QPixmap(32, 32)
pixmap.fill(Qt.transparent)
painter = QPainter(pixmap)
font = painter.font()
font.setPointSize(20)
painter.setFont(font)
painter.drawText(pixmap.rect(), Qt.AlignCenter, emoji)
painter.end()
return QIcon(pixmap)
def init_ui(self):
"""初始化用户界面"""
# 标题
title = QLabel("网络驱动器映射工具")
title.setFont(QFont("Microsoft YaHei", 16, QFont.Bold))
title.setAlignment(Qt.AlignCenter)
title.setStyleSheet("margin-bottom: 15px;")
self.main_layout.addWidget(title)
# 连接设置组
connection_group = QGroupBox("⚡ 连接设置")
connection_group.setFont(QFont("Microsoft YaHei", 10))
connection_layout = QVBoxLayout()
connection_layout.setSpacing(12) # 组内控件间距
connection_layout.setContentsMargins(15, 15, 15, 15) # 组内边距
# 服务器IP
ip_layout = QHBoxLayout()
ip_label = QLabel("🖥️ 服务器IP:")
ip_label.setFixedWidth(100) # 固定标签宽度
ip_layout.addWidget(ip_label)
self.ip_input = QLineEdit("")
self.ip_input.setPlaceholderText("例如: 192.168.1.100")
self.ip_input.setStyleSheet("padding: 5px;")
ip_layout.addWidget(self.ip_input)
connection_layout.addLayout(ip_layout)
# 共享文件夹
share_layout = QHBoxLayout()
share_label = QLabel("📁 共享文件夹:")
share_label.setFixedWidth(100)
share_layout.addWidget(share_label)
self.share_input = QLineEdit("")
self.share_input.setPlaceholderText("例如: SharedFolder")
self.share_input.setStyleSheet("padding: 5px;")
share_layout.addWidget(self.share_input)
connection_layout.addLayout(share_layout)
# 驱动器盘符
drive_layout = QHBoxLayout()
drive_label = QLabel("💽 驱动器盘符:")
drive_label.setFixedWidth(100)
drive_layout.addWidget(drive_label)
self.drive_combo = QComboBox()
self.drive_combo.addItems([f"{chr(i)}:" for i in range(90, 64, -1)])
self.drive_combo.setCurrentText("")
self.drive_combo.setStyleSheet("padding: 5px;")
drive_layout.addWidget(self.drive_combo)
connection_layout.addLayout(drive_layout)
# 账户信息
user_layout = QHBoxLayout()
user_label = QLabel("👤 用户名:")
user_label.setFixedWidth(100)
user_layout.addWidget(user_label)
self.user_input = QLineEdit("")
self.user_input.setPlaceholderText("例如: administrator")
self.user_input.setStyleSheet("padding: 5px;")
user_layout.addWidget(self.user_input)
connection_layout.addLayout(user_layout)
pwd_layout = QHBoxLayout()
pwd_label = QLabel("🔑 密码:")
pwd_label.setFixedWidth(100)
pwd_layout.addWidget(pwd_label)
self.pwd_input = QLineEdit("")
self.pwd_input.setPlaceholderText("输入密码")
self.pwd_input.setEchoMode(QLineEdit.Password)
self.pwd_input.setStyleSheet("padding: 5px;")
pwd_layout.addWidget(self.pwd_input)
connection_layout.addLayout(pwd_layout)
# 持久化选项
self.persistent_check = QCheckBox("保持持久连接 (重启后自动重新连接)")
self.persistent_check.setChecked(True)
self.persistent_check.setStyleSheet("margin-top: 10px;")
connection_layout.addWidget(self.persistent_check)
connection_group.setLayout(connection_layout)
self.main_layout.addWidget(connection_group)
# 按钮区域
button_layout = QHBoxLayout()
button_layout.setSpacing(20) # 按钮间距
# 添加弹性空间使按钮居中
button_layout.addItem(QSpacerItem(20, 20, QSizePolicy.Expanding, QSizePolicy.Minimum))
# 映射按钮
self.map_button = QPushButton(" 映射驱动器")
self.map_button.setIcon(self.emoji_icon("🗺️"))
self.map_button.setFixedSize(150, 40) # 固定按钮大小
self.map_button.setStyleSheet("""
QPushButton {
background-color: #4CAF50;
color: white;
border-radius: 5px;
padding: 8px;
font-weight: bold;
}
QPushButton:hover {
background-color: #45a049;
}
""")
self.map_button.clicked.connect(self.map_drive)
button_layout.addWidget(self.map_button)
# 清理按钮
self.clean_button = QPushButton(" 清理连接")
self.clean_button.setIcon(self.emoji_icon("🧹"))
self.clean_button.setFixedSize(150, 40)
self.clean_button.setStyleSheet("""
QPushButton {
background-color: #f44336;
color: white;
border-radius: 5px;
padding: 8px;
font-weight: bold;
}
QPushButton:hover {
background-color: #d32f2f;
}
""")
self.clean_button.clicked.connect(self.clean_connections)
button_layout.addWidget(self.clean_button)
button_layout.addItem(QSpacerItem(20, 20, QSizePolicy.Expanding, QSizePolicy.Minimum))
self.main_layout.addLayout(button_layout)
# 状态栏
self.status_bar = QLabel("🟢 就绪")
self.status_bar.setAlignment(Qt.AlignCenter)
self.status_bar.setStyleSheet("""
color: #666;
margin-top: 10px;
padding: 8px;
background-color: #f5f5f5;
border-radius: 5px;
""")
self.main_layout.addWidget(self.status_bar)
def run_cmd(self, command):
"""执行命令并返回输出"""
try:
result = subprocess.run(
command,
shell=True,
check=True,
stdout=subprocess.PIPE,
stderr=subprocess.PIPE,
encoding='gbk',
text=True
)
return result.stdout.strip()
except subprocess.CalledProcessError as e:
self.status_bar.setText(f"🔴 错误: {e.stderr}")
return None
def nuclear_cleanup(self, server_ip):
"""彻底清除所有可能的残留连接"""
self.status_bar.setText("🧽 正在深度清理...")
QApplication.processEvents()
self.run_cmd("net use * /delete /y")
self.run_cmd(f"net use \\\\{server_ip} /delete /y")
creds = self.run_cmd("cmdkey /list")
if creds and server_ip in creds:
self.run_cmd(f"cmdkey /delete:\\\\{server_ip}")
self.run_cmd(f"cmdkey /delete:WindowsLive:target=\\\\{server_ip}")
try:
windll.mpr.WNetCancelConnection2W(create_unicode_buffer(f"\\\\{server_ip}"), 0, True)
win32wnet.WNetCancelConnection2(f"\\\\{server_ip}", 0, True)
except Exception as e:
self.status_bar.setText(f"🔴 API清理错误: {e}")
self.status_bar.setText("🔄 正在重启网络服务...")
QApplication.processEvents()
self.run_cmd("net stop workstation /y")
time.sleep(2)
self.run_cmd("net start workstation")
time.sleep(1)
self.status_bar.setText("🟢 清理完成")
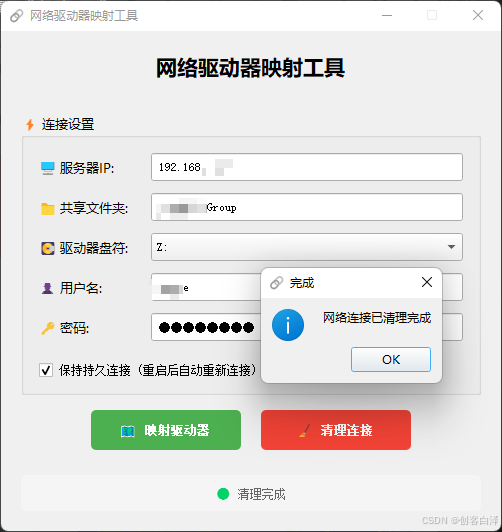
def clean_connections(self):
"""清理所有网络连接"""
server_ip = self.ip_input.text().strip()
if not server_ip:
QMessageBox.warning(self, "警告", "请输入服务器IP地址")
return
reply = QMessageBox.question(
self, '确认',
'确定要清理所有网络连接吗?这可能会断开现有的网络驱动器连接。',
QMessageBox.Yes | QMessageBox.No, QMessageBox.No
)
if reply == QMessageBox.Yes:
self.nuclear_cleanup(server_ip)
QMessageBox.information(self, "完成", "网络连接已清理完成")
def map_drive(self):
"""映射网络驱动器"""
server_ip = self.ip_input.text().strip()
share = self.share_input.text().strip()
drive = self.drive_combo.currentText()
user = self.user_input.text().strip()
pwd = self.pwd_input.text()
if not all([server_ip, share, drive, user, pwd]):
QMessageBox.warning(self, "警告", "请填写所有必填字段")
return
path = f"\\\\{server_ip}\\{share}"
persistent = "/persistent:yes" if self.persistent_check.isChecked() else ""
self.status_bar.setText("🔄 正在准备映射...")
QApplication.processEvents()
self.nuclear_cleanup(server_ip)
self.status_bar.setText(f"🔄 正在映射 {path} 到 {drive}...")
QApplication.processEvents()
result = self.run_cmd(f"net use {drive} {path} {pwd} /user:{user} {persistent}")
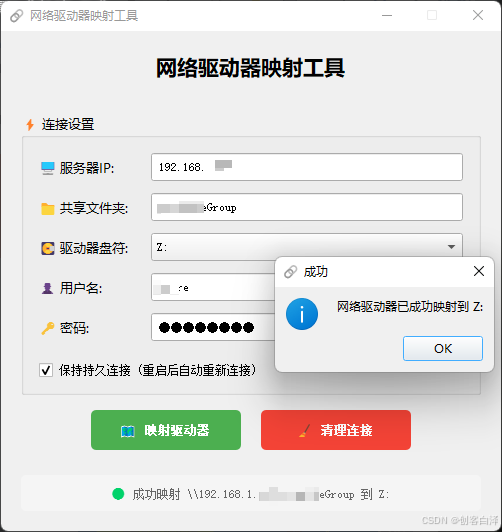
if result:
self.status_bar.setText(f"🟢 成功映射 {path} 到 {drive}")
QMessageBox.information(self, "成功", f"网络驱动器已成功映射到 {drive}")
test_result = self.run_cmd(f"dir {drive}")
if test_result:
self.status_bar.setText(f"🟢 访问测试成功: {drive} 驱动器内容可读")
else:
self.status_bar.setText(f"🟡 映射成功但访问测试失败")
else:
self.status_bar.setText("🔴 映射失败")
QMessageBox.critical(
self, "错误",
"驱动器映射失败!\n\n"
"请尝试以下解决方案:\n"
"1. 手动执行清理操作\n"
"2. 重启计算机后重试\n"
"3. 检查服务器端的共享权限设置"
)
if __name__ == "__main__":
app = QApplication(sys.argv)
app.setStyle('Fusion') # 使用Fusion风格使界面更现代
window = DriveMapperApp()
window.show()
sys.exit(app.exec_())
总结与展望
通过本项目的开发,我们实现了:
- 生产级工具开发:从需求分析到完整实现的全流程
- PyQt5深度应用:复杂界面布局和自定义组件开发
- 系统集成技巧:Windows网络API的混合调用
- 异常处理体系:健壮的错误处理机制
未来可扩展方向:
- 增加批量映射功能
- 集成网络诊断工具
- 添加映射配置导出/导入
- 开发自动重连监控服务
到此这篇关于Python+PyQt5实现智能网络驱动器映射工具的文章就介绍到这了,更多相关Python网络驱动器映射内容请搜索脚本之家以前的文章或继续浏览下面的相关文章希望大家以后多多支持脚本之家!
相关文章
 这篇文章主要介绍了Python使用wget实现下载网络文件功能,简单介绍了wget安装以及Python使用wget下载tar格式网络文件并进行解压处理相关操作技巧,需要的朋友可以参考下2018-05-05
 这篇文章主要介绍了Python中getpass模块无回显输入源码解析,具有一定借鉴价值,需要的朋友可以参考下2018-01-01
 这篇文章主要为大家详细介绍了python实现最速下降法,文中示例代码介绍的非常详细,具有一定的参考价值,感兴趣的小伙伴们可以参考一下2020-03-03
 这篇文章主要介绍了python中使用mysql数据库详细介绍,本文起讲解了安装mysql、安装MySQL-python、mysql 的基本操作、python 操作mysql数据库基础等内容,需要的朋友可以参考下2015-03-03
 这篇文章主要给大家介绍了关于Python中csv文件的写入与读取方法的相关资料,csv是"Comma-Separated Values(逗号分割的值)"的首字母缩写,它其实和txt文件一样,都是纯文本文件,使用Python来读写csv文件是非常容易的,需要的朋友可以参考下2023-09-09
 这篇文章主要介绍了简介Django中内置的一些中间件,Django是最具人气的Python web开发框架,需要的朋友可以参考下2015-07-07
 这篇文章主要介绍了Pytorch中的gather使用方法,具有很好的参考价值,希望对大家有所帮助。如有错误或未考虑完全的地方,望不吝赐教2021-05-05
 这篇文章主要介绍了pandas apply多线程实现代码,文中通过示例代码介绍的非常详细,对大家的学习或者工作具有一定的参考学习价值,需要的朋友们下面随着小编来一起学习学习吧2020-08-08
 这篇文章主要为大家详细介绍了如何通过python实现读取学术论文PDF文件内容的功能,文中的示例代码讲解详细,感兴趣的小伙伴可以跟随小编一起学习一下2024-10-10
pandas dataframe的合并实现(append, merge, concat)
这篇文章主要介绍了pandas dataframe的合并实现,文中通过示例代码介绍的非常详细,对大家的学习或者工作具有一定的参考学习价值,需要的朋友们下面随着小编来一起学习学习吧2019-06-06


最新评论