

EIGRP实验配置过程详解
发布时间:2010-09-07 23:35:06 作者:佚名  我要评论
我要评论
我要评论实验拓扑图 (拓扑图由导师鑫飘雪制作)
原创作品,未经允许严禁转载。 作者:网络白领 实验指导:鑫飘雪
出于学习交流目的需要转载请注明原创作者以及文章出处,谢谢合作!
实验拓扑图:(拓扑图由导师“鑫飘雪”制作)
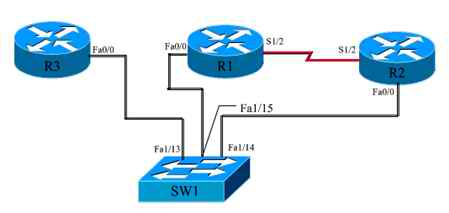
实验环境说明:
1.将路由器R1的Fa0/0端口配置ip:172.16.0.1/24;S1/2端口配置ip:192.168.1.1/24
2.将路由器R2的Fa0/0端口配置ip:192.168.3.2/24;S1/2端口配置ip:192.168.1.2/24
3.将路由器R3 的Fa0/0端口配置ip:172.16.0.3/24
4.将交换机SW1分别划分两个VLAN2、VLAN3,将端口Fa1/13、Fa1/15划入VLAN2,将端口Fa1/14划入VLAN3
出于学习交流目的需要转载请注明原创作者以及文章出处,谢谢合作!
实验拓扑图:(拓扑图由导师“鑫飘雪”制作)
实验环境说明:
1.将路由器R1的Fa0/0端口配置ip:172.16.0.1/24;S1/2端口配置ip:192.168.1.1/24
2.将路由器R2的Fa0/0端口配置ip:192.168.3.2/24;S1/2端口配置ip:192.168.1.2/24
3.将路由器R3 的Fa0/0端口配置ip:172.16.0.3/24
4.将交换机SW1分别划分两个VLAN2、VLAN3,将端口Fa1/13、Fa1/15划入VLAN2,将端口Fa1/14划入VLAN3
实验结果:要求路由器间两两可以互相通信
配置过程详解:
交换机SW1的配置清单:
1.首先禁用错误命令当域名解析和关闭超时退出控制台:
SW1(config)#no ip domain-loo
SW1(config)#line con 0
SW1(config-line)#no exec-t
SW1(config-line)#exit
2.划分VLAN:
SW1#vlan data
SW1(vlan)#vlan 2
SW1(vlan)#vlan 3
SW1(vlan)#exit
3.将Fa1/13端口设为全双工模式,并划入VLAN2:
SW1(config)#int fa1/13
SW1(config-if)#speed 100
SW1(config-if)#duplex full
SW1(config-if)#sw mod acc
SW1(config-if)#sw acc vlan 2
SW1(config-if)#exit
4.将Fa1/15端口设为全双工模式,并划入VLAN2:
SW1(config)#int fa1/15
SW1(config-if)#speed 100
SW1(config-if)#duplex full
SW1(config-if)#sw mod acc
SW1(config-if)#sw acc vlan 2
SW1(config-if)#exit
5.将Fa1/14端口设为全双工模式,并划入VLAN3:
SW1(config)#int fa1/14
SW1(config-if)#speed 100
SW1(config-if)#duplex full
SW1(config-if)#sw mod acc
SW1(config-if)#sw acc vlan 3
SW1(config-if)#exit
交换机SW1的配置清单:
1.首先禁用错误命令当域名解析和关闭超时退出控制台:
SW1(config)#no ip domain-loo
SW1(config)#line con 0
SW1(config-line)#no exec-t
SW1(config-line)#exit
2.划分VLAN:
SW1#vlan data
SW1(vlan)#vlan 2
SW1(vlan)#vlan 3
SW1(vlan)#exit
3.将Fa1/13端口设为全双工模式,并划入VLAN2:
SW1(config)#int fa1/13
SW1(config-if)#speed 100
SW1(config-if)#duplex full
SW1(config-if)#sw acc vlan 2
SW1(config-if)#exit
4.将Fa1/15端口设为全双工模式,并划入VLAN2:
SW1(config)#int fa1/15
SW1(config-if)#speed 100
SW1(config-if)#duplex full
SW1(config-if)#sw acc vlan 2
SW1(config-if)#exit
5.将Fa1/14端口设为全双工模式,并划入VLAN3:
SW1(config)#int fa1/14
SW1(config-if)#speed 100
SW1(config-if)#duplex full
SW1(config-if)#sw acc vlan 3
SW1(config-if)#exit
路由器R1的配置清单:
1.首先禁用错误命令当域名解析和禁用超时退出控制台:
R1(config)#no ip domain-loo
R1(config)#line con 0
R1(config-line)#no exec-t
R1(config-line)#exit
2.将Fa0/0端口设为全双工模式并配置ip:
R1(config)#int fa0/0
R1(config-if)#speed 100
R1(config-if)#duplex full
R1(config-if)#ip add 172.16.0.1 255.255.255.0
R1(config-if)#no shut
R1(config-if)#exit
3.为S1/2端口配置ip:
R1(config)#int s1/2
R1(config-if)#ip add 192.168.1.1 255.255.255.0
R1(config-if)#no shut
R1(config-if)#exit
4.在路由器R1上配置EIGRP:
R1(config)#router eigrp 100
R1(config-router)#no auto-summary
R1(config-router)#network 172.16.0.1 0.0.0.0
R1(config-router)#network 192.168.1.1 0.0.0.255
R1(config-router)#exit
R1(config)#exit
1.首先禁用错误命令当域名解析和禁用超时退出控制台:
R1(config)#no ip domain-loo
R1(config)#line con 0
R1(config-line)#no exec-t
R1(config-line)#exit
2.将Fa0/0端口设为全双工模式并配置ip:
R1(config)#int fa0/0
R1(config-if)#speed 100
R1(config-if)#duplex full
R1(config-if)#ip add 172.16.0.1 255.255.255.0
R1(config-if)#no shut
R1(config-if)#exit
3.为S1/2端口配置ip:
R1(config)#int s1/2
R1(config-if)#ip add 192.168.1.1 255.255.255.0
R1(config-if)#no shut
R1(config-if)#exit
4.在路由器R1上配置EIGRP:
R1(config)#router eigrp 100
R1(config-router)#no auto-summary
R1(config-router)#network 172.16.0.1 0.0.0.0
R1(config-router)#network 192.168.1.1 0.0.0.255
R1(config-router)#exit
R1(config)#exit
路由器R2的配置清单:
1.首先禁用错误命令当域名解析和禁用超时退出控制台:
R2(config)#no ip domain-loo
R2(config)#line con 0
R2(config-line)#no exec-t
R2(config-line)#exit
2.将Fa0/0端口设为全双工模式并配置ip:
R2(config)#int fa0/0
R2(config-if)#speed 100
R2(config-if)#duplex full
R2(config-if)#ip add 192.168.3.2 255.255.255.0
R2(config-if)#no shut
R2(config-if)#exit
3.为S1/2端口配置ip:
R2(config)#int s1/2
R2(config-if)#ip add 192.168.1.2 255.255.255.0
R2(config-if)#no shut
R2(config-if)#exit
4.在路由器R2上配置EIGRP:
R2(config)#router eigrp 100
R2(config-router)#network 192.168.3.0 0.0.0.255
R2(config-router)#network 192.168.1.0 0.0.0.255
R2(config-router)#exit
R2(config)#exit
1.首先禁用错误命令当域名解析和禁用超时退出控制台:
R2(config)#no ip domain-loo
R2(config)#line con 0
R2(config-line)#no exec-t
R2(config-line)#exit
2.将Fa0/0端口设为全双工模式并配置ip:
R2(config)#int fa0/0
R2(config-if)#speed 100
R2(config-if)#duplex full
R2(config-if)#ip add 192.168.3.2 255.255.255.0
R2(config-if)#no shut
R2(config-if)#exit
3.为S1/2端口配置ip:
R2(config)#int s1/2
R2(config-if)#ip add 192.168.1.2 255.255.255.0
R2(config-if)#no shut
R2(config-if)#exit
4.在路由器R2上配置EIGRP:
R2(config)#router eigrp 100
R2(config-router)#network 192.168.3.0 0.0.0.255
R2(config-router)#network 192.168.1.0 0.0.0.255
R2(config-router)#exit
R2(config)#exit
路由器R3的配置清单:
1.首先禁用错误命令当域名解析和禁用超时退出控制台:
R3(config)#no ip domain-loo
R3(config)#line con 0
R3(config-line)#no exec-t
R3(config-line)#exit
2.将Fa0/0端口设为全双工模式并配置ip:
R3(config)#int fa0/0
R3(config-if)#speed 100
R3(config-if)#duplex full
R3(config-if)#ip add 172.16.0.3 255.255.255.0
R3(config-if)#no shut
R3(config-if)#exit
3.在路由器R3上配置EIGRP:
R3(config)#router eigrp 100
R3(config-router)#no auto-summary
R3(config-router)#network 172.16.0.3 0.0.0.0
R3(config-router)#exit
R3(config)#exit
1.首先禁用错误命令当域名解析和禁用超时退出控制台:
R3(config)#no ip domain-loo
R3(config)#line con 0
R3(config-line)#no exec-t
R3(config-line)#exit
2.将Fa0/0端口设为全双工模式并配置ip:
R3(config)#int fa0/0
R3(config-if)#speed 100
R3(config-if)#duplex full
R3(config-if)#ip add 172.16.0.3 255.255.255.0
R3(config-if)#no shut
R3(config-if)#exit
3.在路由器R3上配置EIGRP:
R3(config)#router eigrp 100
R3(config-router)#no auto-summary
R3(config-router)#network 172.16.0.3 0.0.0.0
R3(config-router)#exit
R3(config)#exit
验证EIGRP配置:
查看每台路由器的邻居表:#show ip eigrp nei
R1的邻居表:
R1#show ip eigrp nei
IP-EIGRP neighbors for process 100
H Address Interface Hold Uptime SRTT RTO Q Seq
(sec) (ms) Cnt Num
1 172.16.0.3 Fa0/0 11 00:00:48 168 1008 0 4
0 192.168.1.2 Se1/2 14 00:25:23 244 1464 0 3
R2的邻居表:
R2#show ip eigrp nei
IP-EIGRP neighbors for process 100
H Address Interface Hold Uptime SRTT RTO Q Seq
(sec) (ms) Cnt Num
0 192.168.1.1 Se1/2 14 00:28:34 195 1755 0 5
R3的邻居表:
R3r#show ip eigrp nei
IP-EIGRP neighbors for process 100
H Address Interface Hold Uptime SRTT RTO Q Seq
(sec) (ms) Cnt Num
0 172.16.0.1 Fa0/0 12 00:02:07 134 804 0 8
查看每台路由器的邻居表:#show ip eigrp nei
R1的邻居表:
R1#show ip eigrp nei
IP-EIGRP neighbors for process 100
H Address Interface Hold Uptime SRTT RTO Q Seq
(sec) (ms) Cnt Num
1 172.16.0.3 Fa0/0 11 00:00:48 168 1008 0 4
0 192.168.1.2 Se1/2 14 00:25:23 244 1464 0 3
R2的邻居表:
R2#show ip eigrp nei
IP-EIGRP neighbors for process 100
H Address Interface Hold Uptime SRTT RTO Q Seq
(sec) (ms) Cnt Num
0 192.168.1.1 Se1/2 14 00:28:34 195 1755 0 5
R3的邻居表:
R3r#show ip eigrp nei
IP-EIGRP neighbors for process 100
H Address Interface Hold Uptime SRTT RTO Q Seq
(sec) (ms) Cnt Num
0 172.16.0.1 Fa0/0 12 00:02:07 134 804 0 8
实验的最终结果是每台路由器之间都可以ping通其他的路由器,实验过程到此结束。呵呵,再次感谢导师“鑫飘雪”的耐心指导!
相关文章

重启可暂时解决!微软承认Win10/Win11经典版Outlook存在3个BUG
微软承认Win10/Win11经典版Outlook存在多个bug,官方现已呼吁受影响用户提交诊断日志以协助分析,在为正式解决之前提供了临时解决办法2026-03-16加密邮件终于能打开了! 微软紧急修复Win10/Win11经典版Outlook故障
微软紧急修复 Win10/Win11 经典版 Outlook 故障,加密邮件终于能打开了,针对无法等待正式补丁的用户,微软提供了两种临时解决方案,详细如下文2026-02-02Win10/Win11新版Outlook无法打开Excel 附件的两种临时解决办法
微软承认部分 Win10/Win11 新版 Outlook 无法打开 Excel 附件,遇到这个问题的朋友可以参考本文的两种临时解决办法2025-12-03Win10/Win11版Outlook存在加密邮件问题:附临时解决方案
微软官方近日已承认经典版Outlook桌面客户端存在程序漏洞,该漏洞导致用户在尝试打开来自外部组织(其他租户)的OMEv2加密邮件时操作失败,同时会弹出“正在为信息权限管理2025-09-28- 微软补丁更新引发的软件故障屡见不鲜,最近win10/win11系统更新最新版本的Outlook后,发现无法正常启动,下面分享临时解决办法2025-08-21
- 遇到Outlook无法启动跳 4usqa 错误怎么办?别担心,跟着以下步骤,让你的Outlook重新焕发活力2025-05-14
微软新版Outlook将推出邮件分类快捷键及多项优化:5月开始部署
微软计划在新版Outlook for Windows中引入邮件分类快捷功能,用户可通过预设快捷键快速对邮件进行分类,从而大幅提升工作效率并优化管理流程2025-04-21rsync The --password-file option may only be used when accessing a
客户端上传文件执行命令出错,提醒The --password-file option may only be used when accessing an rsync daemon.查找资料也很少这样的说法,最后发现是冒号的问题2025-02-26 邮箱在使用的时候,由于各种原因,有时候我们可能会遇到忘记密码、账号被盗等问题,这时候就需要进行163邮箱找回操作,本文将为大家介绍如何进行163邮箱找回操作2025-02-01
- 电子邮件成为了我们日常生活和工作中不可或缺的一部分,无论是注册社交媒体、购物平台,还是与他人沟通,一个稳定的邮箱账号都变得至关重要,本文将为您提供详细的电子邮件2025-02-01
最新评论