
Illustrator 绘制矢量性感美女
发布时间:2009-05-15 01:17:12 作者:佚名  我要评论
我要评论
This time there is nothing much to explain. Well, it’s actually hard to explain how you draw bezier curves in Illustrator. I had the urge to do some sketches and I believe I owe it to myself, it’s been too long since I had this kind of fu
Ok! I know a lot of you have been waiting for this very moment. So here it is, part 2, all wrapped up in a (H.264 AKA MPEG-4 Part 10) movie for you to download and watch (14.9 MB). You have to excuse the fact that I often have to drag things back into the movie. I’m using just a small portion of my (big) screen, so the center is way out of the capture area (for example when I zoom in or name the layers).
 Oh and again, I'm far from a perfect illustrator, so please ignore my little (bad clicking) mistakes. The idea that everything is been recorded made me a tidy bit nervous :-D
 Here is a short overview of what we'll do: Organize the illustration
Drag paths (using the selection indicator in the Layer's Palette) to a separate layer, give the layer a name and lock it. We repeat these steps till the illustration is well organized in different layers. Make sure you respect the stacking order of things. The hair is separated in 2 layers: the hair in front of the face as a layer at the top and the part of the hair that resides behind the body. Start filling each layer
Fill parts of the illustration by selecting the path and selecting a color in the Swatches palette. Or go for the faster and smarter way and use the Live Paint Bucket tool.
Select a group of paths, select the Live Paint Bucket and click in the paths to make it a Live Paint group (or Object > Live Paint Make). Then select a color and start clicking. You'll notice that you'll be able to give overlapping areas a different color. If you double click the Live Paint bucket, you can also check the 'Strokes' option, this way you'll be able to click on strokes as well and give each part a different stroke width or color.

Even paths with a small gap can be taken care of. Just go to Object > Live Paint > Gap Options and define the Gap Detection settings to make sure small gaps are ignored where needed. It is also possible to add new paths to a Live Paint group.
I have only used the Live Paint for the face in my drawing here, but I have to admit that I'm still getting used to working with this new powerful feature.
You might think that now we've added colors to our illustration it's as good as finished, but look at it it's far from finished. It needs some touching up. We need to finalize it by adding some shadows and highlights etc. This is the most fun part in my opinion because the "before and after" effect can be huge and you get the feeling it is really "finished"... but that's all for part 3 of this tutorial. So look out for the final part soon, in the meantime I hope you find part 2 enjoyable to watch and (hopefully) learn something from it. Download QuickTime movie of part 2 Mirror server (if the first one is failing)
相关文章
 偏移文本或偏移路径意味着偏离了原来的位置,虽然听起来可能不太理想或杂乱无章,但在Illustrator中使用偏移技术处理文本可以给您带来一些很酷的效果,详细请看下文介绍2026-03-03
ai怎么混合两种颜色? illustrator混合两个色块的颜色的方法
ai填充不同颜色的图形重叠以后,想要将两种颜色混合,该怎么混合颜色呢?下面我们就来看看详细的教程2024-07-18 ai网格线间距默认的不是很喜欢,想要自己调整一下,该怎么调整呢?今天我们就来看看参考线调整技巧2024-05-28
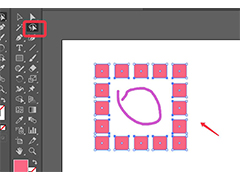
ai路径平均效果怎么用? illustrator使用平均路径的教程
Adobe Illustrator中有一个路径平均功能,如何使用呢?下面小编为大家演示路径平均功能的一种使用方法2024-05-21ai保存pdf格式出现多余内容怎么解决? 去掉pdf文件多余内容的技巧
ai保存pdf格式出现多余内容怎么解决?ai中的文档保存为pdf文件的时候,发现有多余内容,该怎么操作呢?下面我们就来看看去掉pdf文件多余内容的技巧2023-12-19- ai描边在哪里?ai中想要设置描边,该怎么操作呢?下面我们就来看看ai设置描边的多种方法2023-12-19
- ai原位复制怎么用?复制图形的时候,想要原位复制粘贴,该怎么操作呢?下面我们就来看看ai原位复制快捷键介绍2023-12-19
ai怎么让文字随着路径变形? illustrator区域文字不跟着变换方向问题的
ai怎么让文字随着路径变形?选中文字后,发现文字不跟随变换区域旋转该怎么办呢?下面我们就来看看illustrator区域文字不跟着变换问题的解决办法2023-11-30ai渐变色怎么调方向? illustrator将渐变颜色反向的技巧
ai渐变色怎么调方向?ai中给图形填渐变色,想要进行反向,该怎么操作呢?下面我们就来看看illustrator将渐变颜色反向的技巧2023-11-30
Ai彩色logo怎么做反白反黑效果? ai彩色logo转化为黑白稿的技巧
Ai彩色logo怎么做反白反黑效果?设计的彩色logo想要做黑白稿,就是反黑反白效果,下面我们就来看看ai彩色logo转化为黑白稿的技巧2023-11-12


最新评论