
AI制作可爱卡通风格的绿色文字教程
Step 14
步骤14For the other leaves we are going to create an Art Brush.
至于其他叶片我们要创造一个艺术刷。You can draw these elements with the Pen Tool (P), but you'll find it more consistent and easier to use a brush.
你可以借鉴这些元素与钢笔工具性( P ) ,但你会发现它更一致和更容易使用毛笔。Draw an oblong ellipse.
制定一个椭圆形椭圆形。Then with the Direct Selection Tool (A), select the right anchor point in the ellipse.
然后与直接选择工具(一) ,选择正确的定位点,在椭圆形。When you select an anchor point the Control Panel will default to the Anchor Point Options.
当您选择一个定位点控制面板,将默认为定位点的选择。Convert the anchor point to a Corner (the first button to the right on the Control Panel).
转换定位点,以一个角落(第一个按钮的权利,对控制面板) 。Do this again for the left anchor point.
这样做,再次为左锚点。Next, squish the ellipse down from the top to half its original size.
其次,挤椭圆从顶端的一半,其原始大小。
Step 15
第15步Drag the oval into the Brush Panel and choose New Art Brush.
拖动椭圆形成的画笔面板,并选择新的艺术画笔。In the Art Brush options change Colorization to Tints.
在艺术画笔选项改变色,以色彩。This lets you change the color of the brush without creating a new brush.
这可让您改变颜色的画笔,没有建立一个新的画笔。You don't need to change the colors of the brush strokes for this tutorial, but it is good practice.
您不需要改变颜色的画笔笔划为这补习,但它是好的做法。
Step 16
步骤16With your new brush, make a swirl shape for a leaf blade.
与您的新刷子,作出旋流形成一个叶片。You might need to change the stroke of the brush if it looks to small or too big.
您可能需要改变中风的画笔如果看起来小或过大。When you get a stroke you like, go to Object > Expand.
当你得到中风,你想,去反对>扩大。You will also want to clean up the unfilled stroke.
你也将要清理的空中风。An easy way to do this is to go Object > Path > Clean Up.
一个简单的方法做,这是去对象>路径>清理。Also, make sure all the check boxes are checked and press OK.
同时,请确认所有复选框检查,并按下确定。
Step 17
步骤17Select the expanded brush shape and create a Linear Gradient with the same swatches as the original text gradient.
选择扩大刷形状和创建一个线性梯度具有相同swatches作为原始文本梯度。
Step 18
步骤18Repeat the steps for creating the leaf blade around your text.
重复这些步骤,为创造叶片周围的文本。Try to vary the shape and size of the blades.
尝试不同的形状和大小的叶片。
Step 19
步骤19Next we're going to add some more water droplets around the text.
明年我们要添加一些更多的水滴周围的文本。Simply Copy (Command + C) the droplets on the leaf you already made and Paste (Command + V) them around the text.
简单的拷贝(指挥+三)液滴对叶,你已经取得的并粘贴( Command + V键) ,他们周围的文本。Also, be sure to vary their size and shape.
同时,一定要改变其大小和形状。
Step 20
步骤20Now it is time to work on the dirt at the bottom of the text.
现在是时间来的工作,对污垢在底部的文本。Double click on the Pencil Tool (N) in the Tools Panel to bring up the Pencil Tool Options.
双击对铅笔工具( n )在工具面板把铅笔工具选项。Change the Fidelity to 5 to get really smooth lines.
改变富达至5得到真正的顺利线。Use you Pencil Tool (N) to draw a small circular shape.
你使用铅笔工具( n )为制定一个小圆形形状。Press Alt before you let go to close the shape.
按ALT之前,你放过关闭的形状。Next, create a Radial Gradient with the interior swatch a brown color (C=35 M=60 Y=80 K=25) and the exterior swatch a dark brown color (C=50 M=70 Y=80 K=70) .
接下来,创建一个径向梯度与内部Swatch的一褐色(三= 35米= 60为Y = 80当K = 25 )和外部Swatch的一深棕色的颜色(三=五十米= 70为Y = 80当K = 70 ) 。Place the spot on the first letter of your word.
地方当场就的第一个字母,您的Word 。Scale the dot down smaller than one of the droplets.
规模点下跌小于1的液滴。
Step 21
步骤21Repeat this till you have a pile of dirt spots on you first letter.
重复此,直至你有一堆脏点,对你的第一个字母。
Step 22
步骤22Copy (Command + C) and Paste the dirt pile until you have covered the very bottom of all the letters.
复制(指挥+三)并粘贴污垢桩,直到您已经涵盖了非常底部的所有信件。
Step 23
步骤23Draw a Radial Gradient ellipse like you did for the ladybug drop shadow.
以此为径向梯度椭圆喜欢你没有为瓢虫下降的阴影。Squish the ellipse to about half the size.
挤椭圆约一半大小。Send the ellipse behind all the artwork and set it to Multiply.
发送椭圆背后的所有作品,并将其设置为倍增。
Step 24
步骤24Repeat this drop shadow under all the letters.
重复此下拉阴影下,所有的信件。
Step 25
步骤25For the background create a rectangle with the Rectangle Tool that is the size of you document.
为背景,创建一个矩形与矩形工具是规模,您的文件。Give it a Radial Gradient, make the interior swatch white and the second swatch a light green (C=13 M=0 Y=38 K=0).
给它一个径向梯度,使内部Swatch的白色和第二Swatch的一浅绿色(三=一三米= 0为Y = 38当K = 0 ) 。
Final Image
最后的形象Now you have a nice Green type treatment!
现在您有一个不错的绿色型治疗!
教程结束,以上就是AI制作可爱卡通风格的绿色文字教程,希望大家喜欢本教程!
相关文章
 偏移文本或偏移路径意味着偏离了原来的位置,虽然听起来可能不太理想或杂乱无章,但在Illustrator中使用偏移技术处理文本可以给您带来一些很酷的效果,详细请看下文介绍2026-03-03
ai怎么混合两种颜色? illustrator混合两个色块的颜色的方法
ai填充不同颜色的图形重叠以后,想要将两种颜色混合,该怎么混合颜色呢?下面我们就来看看详细的教程2024-07-18 ai网格线间距默认的不是很喜欢,想要自己调整一下,该怎么调整呢?今天我们就来看看参考线调整技巧2024-05-28
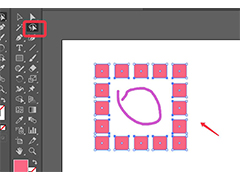
ai路径平均效果怎么用? illustrator使用平均路径的教程
Adobe Illustrator中有一个路径平均功能,如何使用呢?下面小编为大家演示路径平均功能的一种使用方法2024-05-21ai保存pdf格式出现多余内容怎么解决? 去掉pdf文件多余内容的技巧
ai保存pdf格式出现多余内容怎么解决?ai中的文档保存为pdf文件的时候,发现有多余内容,该怎么操作呢?下面我们就来看看去掉pdf文件多余内容的技巧2023-12-19- ai描边在哪里?ai中想要设置描边,该怎么操作呢?下面我们就来看看ai设置描边的多种方法2023-12-19
- ai原位复制怎么用?复制图形的时候,想要原位复制粘贴,该怎么操作呢?下面我们就来看看ai原位复制快捷键介绍2023-12-19
ai怎么让文字随着路径变形? illustrator区域文字不跟着变换方向问题的
ai怎么让文字随着路径变形?选中文字后,发现文字不跟随变换区域旋转该怎么办呢?下面我们就来看看illustrator区域文字不跟着变换问题的解决办法2023-11-30ai渐变色怎么调方向? illustrator将渐变颜色反向的技巧
ai渐变色怎么调方向?ai中给图形填渐变色,想要进行反向,该怎么操作呢?下面我们就来看看illustrator将渐变颜色反向的技巧2023-11-30
Ai彩色logo怎么做反白反黑效果? ai彩色logo转化为黑白稿的技巧
Ai彩色logo怎么做反白反黑效果?设计的彩色logo想要做黑白稿,就是反黑反白效果,下面我们就来看看ai彩色logo转化为黑白稿的技巧2023-11-12


最新评论