
Android实现状态栏(statusbar)渐变效果的示例
前言
qq最近更新搞了渐变式状态栏.然后...新需求就是要加这个.唉
先来张效果图:

常见的方式:
设置Theme,状态栏透明.
<item name="android:windowTranslucentStatus">true</item>
实现起来比较简单.
几行代码搞定了.
但是.我要泼冷水,这种方式会引起这些问题:
1.软键盘弹起bug
2.fragment不适应
这种方式的优点:
兼容到4.4
我的看法:
1.用全屏模式或者状态栏透明的方式去实现,感觉很勉强
2.为了一个statusbar的效果,然后去处理一大堆不适应,我认为是不值得的.特别是软键盘弹出的问题
3.如果为了适配4.4,要费这么大功夫的话...
我的实现方式:
1.拿到StatusBar:
很简单,翻翻DecorView源码,就能知道,是通过ColorViewState 配置创建的View.

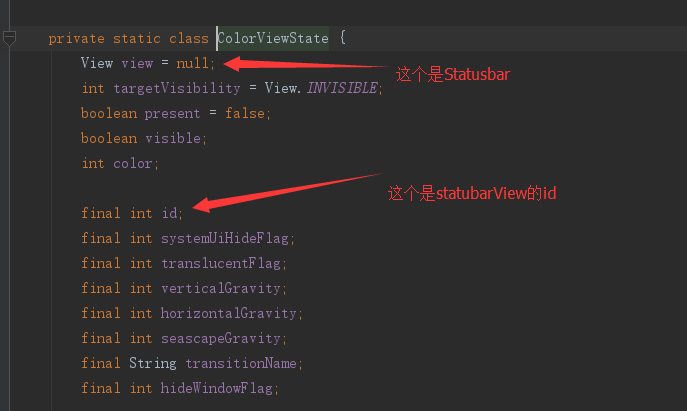
由于是私有成员,要拿到对应的参数,一般做法是使用反射.
这里我取了点巧,既然是View,那么就能findviewbyId找到
只要想办法拿到com.android.internal.R.id.statusBarBackground这个id值就行了
 private void initStatusBar() {
    if (statusBarView == null) {
      //android系统级的资源id得这么拿,不然拿不到
      int identifier = getResources().getIdentifier("statusBarBackground", "id", "android");
      statusBarView = getWindow().findViewById(identifier);
    }
    if (statusBarView != null) {
      statusBarView.setBackgroundResource("你的渐变drawable资源id");
    }
  }
2.等StatusBar绘制完成
如果你直接在onCreate中调用上面的方法,你会发现,拿到的是null.
这是因为Statusbar还没绘制完成.
所以,可以在onCreate()中使用Looper.myQueue().addIdleHandler()来保证Statusbar绘制完成后再findview.
然后对DecorView设置addOnLayoutChangeListener监听
当布局发生变化,就设置statusbar的背景
    Looper.myQueue().addIdleHandler(new MessageQueue.IdleHandler() {
      @Override
      public boolean queueIdle() {
        if (isStatusBar()) {
          initStatusBar();
          getWindow().getDecorView().addOnLayoutChangeListener(new View.OnLayoutChangeListener() {
            @Override
            public void onLayoutChange(View v, int left, int top, int right, int bottom, int oldLeft, int oldTop, int oldRight, int oldBottom) {
              initStatusBar();
            }
          });
        }
        return false;
      }
    });
3.为什么要addOnLayoutChangeListener:
其实不加监听,也能实现改变statusbar颜色的效果..但是会出现问题
比如弹软键盘后,弹popwindow后,引起window状态改变时,statusbar的颜色就会复原...
基本完整的代码
  private View statusBarView;
  @Override
  protected void onCreate(Bundle savedInstanceState) {
    //延时加载数据.
    Looper.myQueue().addIdleHandler(new MessageQueue.IdleHandler() {
      @Override
      public boolean queueIdle() {
        if (isStatusBar()) {
          initStatusBar();
          getWindow().getDecorView().addOnLayoutChangeListener(new View.OnLayoutChangeListener() {
            @Override
            public void onLayoutChange(View v, int left, int top, int right, int bottom, int oldLeft, int oldTop, int oldRight, int oldBottom) {
              initStatusBar();
            }
          });
        }
        //只走一次
        return false;
      }
    });
  }
  private void initStatusBar() {
    if (statusBarView == null) {
      int identifier = getResources().getIdentifier("statusBarBackground", "id", "android");
      statusBarView = getWindow().findViewById(identifier);
    }
    if (statusBarView != null) {
        statusBarView.setBackgroundResource("你的渐变drawable资源id");
    }
  }

   protected boolean isStatusBar() {
    return true;
  }
这种方式的缺点:
1.因为没有使用全屏的模式,所以适配4.4是没戏了.
以上就是本文的全部内容,希望对大家的学习有所帮助,也希望大家多多支持脚本之家。
相关文章
 这篇文章主要介绍了 Android 自定义标题栏的实例详解的相关资料,希望通过本文能帮助到大家,让大家实现这样类似的功能,需要的朋友可以参考下2017-10-10
 这篇文章主要介绍了Android后台启动Activity的实现示例,帮助大家更好的理解和学习使用Android开发,感兴趣的朋友可以了解下2021-04-04
 这篇文章主要介绍了 Android xmlns 的作用及其自定义实例详解的相关资料,需要的朋友可以参考下2017-06-06
 本篇文章是对Android开机自启动程序进行了详细的分析介绍,需要的朋友参考下2013-06-06
 本文主要介绍了在安卓的百度地图开发里面简单实现持续定位的方法,具有一定的参考价值,下面跟着小编一起来看下吧2017-01-01
 这篇文章主要介绍了Android带清除按钮、密码可见小眼睛的输入框,本文给大家介绍的非常详细,对大家的学习或工作具有一定的参考借鉴价值,需要的朋友可以参考下2021-01-01
 这篇文章主要为大家详细介绍了Android仿iOS侧滑退出当前界面功能,具有一定的参考价值,感兴趣的小伙伴们可以参考一下2017-12-12
 这篇文章详细介绍了android内存及内存溢出的问题,有需要的朋友可以参考一下2013-09-09
Android ActionBarActivity设置全屏无标题实现方法总结
这篇文章主要介绍了Android ActionBarActivity设置全屏无标题实现方法总结的相关资料,需要的朋友可以参考下2017-04-04 这篇文章主要介绍了Android实现粒子雨效果的制作过程,粒子雨效果,主要用到绘画线条和多线程,其中的抽象类设计方法值得学习,感兴趣的小伙伴们可以参考一下2016-01-01


最新评论