
android中关于call拨号功能的实现方法
更新时间:2019年05月12日 10:25:47 作者:HyperMan
这篇文章主要介绍了android中关于call拨号功能实现的记录,非常不错,具有一定的参考借鉴价值,需要的朋友可以参考下
前几天考试居然记错dial和call,故在此写上小demo来作区别,加深印象。
主要是实现call(拨通电话)功能,dial(拨电话)功能用作对比,话不多说,贴上代码。
1.创建布局文件如下:
<?xml version="1.0" encoding="utf-8"?>
<LinearLayout xmlns:android="http://schemas.android.com/apk/res/android"
  android:orientation="vertical"
  android:layout_width="match_parent"
  android:layout_height="match_parent"
>
<Button
  android:id="@+id/btn_dial"
  android:text="Dial"
  android:layout_width="match_parent"
  android:layout_height="wrap_content" />
<Button
  android:id="@+id/call"
  android:text="call"
  android:layout_width="match_parent"
  android:layout_height="wrap_content" />
</LinearLayout>
也就是添加了两个按钮DIAL和CALL,废话
2.添加Java代码:
package com.cnblogs.dialandcall;

import android.Manifest;
import android.content.Intent;
import android.content.pm.PackageManager;
import android.net.Uri;
import android.support.annotation.NonNull;
import android.support.v4.app.ActivityCompat;
import android.support.v4.content.ContextCompat;
import android.support.v7.app.AppCompatActivity;
import android.os.Bundle;
import android.view.View;
import android.widget.Button;
import android.widget.Toast;

public class MainActivity extends AppCompatActivity implements View.OnClickListener {

  private Button btn_dial;
  private Button btn_call;
  @Override
  protected void onCreate(Bundle savedInstanceState) {
    super.onCreate(savedInstanceState);
    setContentView(R.layout.activity_main);

    btn_call = (Button)findViewById(R.id.btn_call);
    btn_call.setOnClickListener(this);

    btn_dial = (Button)findViewById(R.id.btn_dial);
    btn_dial.setOnClickListener(this);
  }

  @Override
  public void onClick(View v) {
    switch (v.getId()){
      case R.id.btn_call:
        onCall();
        break;
      case R.id.btn_dial:
        Intent dialIntent = new Intent(Intent.ACTION_DIAL);
        dialIntent.setData(Uri.parse("tel:10086"));
        startActivity(dialIntent);
        break;
    }
  }

  private void onCall() {
    int permissionCheck = ContextCompat.checkSelfPermission(this, Manifest.permission.CALL_PHONE);
    if(permissionCheck!= PackageManager.PERMISSION_GRANTED){
      ActivityCompat.requestPermissions(this,new String[]{Manifest.permission.CALL_PHONE}, Integer.parseInt("001"));
    }
    else{
      startActivity(new Intent(Intent.ACTION_CALL).setData(Uri.parse("tel:10086")));
    }
  }

  @Override
  public void onRequestPermissionsResult(int requestCode, @NonNull String[] permissions, @NonNull int[] grantResults) {
    switch (requestCode){
      case 001:
        if(grantResults.length>0&&(grantResults[0]==PackageManager.PERMISSION_GRANTED)){
          onCall();
        }
        else {
          Toast.makeText(getBaseContext(),"You Need Allow The Permission To Run This App",Toast.LENGTH_SHORT).show();
        }
        break;
    }
  }
}
•需要注意的是,我在btn_call按钮点击事件中添加了单独的方法来进行处理,这是因为CALL_PHONE在Android 6.0及以上版本被认为是危险权限,需要在程序运行时申请。
•关于Android中权限的分类请参考以下链接:
https://developer.android.google.cn/guide/topics/security/permissions.html#normal-dangerous
3.添加Manifest.xml文件代码:
<uses-permission android:name="android.permission.CALL_PHONE" />
千万不要忘记在AndroidManifest.xml中添加上权限申明哦:)
实现效果截图:
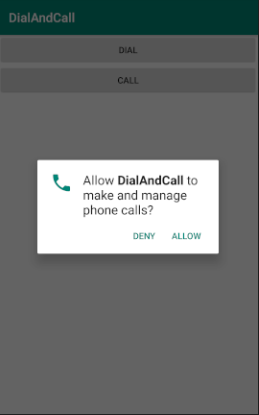
截图1.点击CALL按钮弹出提示框

截图2.点击确认按钮直接跳转至通话界面
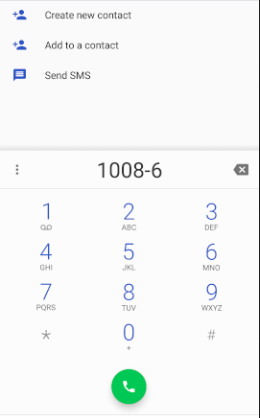
截图3.点击DIAL按钮进入拨号界面
总结
以上所述是小编给大家介绍的android中关于call拨号功能的实现方法,希望对大家有所帮助,如果大家有任何疑问欢迎给我留言,小编会及时回复大家的!
您可能感兴趣的文章:
- Android 中 ActivityLifecycleCallbacks的实例详解
- Android Call(打电话)的基本知识详解
- Android定时器实现的几种方式整理及removeCallbacks失效问题解决
- 基于Android CALL && SendMes Test的相关介绍
- Android Studio Intent隐式启动,发短信,拨号,打电话,访问网页等实例代码
- Android跳转到系统联系人及拨号或短信界面
- Android开发之电话拨号器实例详解
- Android获取手机通讯录、sim卡联系人及调用拨号界面方法
- Android 2.3 拨号上网流程从源码角度进行分析
- android2.3.5 CDMA/EVDO拨号APN解决方案
- Android拨号盘 支持T9搜索和号码搜索等拨号盘案例
相关文章

图文详解Android Studio搭建Android集成开发环境的过程
这篇文章主要以图文的方式详细介绍了Android Studio搭建Android集成开发环境的过程,文中安装步骤介绍的非常详细,具有一定的参考价值,感兴趣的小伙伴们可以参考一下2015-12-12 这篇文章主要为大家介绍了Android 10 启动Init进程解析,有需要的朋友可以借鉴参考下,希望能够有所帮助,祝大家多多进步,早日升职加薪2022-10-10
 这篇文章主要为大家介绍了Android嵌套线性布局玩法坑解决方法,有需要的朋友可以借鉴参考下,希望能够有所帮助,祝大家多多进步,早日升职加薪2022-10-10
 这篇文章主要为大家详细介绍了Android自定义View实现可以拖拽的GridView,文中示例代码介绍的非常详细,具有一定的参考价值,感兴趣的小伙伴们可以参考一下2016-06-06
 倒计时效果相信大家都不陌生,我们可以使用很多种方法去实现此效果,这里自己采用 CountDownTimer 定时器简单封装下此效果,方便我们随时调用。下面小编给大家分享android验证码倒计时封装方法,感兴趣的朋友一起看看吧2018-01-01
 今天小编就为大家分享一篇解决Android 虚拟按键遮住了页面内容的问题,具有很好的参考价值,希望对大家有所帮助。一起跟随小编过来看看吧2018-07-07
Android抽屉导航Navigation Drawer实例解析
这篇文章主要为大家详细介绍了Android抽屉导航NavigationDrawer实例,感兴趣的小伙伴们可以参考一下2016-05-05 安卓开发网络请求可谓是安卓开发的灵魂,如果你不会网络请求,那么你开发的应用软件就是一具没有灵魂的枯骨。本文主要为大家介绍的是Android的网络请求,感兴趣的可以跟随小编一起学习一下2022-11-11
 这篇文章主要为大家详细介绍了Android异步更新UI的四种方式,感兴趣的小伙伴们可以参考一下2016-05-05
android 点击EditText始终不弹出软件键盘实现代码
这篇文章主要介绍了android 点击EditText始终不弹出软件键盘实现代码的相关资料,需要的朋友可以参考下2016-11-11


最新评论