SSM项目频繁打成war包部署,使用tomcat和maven实现热部署配置
背景
众所周知,我们平时将JavaEE项目开发完后,需要将项目部署到服务器的tomcat上。常用的部署方式是将项目打包成war包放到tomcat的webapps下,然后重启tomcat,然后通过ip地址+端口号访问。这样部署本身是没问题的,但问题在于,如果还是在生产环境下的话,需要频繁的更改优化项目,那么就需要频繁的将项目打war包,替换webapps下的war包,操作繁琐。
接下来我们讲述如何实现本地编程,然后部署项目到远程服务器的tomcat上,实现热部署。
所用技术&工具
- maven(项目构建和依赖管理)
- tomcat7插件 (部署到tomcat的插件)
- tomcat服务器 (web服务器)
- 编译器推荐使用IDEA
1.确保本地具有远程tomcat的使用权限
修改Tomcat下{TOMCAT_HOME}conf/tomcat-users.xml配置文件,添加用户名、密码、权限。
<role rolename="manager-gui" />
<role rolename="manager-script" />
<role rolename="admin-gui" />
<role rolename="admin-script" />
<user username="tomcat" password="tomcat" roles="manager-gui,manager-script,admin-gui,admin-script"/>
2.配置Tomcat允许远程访问
在远程服务器的{TOMCAT_HOME}conf/Catalina/localhost/目录下创建一个manager.xml文件,配置如下内容:
<?xml version="1.0" encoding="UTF-8"?>
<Context privileged="true" antiResourceLocking="false" docBase="${catalina.home}/webapps/manager">
     <Valve className="org.apache.catalina.valves.RemoteAddrValve" allow="^.*$" />
</Context>
注:如果只想部分用户使用,可在allow配置IP,例如
allow="192.168.0.102"
3.重启远程Tomcat
在tomcat的bin目录下依次执行
//关闭tomcat
./shutdown.sh
//启动tomcat
./startup.sh
4.测试是否具有使用权限
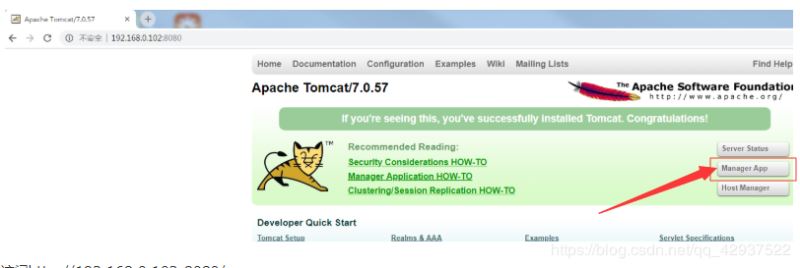
访问tomcat,例如http://192.168.0.102:8080(使用自己的服务器或是虚拟机的ip地址)
点击Manager APP

输入刚才配置的tomcat的账号和密码

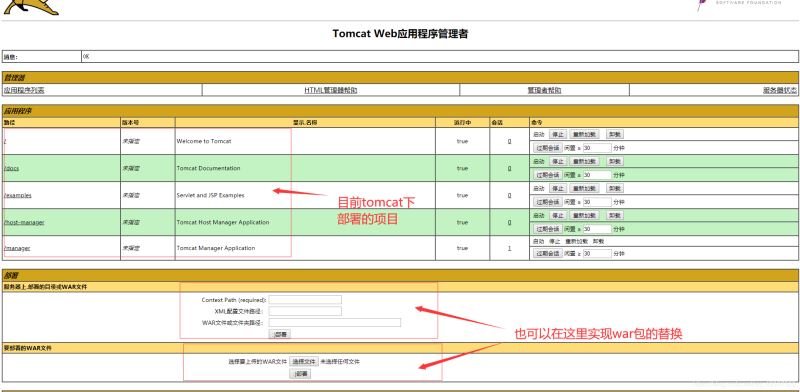
如果跳转到这个页面证明配置完成

当然也可以在当前页面实现war的部署和替换,这也是另一种部署方式,不过依然没有热部署方便
问题:如果出现403报错如下
403 Access Denied

You are not authorized to view this page.

By default the Manager is only accessible from a browser running on the same machine as Tomcat. If you wish to modify this restriction, you'll need to edit the Manager's context.xml file.

If you have already configured the Manager application to allow access and you have used your browsers back button, used a saved book-mark or similar then you may have triggered the cross-site request forgery (CSRF) protection that has been enabled for the HTML interface of the Manager application. You will need to reset this protection by returning to the main Manager page. Once you return to this page, you will be able to continue using the Manager application's HTML interface normally. If you continue to see this access denied message, check that you have the necessary permissions to access this application.

If you have not changed any configuration files, please examine the file conf/tomcat-users.xml in your installation. That file must contain the credentials to let you use this webapp.
解决
修改 /webapps/manager/META_INF/context.xml文件,将文件中对访问的来源受限设置注释
<Context antiResourceLocking="false" privileged="true" >
 <!--注释这里,去除对访问权限的设置
  <Valve className="org.apache.catalina.valves.RemoteAddrValve"
     allow="127\.\d+\.\d+\.\d+|::1|0:0:0:0:0:0:0:1" />
     -->
</Context>
然后直接刷新页面就行了,无需重启tomcat
5.在maven中配置远程Tomcat的管理员账号
在本地maven的{MAVEN_HOME}/conf/settings.xml文件中节点下添加如下内容:
<!-- 配置可以操作tomcat的用户名和密码 -->
<server>
  <id>crocutax</id>
  <!-- server login name -->
  <username>tomcat</username>
  <!-- server login password -->
  <password>tomcat</password>
</server>
6.在项目中配置maven的tomcat7插件
<!-- 配置Tomcat插件 -->
<plugin>
	<groupId>org.apache.tomcat.maven</groupId>
	<artifactId>tomcat7-maven-plugin</artifactId>
	<version>2.2</version>

	<configuration>
		<!-- 此处的名字必须和{MAVEN_HOME}/conf/settings.xml中配置的server节点的id一致-->
		<server>crocutax</server>
		<!--服务器端口号-->
		<port>8080</port>
		<!-- 项目发布的路径,默认就是tomcat/webapps目录,可以指定深层次目录,
		留"/",则默认在webapps目录下部署ROOT.war包-->
		<path></path>
		<!-- 注意tomcat7此处的url,不能随意修改,后缀必须是text,不能是html.
		 如果是本地tomcat部署,用localhost和ip都可以 -->
		<url>http://localhost:8080/manager/text</url>
		<!--<url>http://117.62.110.110:8080/manager/text</url>-->
		<!--解决中文参数乱码问题-->
		<uriEncoding>UTF-8</uriEncoding>
		<update>true</update>
		<!--配置在tomcat\conf\tomcat-users.xml中定义的用户名-->
		<username>tomcat</username>
		<password>tomcat</password>
	</configuration>
</plugin>
- server : 名字必须和{MAVEN_HOME}/conf/settings.xml中配置的server节点的id一致
- port : 服务器端口号
- path :项目发布的路径,默认就是tomcat/webapps目录,可以指定深层次目录,留"/",则默认在webapps目录下部署ROOT.war包
- url : 注意tomcat7此处的url,不能随意修改,后缀必须是text,不能是html. 如果是本地tomcat部署,用localhost和ip都可以uriEncoding :解决中文参数乱码问题
- update : 热部署,否则后期会报错
- username :配置{TOMCAT_HOME}\conf\tomcat-users.xml中定义的用户名
- password :配置{TOMCAT_HOME}\conf\tomcat-users.xml中定义的密码
7.在项目中启动maven的tomcat部署命令
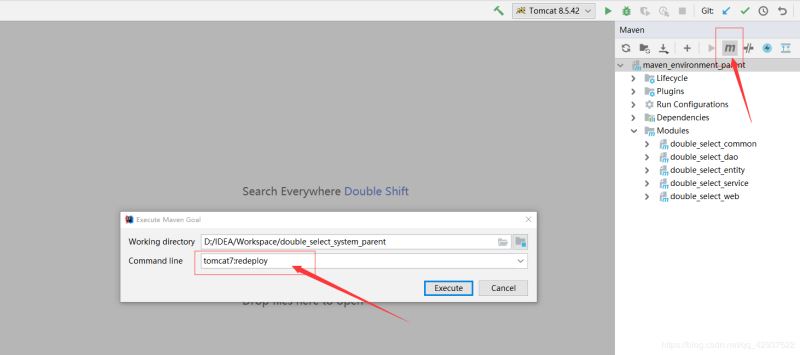
初次部署可以使用 “tomcat7:deploy” 命令(在tomcat的webapps下没有Root文件夹时使用)
如果已经部署过使用 **“tomcat7:redeploy” **命令
若有时遇到项目冲突可以使用命令
-DskipTests的意思跳过测试
clean tomcat7:redeploy -DskipTests
使用的时候出现找不到文件的错误,重新编译或者打包一下即可
使用IDEA如下图操作即可

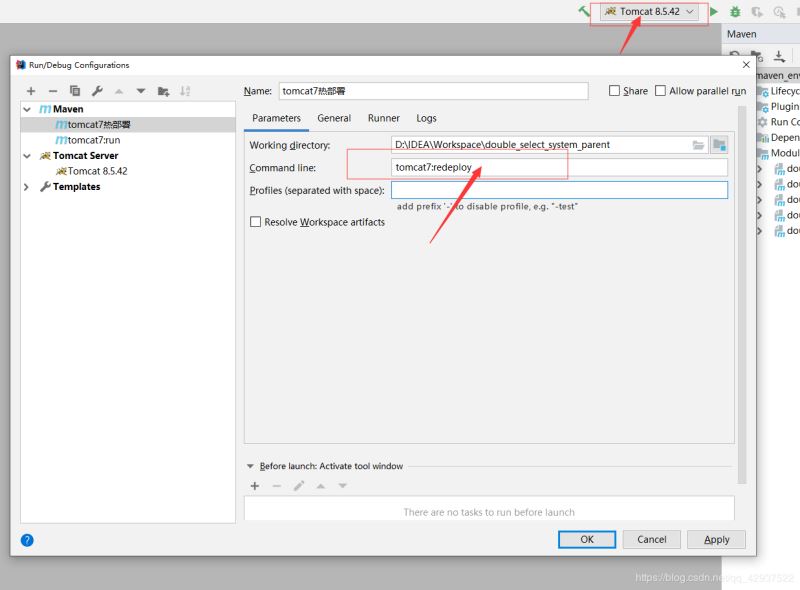
当然也可以配置快捷启动

也可使用IDE->Terminal 或 项目根目录打开dos窗口,输入maven命令
至此tomcat+maven的热部署就配置完成了,再也不用为了繁琐的打包部署而揪心了
总结
以上所述是小编给大家介绍的SSM项目频繁打成war包部署,使用tomcat和maven实现热部署配置,希望对大家有所帮助,如果大家有任何疑问请给我留言,小编会及时回复大家的。在此也非常感谢大家对脚本之家网站的支持!
如果你觉得本文对你有帮助,欢迎转载,烦请注明出处,谢谢!


最新评论