
SpringBoot异步任务使用方法详解
更新时间:2020年03月13日 12:29:17 作者:玉天恒
这篇文章主要介绍了SpringBoot异步任务使用方法详解,文中通过示例代码介绍的非常详细,对大家的学习或者工作具有一定的参考学习价值,需要的朋友可以参考下
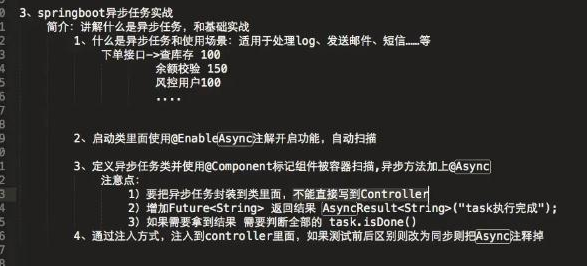
步骤,如图所示:
1.添加异步任务业务类
package top.ytheng.demo.task;

import java.util.concurrent.Future;

import org.springframework.scheduling.annotation.Async;
import org.springframework.scheduling.annotation.AsyncResult;
import org.springframework.stereotype.Component;

//异步任务业务类
@Component
//标记此类是异步类,也可在方法中标记
//不加,则类里面的方法为同步执行
@Async
public class AsyncTask {

  public void task1() throws InterruptedException {
    long begin = System.currentTimeMillis();
    Thread.sleep(1000);
    long end = System.currentTimeMillis();
    System.out.println("任务1耗时:" + (end - begin));
  }

  public void task2() throws InterruptedException {
    long begin = System.currentTimeMillis();
    Thread.sleep(2000);
    long end = System.currentTimeMillis();
    System.out.println("任务2耗时:" + (end - begin));
  }

  public void task3() throws InterruptedException {
    long begin = System.currentTimeMillis();
    Thread.sleep(3000);
    long end = System.currentTimeMillis();
    System.out.println("任务3耗时:" + (end - begin));
  }

  //测试拿到返回结果
  public Future<String> task4() throws InterruptedException {
    long begin = System.currentTimeMillis();
    Thread.sleep(1000);
    long end = System.currentTimeMillis();
    System.out.println("任务4耗时:" + (end - begin));
    return new AsyncResult<String>("任务4");
  }

  public Future<String> task5() throws InterruptedException {
    long begin = System.currentTimeMillis();
    Thread.sleep(2000);
    long end = System.currentTimeMillis();
    System.out.println("任务5耗时:" + (end - begin));
    return new AsyncResult<String>("任务5");
  }

  public Future<String> task6() throws InterruptedException {
    long begin = System.currentTimeMillis();
    Thread.sleep(3000);
    long end = System.currentTimeMillis();
    System.out.println("任务6耗时:" + (end - begin));
    return new AsyncResult<String>("任务6");
  }
}
2.添加测试控制器
package top.ytheng.demo.controller;
import java.util.concurrent.ExecutionException;
import java.util.concurrent.Future;
import org.springframework.beans.factory.annotation.Autowired;
import org.springframework.web.bind.annotation.GetMapping;
import org.springframework.web.bind.annotation.RequestMapping;
import org.springframework.web.bind.annotation.RestController;
import top.ytheng.demo.task.AsyncTask;
@RestController
@RequestMapping("api/v1/async")
public class TaskController {
@Autowired
private AsyncTask asyncTask;
@GetMapping("/test")
public Object test() throws InterruptedException, ExecutionException {
long begin = System.currentTimeMillis();
//asyncTask.task1();
//asyncTask.task2();
//asyncTask.task3();
Future<String> result1 = asyncTask.task4();
Future<String> result2 = asyncTask.task5();
Future<String> result3 = asyncTask.task6();
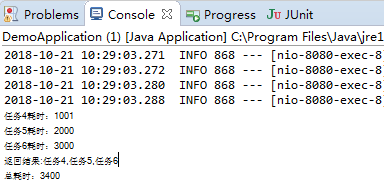
System.out.println("返回结果:" + result1.get() + "," + result2.get() + "," + result3.get());
for(;;) {
if(result1.isDone() && result2.isDone() && result3.isDone()) {
break;
}
}
long end = System.currentTimeMillis();
long total = end - begin;
System.out.println("总耗时:" + total);
return "总耗时:" + total;
}
}
3.添加启动类
package top.ytheng.demo;

import org.mybatis.spring.annotation.MapperScan;
import org.springframework.scheduling.annotation.EnableAsync;
import org.springframework.scheduling.annotation.EnableScheduling;

import org.springframework.boot.autoconfigure.SpringBootApplication;
import org.springframework.boot.web.servlet.ServletComponentScan;

@SpringBootApplication //等于下面3个
//@SpringBootConfiguration
//@EnableAutoConfiguration
//@ComponentScan
//拦截器用到
@ServletComponentScan
//MyBatis用到
@MapperScan("top.ytheng.demo.mapper")
//定时使用(开启定时任务)
@EnableScheduling
//开启异步任务
@EnableAsync
public class DemoApplication {

  public static void main(String[] args) {
    SpringApplication.run(DemoApplication.class, args);
  }
}
4.右键项目Run As启动,访问url
http://localhost:8080/api/v1/async/test
结果:
以上就是本文的全部内容,希望对大家的学习有所帮助,也希望大家多多支持脚本之家。
相关文章

springboot集成nacos报错:get data from Nacos
这篇文章给大家介绍了springboot集成nacos报错:get data from Nacos error,dataId:null.yaml的原因及解决方法,如果又遇到相同问题的朋友可以参考阅读本文2023-10-10
SpringBoot使用RestTemplate实现HTTP请求详解
这篇文章主要为大家详细介绍了SpringBoot如何使用RestTemplate实现进行HTTP请求,文中的示例代码讲解详细,感兴趣的小伙伴可以跟随小编一起学习一下2024-03-03 在 Java 开发中,截取字符串是一个非常常见的操作,无论是获取文件名还是提取某些特定内容,本文详细介绍了截取字符串最后一位及其他常见截取操作的多种方法,帮助开发者快速上手,感兴趣的朋友跟随小编一起看看吧2024-12-12
 最近项目要求部署到其他公司的服务器上,但是又不想将源码泄露出去,要求对正式环境的启动包进行安全性处理,防止客户直接通过反编译工具将代码反编译出来,本文介绍了如何对SpringBoot项目Jar包进行加密防止反编译,需要的朋友可以参考下2023-10-10
 这篇文章主要介绍了这一次搞懂Spring代理创建及AOP链式调用过程操作,具有很好的参考价值,希望对大家有所帮助。一起跟随小编过来看看吧2020-08-08
java高级用法之绑定CPU的线程Thread Affinity简介
java线程thread affinity是用来将java代码中的线程绑定到CPU特定的核上,用来提升程序运行的性能,这篇文章主要介绍了java高级用法之绑定CPU的线程thread affinity的相关知识,需要的朋友可以参考下2022-05-05 这篇文章主要介绍了SpringBoot2.0如何启用https协议,小编觉得挺不错的,现在分享给大家,也给大家做个参考。一起跟随小编过来看看吧2018-06-06
Spring Security其它权限校验方式&自定义权限校验方式
这篇文章主要介绍了Spring Security其它权限校验方式&自定义权限校验方式,具有很好的参考价值,希望对大家有所帮助,如有错误或未考虑完全的地方,望不吝赐教2024-08-08 这篇文章主要介绍了idea中Java实体类怎样生成序列化的版本号的方法,本文给大家介绍的非常详细,对大家的学习或工作具有一定的参考借鉴价值,需要的朋友可以参考下2020-11-11
SpringBoot项目打包发布到外部tomcat(出现各种异常的解决)
这篇文章主要介绍了SpringBoot项目打包发布到外部tomcat(出现各种异常的解决),文中通过示例代码介绍的非常详细,对大家的学习或者工作具有一定的参考学习价值,需要的朋友们下面随着小编来一起学习学习吧2019-09-09


最新评论