
基于spring boot 2和shiro实现身份验证案例
Shiro是一个功能强大且易于使用的Java安全框架,官网:https://shiro.apache.org/。
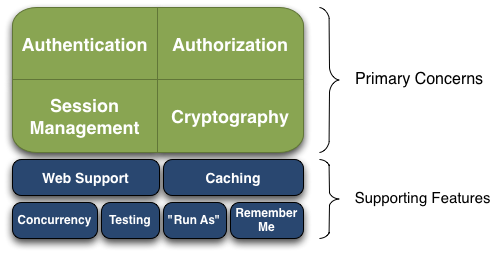
主要功能有身份验证、授权、加密和会话管理。
其它特性有Web支持、缓存、测试支持、允许一个用户用另一个用户的身份进行访问、记住我。
Shiro有三个核心组件:Subject,SecurityManager和 Realm。
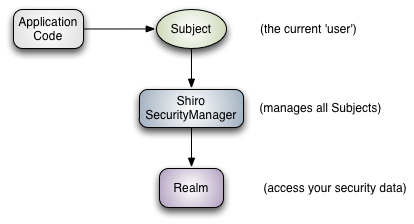
Subject:即当前操作“用户”,“用户”并不仅仅指人,也可以是第三方进程、后台帐户或其他类似事物。
SecurityManager:安全管理器,Shiro框架的核心,通过SecurityManager来管理所有Subject,并通过它来提供安全管理的各种服务。
Realm:域,充当了Shiro与应用安全数据间的“桥梁”或者“连接器”。也就是说,当对用户执行认证(登录)和授权(访问控制)验证时,Shiro会从应用配置的Realm中查找用户及其权限信息。当配置Shiro时,必须至少指定一个Realm,用于认证和(或)授权。
Spring Boot 中整合Shiro,根据引入的依赖包shiro-spring和shiro-spring-boot-web-starter(当前版本都是1.4.2)不同有两种不同方法。
方法一:引入依赖包shiro-spring
1、IDEA中创建一个新的SpringBoot项目,pom.xml引用的依赖包如下:
<dependency>
   <groupId>org.springframework.boot</groupId>
      <artifactId>spring-boot-starter-web</artifactId>
    </dependency>

    <dependency>
      <groupId>org.apache.shiro</groupId>
      <artifactId>shiro-spring</artifactId>
      <version>1.4.2</version>
    </dependency>
2、创建Realm和配置shiro
(1)创建Realm
package com.example.demo.config;

import org.apache.shiro.authc.*;
import org.apache.shiro.authz.AuthorizationInfo;
import org.apache.shiro.realm.AuthorizingRealm;
import org.apache.shiro.subject.PrincipalCollection;

public class MyRealm extends AuthorizingRealm {

  /**权限信息,暂不实现*/
  @Override
  protected AuthorizationInfo doGetAuthorizationInfo(PrincipalCollection principalCollection) {
    return null;
  }

  /**身份认证:验证用户输入的账号和密码是否正确。*/
  @Override
  protected AuthenticationInfo doGetAuthenticationInfo(AuthenticationToken token) throws AuthenticationException {
    //获取用户输入的账号
    String userName = (String) token.getPrincipal();
    //验证用户admin和密码123456是否正确
    if (!"admin".equals(userName)) {
      throw new UnknownAccountException("账户不存在!");
    }
    SimpleAuthenticationInfo authenticationInfo = new SimpleAuthenticationInfo(userName, "123456", getName());
    return authenticationInfo;
    //实际项目中,上面账号从数据库中获取用户对象,再判断是否存在
    /*User user = userService.findByUserName(userName);
    if (user == null) {
      throw new UnknownAccountException("账户不存在!");
    }
    SimpleAuthenticationInfo authenticationInfo = new SimpleAuthenticationInfo(user,user.getPassword(), getName());
    return authenticationInfo;
    */
  }
}
(2)配置Shiro
package com.example.demo.config;

import org.apache.shiro.spring.web.ShiroFilterFactoryBean;
import org.apache.shiro.web.mgt.DefaultWebSecurityManager;
import org.springframework.context.annotation.Bean;
import org.springframework.context.annotation.Configuration;

import java.util.LinkedHashMap;
import java.util.Map;

@Configuration
public class ShiroConfig {
  @Bean
  MyRealm myRealm() {
    return new MyRealm();
  }

  @Bean
  DefaultWebSecurityManager securityManager() {
    DefaultWebSecurityManager manager = new DefaultWebSecurityManager();
    manager.setRealm(myRealm());
    return manager;
  }

  @Bean
  ShiroFilterFactoryBean shiroFilterFactoryBean() {
    ShiroFilterFactoryBean bean = new ShiroFilterFactoryBean();
    bean.setSecurityManager(securityManager());
    //如果不设置默认会自动寻找Web工程根目录下的"/login.jsp"页面
    bean.setLoginUrl("/login");
    //登录成功后要跳转的链接
    bean.setSuccessUrl("/index");
    //未授权界面
    bean.setUnauthorizedUrl("/403");
    //配置不会被拦截的链接
    Map<String, String> map = new LinkedHashMap<>();
    map.put("/doLogin", "anon");
    map.put("/**", "authc");
    bean.setFilterChainDefinitionMap(map);
    return bean;
  }
}
3、控制器测试方法
package com.example.demo.controller;

import org.apache.shiro.SecurityUtils;
import org.apache.shiro.authc.AuthenticationException;
import org.apache.shiro.authc.UnknownAccountException;
import org.apache.shiro.authc.UsernamePasswordToken;
import org.apache.shiro.subject.Subject;
import org.springframework.web.bind.annotation.GetMapping;
import org.springframework.web.bind.annotation.PostMapping;
import org.springframework.web.bind.annotation.RestController;

@RestController
public class LoginController {

  @GetMapping("/login")
  public String login() {
    return "登录页面...";
  }

  @PostMapping("/doLogin")
  public String doLogin(String userName, String password) {
    Subject subject = SecurityUtils.getSubject();
    try {
      subject.login(new UsernamePasswordToken(userName, password));
      return "登录成功!";
    } catch (UnknownAccountException e) {
      return e.getMessage();
    } catch (AuthenticationException e) {
      return "登陆失败,密码错误!";
    }
  }

  //如果没有先登陆,访问会跳到/login
  @GetMapping("/index")
  public String index() {
    return "index";
  }

  @GetMapping("/403")
  public String unauthorizedRole(){
    return "没有权限";
  }
}
方法二:引入依赖包shiro-spring-boot-web-starter
1、pom.xml中删除shiro-spring,引入shiro-spring-boot-web-starter
<dependency>
      <groupId>org.springframework.boot</groupId>
      <artifactId>spring-boot-starter-web</artifactId>
    </dependency>

    <dependency>
      <groupId>org.apache.shiro</groupId>
      <artifactId>shiro-spring-boot-web-starter</artifactId>
      <version>1.4.2</version>
    </dependency>
2、创建Realm和配置shiro
(1)创建Realm,代码和方法一的一样。
(2)配置Shiro
package com.example.demo.config;

import org.apache.shiro.spring.web.config.DefaultShiroFilterChainDefinition;
import org.apache.shiro.spring.web.config.ShiroFilterChainDefinition;
import org.apache.shiro.web.mgt.DefaultWebSecurityManager;
import org.springframework.context.annotation.Bean;
import org.springframework.context.annotation.Configuration;

@Configuration
public class ShiroConfig {
  @Bean
  MyRealm myRealm() {
    return new MyRealm();
  }

  @Bean
  DefaultWebSecurityManager securityManager() {
    DefaultWebSecurityManager manager = new DefaultWebSecurityManager();
    manager.setRealm(myRealm());
    return manager;
  }

  @Bean
  ShiroFilterChainDefinition shiroFilterChainDefinition() {
    DefaultShiroFilterChainDefinition definition = new DefaultShiroFilterChainDefinition();
    definition.addPathDefinition("/doLogin", "anon");
    definition.addPathDefinition("/**", "authc");
    return definition;
  }
}
(3)application.yml配置
shiro:
 unauthorizedUrl: /403
 successUrl: /index
 loginUrl: /login
以上就是本文的全部内容,希望对大家的学习有所帮助,也希望大家多多支持脚本之家。
相关文章
 这篇文章主要为大家详细介绍了servlet生命周期的相关资料,具有一定的参考价值,感兴趣的小伙伴们可以参考一下2017-07-07
 Controller是SpringBoot里最基本的组件,他的作用是把用户提交来的请求通过对URL的匹配,分配给不同的接收器,再进行处理,然后向用户返回结果,这篇文章主要介绍了SpringBoot中的Controller用法,需要的朋友可以参考下2023-06-06
 这篇文章主要介绍了SpringBoot声明式事务的简单运用说明,具有很好的参考价值,希望对大家有所帮助。一起跟随小编过来看看吧2020-09-09
 在实际应用过程中,我们可能需要限流的层面不仅限于接口。可能对于某个方法的调用限流,对于某个外部资源的调用限流等都希望做到控制。对此,我们需要学习使用@SentinelResource注解,灵活的定义控制资源以及如何配置控制策略2022-08-08
 这篇文章主要介绍了idea前后跳转箭头的快捷键,具有很好的参考价值,希望对大家有所帮助。一起跟随小编过来看看吧2021-02-02
 这篇文章主要介绍了Java 创建URL的常见问题及解决方案的相关资料,需要的朋友可以参考下2016-10-10
 开发项目时会遇到这个问题:开发环境,测试环境,生产环境的配置文件不同, 打包时经常要手动更改配置文件,本文就来介绍一下maven中profile动态打包不同环境配置文件的实现,感兴趣的可以了解一下2023-10-10
 这篇文章主要介绍了Java如何将ResultSet结果集遍历到List中问题,具有很好的参考价值,希望对大家有所帮助。如有错误或未考虑完全的地方,望不吝赐教2023-02-02
 这篇文章主要介绍了Netty分布式server启动流程Nio创建源码分析,有需要的朋友可以借鉴参考下,希望能够有所帮助,祝大家多多进步,早日升职加薪2022-03-03
 这篇文章主要介绍了SpringBoot项目Pom文件的基本配置方式,具有很好的参考价值,希望对大家有所帮助。如有错误或未考虑完全的地方,望不吝赐教2023-06-06


最新评论