
Vue单文件组件开发实现过程详解
第一步:配置环境
安装cnpm
npm install -g cnpm --registry=https://registry.npm.taobao.org
安装@vue/cli
cnpm install -g @vue/cli
检查版本是否正确
vue --version

使用vue.server和vue.build对*.vue文件进行快速原型开发,需要安装vue serve
cnpm install -g @vue/cli-service-global
新建一个App.vue文件测试安装是否成功:
<template>2 <h1>Hello world!</h1>3 </template>
在该文件当前路径运行:
vue serve App.vue
打开浏览器输入localhost:8080看到如下画面则运行成功

环境安装到此结束,接下来用一个简单案例来学习vue的单文件组件开发。
第二步:简单案例实战
以一个物品清单为例:
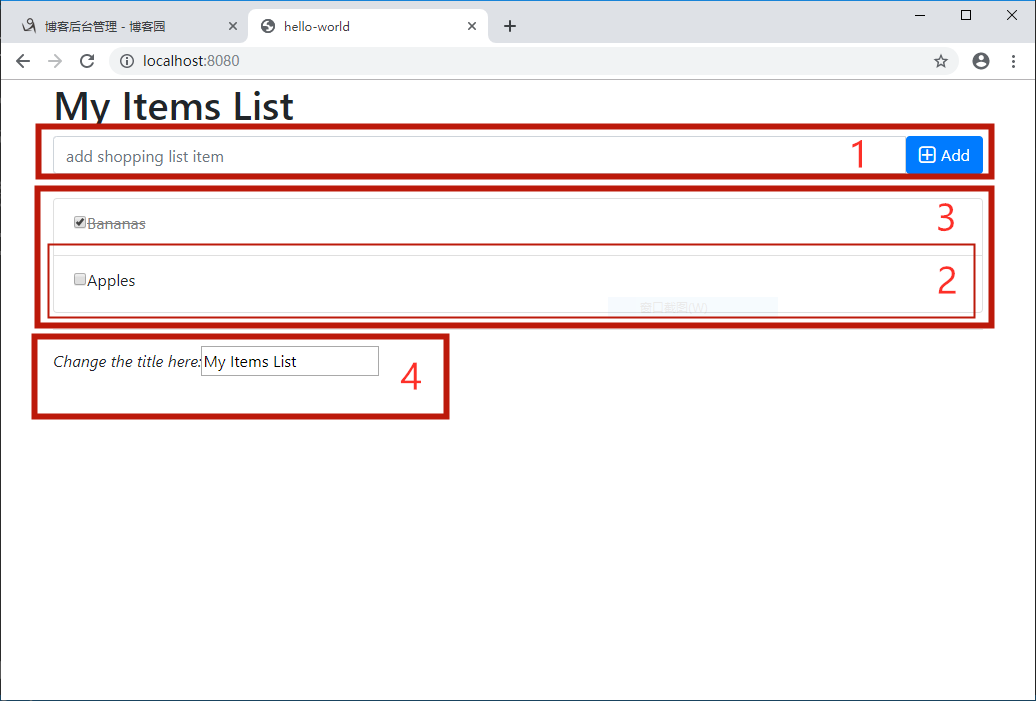
该案例由4个组件构成,分别是:
1. addItem.vue 添加物品
2. item.vue 物品实例
3. items.vue 物品列表
4. changeTitle 改变标题
首先,创建一个项目demo:
vue create demo
项目默认目录如下,启动主页在public, vue源码(包括组件)都存放到src

然后分别编写各组件代码
1. addItem.vue:
<template>
  <div class="input-group">
    <input type="text" class="form-control" placeholder="add shopping list item" v-model="newItem">
    <span class="input-group-btn">
      <button class="btn btn-primary" @click="emitAdd">
        <i class="fa fa-plus-square-o fa-lg"> </i><span>Add</span>
      </button>
    </span>
  </div>
</template>

<script>
export default {
  data() {
    return {
      newItem: ''
    }
  },
  methods: {
    emitAdd() {
      this.$emit('addItem', this.newItem);
    }
  }
}
</script>

<style>
</style>
2. item.vue:
<template>
  <li :class="{'removed': item.checked}" class="list-group-item">
    <div class="checkbox">
      <label>
        <input type="checkbox" v-model="item.checked">
        <span>{{ item.text }}</span>
      </label>
    </div>
  </li>
</template>

<script>
export default {
  props: ['item']
}
</script>

<style>
.removed {
  color: gray;
}

.removed span {
  text-decoration: line-through;
}
</style>
3. items.vue:
<script>
import item from './item'

export default {
  props: ['items'],
  components: {
    item
  }
}
</script>

<template>
  <ul class="list-group">
    <item v-for="item in items" :key="item.id" :item="item"></item>
  </ul>
</template>

<style>
</style>
4. changeTitle.vue:
<template>
  <div>
    <em>Change the title here:</em>
    <input type="text" :value="title" @input="onInput">
  </div>
</template>

<script>
export default {
  props: ['title'],
  methods: {
    onInput(event) {
      this.$emit('input', event.target.value);
    }
  }
}
</script>
最后修改App.vue,导入上面的组件:
<template>
  <div id="app" class="container">
    <h1>{{ title }}</h1>
    <add-item @addItem="add"></add-item><br>
    <items :items="items"></items>
    <div class="footer">
      <hr>
      <change-title :title="title" v-model="title"></change-title>
    </div>
  </div>
</template>

<script>
import addItem from './components/addItem'
import items from './components/items'
import changeTitle from './components/changeTitle'

export default {
  name: 'app',
  components: {
    addItem,
    items,
    changeTitle
  },
  data() {
    return {
      items: [
        {id: 1, text: 'Bananas', checked: true},
        {id: 2, text: 'Apples', checked: false}
      ],
      title: 'My Items List'
    }
  },
  methods: {
    add(text) {
      this.items.push({
        text: text,
        checked: false
      });
    }
  }
}
</script>

<style>
</style>
需要注意的是:每个组件必须只有一个根元素。我这里需要在public/index.html引入bootstrap样式和font-awesome图标字体。
运行程序:
cnpm run serve
最后附上运行截图:
以上就是本文的全部内容,希望对大家的学习有所帮助,也希望大家多多支持脚本之家。
相关文章

详解让sublime text3支持Vue语法高亮显示的示例
本篇文章主要介绍了让sublime text3支持Vue语法高亮显示的示例,非常具有实用价值,需要的朋友可以参考下2017-09-09 这篇文章主要介绍了el-select 下拉框全选、多选的几种方式组件示例详解,本文通过示例代码给大家介绍的非常详细,对大家的学习或工作具有一定的参考借鉴价值,需要的朋友参考下吧2023-12-12
 这篇文章主要介绍了vue 二维码长按保存和复制内容操作,具有很好的参考价值,希望对大家有所帮助。一起跟随小编过来看看吧2020-09-09
解决ant design vue中树形控件defaultExpandAll设置无效的问题
这篇文章主要介绍了解决ant design vue中树形控件defaultExpandAll设置无效的问题,具有很好的参考价值,希望对大家有所帮助。一起跟随小编过来看看吧2020-10-10
解决vue admin element noCache设置无效的问题
今天小编就为大家分享一篇解决vue admin element noCache设置无效的问题,具有很好的参考价值,希望对大家有所帮助。一起跟随小编过来看看吧2019-11-11 pinia,一个基于Vue3的状态管理库,它可以帮助开发人员管理Vue应用程序的状态,本文主要为大家介绍了Pinia的用法,感兴趣的小伙伴可以跟随小编一起学习一下2023-06-06
详解vue-cli项目中用json-sever搭建mock服务器
这篇文章主要介绍了详解vue-cli项目中用json-sever搭建mock服务器,小编觉得挺不错的,现在分享给大家,也给大家做个参考。一起跟随小编过来看看吧2017-11-11 在现代Web应用中,集成文档编辑功能变得越来越常见,特别是在协作环境中,能够直接在Web应用内编辑Word文档可以极大地提高工作效率,本文将详细介绍如何在Vue.js项目中集成Word在线编辑功能,需要的朋友可以参考下2024-08-08
 这篇文章主要给大家介绍了关于el-input宽度跟随输入内容自适应的实现方法,我们再实际应用中可能需要input文本框能够根据输入字符的所占据的宽度自动调节尺寸,需要的朋友可以参考下2023-08-08
elementPlus 的el-select在提示框关闭时自动弹出的问题解决
这篇文章主要介绍了elementPlus 的el-select在提示框关闭时自动弹出闭时自动弹出的问题,主要问题就是因为filterable属性,根本解决方案是选中的时候让他失去焦点 el-select有一个visible-change事件,下拉框出现/隐藏时触发,感兴趣的朋友跟随小编一起看看吧2024-01-01


最新评论