vue实现移动端H5数字键盘组件使用详解
更新时间:2020年08月25日 12:36:56 作者:#麻辣小龙虾#
这篇文章主要为大家详细介绍了vue实现移动端H5数字键盘组件,文中示例代码介绍的非常详细,具有一定的参考价值,感兴趣的小伙伴们可以参考一下
本文实例为大家分享了vue实现移动端H5数字键盘组件的使用代码,供大家参考,具体内容如下
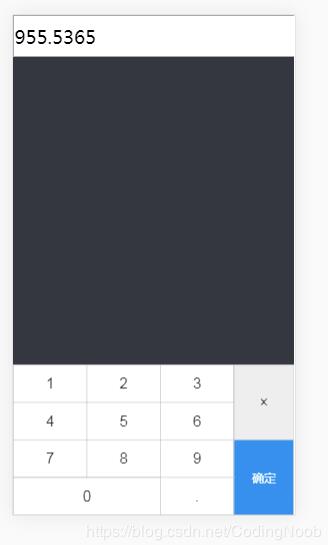
我们平时扫码付款的时候,经常会输入一些数字进行付款,仔细看了下键盘和系统的键盘有点不一样,于是今天买甘蔗的时候扫码付款就想了一下要怎么去实现一个。话不多说,直接上代码。
结果如下:

代码如下:
<template>
 <div class="keyboard-wrapper">
 <input type="text" v-model="NUM" @focus="show = true" onfocus="this.blur()"/>
 <div class="keyboard" v-if="show">
 <div class="num">
 <table>
  <tr>
  <td @click="change(1)" :class="[active === 1 ? 'active' : '']" @touchstart="msDown(1)" @touchend="msUp(1)">1</td>
  <td @click="change(2)" :class="[active === 2 ? 'active' : '']" @touchstart="msDown(2)" @touchend="msUp(2)">2</td>
  <td @click="change(3)" :class="[active === 3 ? 'active' : '']" @touchstart="msDown(3)" @touchend="msUp(3)">3</td>
  <td rowspan="2" class="del" @click="del">×</td>
  </tr>
  <tr>
  <td @click="change(4)" :class="[active === 4 ? 'active' : '']" @touchstart="msDown(4)" @touchend="msUp(4)">4</td>
  <td @click="change(5)" :class="[active === 5 ? 'active' : '']" @touchstart="msDown(5)" @touchend="msUp(5)">5</td>
  <td @click="change(6)" :class="[active === 6 ? 'active' : '']" @touchstart="msDown(6)" @touchend="msUp(6)">6</td>
  </tr>
  <tr>
  <td @click="change(7)" :class="[active === 7 ? 'active' : '']" @touchstart="msDown(7)" @touchend="msUp(7)">7</td>
  <td @click="change(8)" :class="[active === 8 ? 'active' : '']" @touchstart="msDown(8)" @touchend="msUp(8)">8</td>
  <td @click="change(9)" :class="[active === 9 ? 'active' : '']" @touchstart="msDown(9)" @touchend="msUp(9)">9</td>
  <td rowspan="2" class="comfirm" @click="comfirm">确定</td>
  </tr>
  <tr>
  <td colspan="2" @click="change(0)" :class="[active === 0 ? 'active' : '']" @touchstart="msDown(0)" @touchend="msUp(0)">0</td>
  <td colspan="1" @click="change('.')" :class="[active === '.' ? 'active' : '']" @touchstart="msDown('.')" @touchend="msUp('.')">.</td>
  </tr>
 </table>
 </div>
 </div>
 </div>
</template>

<script>

export default {
 name: 'App',
 data () {
 return {
 active: null,
 show: false,
 NUM: '',
 result: []
 };
 },
 computed: {
 // 统计打中的地鼠数量
 num: function () {
 return this.result.join('');
 }
 },
 created () {
 },
 mounted () {
 },
 methods: {
 msDown (v) {
 this.active = v;
 },
 msUp (v) {
 this.active = '';
 },
 stopInput () {
 return false;
 },
 change (val, $event) {
 if (this.result.length === 0 && val === '.') {
 return false;
 } else {
 this.result.push(val);
 this.NUM = this.result.join('');
 }
 },
 del () {
 this.result.pop();
 this.NUM = this.result.join('');
 this.$emit('del', this.NUM);
 },
 comfirm () {
 this.$emit('comfirm', this.NUM);
 this.show = false;
 }
 }
};
</script>
<style lang="less" scoped>
.keyboard-wrapper {
 user-select: none;
 input {
 width:100%;
 height:50px;
 font-size:25px;
 }
 .keyboard {
 position: fixed;
 bottom: 0;
 width: 100%;
 .num {
 table {
 width: 100%;
 border: 1px solid #ccc;
 border-collapse: collapse;
 background: #fff;
 td {
  height: 50px;
  vertical-align: middle;
  color: #333;
  font-size: 20px;
  border: 1px solid #ccc;
  text-align: center;
 }
 td.active{
  background:#ccc;
 }
 .del {
  background: #eee;
 }
 .comfirm {
  font-size: 16px;
  width: 80px;
  background: #118eeb;
  color: #fff;
 }
 }
 }
 }
}
</style>
以上就是本文的全部内容,希望对大家的学习有所帮助,也希望大家多多支持脚本之家。
相关文章

Vue2 this 能够直接获取到 data 和 methods 的原理分析
这篇文章主要介绍了Vue2 this能够直接获取到data和methods的原理分析,因为methods里的方法通过bind指定了this为new Vue的实例2022-06-06


最新评论