
鸿蒙开发之Button按钮类型及如何通过代码设置(HarmonyOS鸿蒙开发基础知识)
更新时间:2020年09月14日 11:34:13 作者:知识大胖
这篇文章主要介绍了鸿蒙开发之Button按钮类型及如何通过代码设置(HarmonyOS鸿蒙开发基础知识),本文给大家介绍的非常详细,对大家的学习或工作具有一定的参考借鉴价值,需要的朋友可以参考下
AbilitySlice 是什么 (HarmonyOS鸿蒙开发基础知识)
AbilitySlice 是什么
AbilitySlice主要用于承载Ability的具体逻辑实现和界面UI,是应用显示、运行和跳转的最小单元。AbilitySlice通过setUIContent()为界面设置布局
本文重点给大家介绍鸿蒙开发之Button按钮类型及如何通过代码设置(HarmonyOS鸿蒙开发基础知识),具体内容如下所示:
Button类型分类
按照按钮的形状,按钮可以分为:
- 普通按钮
- 椭圆按钮
- 胶囊按钮
- 圆形按钮
- 其它
Button类型效果和代码
普通按钮
普通按钮和其他按钮的区别在于不需要设置任何形状,只设置文本和背景颜色即可,例如:
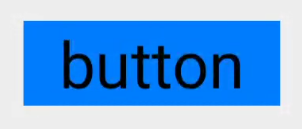
<Button
 ohos:width="150vp"
 ohos:height="50vp"
 ohos:text_size="27fp"
 ohos:text="button"
 ohos:background_element="$graphic:color_blue_element"
 ohos:left_margin="15vp"
 ohos:bottom_margin="15vp"
 ohos:right_padding="8vp"
 ohos:left_padding="8vp"
/>
椭圆按钮
椭圆按钮是通过设置background_element的来实现的,background_element的shape设置为椭圆(oval),例如:

<Button
 ohos:width="150vp"
 ohos:height="50vp"
 ohos:text_size="27fp"
 ohos:text="button"
 ohos:background_element="$graphic:oval_button_element"
 ohos:left_margin="15vp"
 ohos:bottom_margin="15vp"
 ohos:right_padding="8vp"
 ohos:left_padding="8vp"
 ohos:element_left="$graphic:ic_btn_reload"
/>
胶囊按钮
胶囊按钮是一种常见的按钮,设置按钮背景时将背景设置为矩形形状,并且设置ShapeElement的radius的半径,例如:
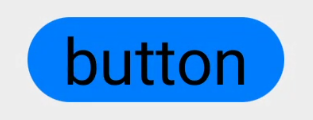
<Button
 ohos:id="$+id:button"
 ohos:width="match_content"
 ohos:height="match_content"
 ohos:text_size="27fp"
 ohos:text="button"
 ohos:background_element="$graphic:capsule_button_element"
 ohos:left_margin="15vp"
 ohos:bottom_margin="15vp"
 ohos:right_padding="15vp"
 ohos:left_padding="15vp"
/>
圆形按钮
圆形按钮和椭圆按钮的区别在于组件本身的宽度和高度需要相同,例如:
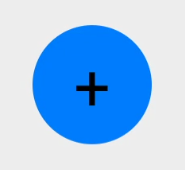
<Button
 ohos:id="$+id:button4"
 ohos:width="50vp"
 ohos:height="50vp"
 ohos:text_size="27fp"
 ohos:background_element="$graphic:circle_button_element"
 ohos:text="+"
 ohos:left_margin="15vp"
 ohos:bottom_margin="15vp"
 ohos:right_padding="15vp"
 ohos:left_padding="15vp"
/>
场景示例
利用圆形按钮,胶囊按钮,文本组件可以绘制出如下拨号盘的UI界面。
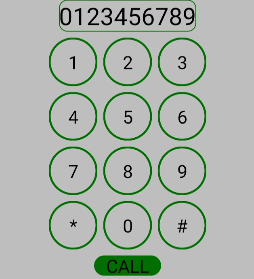
<?xml version="1.0" encoding="utf-8"?>
<DirectionalLayout
 xmlns:ohos="http://schemas.huawei.com/res/ohos"
 ohos:width="match_parent"
 ohos:height="match_parent"
 ohos:background_element="$graphic:color_light_gray_element"
 ohos:orientation="vertical">
 <Text
 ohos:width="match_content"
 ohos:height="match_content"
 ohos:text_size="20fp"
 ohos:text="0123456789"
 ohos:background_element="$graphic:green_text_element"
 ohos:text_alignment="center"
 ohos:layout_alignment="horizontal_center"
 />
 <DirectionalLayout
 ohos:width="match_parent"
 ohos:height="match_content"
 ohos:alignment="horizontal_center"
 ohos:orientation="horizontal"
 ohos:top_margin="5vp"
 ohos:bottom_margin="5vp">
 <Button
  ohos:width="40vp"
  ohos:height="40vp"
  ohos:text_size="15fp"
  ohos:background_element="$graphic:green_circle_button_element"
  ohos:text="1"
  ohos:text_alignment="center"
 />
 <Button
  ohos:width="40vp"
  ohos:height="40vp"
  ohos:text_size="15fp"
  ohos:background_element="$graphic:green_circle_button_element"
  ohos:text="2"
  ohos:left_margin="5vp"
  ohos:right_margin="5vp"
  ohos:text_alignment="center"
 />
 <Button
  ohos:width="40vp"
  ohos:height="40vp"
  ohos:text_size="15fp"
  ohos:background_element="$graphic:green_circle_button_element"
  ohos:text="3"
  ohos:text_alignment="center"
 />
 </DirectionalLayout>
 <DirectionalLayout
 ohos:width="match_parent"
 ohos:height="match_content"
 ohos:alignment="horizontal_center"
 ohos:orientation="horizontal"
 ohos:bottom_margin="5vp">
 <Button
  ohos:width="40vp"
  ohos:height="40vp"
  ohos:text_size="15fp"
  ohos:background_element="$graphic:green_circle_button_element"
  ohos:text="4"
  ohos:text_alignment="center"
 />
 <Button
  ohos:width="40vp"
  ohos:height="40vp"
  ohos:text_size="15fp"
  ohos:left_margin="5vp"
  ohos:right_margin="5vp"
  ohos:background_element="$graphic:green_circle_button_element"
  ohos:text="5"
  ohos:text_alignment="center"
 />
 <Button
  ohos:width="40vp"
  ohos:height="40vp"
  ohos:text_size="15fp"
  ohos:background_element="$graphic:green_circle_button_element"
  ohos:text="6"
  ohos:text_alignment="center"
 />
 </DirectionalLayout>
 <DirectionalLayout
 ohos:width="match_parent"
 ohos:height="match_content"
 ohos:alignment="horizontal_center"
 ohos:orientation="horizontal"
 ohos:bottom_margin="5vp">
 <Button
  ohos:width="40vp"
  ohos:height="40vp"
  ohos:text_size="15fp"
  ohos:background_element="$graphic:green_circle_button_element"
  ohos:text="7"
  ohos:text_alignment="center"
 />
 <Button
  ohos:width="40vp"
  ohos:height="40vp"
  ohos:text_size="15fp"
  ohos:left_margin="5vp"
  ohos:right_margin="5vp"
  ohos:background_element="$graphic:green_circle_button_element"
  ohos:text="8"
  ohos:text_alignment="center"
 />
 <Button
  ohos:width="40vp"
  ohos:height="40vp"
  ohos:text_size="15fp"
  ohos:background_element="$graphic:green_circle_button_element"
  ohos:text="9"
  ohos:text_alignment="center"
 />
 </DirectionalLayout>
 <DirectionalLayout
 ohos:width="match_parent"
 ohos:height="match_content"
 ohos:alignment="horizontal_center"
 ohos:orientation="horizontal"
 ohos:bottom_margin="5vp">
 <Button
  ohos:width="40vp"
  ohos:height="40vp"
  ohos:text_size="15fp"
  ohos:background_element="$graphic:green_circle_button_element"
  ohos:text="*"
  ohos:text_alignment="center"
 />
 <Button
  ohos:width="40vp"
  ohos:height="40vp"
  ohos:text_size="15fp"
  ohos:left_margin="5vp"
  ohos:right_margin="5vp"
  ohos:background_element="$graphic:green_circle_button_element"
  ohos:text="0"
  ohos:text_alignment="center"
 />
 <Button
  ohos:width="40vp"
  ohos:height="40vp"
  ohos:text_size="15fp"
  ohos:background_element="$graphic:green_circle_button_element"
  ohos:text="#"
  ohos:text_alignment="center"
 />
 </DirectionalLayout>
 <Button
 ohos:width="match_content"
 ohos:height="match_content"
 ohos:text_size="15fp"
 ohos:text="CALL"
 ohos:background_element="$graphic:green_capsule_button_element"
 ohos:bottom_margin="5vp"
 ohos:text_alignment="center"
 ohos:layout_alignment="horizontal_center"
 ohos:left_padding="10vp"
 ohos:right_padding="10vp"
 ohos:top_padding="2vp"
 ohos:bottom_padding="2vp"
 />
</DirectionalLayout>
总结
到此这篇关于鸿蒙开发之Button按钮类型及如何通过代码设置(HarmonyOS鸿蒙开发基础知识)的文章就介绍到这了,更多相关鸿蒙开发Button按钮类型内容请搜索脚本之家以前的文章或继续浏览下面的相关文章希望大家以后多多支持脚本之家!
您可能感兴趣的文章:
- 鸿蒙HarmonyOS开发:Navigation路由导航功能和实践
- 鸿蒙(HarmonyOS)实现隐私政策弹窗效果
- DevEco Studio 2.0开发鸿蒙HarmonyOS应用初体验全面测评(推荐)
- 鸿蒙HarmonyOS中的ArkUI组件库特性与常用组件实例演示
- 鸿蒙中@State的原理使用详解(HarmonyOS 5)
- 鸿蒙HarmonyOS App开发造轮子之自定义圆形图片组件的实例代码
- 浅析鸿蒙基础之Permanent 持久性内存对象(HarmonyOS鸿蒙开发基础知识)
- 鸿蒙开发之处理图片位图操作的方法详解(HarmonyOS鸿蒙开发基础知识)
- HarmonyOS开发基础知识之Component和ComponentContainer区别(鸿蒙教程)
- 鸿蒙HarmonyOS 分布式任务调度的实现
- 鸿蒙HarmonyOS剪切板的实现
- 鸿蒙HarmonyOS视频播放的实现
- HarmonyOS鸿蒙基本控件的实现
- HarmonyOS鸿蒙实现HelloWorld应用开发E2E体验
- 鸿蒙游戏开发实战从0到1:手把手带你搭建完整小游戏系统
相关文章
 这篇文章主要介绍了鸿蒙OS运行第一个“hello world”,文中通过示例代码介绍的非常详细,对大家的学习或者工作具有一定的参考学习价值,需要的朋友们下面随着小编来一起学习学习吧2020-09-09
 HarmonyOS是一款“面向未来”、面向全场景(移动办公、运动健康、社交通信、媒体娱乐等)的分布式操作系统。本文给大家介绍的非常详细,对大家的学习或工作具有一定的参考借鉴价值,需要的朋友可以参考下2020-09-09
详解DevEco Studio项目构建讲解、编写页面、布局介绍、页面跳转
这篇文章主要介绍了详解DevEco Studio项目构建讲解、编写页面、布局介绍、页面跳转,文中通过示例代码介绍的非常详细,对大家的学习或者工作具有一定的参考学习价值,需要的朋友们下面随着小编来一起学习学习吧2020-09-09 我们来介绍一下Award Bios的设置,其实Award Bios和AMI Bios里面有很多东西是相同的,可以说基本上是一样的,虽然有些名字叫法不同,但是实际作用是一样的2007-01-01
 这篇文章主要介绍了win10设定计划任务时提示所指定的账户名称无效问题解析,文中通过示例代码介绍的非常详细,对大家的学习或者工作具有一定的参考学习价值,需要的朋友可以参考下2019-09-09
 个性_安全的电脑系统图文教程2008-05-05
 这篇文章主要介绍了鸿蒙HarmonyOS剪切板的实现,文中通过示例代码介绍的非常详细,对大家的学习或者工作具有一定的参考学习价值,需要的朋友们下面随着小编来一起学习学习吧2020-09-09
 这篇文章主要介绍了让WindowsForm缩小到系统匣过程详解,文中通过示例代码介绍的非常详细,对大家的学习或者工作具有一定的参考学习价值,需要的朋友可以参考下2019-09-09
深度操作系统 deepin 15.11安装 QGIS 3.4
深度操作系统是基于Linux内核,以桌面应用为主的开源 GNU/Linux 操作系统,支持笔记本、台式机和一体机,这篇文章给大家介绍deepin 15.11安装 QGIS 3.4的方法,需要的朋友参考下吧2020-02-02 这篇文章主要介绍了MAC找回系统账号密码常用方法,文中通过示例代码介绍的非常详细,对大家的学习或者工作具有一定的参考学习价值,需要的朋友可以参考下2020-10-10


最新评论