
C++ 智能指针代码解析
前言
如果在程序中使用new从堆分配内存,等到不再需要时,应使用delete将其释放,C++引入了智能指针auto_ptr,以帮助自动完成这个过程,但是aoto_ptr也有其局限性,因此从Boost库中又引入了三种智能指针unique_ptr shared_ptr weak_ptr。
1,aoto_ptr
// ConsoleApplication1.cpp : 定义控制台应用程序的入口点。
//
#include "stdafx.h"
#include <memory>
#include <string>
#include <iostream>
#include <ostream>
using namespace std;
int _tmain(int argc, _TCHAR* argv[])
{
	auto_ptr<string>  ptr1(new string("this is ptr!"));
	auto_ptr<string>  ptr2;
	ptr2 = ptr1;
	cout << &ptr2<<endl;
	cout << *ptr2 << endl;
	return 0;
}
- output :
003AFBC0
this is ptr!
但是如果输出的是ptr1,程序会如何呢?
#include "stdafx.h"
#include <memory>
#include <string>
#include <iostream>
#include <ostream>
using namespace std;
int _tmain(int argc, _TCHAR* argv[])
{
	auto_ptr<string>  ptr1(new string("this is ptr!"));
	auto_ptr<string>  ptr2;
	ptr2 = ptr1;
	cout << &ptr1 <<endl;
	cout << *ptr1 << endl;  #这一步程序会崩溃
	return 0;
}
崩溃原因: 首先ptr2 = ptr1表示ptr1将访问的权限给了ptr2,同时意味了ptr1已经没有访问字符串的权限,因此会报错。
那如何解决这个问题呢?引入了unique_ptr
2,unique_ptr
#include "stdafx.h"
#include <memory>
#include <string>
#include <iostream>
#include <ostream>
using namespace std;
int _tmain(int argc, _TCHAR* argv[])
{
	unique_ptr<string> ptr1(new string("this is unique_ptr"));
	unique_ptr<string> ptr2;
	ptr2 = ptr1;  #这一步编译器会报错
	return 0;
}
unique_ptr 替代auto_ptr实现独占式,可以理解成,同一时刻只能有一个unique_ptr指向给定对象,unique_ptr对象始终是关联的原始指针的唯一所有者。无法复制unique_ptr对象,它只能移动。(这样可以保证,不会出现auto_ptr那样运行时会出现的隐藏内存崩溃问题)
int _tmain(int argc, _TCHAR* argv[])
{
	unique_ptr<string> ptr1(new string("this is unique_ptr"));
	unique_ptr<string> ptr2;
	cout << &ptr1 << endl;
	unique_ptr<string> ptr3(new string("other unique_ptr"));
	cout << &ptr3 << endl;
	cout << *ptr3 << endl;
	return 0;
}
- output:
00D9F8B4
00D9F89C
other unique_ptr
3,share_ptr
// ConsoleApplication1.cpp : 定义控制台应用程序的入口点。
//
#include "stdafx.h"
#include <memory>
#include <string>
#include <iostream>
#include <ostream>
using namespace std;
class base{
public:
	base()
	{
		cout << "begin..." << endl;
	};
	~base()
	{
		cout << "end..." << endl;
	}
};
int _tmain(int argc, _TCHAR* argv[])
{
	base *a = new base();
	shared_ptr<base> ptr1(a);
	//shared_ptr<base> ptr2(a);    ## 如果加上这句程序会崩溃,双重管理陷阱,a对象被删除了两次
	return 0;
}
- output:
begin...
end...
- share_ptr的循环陷阱
#include "stdafx.h"
#include <memory>
#include <string>
#include <iostream>
#include <ostream>
using namespace std;
class CB;
class CA
{
public:
CA()
{
cout << "CA call ..."<< endl;
}
~CA()
{
cout << "~CA call..."<< endl;
}
void setPtr(shared_ptr<CB> &ptr)
{
m_ptr_b = ptr;
}
int getCount()
{
return m_ptr_b.use_count();
}
private:
shared_ptr<CB> m_ptr_b;
};
class CB
{
public:
CB()
{
cout << "CB call..." << endl;
}
~CB()
{
cout << "~CB call..." << endl;
}
void setPtr(shared_ptr<CA> ptr)
{
m_ptr_a = ptr;
}
int getCount()
{
return m_ptr_a.use_count();
}
private:
shared_ptr<CA> m_ptr_a;
};
int _tmain(int argc, _TCHAR* argv[])
{
shared_ptr<CA> ptr_a(new CA);
shared_ptr<CB> ptr_b(new CB);
cout << " CA count is : " << ptr_a->getCount()<<endl;
cout << "CB count is:" << ptr_b->getCount()<< endl;
ptr_a->setPtr(ptr_b);
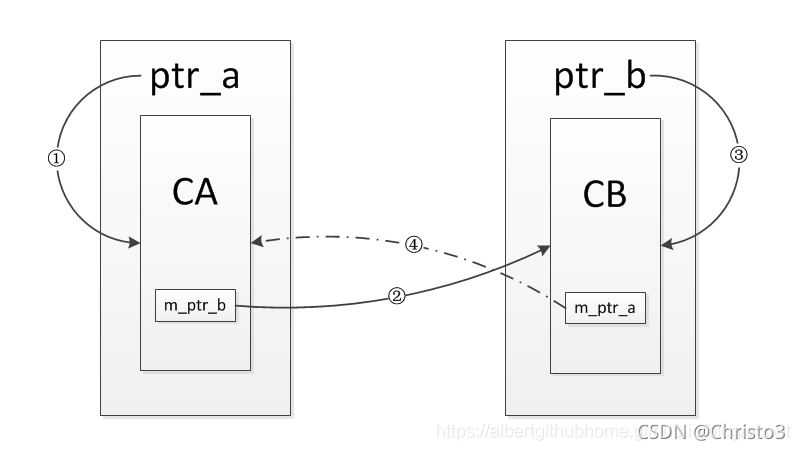
ptr_b->setPtr(ptr_a);
cout << " CA count is : " << ptr_a->getCount() << endl;
cout << "CB count is:" << ptr_b->getCount() << endl;
return 0;
}
上面这段程序的思路用下面张图可以清晰的表示
图片和代码主要参考的是这篇很棒的博文:智能指针(三):weak_ptr浅析


运行结果后发现并没有调用析构函数释放内存,以后存在内存泄漏的风险
那如何去解决这个问题呢?,可以通过引入weak_ptr来解决,但是weak_ptr需要与share_ptr配合使用
4, weak_ptr
通过在两个类中的一个成员变量改为weak_ptr对象,因为weak_ptr不会增加引用计数,使得引用形不成环,最后就可以正常的释放内部的对象,不会造成内存泄漏
class CB
{
public:
	CB()
	{
		cout << "CB call..." << endl;
	}
	~CB()
	{
		cout << "~CB call..." << endl;
	}
	void setPtr(shared_ptr<CA> ptr)
	{
		m_ptr_a = ptr;
	}
	int getCount()
	{
		return m_ptr_a.use_count();
	}

private:
	///shared_ptr<CA> m_ptr_a;
	weak_ptr<CA> m_ptr_a;  ## 改为weak_ptr对象
};

总结
遇到这类新的概念或者方法时,一定要不嫌麻烦的一行一行代码的去敲,在敲的过程中去理解吸收,如果只看不实践,很有可能理解不深刻,无法体会到其中的原理和机制,所以对待问题一定要沉下心来多实践。
本篇文章就到这里了,希望能够给你带来帮助,也希望您能够多多关注脚本之家的更多内容!
相关文章
 本文以实现图像拼接为目标,把分割开的图像进行拼接还原,核心的内容包括:OpenCV图像拼接相关原理以及OpenCV图像拼接案例的实现,感兴趣的可以了解一下2022-07-07
 这篇文章主要介绍了C++ DLL注入工具的相关资料,并向大家分享了完整的源码,具有一定的参考价值,希望对正在工作或学习的你有所帮助2022-02-02
 pair是C++STL(标准模板库)中的一个现有容器,它将2个数据整合成一组数据,当我们类似需求的时候就可以使用到pair,pair的本质其实就是个结构体,本文将详细的给大家介绍pair用法,感兴趣的同学可以参考阅读2023-05-05
 ptrdiff_t是C/C++标准库中定义的一个与机器相关的数据类型,ptrdiff_t类型变量通常用来保存两个指针减法操作的结果,下面这篇文章主要给大家介绍了关于C/C++标准库中ptrdiff_t的相关资料,需要的朋友可以参考下2022-11-11
 做题之前呢,小编想提醒下大家,要三思而后行,不要一上来就嘎嘎敲代码,要先学会自己画图分析,把自己的思路捋清楚,不要到时候写代码五分钟,调试两小时,记住,编程思路很重要2022-03-03
 这篇文章主要介绍了C语言如何实现循环输入问题,具有很好的参考价值,希望对大家有所帮助。如有错误或未考虑完全的地方,望不吝赐教2023-02-02
 这篇文章主要给大家介绍了关于如何在C++中实现一个正确的时间循环器的相关资料,文中通过示例代码介绍的非常详细,对大家的学习或者工作具有一定的参考学习价值,需要的朋友们下面随着小编来一起学习学习吧2020-10-10
 事件模型是被广泛使用的好东西,但是C++标准库里没有现成的,现在VC11可以用在XP下了,那么就痛快的拿起C++11提供的先进设施组合出一个轻便的实现吧感兴趣的朋友可以了解下,或许对你有所帮助2013-02-02
 这篇文章主要介绍了C++中结构体的类型定义和初始化以及变量引用,是C++入门学习中的基础知识,需要的朋友可以参考下2015-09-09
 缓冲区是用来存放流中的数据,本文详细的介绍了C++字符串输入缓冲区机制,感兴趣的小伙伴们可以参考一下,希望能够给你带来帮助2021-10-10


最新评论