angular内容投影详解
更新时间:2021年12月22日 15:39:23 作者:桐溪漂流
这篇文章主要为大家介绍了angular内容投影,具有一定的参考价值,感兴趣的小伙伴们可以参考一下,希望能够给你带来帮助
单内容投影
利用ng-content来实现
<!-- 组件 - app-content-single -->
<div>
  <h2>标题</h2>
  <!-- 投影内容显示位置 -->
  <ng-content></ng-content>
</div>
<!-- 使用 -->
<app-content-single>
  <div>this is content</div>
</app-content-single>
多内容投影
利用ng-content来实现
<!-- 组件 - app-content-more -->
<div>
  <h3>Herder Title</h3>
  <ng-content select=".header"></ng-content>
  <h3>Body Title</h3>
  <ng-content select="[body]"></ng-content>
  <h3>Default Title</h3>
  <ng-content></ng-content>
  <h3>Footer Title</h3>
  <ng-content select="footer"></ng-content>
</div>
<!-- 使用 -->
<app-content-more>
  <div>this is default01</div>
  <div class="header">this is header</div>
  <div>this is default02</div>
  <div body>this is body</div>
  <div>this is default03</div>
  <footer>this is footer</footer>
  <div>this is default04</div>
</app-content-more>
有条件的内容投影-ng-template, ng-container, directive 等来配合实现
单个条件的内容投影
eg: 假设现在有一个人员列表,当某个人的money大于200的时候,额外添加组件中模板定义的内容
定义一个 appChildRef 指令来配合 ng-template 获取模板
import { Directive, TemplateRef } from '@angular/core';
@Directive({
  selector: '[appChildRef]'
})
export class ChildRefDirective {
  constructor(public templateRef: TemplateRef<any>) { }
}
app-persons - html
<div class="list-item" *ngFor="let person of persons;">
  <div>Name: {{ person.name }}</div>
  <div>Money: {{ person.money }}</div>
  <div *ngIf="person.money > 200">
    <ng-container *ngIf="childRef" [ngTemplateOutlet]="childRef.templateRef"></ng-container>
  </div>
</div>
app-persons - ts
import { Component, ContentChild, OnInit } from '@angular/core';
import { ChildRefDirective } from '../../../../directives/child-ref.directive';
@Component({
  selector: 'app-persons',
  templateUrl: './persons.component.html',
  styleUrls: ['./persons.component.scss']
})
export class PersonsComponent implements OnInit {
  persons: { name: string; money: number; }[] = [
    { name: '杰克', money: 120 },
    { name: '李莉', money: 210 },
    { name: '张三', money: 170 },
  ];
  @ContentChild(ChildRefDirective, { static: true }) childRef!: ChildRefDirective;
  constructor() { }
  ngOnInit(): void { }
}
使用
<app-persons>
  <ng-template appChildRef>
    <div style="font-size: 14px; color: red;">this is child ref content</div>
  </ng-template>
</app-persons>
效果图

多个条件内容投影
eg: 现在希望通过 persons 数据中的字段进行绑定内嵌的模板来显示
appChildRef 调整
import { Directive, Input, TemplateRef } from '@angular/core';
@Directive({
  selector: '[appChildRef]'
})
export class ChildRefDirective {
  // 接受定义模板名称-通过这个名称和 persons 中的render字段对应进行显示对应的模板内容
  @Input() appChildRef!: string;
  constructor(public templateRef: TemplateRef<any>) { }
}
app-persons - html
<div class="list-item" *ngFor="let person of persons;let i=index;">
  <div>Name: {{ person.name }}</div>
  <div>Money: {{ person.money }}</div>
  <!-- <div *ngIf="person.money > 200">
    <ng-container *ngIf="childRef" [ngTemplateOutlet]="childRef.templateRef"></ng-container>
  </div> -->
  <div *ngIf="person.render && tempRefs[person.render]">
    <!-- 配合 ngTemplateOutlet 指令给template传递当前person的数据 -->
    <ng-container *ngTemplateOutlet="tempRefs[person.render].templateRef; context: { $implicit: person, i: i }"></ng-container>
  </div>
</div>
app-persons - ts
import { Component, ContentChild, ContentChildren, OnInit, QueryList } from '@angular/core';
import { ChildRefDirective } from '../../../../directives/child-ref.directive';
@Component({
  selector: 'app-form-unit',
  templateUrl: './form-unit.component.html',
  styleUrls: ['./form-unit.component.scss']
})
export class FormUnitComponent implements OnInit {
  persons: { name: string; money: number; render?: string; }[] = [
    { name: '杰克', money: 120, render: 'temp1' },
    { name: '李莉', money: 210, render: 'temp2' },
    { name: '张三', money: 170, render: 'temp3' },
  ];
  // @ContentChild(ChildRefDirective, { static: true }) childRef!: ChildRefDirective;
  @ContentChildren(ChildRefDirective) childrenRef!: QueryList<ChildRefDirective>;
  get tempRefs() {
    const aObj: any = {};
    this.childrenRef.forEach(template => {
      const key: string = template.appChildRef;
      aObj[key] = template;
    })
    return aObj;
  }
  constructor() { }
  ngOnInit(): void { }
}
使用
<app-persons>
  <ng-template appChildRef="temp1" let-person let-index="i">
    <div style="font-size: 14px; color: red;">{{index}}-{{person.name}}: this is temp1</div>
  </ng-template>
  <ng-template appChildRef="temp2" let-person let-index="i">
    <div style="font-size: 14px; color: green;">{{index}}-{{person.name}}: this is temp2</div>
  </ng-template>
  <ng-template appChildRef="temp3" let-person let-index="i">
    <div style="font-size: 14px; color: orange;">{{index}}-{{person.name}}: this is temp3</div>
  </ng-template>
</app-persons>
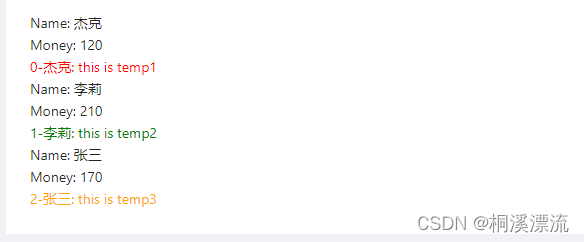
效果图

总结
本篇文章就到这里了,希望能够给你带来帮助,也希望您能够多多关注脚本之家的更多内容!


最新评论