
SpringBoot搭建go-cqhttp机器人的方法实现
百度一下搭建go-cqhttp,千篇一律都是采用python搭建的,Java搭建根本没有。导致自己在搭建的时候可折磨了,出现了许多的问题。唯一能参考就只有官方文档。文档对小白也不是太友好,所以出这篇博客弥补一下Java 的搭建版本。
搭建环境: winndows 系统 + Java + Idea 2020.2
注意:本博客写的比较简单,存在很多不完善的地方,如需符合自己需求请参考官方文档
参考文档:
一、搭建go-cqhttp机器人
请 参考go-cqhttp 视频:https://www.bilibili.com/video/av247603841/
测试
给自己好友发送一条私聊消息(user_id:好友的QQ号)
# cmd
crul '127.0.0.1:5700/send_private_msg?user_id=xxxxxx&message=你好~'

#postMan
GET http://127.0.0.1:5700/send_private_msg?user_id=xxxxx&message=你好~
响应:
二、搭建SpringBoot环境
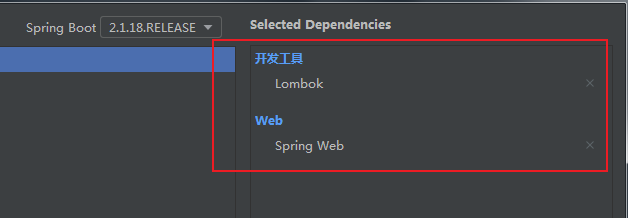
基本环境
<dependencies>
    <dependency>
        <groupId>org.springframework.boot</groupId>
        <artifactId>spring-boot-starter-web</artifactId>
    </dependency>

    <dependency>
        <groupId>org.projectlombok</groupId>
        <artifactId>lombok</artifactId>
        <optional>true</optional>
    </dependency>

    <dependency>
        <groupId>org.springframework.boot</groupId>
        <artifactId>spring-boot-starter-test</artifactId>
        <scope>test</scope>
    </dependency>

    <dependency>
        <groupId>com.alibaba</groupId>
        <artifactId>fastjson</artifactId>
        <version>1.2.46</version>
    </dependency>

    <!--httpUtils-->
    <dependency>
        <groupId>commons-httpclient</groupId>
        <artifactId>commons-httpclient</artifactId>
        <version>3.1</version>
    </dependency>
    <dependency>
        <groupId>org.apache.httpcomponents</groupId>
        <artifactId>httpclient</artifactId>
        <version>4.4.1</version>
    </dependency>

    <!--websocket作为客户端-->
    <dependency>
        <groupId>org.java-websocket</groupId>
        <artifactId>Java-WebSocket</artifactId>
        <version>1.3.5</version>
    </dependency>

</dependencies>
1、HTTP通信
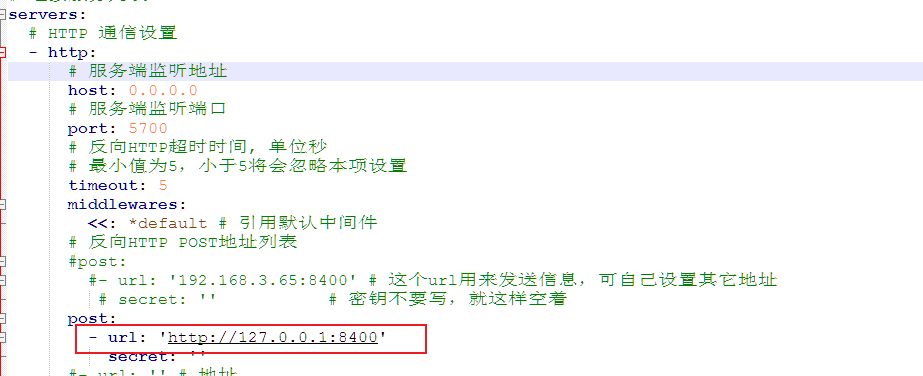
修改go-cqhhtp 配置文件 config.yml
post:
  # 这里一定要填成这样的http://{host}:{ip}
  - url: 'http://127.0.0.1:8400'
   secret: ''
Java 代码
测试案例:https://docs.go-cqhttp.org/api/#%E5%8F%91%E9%80%81%E7%A7%81%E8%81%8A%E6%B6%88%E6%81%AF 发送私聊消息
QqRobotController.java
@RestController
@Slf4j
public class QqRobotController {

    @Resource
    private QqRobotService robotService;

    @PostMapping
    public void QqRobotEven(HttpServletRequest request){
        robotService.QqRobotEvenHandle(request);
    }
}
QqRobotService.java
public interface QqRobotService {
    void QqRobotEvenHandle(HttpServletRequest request);
}
QqRobotServiceImpl.java
@Service
@Slf4j
public class QqRobotServiceImpl implements QqRobotService {

    @Override
    public void QqRobotEvenHandle(HttpServletRequest request) {
        //JSONObject
        JSONObject jsonParam = this.getJSONParam(request);
        log.info("接收参数为:{}",jsonParam.toString() !=null ? "SUCCESS" : "FALSE");
        if("message".equals(jsonParam.getString("post_type"))){
            String message = jsonParam.getString("message");
            if("你好".equals(message)){
                // user_id 为QQ好友QQ号
                String url = "http://127.0.0.1:5700/send_private_msg?user_id=xxxxx&message=你好~";
                String result = HttpRequestUtil.doGet(url);
                log.info("发送成功:==>{}",result);
            }
        }
    }

    public JSONObject getJSONParam(HttpServletRequest request){
        JSONObject jsonParam = null;
        try {
            // 获取输入流
            BufferedReader streamReader = new BufferedReader(new InputStreamReader(request.getInputStream(), "UTF-8"));

            // 数据写入Stringbuilder
            StringBuilder sb = new StringBuilder();
            String line = null;
            while ((line = streamReader.readLine()) != null) {
                sb.append(line);
            }
            jsonParam = JSONObject.parseObject(sb.toString());
        } catch (Exception e) {
            e.printStackTrace();
        }
        return jsonParam;
    }

}
HttpUtils 工具类
public class HttpRequestUtil {
    /**
     * @Description: 发送get请求
     */
    public static String doGet(String url) {
        CloseableHttpClient httpClient = HttpClients.createDefault();
        HttpGet httpGet = new HttpGet(url);
        httpGet.setHeader("Content-type", "application/json");
        httpGet.setHeader("DataEncoding", "UTF-8");
        RequestConfig requestConfig = RequestConfig.custom().setConnectTimeout(35000).setConnectionRequestTimeout(35000).setSocketTimeout(60000).build();
        httpGet.setConfig(requestConfig);
        CloseableHttpResponse httpResponse = null;
        try {
            httpResponse = httpClient.execute(httpGet);
            HttpEntity entity = httpResponse.getEntity();
            if(httpResponse.getStatusLine().getStatusCode() != 200){
                return null;
            }
            return EntityUtils.toString(entity);
        } catch (ClientProtocolException e) {
            // TODO Auto-generated catch block
            e.printStackTrace();
        } catch (IOException e) {
            // TODO Auto-generated catch block
            e.printStackTrace();
        } finally {
            if (httpResponse != null) {
                try {
                    httpResponse.close();
                } catch (IOException e) {
                    // TODO Auto-generated catch block
                    e.printStackTrace();
                }
            }
            if (null != httpClient) {
                try {
                    httpClient.close();
                } catch (IOException e) {
                    e.printStackTrace();
                }
            }
        }
        return null;
    }

    /**
     * @Description: 发送http post请求
     */
    public static String doPost(String url, String jsonStr) {
        CloseableHttpClient httpClient = HttpClients.createDefault();
        HttpPost httpPost = new HttpPost(url);
        RequestConfig requestConfig = RequestConfig.custom().setConnectTimeout(35000).setConnectionRequestTimeout(35000).setSocketTimeout(60000).build();
        httpPost.setConfig(requestConfig);
        httpPost.setHeader("Content-type", "application/json");
        httpPost.setHeader("DataEncoding", "UTF-8");
        CloseableHttpResponse httpResponse = null;
        try {
            httpPost.setEntity(new StringEntity(jsonStr));
            httpResponse = httpClient.execute(httpPost);
            if(httpResponse.getStatusLine().getStatusCode() != 200){
                return null;
            }
            HttpEntity entity = httpResponse.getEntity();
            String result = EntityUtils.toString(entity);
            return result;
        } catch (ClientProtocolException e) {
            e.printStackTrace();
        } catch (IOException e) {
            e.printStackTrace();
        } finally {
            if (httpResponse != null) {
                try {
                    httpResponse.close();
                } catch (IOException e) {
                    e.printStackTrace();
                }
            }
            if (null != httpClient) {
                try {
                    httpClient.close();
                } catch (IOException e) {
                    e.printStackTrace();
                }
            }
        }
        return null;
    }
}
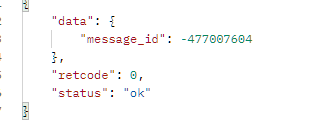
响应:
发送成功:==>{"data":{"message_id":2113266863},"retcode":0,"status":"ok"}

2、WebScoket 通信
一般WebScoket的客户端都是H5, 但是为了测试本篇博客使用Java作为客户端
修改go-cqhhtp 配置文件 config.yml
  - ws:
      # 正向WS服务器监听地址
      host: 127.0.0.1
      # 正向WS服务器监听端口
      port: 5701

Java 代码
需要导入pom包

WebsocketClient.java
@Slf4j
@Component
public class WebSocketConfig {

    @Bean
    public WebSocketClient webSocketClient() {
        try {
            WebSocketClient webSocketClient = new WebSocketClient(new URI("ws://127.0.0.1:5701"),new Draft_6455()) {
                @Override
                public void onOpen(ServerHandshake handshakedata) {
                    log.info("[websocket] 连接成功");
                }

                @Override
                public void onMessage(String message) {
                    log.info("[websocket] 收到消息={}",message);

                }

                @Override
                public void onClose(int code, String reason, boolean remote) {
                    log.info("[websocket] 退出连接");
                }

                @Override
                public void onError(Exception ex) {
                    log.info("[websocket] 连接错误={}",ex.getMessage());
                }
            };
            webSocketClient.connect();
            return webSocketClient;
        } catch (Exception e) {
            e.printStackTrace();
        }
        return null;
    }

}
测试(具体需求实现就根据官方API实现,参考本篇博客HTTP通信的逻辑)

[websocket] 收到消息={"interval":5000,"meta_event_type":"heartbeat","post_type":"meta_event","self_id":2878522414,"status":{"app_enabled":true,"app_good":true,"app_initialized":true,"good":true,"online":true,"plugins_good":null,"stat":{"packet_received":29,"packet_sent":21,"packet_lost":0,"message_received":0,"message_sent":0,"disconnect_times":0,"lost_times":0,"last_message_time":0}},"time":1639797397}
三、补充
具体详细需求请参考实现:https://docs.go-cqhttp.org/api/
到此这篇关于SpringBoot搭建go-cqhttp机器人的方法实现的文章就介绍到这了,更多相关SpringBoot搭建go-cqhttp机器人内容请搜索脚本之家以前的文章或继续浏览下面的相关文章希望大家以后多多支持脚本之家!
相关文章
 下面小编就为大家带来一篇将一个数组按照固定大小进行拆分成数组的方法。小编觉得挺不错的,现在就分享给大家,也给大家做个参考。一起跟随小编过来看看吧2016-11-11
 这篇文章主要为大家详细介绍了Java实现导入csv的相关知识,文中的示例代码讲解详细,具有一定的借鉴价值,有需要的小伙伴可以跟随小编一起学习一下2024-03-03
关于idea-web.xml版本过低怎么生成新的(web.xml报错)问题
今天通过本文给大家分享idea-web.xml版本过低怎么生成新的(web.xml报错)问题,通过更换web.xml版本解决此问题,感兴趣的朋友跟随小编一起看看吧2021-07-07 我们在走ingress的java程序的时候,往往会有导出数据的功能,这个时候就会有因网络慢、后台处理时间过长导致下载超时,也有因下载文件太大,导致下载失败,下面给分享k8s解决java服务下载超时问题,感兴趣的朋友跟随小编一起看看吧2024-06-06
 本文主要介绍了spring中Mapstruct属性映射的实现,文中通过示例代码介绍的非常详细,对大家的学习或者工作具有一定的参考学习价值,需要的朋友们下面随着小编来一起学习学习吧2024-12-12
 这篇文章主要介绍了mybatisplus如何解决分页最多500条数据的问题,具有很好的参考价值,希望对大家有所帮助。如有错误或未考虑完全的地方,望不吝赐教2022-07-07
 Watcher,异步通知客户端,并且删除哈希表中对应的 Key-Value,这篇文章主要介绍了zookeeper的watch机制详细讲解,需要的朋友可以参考下2022-06-06
 Spring 事件监听机制是 Spring 框架中用于在应用程序的不同组件之间进行通信的一种机制,Spring 事件监听机制基于观察者设计模式,使得应用程序的各个部分可以解耦,提高模块化和可维护性,本文给大家介绍了使用Spring事件监听机制实现跨模块调用,需要的朋友可以参考下2024-06-06
RestFul风格 — 使用@PathVariable传递参数报错404的解决
这篇文章主要介绍了RestFul风格 — 使用@PathVariable传递参数报错404的解决,具有很好的参考价值,希望对大家有所帮助。如有错误或未考虑完全的地方,望不吝赐教2021-10-10
详解利用SpringMVC拦截器控制Controller返回值
这篇文章主要介绍了详解利用SpringMVC拦截器控制Controller返回值,通过定义一个StringResult注解,在访问方法的时候返回StringResult中的内容,有兴趣的可以了解一下。2017-01-01


最新评论